4.2.2.4.3. Configuring the BSP Project
The BSP project is a configurable library. You can configure your BSP project to incorporate your optimization preferences—size, speed, or other features—in the custom library you create. This custom library is the BSP library file (.a) that is used by the application project.
Creating the BSP project populates the target directory with the BSP library file source and build file scripts. Some of these files are copied from other directories and are not overwritten when you recreate the BSP project. Others are generated when you create the BSP project.
The most basic tool for configuring BSPs is the BSP setting. Throughout this section, many of the project modifications you can make are based on BSP settings. In each case, this section presents the names of the relevant settings, and explains how to select the correct setting value. You can control the value of BSP settings several ways: on the command line, with a Tcl script, by directly adjusting the settings with the BSP Editor, or by importing a Tcl script to the BSP Editor.
Another powerful tool for configuring a BSP is the software package. Software packages add complex capabilities to your BSP. As when you work with BSP settings, you can add and remove software packages on the command line, with a Tcl script, directly with the BSP Editor, or by importing a Tcl script to the BSP Editor.
Intel recommends that you use the Nios® II BSP Editor to configure your BSP project. To start the Nios® II BSP Editor from the Nios® II Software Build Tools for Eclipse, right-click an existing BSP, point to Nios® II , and click BSP Editor.
For detailed information about how to manipulate BSP settings and add and remove software packages with the BSP Editor, refer to “Using the BSP Editor” in the Getting Started with the Graphical User Interface chapter of the Nios® II Gen2 Software Developer's Handbook. This chapter also discusses how to use Tcl scripts in the BSP Editor.
For information about manipulating BSP settings and controlling software packages at the command line, refer to “ Nios® II Software Build Tools Utilities” in the Nios® II Software Build Tools Reference chapter of the Nios® II Gen2 Software Developer's Handbook.
For details about available BSP settings, refer to “Settings Managed by the Software Build Tools” in the Nios® II Software Build Tools Reference chapter of the Nios® II Gen2 Software Developer's Handbook.
For a discussion of Tcl scripting, refer to “Software Build Tools Tcl Commands” in the Nios® II Software Build Tools Reference chapter of the Nios® II Gen2 Software Developer's Handbook.
MicroC/OS-II RTOS Configuration Tips
If you use the MicroC/OS-II RTOS environment, be aware of the following properties of this environment:
- MicroC/OS-II BSP settings—The MicroC/OS-II RTOS supports many configuration options. All of these options can be enabled and disabled with BSP settings. Some of the options are enabled by default. A comprehensive list of BSP settings for MicroC/OS-II is shown in the Settings tab of the Nios® II BSP Editor.
Note: The MicroC/OS-II BSP settings are also described in “Settings Managed by the Software Build Tools” in the Nios® II Software Build Tools Reference chapter of the Nios® II Gen2 Software Developer's Handbook.
- MicroC/OS-II setting modification—Modifying the MicroC/OS-II options modifies the system.h file, which is used to compile the BSP library file.
- MicroC/OS-II initialization—The core MicroC/OS-II RTOS is initialized during the execution of the C run-time initialization (crt0) code block. After the crt0 code block runs, the MicroC/OS-II RTOS resources are available for your application to use. For more information, refer to “crt0 Initialization”.
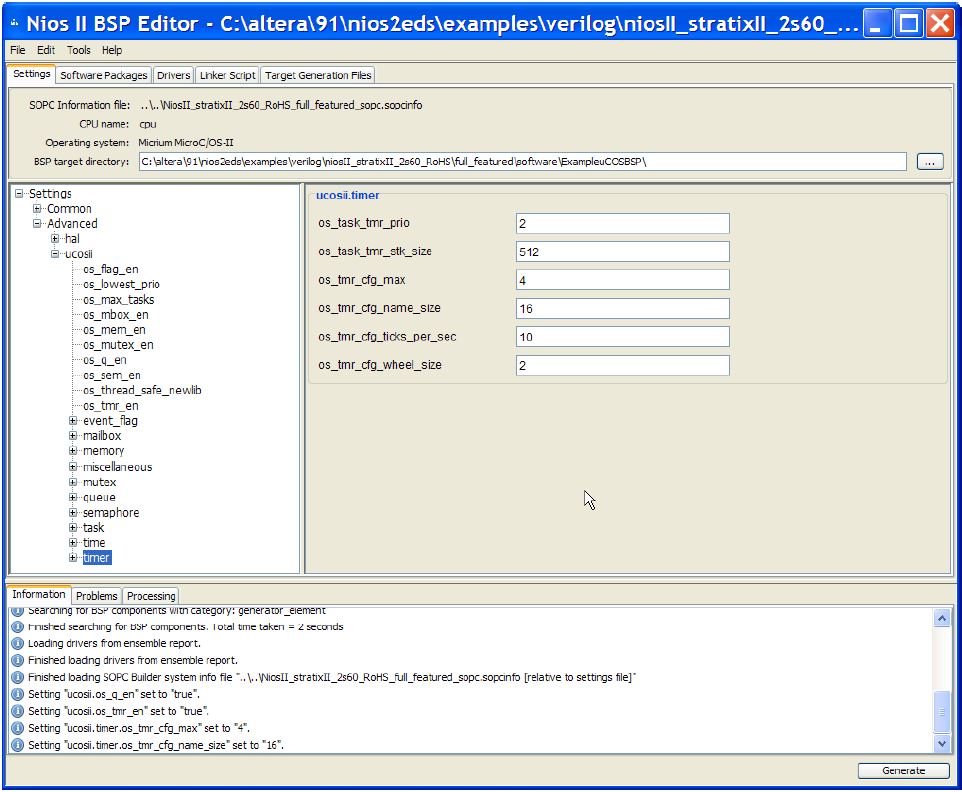
You can configure MicroC/OS-II with the BSP Editor. Figure 2–1 shows how you enable the MicroC/OS-II timer and queue code. The figure below shows how you specify a maximum of four timers for use with MicroC/OS-II.
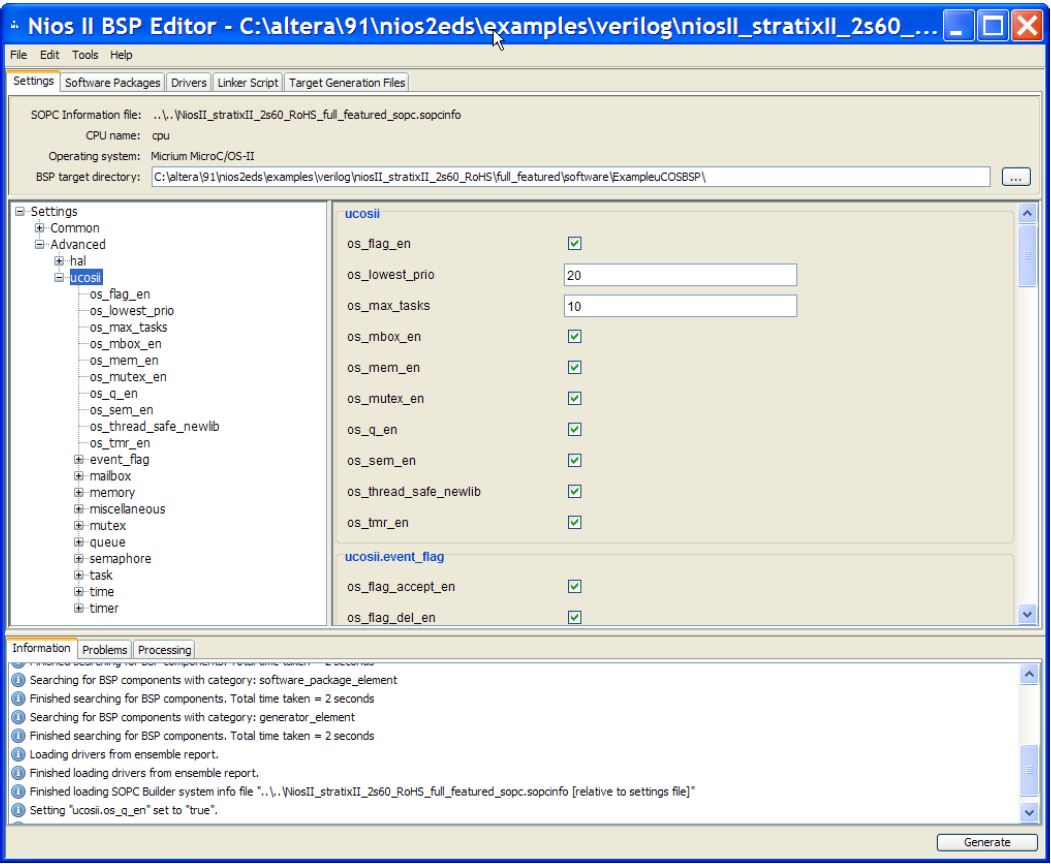
The MicroC/OS-II configuration script in the example below performs the same MicroC/OS-II configuration as in the figure above and Figure 33: it enables the timer and queue code, and specifies a maximum of four timers.
MicroC/OS-II Tcl Configuration Script Example (ucosii_conf.tcl)
#enable code for UCOSII timers
set_setting ucosii.os_tmr_en 1

#enable a maximum of 4 UCOSII timers
set_setting ucosii.timer.os_tmr_cfg_max 4

#enable code for UCOSII queues
set_setting ucosii.os_q_en 1
HAL Configuration Tips
If you use the HAL environment, be aware of the following properties of this environment:
- HAL BSP settings—A comprehensive list of options is shown in the Settings tab in the Nios® II BSP Editor. These options include settings to specify a pre- and post-process to run for each C or C++ file compiled, and for each file assembled or archived.
Note: For more information about BSP settings, refer to “Settings Managed by the Software Build Tools” in the Nios® II Software Build Tools Reference chapter of the Nios® II Gen2 Software Developer's Handbook.
- HAL setting modification—Modifying the HAL options modifies the system.h file, which is used to compile the BSP library file.
- HAL initialization—The HAL is initialized during the execution of the C run-time initialization (crt0) code block. After the crt0 code block runs, the HAL resources are available for your application to use.For more information, refer to the “crt0 Initialization” section.
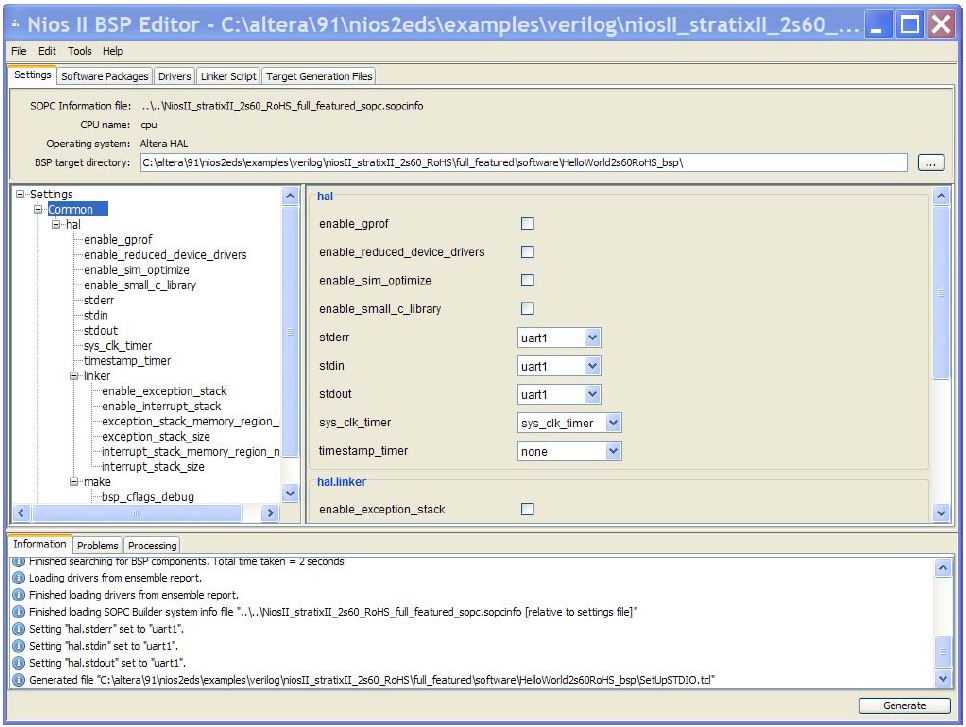
You can configure the HAL in the BSP Editor. The figure below shows how you specify a UART to be used as the stdio device.
The Tcl script in the example performs the same configuration as in the figure: it specifies a UART to be used as the stdio device.
HAL Tcl Configuration Script Example (hal_conf.tcl)
#set up stdio file handles to point to a UART
set default_stdio uart1
set_setting hal.stdin $default_stdio
set_setting hal.stdout $default_stdio
set_setting hal.stderr $default_stdio
Adding Software Packages
Intel supplies several add-on software packages in the Nios® II EDS. These software packages are available for your application to use, and can be configured in the BSP Editor from the Software Packages tab. The Software Packages tab allows you to insert and remove software packages in your BSP, and control software package settings. The software package table at the top of this tab lists each available software package. The table allows you to select the software package version, and enable or disable the software package.
The operating system determines which software packages are available.
The following software packages are provided with the Nios® II EDS:
- Host File System—Allows a Nios® II system to access a file system that resides on the workstation. For more information, refer to “The Host-Based File System”.
- Read-Only Zip File System—Provides access to a simple file system stored in flash memory. For more information, refer to “Read-Only Zip File System”.
- NicheStack TCP/IP Stack – Nios® II Edition—Enables support of the NicheStack TCP/IP networking stack.
Note: The stack is provided as is but Intel does not offer additional support.
Using Tcl Scripts with the Nios II BSP Editor
The Nios® II BSP Editor supports Tcl scripting. Tcl scripting in the Nios® II BSP Editor is a simple but powerful tool that allows you to easily migrate settings from one BSP to another. This feature is especially useful if you have multiple software projects utilizing similar BSP settings. Tcl scripts in the BSP editor allow you to perform the following tasks:
- Regenerate the BSP from the command line
- Export a TCL script from an existing BSP as a starting point for a new BSP
- Recreate the BSP on a different hardware platform
- Examine the Tcl script to improve your understanding of Tcl command usage and BSP settings
You can configure a BSP either by importing your own manually-created Tcl script, or by using a Tcl script exported from the Nios® II BSP Editor.
You can apply a Tcl script only at the time that you create the BSP.
Exporting a Tcl Script
To export a Tcl script, follow these steps:
- Use the Nios® II BSP Editor to configure the BSP settings in an existing BSP project.
- In the Tools menu, click Export Tcl Script.
- Navigate to the directory where you wish to store your Tcl script.
- Select a file name for the Tcl script.
When creating a Tcl script, the Nios® II BSP Editor only exports settings that differ from the BSP defaults. For example, if the only non-default settings in the BSP are those shown in Configuring HAL stdio Device in BSP Editor, the BSP Editor exports the script shown in the example below.
Tcl Script Exported by BSP Editor
######################################################################
#
# This is a generated Tcl script exported
# by a user of the Intel FPGA
               Nios® II BSP Editor.
#
# It can be used with the Intel FPGA 'nios2-bsp' shell script '--script'
# option to customize a new or existing BSP.
#
######################################################################
######################################################################
#
# Exported Setting Changes
#
######################################################################
set_setting hal.stdout uart1
set_setting hal.stderr uart1
set_setting hal.stdin uart1
For details about default BSP settings, refer to “Specifying BSP Defaults” in the Nios® II Software Build Tools chapter of the Nios® II Gen2 Software Developer's Handbook.
Importing a Tcl Script to Create a New BSP
The following example illustrates how to configure a new BSP with an imported Tcl script. You import the Tcl script with the Nios® II BSP Editor, when you create a new BSP settings file.
In this example, you create the Tcl script by hand, with a text editor. You can also use a Tcl script exported from another BSP, as described in “Exporting a Tcl Script”.
To configure a new BSP with a Tcl script, follow these steps:
- With any text editor, create a new file called example.tcl.
- Insert the contents of the example below in the file.
- In the Nios® II BSP Editor, in the File menu, click New BSP.
- In the BSP Settings File Name box, select a folder in which to save your new BSP settings file. Accept the default settings file name, settings.bsp.
- In the Operating System list, select Intel FPGA HAL.
- In the Additional Tcl script box, navigate to example.tcl.
- In the Platform Designer Information File Name box, select the .sopcinfo file.
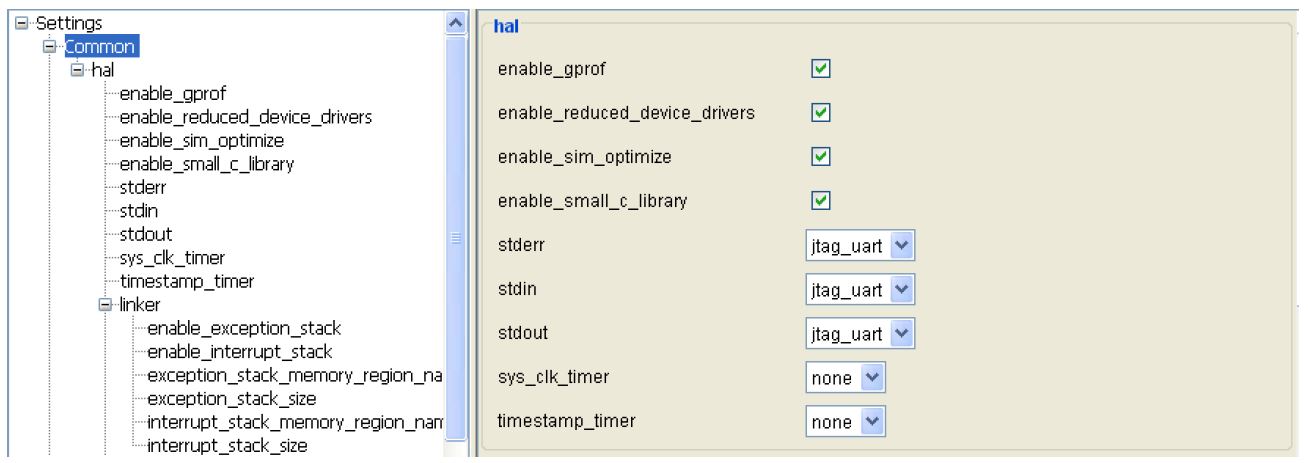
- Click OK. The BSP Editor creates the new BSP. The settings modified by example.tcl appear as in the figure below.
Example 2–4. BSP Configuration Tcl Script example.tcl
set_setting hal.enable_reduced_device_drivers true
set_setting hal.enable_sim_optimize true
set_setting hal.enable_small_c_library true
set_setting hal.enable_gprof true
Do not attempt to import an Intel FPGA HAL Tcl script to a MicroC/OS-II BSP or vice-versa. Doing so could result in unpredictable behavior, such as lost settings. Some BSP settings are OS-specific, making scripts from different OSes incompatible.
For more information about commands that can appear in BSP Tcl scripts, refer to “Software Build Tools Tcl Commands” in the Nios® II Software Build Tools Reference chapter of the Nios® II Gen2 Software Developer's Handbook.