Profiling Linux*, Android*, and QNX* System Boot Time
This recipe illustrates how to integrate Intel® VTune™ Profiler performance analysis to the boot flow of Linux, Android, and QNX operating systems. This analysis helps to identify activities that execute unexpectedly long on CPU cores during the OS boot. This enables further boot order inspection.
Content experts: Vitaly Slobodskoy, Kirill Uhanov, Dmitry Obrezchikov, Artem Shcherbak
When profiling boot time, you inject Intel® VTune™ Profiler performance data collection command into the early stage of OS boot (either configured via init script or using a particular service). To achieve best results, ensure that these requirements are met:
- Place Intel® VTune™ Profiler data collector binary files in the earliest available file directory.
- For Linux and Android OS data collector writes to the file system, the output file name must use the earliest available writable directory.
- For Linux and Android OS, the VTune Amplifier data collection command should depend on file system availability. For QNX OS, the command should depend on network availability.
DIRECTIONS:
Profile target system boot time:
Ingredients
This section lists the software used for the performance analysis scenario.
Operating system:
Linux with the systemd system initialization type. Root access is enabled.
QNX
Tools:
QNX* Momentics* Tool Suite
QNX 7.0 SDK
Intel® VTune™ Profiler 2019 (or newer)
NOTE:Starting with the 2020 release, Intel® VTune™ Amplifier has been renamed to Intel® VTune™ Profiler.
Most recipes in the Intel® VTune™ Profiler Performance Analysis Cookbook are flexible. You can apply them to different versions of Intel® VTune™ Profiler. In some cases, minor adjustments may be required.
Get the latest version of Intel® VTune™ Profiler:
From the Intel® VTune™ Profiler product page.
Download the latest standalone package from the Intel® oneAPI standalone components page.
Profile Linux System Boot Time via systemd
Prerequisites:
Install VTune Profiler on your target Linux system.
Check the type of system initialization. To confirm the system is using systemd, enter:
systemctl | grep "\-\.mount"The following output is expected if systemd is used:
-.mount loaded active mounted /
To profile Linux system boot time:
Create a /boot_profile file and configure it to run a hardware analysis (Hotspots, I/O Analysis, and others) with Intel® VTune™ Profiler.
For example, to execute the Hotspots analysis system-wide for 30 seconds using a low sampling interval for higher data precision, use:
#!/bin/bash /opt/intel/vtune_amplifier/bin64/amplxe-cl -c hotspots -knob sampling-mode=hw -knob sampling-interval=0.1 -d 30 -finalization-mode=none -r /tmp/boot_profile &NOTE:Make sure the path in the file correctly specifies the Intel® VTune™ Profiler installation directory. By default, the installation directory on Linux is /opt/intel/vtune_amplifier.
The path to the boot_profile script can be any local path available at early boot stages, for example: /tmp.
Change the permission for the data collection startup script:
chmod 755 /boot_profileCreate a /etc/systemd/system/vtune_boot.service file with the following content:
[Unit]
Description=VTune Profiler boot profile service

[Service]
Type=forking
ExecStart=/boot_profile

[Install]
WantedBy=multi-user.target
Enable the service:
systemctl enable vtune_bootReboot your system to start a Intel® VTune™ Profiler data collection during the OS boot process.
When the data collection is completed, the result directory will be located in /tmp/boot_profile. This directory is created under the root user. If you need to open a result under a regular user, change the folder permissions:
sudo chmod -R a+w /tmp/boot_profileAdditional commands:
To disable the service:
systemctl disable vtune_bootTo analyze Intel® VTune™ Profiler collector output during the OS boot process in case of any failures:
sudo journalctl -u vtune_boot
Profile Android System Boot Time
Prerequisites:
Install Intel® VTune™ Profiler on your host system.
Run the lsmod command on the target Android system to make sure Intel sampling drivers are available.
If the drivers (pax.ko, sep5.ko, socperf3.ko) are not present, you can either continue with driverless approach and skip the subsequent steps or you can build and sign the drivers as follows:
Run the following command on your host system:
<vtune-install-dir>/target/<android-version-arch>/sepdk/build-driver
When prompted, specify the path to the GCC* compiler and Android kernel source directory used to build the target system.
For example, the kernel source directory is <android-source-dir>/out/target/product/<name>/obj/kernel, and the compiler directory is <android-source-dir>/prebuilts/gcc/linux-x86/x86/x86_64-linux-android-<version>/bin/x86_64-linux-android-gcc.
Successfully built drivers are located in the following directories:
- <vtune-install-dir>/target/<android-version-arch>/sepdk/pax/pax.ko
- <vtune-install-dir>/target/<android-version-arch>/sepdk/sep5.ko
- <vtune-install-dir>/target/<android-version-arch>/sepdk/src/socperf/src/socperf.ko
Sign the drivers as follows:
$KERNEL_DIR/scripts/sign-file $(CONFIG_MODULE_SIG_HASH)
$KERNEL_DIR/$(CONFIG_MODULE_SIG_KEY)
$KERNEL_DIR/certs/signing_key.x509 <driver_file_name.ko>
where <driver_file_name.ko> is the name of the driver you sign. You have to sign each driver separately.
Use the kernel config file from KERNEL_DIR to get values for CONFIG_MODULE_SIG_HASH and CONFIG_MODULE_SIG_KEY parameters.
To profile Android system boot time:
- Install the Intel® VTune™ Profiler target collector.
- Boot the target system in a normal manner.
- Run the Intel® VTune™ Profiler GUI and create a new project.
- Configure a new analysis. In the WHERE field, select Android Device (ADB) as the connection type. Select the target device in the ADB destination field. From this point onwards, Intel® VTune™ Profiler should automatically upload the target collector to the target system.
Copy the target collector to the earliest available file system location (for example, to /vendor):
adb shell cp -rf /data/data/com.intel.vtune/perfrun /vendor/vtuneIf Intel sampling drivers are available, copy pax.ko, sep5.ko, and socperf3.ko drivers to /vendor/vtune.
Choose the earliest available writable location as the destination directory for the collected traces. For example, choose /data/vtune and create an executable script (/vendor/vtune/vtune.sh) with this content, using either Intel sampling drivers or driver-less mode:
Driver mode
Driver-less mode
#!/bin/sh
rm -rf /data/vtune
mkdir /data/vtune 0777
/system/bin/insmod /vendor/vtune/pax.ko
/system/bin/insmod /vendor/vtune/socperf3.ko
/system/bin/insmod /vendor/vtune/sep5.ko
LD_LIBRARY_PATH=/vendor/vtune/perfrun/lib64
SEP_BASE_DIR=/vendor/vtune/perfrun/lib64 /vendor/vtune/perfrun/bin64/sep -
start -d 10 -out /data/vtune/android_boot.tb7
#!/bin/sh rm -rf /data/vtune
mkdir /data/vtune 0777
echo 0 >
/proc/sys/kernel/perf_event_paranoid
echo 0 >
/proc/sys/kernel/kptr_restrict
/vendor/vtune/perfrun/bin64/amplxe-perf record
-a -o /data/vtune/android_boot.data -- sleep 10
This should start the Hotspots collection for 10 seconds.
Add this section to init.rc on the target. Consider using post-fs or any other trigger depending on the actual boot flow:
on fs start vtune service vtune /vendor/vtune/vtune.sh user root group root seclabel u:r:init:s0 oneshot disabledNOTE:If you have a read-only file system, consider changing these files on the host and building your Android system from the source code.
Optionally, depending on the OS configuration, add these lines to the /system/sepolicy/private/file_contexts file:
/system/bin/toolbox      u:object_r:toolbox_exec:s0
+ /system/bin/insmod     u:object_r:toolbox_exec:s0
+ /system/bin/sep        u:object_r:toolbox_exec:s0
+ /system/bin/sh         u:object_r:toolbox_exec:s0
NOTE:Make sure your Android device is booted in the permissive mode.
Reboot the target Android system and wait until data is collected.
Copy the /data/vtune/android_boot.tb7 file to the host system for further analysis.
Profile QNX System Boot Time
Prerequisites:
Install QNX* Momentics* Tool Suite on your host.
Install QNX 7.0 SDK.
Import a BSP to your QNX Momentics workspace via File > Import > QNX > QNX Source Package and BSP.
Install VTune Profiler on your host system.
To profile QNX system boot time:
Copy the target profiling agent ( sep binary) from <vtune-install-dir>/target/qnx_x86_64 to <qnx-sdk-path>\qnx700\target\qnx7\x86_64\usr\bin.
Modify a *.build file of your QNX image.
Find a string /usr/bin/gzip=gzip and add /usr/bin/sep=sep after it.
Find a startup script section and add sep -p1 &.
[+script] startup-script = {
...
    # NOTE: Temporary enable for UART devices on OCP bridge
    # will be able to removed once ABL is fixed
    ocp_init -d 0:24:0 0x200=0xffff04b5 0x204=7
    ocp_init -d 0:24:1 0x200=0xffff04b5 0x204=7
    ocp_init -d 0:24:2 0x200=0xffff04b5 0x204=7 # console
    ocp_init -d 0:24:3 0x200=0xffff04b5 0x204=7
    # the sep run before this could move system to unstable
    # state and crash it
    sep -p1 -d 10 &
The sep target profiling agent options are:
-p<mode> configures the collection mode:
0 sets regular default mode. The profiling agent waits for the connection from the host over TCP/IP.
1 enables the agent to start a preconfigured collection without stacks. Collected samples are stored in the target memory. To transfer the data to the host, TCP/IP connection is required.
2 enables the agent to start a preconfigured collection with sample call stacks. Collected samples are stored in the target memory. To transfer the data to the host, TCP/IP connection is required.
-d <sec> sets the maximum duration of a collection (in seconds). The collection stops after the specified time or when the memory buffer is full.
-s <sec> defers the start of a collection by the specified time.
-b <size_ratio> sets the collection buffer size (1 ^ size_ratio bytes); for a single CPU core, for example, specify -b 23 for 8Mb buffer size. The agent uses a double-buffer schema for switching buffers so that the amount of target memory consumption per a CPU core would be 16Mb. In case of 4 CPU cores, the overall memory consumption by the agent would be 64Mb. The default value is 19 (0.5Mb).
Rebuild and flash QNX image.
Reboot your system to start a data collection with Intel® VTune™ Profiler during OS boot process.
Propagate the collection results to the host.
In the preconfigured collection mode (-p1 or -p2), the target agent profiles the workload for the specified duration inside the memory buffer and switches to the listening mode sending a message like this: 'sep5_0: Waiting for control connection from host on port XXXX...' to console. After this, you can launch the sep utility on the host to copy the collected data from the target over the network. Make sure the host command line options you use correspond to the target agent options. For example, for the -p1 mode, the host command looks like this:
<vtune-install-dir>/bin64/sep -start -target-ip <target-system-ip-address> -target-port 9321 -out /tmp/qnx_boot.tb7For the -p2 mode:
<vtune-install-dir>/bin64/sep -start -target-ip <target-system-ip-address> -target-port 9321 -lbr call_stack -out /tmp/qnx_boot.tb7
Import the Result to an Intel® VTune™ Profiler Project
Launch the Intel® VTune™ Profiler standalone GUI on the host system to pick up proper binary files during result finalization.
For example, to launch Intel® VTune™ Profiler on Windows OS, enter:
<vtune-install-dir>/bin64/amplxe-gui.exe
Create a new VTune Profiler project and configure binary/symbol search directories to include paths for the debug files of the kernel and/or drivers.
On a Linux host, you can change the kptr_restrict value to 0 to enable resolving kernel function names.
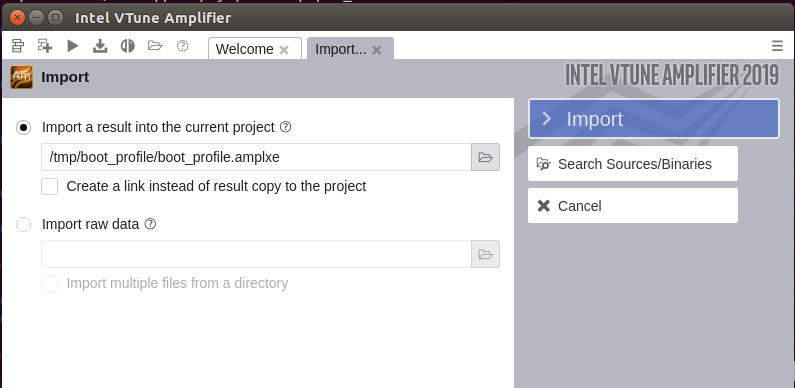
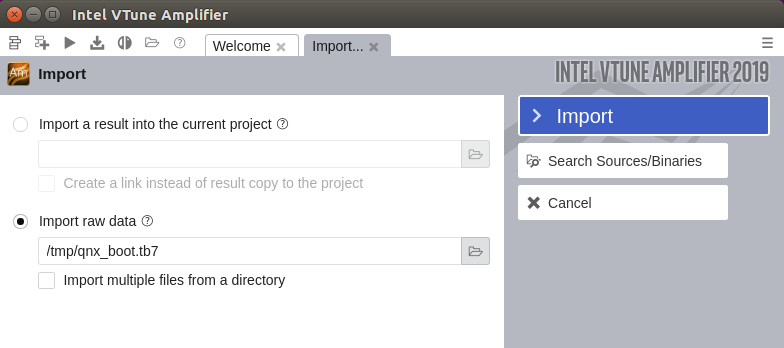
Import your result to the project:
To import a Linux result, use the Import a result into the current project option. For example:
To import a result from Android or QNX, use the Import raw data option and click the browse button to select the required *.tb7 file:
When the *.tb7 file is imported and the result is finalized, switch to the Hotspots by CPU Utilization viewpoint:

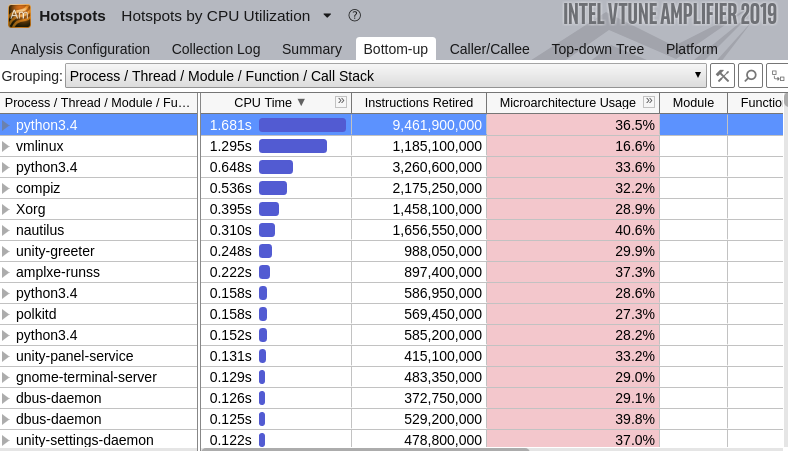
Analyze Process Execution
Open the result and click the Bottom-up tab to identify which processes occupied most of CPU resources:
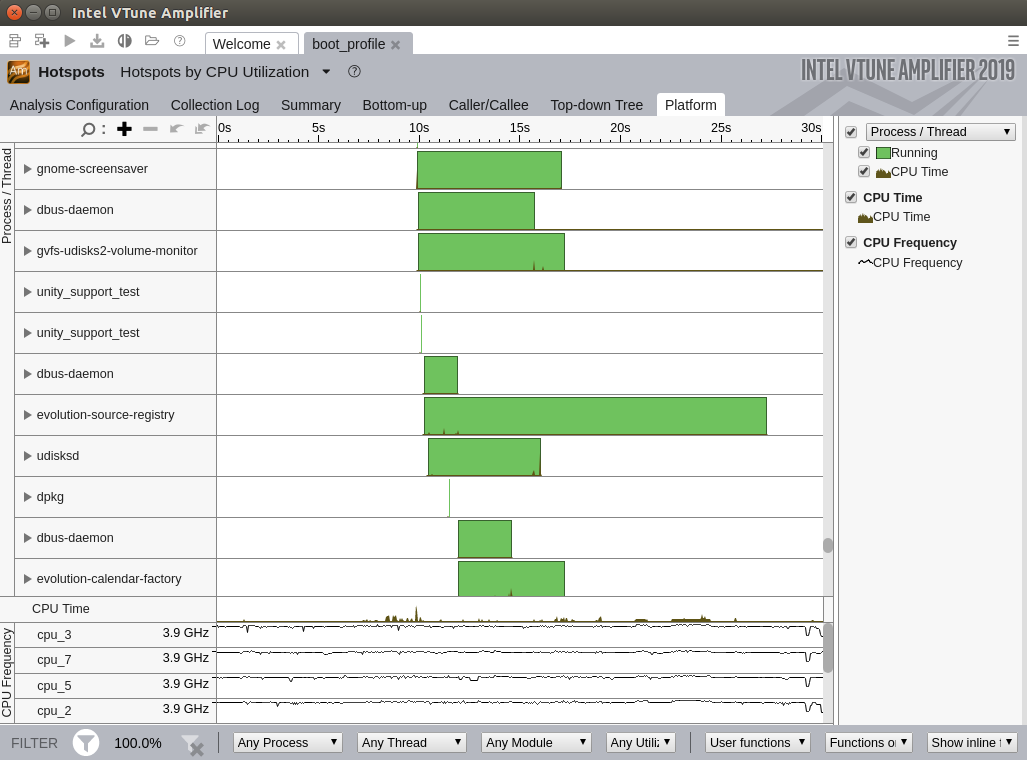
Switch to the Platform tab and analyze a sequence of processes/services execution. To do this:
Change the Timeline grouping to Process/Thread.
Right-click to open the context menu and sort the rows by Row Start Time in the Ascending order:

Analyze a process execution order: