AN 1006: Multi-Project Analysis with Exploration Dashboard
ID
816589
Date
9/29/2025
Public
2.1. Step 1: Create an Exploration Dashboard Workspace
2.2. Step 2: Add Projects to Exploration Dashboard
2.3. Step 3: Launch Connections and Compile the Projects
2.4. Step 4: Analyze Timing Summary Reports
2.5. Step 5: Analyze the Results of Report Timing
2.6. Step 6: Disconnecting Interactive Connections
2.1. Step 1: Create an Exploration Dashboard Workspace
Exploration Dashboard allows you to interact with multiple Quartus® Prime projects simultaneously within a unified dashboard workspace GUI. When you open Exploration Dashboard, you must first create and configure this workspace.
The Exploration Dashboard workspace is a single container that hosts the multi-project analysis. This workspace container is similar in purpose to the Quartus® Prime project that is a container for all the RTL, SDC, and IP files of each design you compile.
To create a workspace in Exploration Dashboard, follow these steps:
- Setup the example design, as Example Design Setup describes.
- To launch Exploration Dashboard, type the following command in the directory that contains the seed_1, seed_2, and seed_3 subdirectories:
quartus_edw
- On the Tasks list, click New Workspace.
Figure 3. Tasks List
- Type My_Workspace as the Workspace Name, type ./QED_Folder as the Workspace Directory for this example. Click OK.
Figure 4. Defining New Workspace
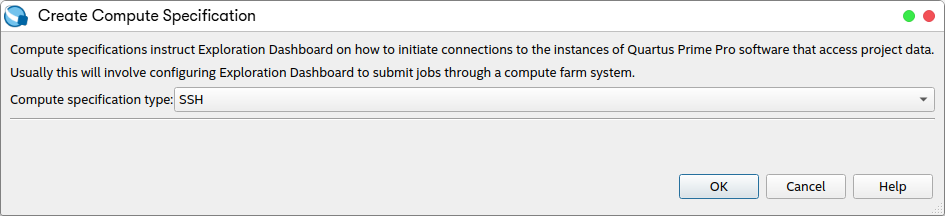
- When prompted, click OK to create a new Compute Specification.
- In the Create Compute Specification dialog box, select SSH for Compute specification type.
Figure 5. Specifying ssh Compute Spec Type
- In the Configure ssh Compute Specification dialog box, specify three comma-separated SSH Hostnames. Ensure that the hosts you launch have at least 16GB RAM to accommodate the Quartus® Prime Timing Analyzer processes that Exploration Dashboard launches for this example.
Note: You must accept any SSH connection fingerprints before connecting with Exploration Dashboard. You must accept any SSH connection fingerprints for the hostnames you specify. Otherwise, the SSH connections hang.Figure 7. Configure SSH Compute Specification
- Retain the default values for the Quartus Prime software root directory and LM license file settings. These values derive from the Quartus Prime installation. Click OK to save the specifications.
Note: Your actual compute specifications are determined by your specific computing environment. You can use any supported job management interface available in the Compute Spec Type section of the Configure Compute Specification dialog box. The available option fields in the Configure Compute Specification dialog box vary based on your compute environment, and not all fields are required for every compute specification. These fields will adjust automatically, according to the selected compute specification. For detailed information on each field, hover your cursor over the tooltip icon. The remaining steps of this tutorial are the same, regardless of the Compute Spec Type chosen.
- When prompted, apply the current compute specification to the workspace and pair the recently created Compute Specification to My_Workspace.
Figure 8. Applying the Compute Specification