1.1. Acronyms and Definitions
1.2. Recommended System Requirements
1.3. Installation Folders
1.4. Boot Flow Overview
1.5. Getting Started
1.6. Enabling the UEFI DXE Phase and the UEFI Shell
1.7. Using the Network Feature Under the UEFI Shell
1.8. Creating your First UEFI Application
1.9. Using Arm* DS-5* Intel® SoC FPGA Edition (For Windows* Only)
1.10. Pit Stop Utility Guide
1.11. Porting HWLIBs to UEFI Guidelines
1.12. Tera Term Installation
1.13. Minicom Installation
1.14. Win32DiskImager Tool Installation
1.15. TFTPd64 By Ph.Jounin Installation
1.16. Revision History of Intel® Arria® 10 SoC UEFI Boot Loader User Guide
1.5.1. Compiling the Hardware Design
1.5.2. Generating the Boot Loader and Device Tree for UEFI Boot Loader
1.5.3. Building the UEFI Boot Loader
1.5.4. Creating an SD Card Image
1.5.5. Creating a QSPI Image
1.5.6. Booting the Board with SD/MMC
1.5.7. Booting the Board with QSPI
1.5.8. Early I/O Release
1.5.9. Booting Linux* Using the UEFI Boot Loader
1.5.10. Debugging an Example Project
1.5.11. UEFI Boot Loader Customization
1.5.12. Enabling Checksum for the FPGA Image
1.5.13. NAND Bad Block Management
1.5.2.1.1. Windows* Environment
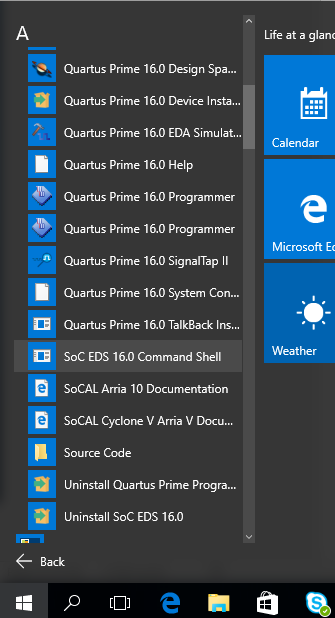
- Start an embedded command shell.
Figure 21. Open an Embedded Command Shell
- Go to the a10_soc_devkit_ghrd folder.
$ cd <Working_Directory>/a10_soc_devkit_ghrd/ - Start the BSP Editor.
$ bsp-editor& - In the BSP Editor window, select File > New HPS BSP... to open a new BSP window.
- In the new BSP window:
- Click the browse (…) button next to the Preloader Setting Directory text box and browse to the <your_working_directory>/a10_soc_devkit_ghrd/hps_isw_handoff folder.
- Select the Operating system to be U-Boot Bootloader (Arria 10 HPS) in the pull-down menu.
- Leave the Use default locations enabled to create the new BSP in the <your_working_directory>/a10_soc_devkit_ghrd/software/uboot_bsp folder.
- Click OK to create the BSP settings file and close the New BSP window.
Figure 22. New BSP Window Settings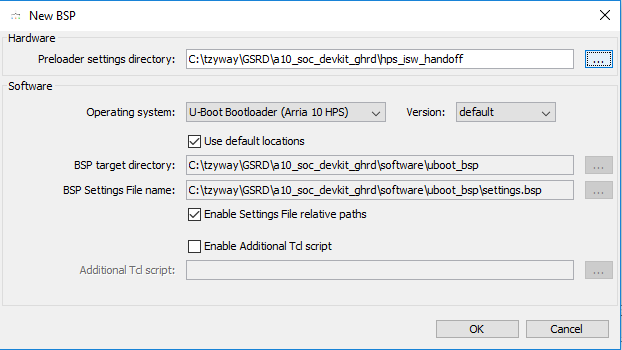
- In the BSP Editor window, edit the BSP settings as follows:
- boot_device: Boot from SD/MMC (default)
- model: SOCFPGA Arria 10 Dev Kit (default)
- rbf_filename: ghrd_10as066n2.rbf (default was socfpga.rbf)
- peripheral_rbf_filename: periph.rbf (default)
- core_rbf_filename: core.rbf (default)
- disable_uboot_build: unchecked (default)
Figure 23. BSP Settings
- In the BSP Editor window, click Generate in the lower right hand corner to produce the source code and the U-Boot device tree.
- When the file generation is complete, click Close in the BSP Editor window.
The following files are generated in the <your_working_directory>//a10_soc_devkit_ghrd/software/uboot_bsp folder:
- config.mk
- devicetree.dts
- Makefile
- settings.bsp
- uboot.ds