Intel® Acceleration Stack User Guide: Intel FPGA Programmable Acceleration Card N3000
ID
683040
Date
6/14/2021
Public
1. About this Document
2. System Requirements
3. Hardware Installation
4. Installing the OPAE Software
5. OPAE Tools
6. Sample Test: Native Loopback
7. Installing the Intel XL710 Driver
8. Configuring Ethernet Interfaces
9. Testing Network Loopback Using Data Plane Development Kit (DPDK)
10. Graceful Shutdown
11. Single Event Upset (SEU)
12. Document Revision History for Intel Acceleration Stack User Guide: Intel® FPGA PAC N3000
A. Troubleshooting
B. Upgrade your Intel® FPGA PAC N3000 with Production Version of BMC and Intel® Arria® 10 Image
C. Configure the 4.19 Kernel
D. fpgabist Sample Output
7.1. Updating the Intel XL710 Firmware
To update the Intel XL710 firmware, follow these steps:
- Extract the N3000_XL710_firmware.zip which is provided as part of the Acceleration Stack installer:
$ unzip N3000_XL710_firmware.zip - Change directory:
cd N3000_XL710_firmware/$ export N3000_XL710_FIRMWARE=$PWD - The XL710 devices on each Intel® FPGA PAC N3000 are configured during board manufacturing to support either 10G or 25G operation. You cannot change the Ethernet network operation (10G or 25G). The XL710 PCIe device ID identifies whether 10G or 25G support is configured. The device ID for 25G is 0x0d58 and for 10G is 0x0cf8 respectively.
Determine the XL710 device ID on your Intel® FPGA PAC N3000 using the following commands:
$ lspci -d :0d58
$ lspci -d :0cf8
Based on the result, you will run nvmupdate with the appropriate config file.
- Download the NVM Update Package version 7.0: NVMUpdatePackage_700_Series.zip.
- Extract the nvmupdate64e tool:
$ unzip NVMUpdatePackage_700_Series.zip$ cd NVMUpdatePackage_700_Series/$ tar xvzf 700Series_NVMUpdatePackage_v7_00_Linux.tar.gz$ chmod +x 700Series/Linux_x64/nvmupdate64e$ sudo cp 700Series/Linux_x64/nvmupdate64e $N3000_XL710_FIRMWARE/ - Update the XL710:
$ cd $N3000_XL710_FIRMWARE/- For device ID: 0cf8
$ sudo ./nvmupdate64e -c nvmupdate_10G_0CF8.cfg - For device ID: 0d58
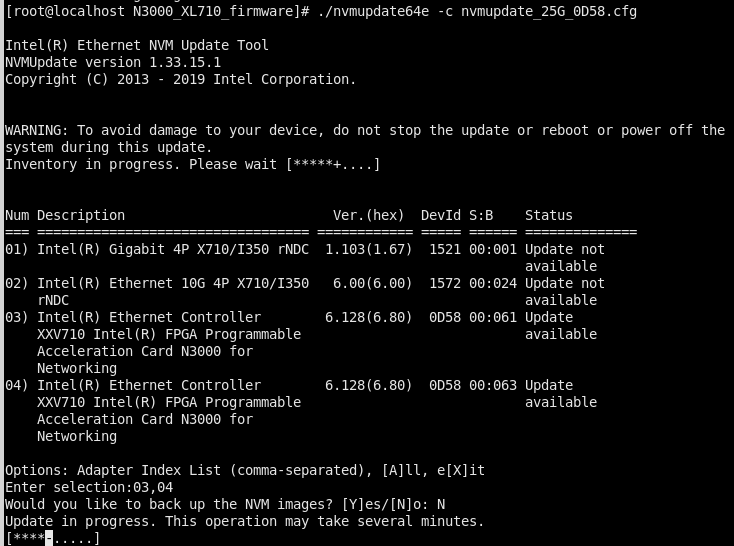
$ sudo ./nvmupdate64e -c nvmupdate_25G_0D58.cfg
- For device ID: 0cf8
- A menu lists all the XL710 devices and specifies which ones have updates (only 0D58 or 0CF8 device should show Update Available).
- Enter the Num values (use comma to separate multiple devices)
- Hit Enter and wait. An on-screen will prompt to hit any key when programming is completed.
Figure 12. Step Illustration
- Power cycle the card using:
$ sudo rsu bmcimg <FPGA PCIe B:D.F>
In the future, you can choose to upgrade to Intel XL710 Firmware 7.3 or later and install the corresponding i40e and iavf driver. The following steps are instructive and provide guidance on how to perform firmware updates for future versions:
- Check the version compatibility between firmware and driver. Refer to the Feature Support Matrix.
- Download the NVM Update package version 7.3 or above from download center.
- Extract the nvmupdate64e tool:
$ unzip NVMUpdatePackage_*_Series.zip $ cd NVMUpdatePackage_*_Series/ $ tar xvzf 700Series_NVMUpdatePackage_*_Linux.tar.gz $ chmod +x 700Series/Linux_x64/nvmupdate64e $ cd 700Series/Linux_x64/ - Upgrade Intel XL710 firmware:
For more details, refer to the corresponding Readme file.# ./nvmupdate64e - The NVMUpdate utility returns an exit code of zero after successful completion of the update.
- Power cycle the card:
$ sudo rsu bmcimg [PCIe B:D.F]
Note: You must not use firmware version 7.1 and 7.2, since these versions do not support Intel XL710 device ID 0d58.