AN 999: Drive-on-Chip with Functional Safety Design Example: Agilex™ 7 Devices
ID
823627
Date
7/04/2024
Public
1. About the Drive-on-Chip with Functional Safety Design Example for Agilex™ 7 Devices
2. Getting Started
3. Rebuilding the Drive-on-Chip Design
4. Functional Description of the Drive-On-Chip with Functional Safety Design Example for Agilex 7 Devices
5. HPS Channel Safety Software
6. Drive-on-Chip Design Recommendations and Disclaimers
7. Document Revision History for AN 999: Drive-on-Chip with Functional Safety Design Example for Agilex 7 Devices
2.1. Software Requirements for the Drive-On-Chip with Functional Safety Design Example for Agilex 7 Devices
2.2. Hardware Requirements for the Safe Drive-On-Chip with Functional Safety Design Example for Agilex 7 Devices
2.3. Downloading and Installing the Design
2.4. Installing Python
2.5. Creating an SD Card Image
2.6. Setting Up your Development Board for the Drive-On-Chip with Functional Safety Design Example for Agilex 7 Devices
2.7. Debugging and Monitoring the Drive-On-Chip with Functional Safety Design Example for Agilex 7 Devices with Python GUI
2.8. Looking into the Drive-On-Chip Output
3.1. Generating the Platform Designer System
3.2. Generating and Building the NiosV/g BSP for the Drive-On-Chip Design Example
3.3. Compiling the Hardware in the Intel Quartus Prime Software
3.4. Modifying the Motor Control Software Application
3.5. Generating .jic and .rbf files After Hardware Modifications
3.6. Recreate an SD Card Image
3.7. Modifying the HPS Safety Function Application
2.5. Creating an SD Card Image
The Drive-on-Chip with Functional Safety Design Example requires an SD card image (gsrd-console-image-agilex7.wic) and a .jic file (included in the images directory) to program and use on the Agilex7 SoC F-series Transceiver SoC Development Kit. To create an SD card image or, if you modify the design or rebuild the software layers, you should build a Yocto with the provided meta layer. The output of the Yocto build is an SD card image (.wic) to be use in the development kit. To build Yocto and create the SD card, refer to the RocketBoards GSRD web page.
Altera recommends you build the design using a specific version of the GSRD and Quartus Prime Pro. Altera provides no support for the design in later or earlier versions of the GSRD or Quartus Prime. You must solve any potential differences if you use any other version of the tools.
- In the GSRD:
- Follow the steps in Setting up the Environment.
- Ignore the steps Building the Hardware Design and Building Core RBF. You provide or generate the agilex7_dk_si_agf014ea.core.rbf from the Quartus Prime project..
- Follow the steps in Setting Up Yocto Build System.Use nandbield branch of the altera-opensource repository.
- Ignore the section Customize Yocto Build.
- Before building Yocto, copy the provided meta layer in hps_software directory to $TOP_FOLDER/gsrd_socfpga and add the layer to the project:
>> cp -r <PROJ_LOCATION>/hps_software/meta-safedriveonchip
$TOP_PROJECT/gsrd_socfpga
>> cd $TOP_FOLDER/gsrd_socfpga
>> bitbake-layers add-layer meta-safedriveonchip
>> bitbake-layers show-layers
Figure 5. GSRD meta layers including meta-safedriveonchip.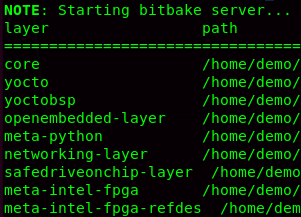
- Check your desired .rbf is in $TOP_FOLDER/gsrd_socfpga/meta-safedriveonchip/recipes-bsp/hw-ref-design/files/ with the name agilex7_dk_si_agf014ea.core.rbf.
- Write the correct sha256sum value of the .rbf to the $TOP_FOLDER/gsrd_socfpga/meta-safedriveonchip/recipes-bsp/hw-ref-design/hw-ref-design.bb recipe.
Figure 6. hw-ref-design.bb recipe for .rbf inclusion

- Build Yocto:
>> cd $TOP_FOLDER/gsrd_socfpga
>> bitbake_image
>> package
The gsrd-console-image-agilex7.wic file for SD card is in $TOP_FOLDER/gsrd_socfpga/agilex7_dk_si_agf014ea-gsrd-images. - Burn the SD card using the image with a tool like SD imager or follow the steps in the GSRD Creating SD card.