Using Intel® Visual Fortran to Create and Build Windows*-Based Applications
A newer version of this document is available. Customers should click here to go to the newest version.
Visible to Intel only — GUID: GUID-DBCE33EC-AFFC-46DA-8927-7259478000C1
Visible to Intel only — GUID: GUID-DBCE33EC-AFFC-46DA-8927-7259478000C1
Using the Resource Editor to Design a Dialog Box
You design the appearance of the dialog box, choose and name the dialog controls within it, and set other control properties with the Dialog Editor. The Dialog Editor is one of the Resource Editors provided by the Microsoft Visual Studio* integrated development environment (IDE).
The Dialog Editor is not available from the Visual Studio Shell.
A program's resources are defined in a resource file (typically with an .rc extension). A Microsoft Visual Studio project typically contains a single resource file. The contents of the resource file are displayed in the Resource Editor by double-clicking on the .RC file. The resource file can be created by one of the following:
When you create a project and use one of the Fortran AppWizards (for example, when using the Fortran Windows Application AppWizard).
When you save the resources that you define using one of the Resource Editors.
If you create the resource file from the Resource Editors, be sure to add the resource file to your project. It is possible to include additional resource files in a project (see Including Resources Using Multiple Resource Files).
This section describes the steps needed to design a dialog box, and uses as an example a dialog box that converts temperatures between Celsius and Fahrenheit. The code in the example is explained as you read through this section.
In this section, there is an example of how to include the dialog box in a Fortran Console project.
To create a Fortran Console application:
From the File menu, select New>Project...
Select the Intel(R) Fortran Projects item.
From the list of project types, select Console Application.
Enter Temp as the name for the project, verify where the project will be created, and click OK.
In the Fortran Console Application Wizard, click Finish.
The Solution View displays the solution.
Click the plus sign (+) next to the project name to display the categories of source files, if necessary .
To open the Dialog Editor:
From the File menu, select Add New Item...
Select Resource and change the name to Temp.rc. Click Open.
Right-click on the .rc file in the Solution View, select Open With>Resource Editor.
From the Edit >menu, select Add Resource... From the list of possible resources, select Dialog.
Click the New button. The Dialog Editor (one of the resource editors) appears on the screen as shown below.
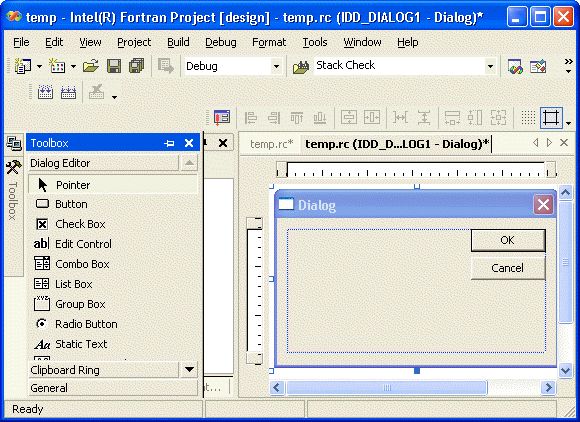
A blank dialog box appears along with a toolbox of available controls. If the toolbox does not appear, select View>Toolbox.
The controls that are supported by Intel Visual Fortran follow:
Button |
Check box |
Combo box |
Edit box |
Group box |
List box |
Picture |
Progress bar |
Radio button |
Scroll bar, horizontal |
Scroll bar, vertical |
Slider |
Spin control |
Static text |
Tab control |


You can also add ActiveX* controls to your dialog box (see Using ActiveX* Controls Overview).
To add controls to the dialog box:
Point at one of the available controls in the Toolbox, then hold down the left mouse button and drag the control to the dialog box.
Place the dialog control where you want it on the dialog box and release the mouse button. You can delete controls by selecting them with the mouse, then pressing the Delete (or DEL) key.
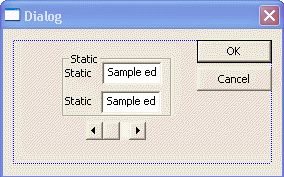
The following figure shows the dialog box after adding two Static text lines (which currently say "Static"), two Edit boxes (which currently say "Sample edit"), a Horizontal Scroll bar, and a Group box. The Group box is the outlined rectangular area in the dialog box that encloses the other related controls.
The OK and CANCEL buttons were added for you by the Resource Editor. You can delete (select the control and press DEL key), move (drag the control), resize (drag one of the anchor points), or rename the OK and CANCEL buttons or any of the controls that you add.
To specify the names and properties of the added controls:
Click on one of the controls in your dialog box and select Properties from the pop-up (right-click) menu. A Properties window appears showing the default name and properties for that control.
The following figure shows the Properties box for the Horizontal Scroll bar.
Dialog Editor Sample 3
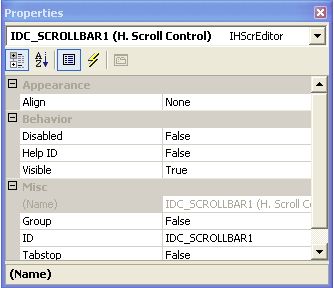
Change the control name by modifying the ID property (currently, IDC_SCROLLBAR1) to another name (for example, IDC_SCROLLBAR_TEMPERATURE).
Select the available options in the left column to change the control's properties.
Repeat the same process for each control and for the dialog box itself.
To use the controls from within a program, you need symbolic names for each of them. In the previous series of steps, the Horizontal Scroll bar symbolic name has been changed in the Properties box to IDC_SCROLLBAR_TEMPERATURE. Use this name to refer to the control; for example:
 INTEGER slide_position
 retlog = DLGGET (dlg, IDC_SCROLLBAR_TEMPERATURE, &
                slide_position, DLG_POSITION)
To save the dialog box as a resource file:
Select File>Save All.
Typically, only one resource file is used with each Intel Visual Fortran project (see Including Resources Using Multiple Resource Files).
When you save your resource file for the first time, the resource editor also creates a Resource.h file. This file is included by the .RC file. To create the Fortran equivalent of this file (resource.fd), do the following:
Add Resource.h to your project using File>Add Existing Item....
Select the Resource.h file in the Solution View and the select View>Property Pages from the main menu bar.
Set the Command Line option to use the deftofd tool by entering:
deftofd resource.h resource.fd
(For more information on the deftofd tool, see The Include (.FD and .H) Files.)
Set the Description option to Generating Fortran include file...
Set the Outputs option to resource.fd.
Click OK.
To open an existing dialog box in the Resource Editor:
From the File menu, open the project .
Double-click the RC file.
Click the plus sign (+) next to Dialog.
Double-click the appropriate dialog name, such as IDD_DIALOG1.
Use the Resource Editor to add a new control or modify an existing control. To modify an existing control, use the Tab key to select the appropriate control. Now select View>Properties Window (or, on the pop-up menu, click Properties) to view or modify its properties.
At this point, the appearance of the dialog box is finished and the controls are named, but the box cannot function on its own. An application must be created to run it.
Not all the controls on the Resource Editor Controls toolbar are supported by Intel Visual Fortran dialog routines. The supported dialog controls are:
Using List Boxes and Combo Boxes (such as a drop-down list box)
Using Scroll Bars (Horizontal and Vertical)
You can also add ActiveX controls to your dialog box. For information, see Using ActiveX* Controls Overview.
For information on creating an application for your dialog box, see Writing a Dialog Application Overview.
This section also discusses other resources and control properties.