Intel® Stratix® 10 Configuration via Protocol (CvP) Implementation User Guide
ID
683704
Date
7/01/2021
Public
A newer version of this document is available. Customers should click here to go to the newest version.
1. Overview
2. CvP Description
3. CvP Topologies
4. Design Considerations
5. CvP Driver and Registers
6. Understanding the Design Steps for CvP Initialization and Update Mode in Intel® Stratix® 10
7. Intel® Stratix® 10 Configuration via Protocol (CvP) Implementation User Guide Archives
8. Document Revision History
5.3.1. Vendor Specific Capability Header Register
5.3.2. Vendor Specific Header Register
5.3.3. Intel Marker Register
5.3.4. User Configurable Device/Board ID Register
5.3.5. CvP Status Register
5.3.6. CvP Mode Control Register
5.3.7. CvP Data Registers
5.3.8. CvP Programming Control Register
5.3.9. CvP Credit Register
6.1.5.3. Programming CvP Images
In Active Serial configuration mode, you must program the periphery image (.periph.jic) into your AS configuration device and then download the core image (.core.rbf) using the PCIe Link. You can use Active Serial x4 (Fast mode) to load .periph.jic into your selected CvP initialization enabled Intel® Stratix® 10 device.
After loading the periphery image, the Intel® Stratix® 10 is triggered to reconfigure from AS to load it. The link should reach the expected data rate and link width. You can confirm the PCIe link status using the RW Utilities. Follow these steps to program and test the CvP functionality:
- Plug the Intel® Stratix® 10 FPGA Development Kit into the PCI Express slot of the DUT PC and power it ON. It is recommended to use the ATX power supply that the development kit includes.
- Open the Intel® Quartus® Prime Tools menu and select Programmer.
- Click Auto Detect to verify that the Intel® FPGA Download Cable recognizes the Intel® Stratix® 10 FPGA.
- Follow these steps to program the periphery image:
- Select Stratix 10 device, and then right click None under File column and select Change File.
- Navigate to .periph.jic file and click Open.
- Under Program/Configure column, select the respective devices. For example, 1SG280LU3S1 and EPCQL1024.
- Click Start to program the periphery image into EPCQL1024 flash.
Figure 14. Illustrating the Specified Options to the Program Periphery Image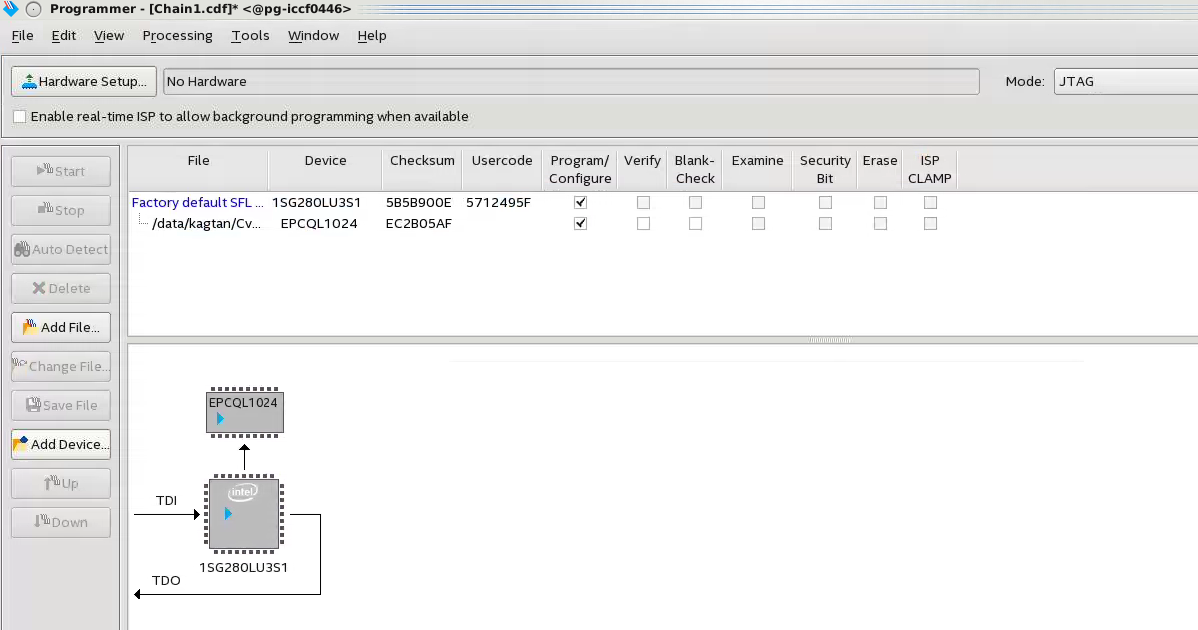
- After the .periph.jic is programmed, the FPGA must be powered cycle to allow the new peripheral image to load from the on-board flash into the FPGA. To force the DUT PC to re-enumerate the link with the new image, power cycle the DUT PC and the Intel® Stratix® 10 FPGA Development Kit.
- You can use RW Utilities or another system software driver to verify the link status. You can also confirm expected link speed and width.
- Follow these steps to program the core image:
- Copy the .core.rbf file to your working directory.
- Open a console in Linux. Change the directory to the same mentioned above where the file is copied.
- Program the core image by typing the following command: dd if= <new core.rbf file> of= /dev/altera_cvp bs=4K
Note: You can also program the core image by using command: cp *.core.rbf /dev/altera_cvp
- You can see your core image running on the Intel® Stratix® 10 FPGA Development Kit. Alternatively, print out the kernel message using the dmesg to ensure the CvP is completed successfully.