AN 845: Signal Tap Tutorial for Intel® Arria® 10 Partial Reconfiguration Design
ID
683662
Date
1/28/2022
Public
2.1. Step 1: Getting Started
2.2. Step 2: Preparing the Base Revision
2.3. Step 3: Preparing the Implementation Revisions for Debugging
2.4. Step 4: Configuring Signal Tap Logic Analyzer
2.5. Step 5: Generating Programming Files
2.6. Step 6: Programming the FPGA Device
2.7. Step 7: Performing Data Acquisition
2.2.1. Preparing the Static Region
- Ensure that blinking_led is the current revision.
To change the revision to the blinking_led revision, click Project > Revisions and set blinking_led as the current revision.
- Add the SLD JTAG Bridge Agent Intel® FPGA IP to the design:
- In the IP Catalog (Tools > IP Catalog), type SLD JTAG Bridge Agent, and double-click the SLD JTAG Bridge Agent Intel® FPGA IP .
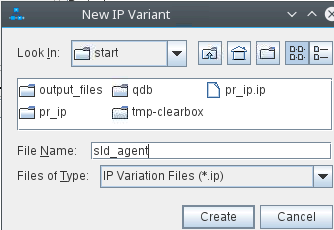
- In the New IP Variant dialog box, type sld_agent as the file name, and then click Create.
Figure 4. New IP Variant Dialog Box
- In the parameter editor, use the default parameterization for sld_agent. Click Generate HDL and then click Generate.
Save your changes, if prompted.
Figure 5. SLD JTAG Bridge Agent Intel® FPGA IP Parameters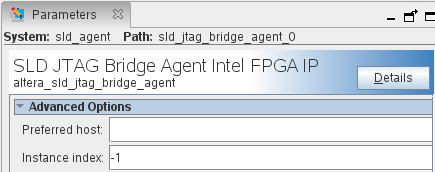 The parameter editor generates the sld_agent.ip IP variation file and adds the file to the blinking_led project.
 - Close the parameter editor.
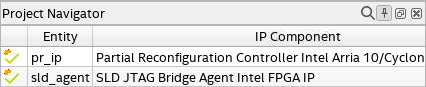
- Verify whether the sld_agent IP variant appears in the IP Components tab of the Project Navigator.
Figure 6. sld_agent IP Variant in Project NavigatorIf the IP variant does not appear in the Project Navigator, click Project > Add/Remove Files in Project, find the sld_agent.ip file, and add to the project.
- In the top.sv file, instantiate the sld_agent IP in the base revision by uncommenting the following block of code:
//==============
//Uncomment this block to enable Signal Tap

wire tck;
wire tms;
wire tdi;
wire vir_tdi;
wire ena;
wire tdo;

sld_agent u_sld_agent (
 .tck  (tck),  //  output,  width = 1, connect_to_bridge_host.tck
 .tms  (tms),  //  output,  width = 1, .tms
 .tdi  (tdi),  //  output,  width = 1, .tdi
 .vir_tdi (vir_tdi), //  output,  width = 1, .vir_tdi
 .ena  (ena),  //  output,  width = 1,  .ena
 .tdo  (tdo)   //  input,   width = 1,  .tdo
);

//==============