Intel® FPGA SDK for OpenCL™ Pro Edition: Programming Guide
ID
683846
Date
6/21/2022
Public
A newer version of this document is available. Customers should click here to go to the newest version.
1. Intel® FPGA SDK for OpenCL™ Overview
2. Intel® FPGA SDK for OpenCL™ Offline Compiler Kernel Compilation Flows
3. Obtaining General Information on Software, Compiler, and Custom Platform
4. Managing an FPGA Board
5. Structuring Your OpenCL Kernel
6. Designing Your Host Application
7. Compiling Your OpenCL Kernel
8. Emulating and Debugging Your OpenCL Kernel
9. Developing OpenCL Applications Using Third-party IDEs
10. Developing OpenCL™ Applications Using Intel® Code Builder for OpenCL™
11. Intel® FPGA SDK for OpenCL™ Advanced Features
A. Support Statuses of OpenCL Features
B. Intel FPGA SDK for OpenCL Pro Edition Programming Guide Archives
C. Document Revision History of the Intel® FPGA SDK for OpenCL™ Pro Edition Programming Guide
3.1. Displaying the Software Version (version)
3.2. Displaying the Compiler Version (-version)
3.3. Listing the Intel® FPGA SDK for OpenCL™ Utility Command Options (help)
3.4. Listing the Intel® FPGA SDK for OpenCL™ Offline Compiler Command Options (no argument, -help, or -h)
3.5. Listing the Available FPGA Boards and Custom Platforms (-list-boards and -list-board-packages)
3.6. Displaying the Compilation Environment of an OpenCL Binary (env)
4.1. Installing an FPGA Board (install)
4.2. Uninstalling an FPGA Board (uninstall)
4.3. Querying the Device Name of Your FPGA Board (diagnose)
4.4. Running a Board Diagnostic Test (diagnose <device_name>)
4.5. Programming the FPGA Offline or without a Host (program <device_name>)
4.6. Programming the Flash Memory (flash <device_name>)
5.1. Guidelines for Naming the Kernel
5.2. Programming Strategies for Optimizing Data Processing Efficiency
5.3. Programming Strategies for Optimizing Pointer-to-Local Memory Size
5.4. Implementing the Intel® FPGA SDK for OpenCL™ Channels Extension
5.5. Implementing OpenCL Pipes
5.6. Implementing Arbitrary Precision Integers
5.7. Using Predefined Preprocessor Macros in Conditional Compilation
5.8. Declaring __constant Address Space Qualifiers
5.9. Including Structure Data Types as Arguments in OpenCL Kernels
5.10. Inferring a Register
5.11. Enabling Double Precision Floating-Point Operations
5.12. Single-Cycle Floating-Point Accumulator for Single Work-Item Kernels
5.13. Integer Promotion Rules
5.2.1. Unrolling a Loop (unroll Pragma)
5.2.2. Disabling Pipelining of a Loop (disable_loop_pipelining Pragma)
5.2.3. Coalescing Nested Loops
5.2.4. Fusing Adjacent Loops (loop_fuse Pragma)
5.2.5. Marking Loops to Prevent Automatic Fusion (nofusion Pragma)
5.2.6. Specifying a Loop Initiation interval (II)
5.2.7. Loop Concurrency (max_concurrency Pragma)
5.2.8. Loop Speculation (speculated_iterations Pragma)
5.2.9. Loop Interleaving Control (max_interleaving Pragma)
5.2.10. Floating Point Optimizations (fp contract and fp reassociate Pragma)
5.2.11. Specifying Work-Group Sizes
5.2.12. Specifying Number of Compute Units
5.2.13. Specifying Number of SIMD Work-Items
5.2.14. Specifying the private_copies Memory Attribute
5.2.15. Specifying the use_stall_enable_clusters Cluster-control Attribute
5.4.1. Overview of the Intel® FPGA SDK for OpenCL™ Channels Extension
5.4.2. Channel Data Behavior
5.4.3. Multiple Work-Item Ordering for Channels
5.4.4. Restrictions in the Implementation of Intel® FPGA SDK for OpenCL™ Channels Extension
5.4.5. Enabling the Intel® FPGA SDK for OpenCL™ Channels for OpenCL Kernel
5.4.5.1. Declaring the Channel Handle
5.4.5.2. Implementing Blocking Channel Writes
5.4.5.3. Implementing Blocking Channel Reads
5.4.5.4. Implementing I/O Channels Using the io Channels Attribute
5.4.5.5. Emulating I/O Channels
5.4.5.6. Use Models of Intel® FPGA SDK for OpenCL™ Channels Implementation
5.4.5.7. Implementing Buffered Channels Using the depth Channels Attribute
5.4.5.8. Enforcing the Order of Channel Calls
5.5.5.1. Ensuring Compatibility with Other OpenCL SDKs
5.5.5.2. Declaring the Pipe Handle
5.5.5.3. Implementing Pipe Writes
5.5.5.4. Implementing Pipe Reads
5.5.5.5. Implementing Buffered Pipes Using the depth Attribute
5.5.5.6. Implementing I/O Pipes Using the io Attribute
5.5.5.7. Enforcing the Order of Pipe Calls
6.1. Host Programming Requirements
6.2. Allocating OpenCL Buffers for Manual Partitioning of Global Memory
6.3. Triggering Collection Profiling Data During Kernel Execution
6.4. Accessing Custom Platform-Specific Functions
6.5. Modifying Host Program for Structure Parameter Conversion
6.6. Managing Host Application
6.7. Allocating Shared Memory for OpenCL Kernels Targeting SoCs
6.8. Sharing Multiple Devices Across Multiple Host Programs
6.6.2.1. Linking Your Host Application to the Khronos ICD Loader Library
6.6.2.2. Displaying Flags for Compiling Host Application (compile-config)
6.6.2.3. Displaying Paths to OpenCL Host Runtime and MMD Libraries (ldflags)
6.6.2.4. Listing OpenCL Host Runtime and MMD Libraries (ldlibs)
6.6.2.5. Displaying Information on OpenCL Host Runtime and MMD Libraries (link-config or linkflags)
7.1. Compiling Your Kernel to Create Hardware Configuration File
7.2. Compiling Your Kernel without Building Hardware (-c)
7.3. Compiling and Linking Your Kernels or Object Files without Building Hardware (-rtl)
7.4. Specifying the Location of Header Files (-I=<directory>)
7.5. Specifying the Name of an Intel® FPGA SDK for OpenCL™ Offline Compiler Output File (-o <filename>)
7.6. Compiling a Kernel for a Specific FPGA Board and Custom Platform (-board=<board_name>) and (-board-package=<board_package_path>)
7.7. Resolving Hardware Generation Fitting Errors during Kernel Compilation (-high-effort)
7.8. Specifying Schedule Fmax Target for Kernels (-clock=<clock_target>)
7.9. Defining Preprocessor Macros to Specify Kernel Parameters (-D<macro_name>)
7.10. Generating Compilation Progress Report (-v)
7.11. Displaying the Estimated Resource Usage Summary On-Screen (-report)
7.12. Suppressing Warning Messages from the Intel® FPGA SDK for OpenCL™ Offline Compiler (-W)
7.13. Converting Warning Messages from the Intel® FPGA SDK for OpenCL™ Offline Compiler into Error Messages (-Werror)
7.14. Removing Debug Data from Compiler Reports and Source Code from the .aocx File (-g0)
7.15. Disabling Burst-Interleaving of Global Memory (-no-interleaving=<global_memory_type>)
7.16. Forcing Ring Interconnect for Global Memory (-global-ring)
7.17. Forcing a Single Store Ring to Reduce Area at the Expense of Write Throughput to Global Memory (-force-single-store-ring)
7.18. Forcing Fewer Read Data Reorder Units to Reduce Area at the Expense of Read Throughput to Global Memory (-num-reorder)
7.19. Configuring Constant Memory Cache Size (-const-cache-bytes=<N>)
7.20. Relaxing the Order of Floating-Point Operations (-ffp-reassociate)
7.21. Reducing Floating-Point Rounding Operations (-ffp-contract=fast)
7.22. Speeding Up Your OpenCL Compilation (-fast-compile)
7.23. Compiling Your Kernel Incrementally (-incremental)
7.24. Compiling Your Kernel with Memory Error Correction Coding (-ecc)
7.25. Disabling Hardware Kernel Invocation Queue (-no-hardware-kernel-invocation-queue)
7.26. Modifying the Handshaking Protocol (-hyper-optimized-handshaking)
7.27. Pipelining Loops in Non-task Kernels (-auto-pipeline)
8.1. Setting up the Emulator
8.2. Modifying Channels Kernel Code for Emulation
8.3. Compiling a Kernel for Emulation (-march=emulator)
8.4. Emulating Your OpenCL Kernel
8.5. Debugging Your OpenCL Kernel on Linux
8.6. Limitations of the Intel® FPGA SDK for OpenCL™ Emulator
8.7. Discrepancies in Hardware and Emulator Results
8.8. Emulator Environment Variables
8.9. Extensions Supported by the Emulator
8.10. Emulator Known Issues
11.1.1. Creating Library Objects From OpenCL Code
11.1.2. Understanding RTL Modules and the OpenCL Pipeline
11.1.3. Packaging an OpenCL Helper Function File for an OpenCL Library
11.1.4. Packaging an RTL Component for an OpenCL Library
11.1.5. Verifying the RTL Modules
11.1.6. Specifying an OpenCL Library when Compiling an OpenCL Kernel
11.1.7. Debugging Your OpenCL Library Through Simulation (Preview)
11.1.8. Using an OpenCL Library that Works with Simple Functions (Example 1)
11.1.9. Using an OpenCL Library that Works with External Memory (Example 2)
11.1.10. OpenCL Library Command-Line Options
11.1.2.1. Overview: Intel FPGA SDK for OpenCL Pipeline Approach
11.1.2.2. Integration of an RTL Module into the Intel FPGA SDK for OpenCL Pipeline
11.1.2.3. Stall-Free RTL
11.1.2.4. RTL Module Interfaces
11.1.2.5. Avalon Streaming Interface
11.1.2.6. RTL Reset and Clock Signals
11.1.2.7. Object Manifest File Syntax of an RTL Module
11.1.2.8. Interaction between RTL Module and External Memory
11.1.2.9. Order of Threads Entering an RTL Module
11.1.2.10. OpenCL C Model of an RTL Module
11.1.2.11. Potential Incompatibility between RTL Modules and Partial Reconfiguration
A.1.1. OpenCL 1.0 C Programming Language Implementation
A.1.2. OpenCL C Programming Language Restrictions
A.1.3. Argument Types for Built-in Geometric Functions
A.1.4. Numerical Compliance Implementation
A.1.5. Image Addressing and Filtering Implementation
A.1.6. Atomic Functions
A.1.7. Embedded Profile Implementation
9.2.2.1. Creating a Project
Perform the following steps to create a project using Eclipse CDT:
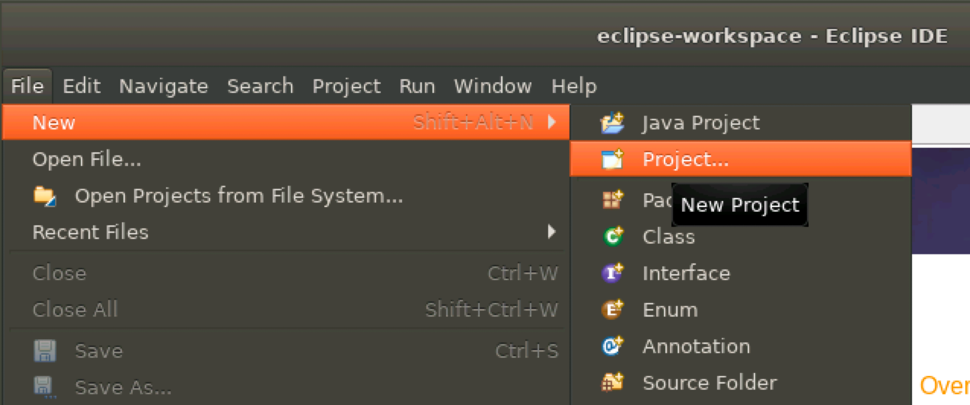
- Select File > New > Project menu option.
Figure 19. Eclipse CDT File Menu
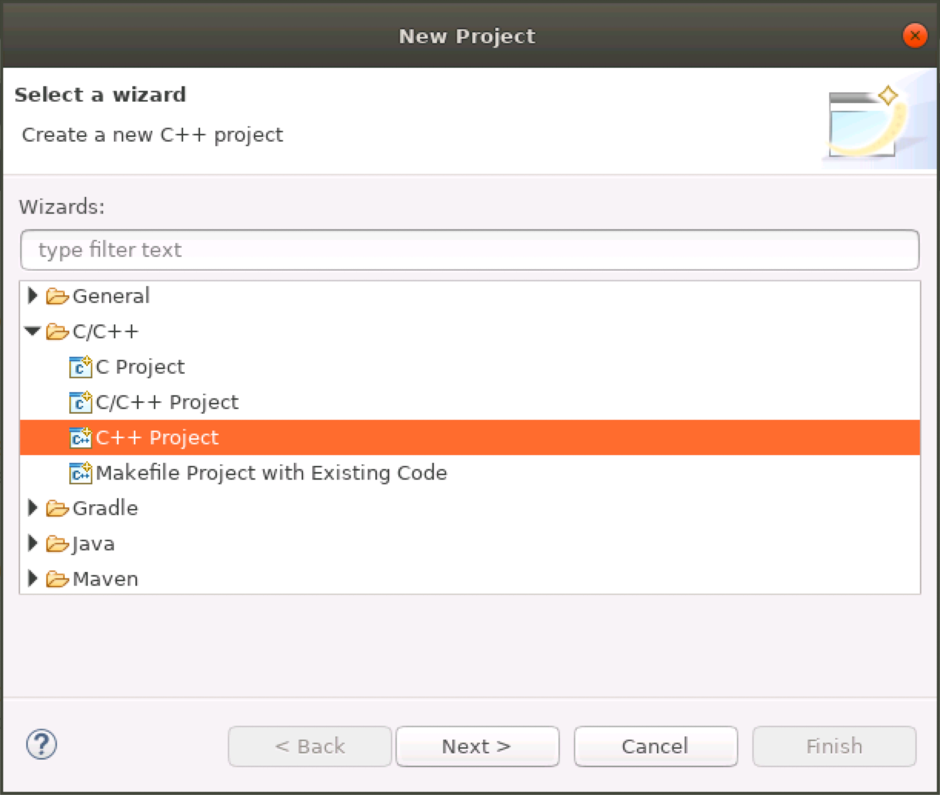
- Select the type of project you want to create. For this tutorial, expand the C/C++ folder, select C++ Project, and click the Next button.
Figure 20. New Project Wizard
 The C++ Project wizard opens. By default, the CDT filters the Project Type and Toolchain based on the language supported for the C++ Project wizard you selected for this tutorial.
 - In the C++ Project wizard, perform these steps:
Figure 21. C++ Project Wizard
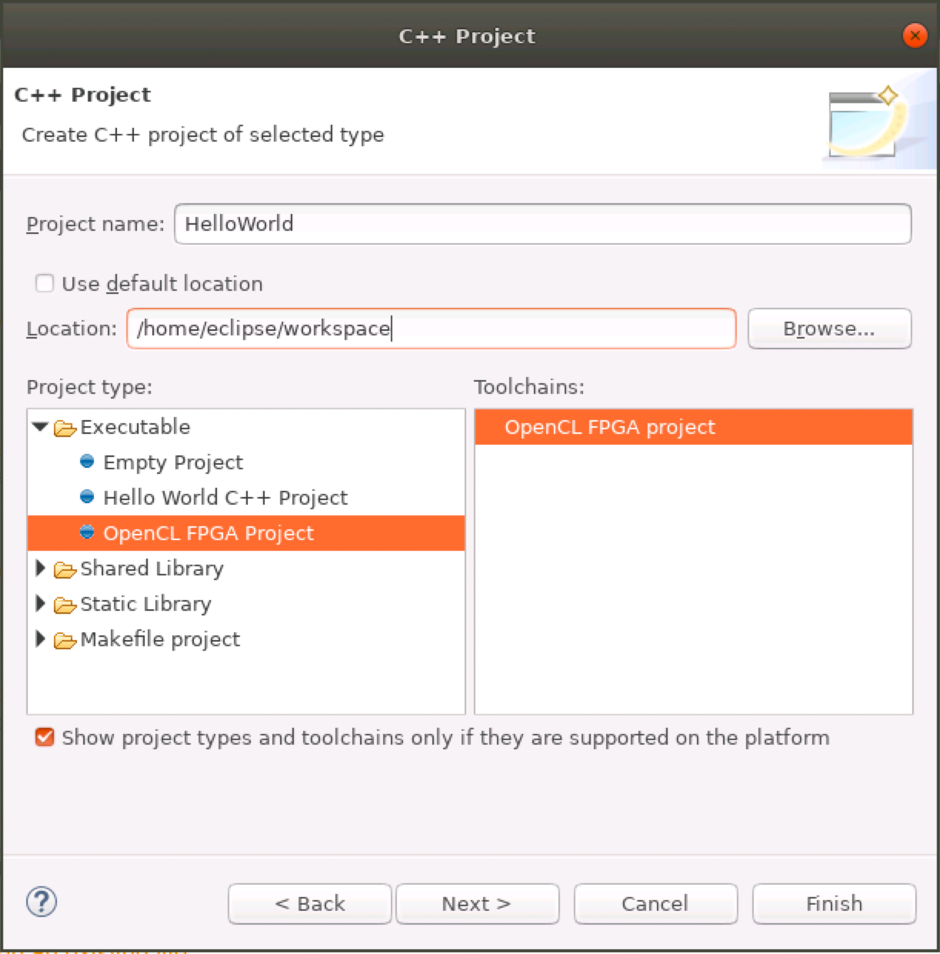
- In the Project name field, type a name for the project. For example, HelloWorld.
- In the Project type list, expand Executable folder and select OpenCL FPGA Project. This project type provides a simple Hello World application in OpenCL and the makefile is automatically created by the CDT.
- Under Toolchains, select OpenCL FPGA project.
- Click the Next button.
The Select Configurations dialog box displays a list of configurations based on the project type and toolchain selected earlier.Figure 22. Select Configurations Dialog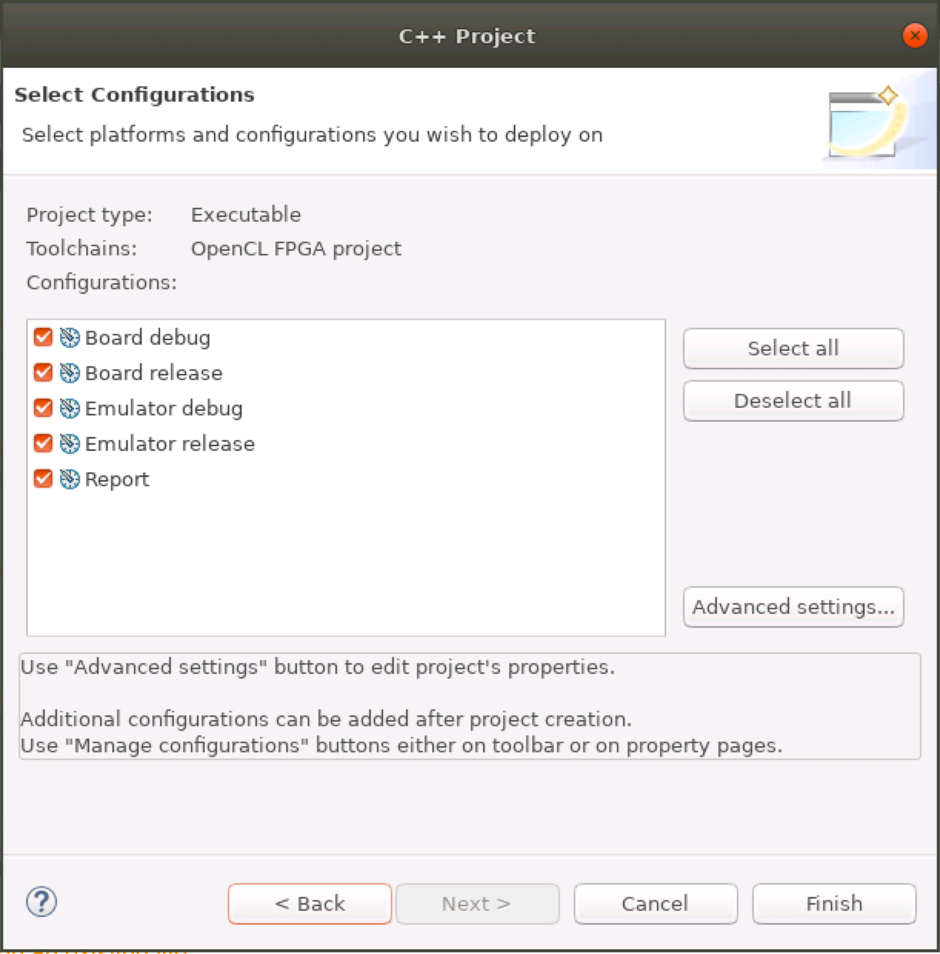 Note: Board debug and Board release configuration options are equivalent to HW Debug and HW Release build target options in the Microsoft Visual Studio IDE. When you use these options, board compiles for hardware and executes on a board.
 - Optional: If you want to change the default project settings, click the Advanced settings button. The Project Properties dialog launches for your new project, allowing you to change any of the project specific settings, such as includes paths, compiler options, and libraries.
- Click the Finish button.
Note: If the C++ perspective is not currently set as the default, you are prompted to determine if you want this project to be associated with the C/C++ perspective. Click Yes.
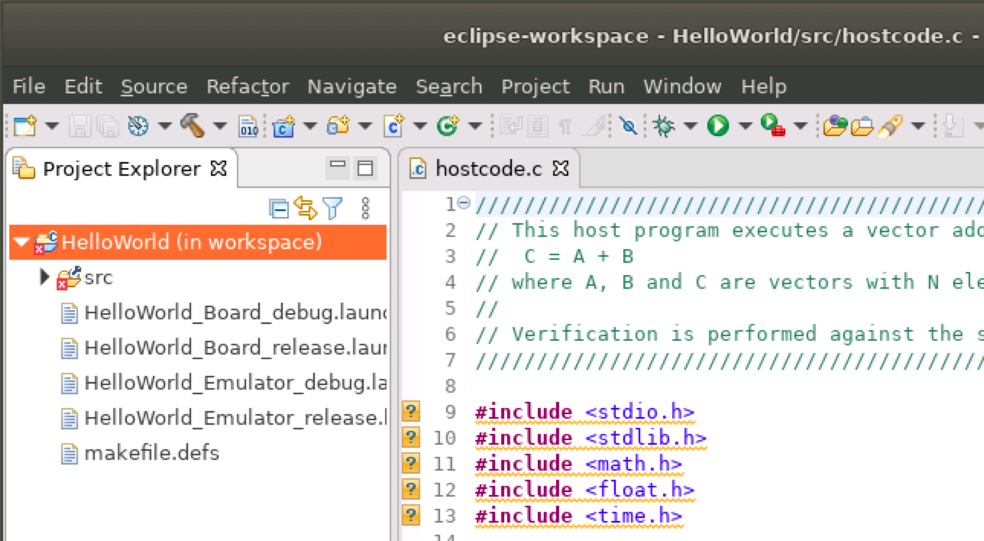
A project is created with the default settings and a full set of configurations based on the project type and toolchain you selected. You should now see the new project in the Project Explorer view.
Figure 23. New Project Displayed in the Project Explorer View