A newer version of this document is available. Customers should click here to go to the newest version.
2.1. Design Features
2.2. Hardware and Software Requirements
2.3. HDMI 2.1 RX-TX Retransmit Design Block Diagram
2.4. Design Parameters
2.5. Design Components
2.6. Design Software Flow
2.7. Clocking Scheme
2.8. Interface Signals
2.9. Hardware Setup
2.10. Simulation Testbench
2.11. Debugging Features
1.4. Compiling and Testing the Design
Figure 5. Design Compilation and Hardware Flow
To compile and run a demonstration test on the hardware example design, follow these steps:
- Ensure hardware example design generation is complete
- Launch the Intel® Quartus® Prime Pro Edition software and open the .qpf file.
- HDMI 2.1 design example with Support FRL enabled:
project directory/quartus/agx_hdmi21_frl_demo.qpf
- HDMI 2.1 design example with Support FRL enabled:
- Click Processing > Start Compilation.
- After successful compilation, a .sof file generates in your specified directory.
- Set up the Hardware and Power up the Intel FPGA board.
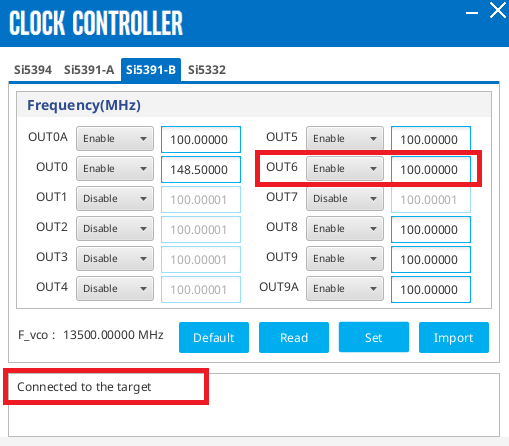
- Make the necessary clock controller settings. Open the Clock Controller parameter editor and set the clock frequency in Si5391-B tab.
Note: Based on our user experience on the Clock Controller, user needs to make sure it displays “Connected to the target” before proceeding with the clock settings. If it displays different message, user needs to exit and reopen the Clock Controller. To identify the successful clock settings, F_vco will display a certain clock frequency:
- Set Out6 frequency to 100.00 Mhz
- Configure the selected device on the development board using the generated .sof file (Tools > Programmer).
- HDMI2.1 design example with Support FRL enabled:
- project directory/quartus/output_files/agx_hdmi21_frl_demo.sof
- HDMI2.1 design example with Support FRL enabled:
- If changes are made on the software files, user needs to run the build_sw.sh script to rebuild the software.
- Download the software .elf file using the Nios2 Terminal.
- Download .elf file: nios2-download <project directory> /software/tx_control/tx_control.elf -g -r -i 1
- Run nios terminal: nios2-terminal -i 1
Note: Step 9 is an optional step. This step is only needed when user will make changes on the software files.