Abstract
In the last few years there has been a sea-change in GPU (Graphics Processing Units) rendering with the introduction of Neural Network based Super Sampling Techniques like Intel’s XeSS. Super Sampling allows games to scale low resolution render targets to larger resolutions like 2k, 4k, or beyond with enhanced quality compared to previous generation upscaling technology [Intel, et al. 2021]. Additionally, with the release of Intel’s first series of discrete GPUs known as Intel Arc A-Series Graphics there is now broad support for DirectX 12 Ultimate features like Variable Rate Shading (VRS) Tier 1 & Tier 2 [Hargreaves, 2021]. In 2022 Intel disclosed a Velocity and Luminance Adaptive Rasterization (VALAR) [du Bois, et al, 2022] mini-engine demo which leverages VRS Tier 2 on an Intel® Arc™ A-Series GPU to render scenes faster with a perceptually lossless “just-noticeable difference” algorithm [du Bois, et al. 2022]. In this paper we propose a method of combining Intel’s VALAR algorithm with XeSS to render upscaled scenes faster with minimal quality loss.
Introduction
In 2022 Intel released their first DirectX 12 Ultimate discrete GPU capable of supporting Variable Rate Shading (VRS) Tier 2, with the Introduction of the Intel® Arc™ A-Series GPUs. In parallel Intel also developed an optimized neural network based super scaling technology known as XeSS. For better image quality, XeSS utilizes XMX instructions introduced with Intel® Arc™ A-Series Discrete GPUs or the broadly available 4-element vector dot product (DP4a) instructions, also supported on Xe-LP GPUs.
In many ways, Variable Rate Shading is the opposite of Super-Sampling so it is not immediately obvious that the two technologies can be complementary. Variable Rate Shading sub-samples pixels with fewer Pixel Shader Invocations than the total number of pixels rendered in selective portions of an Image. XeSS on the other hand takes a low-resolution image and “fills-in” extra pixels with super-sampling to upscale to a high-resolution image. By using a technique like Velocity and Luminance Adaptive Rasterization prior to XeSS upscaling we can improve performance while retaining visual quality by only sub-sampling in regions of low contrast which are less noticeable to the user.
However, combining the two techniques together does not give a “free lunch.” There are some caveats developers should be aware of to preserve enough visual quality for XeSS to render a high-quality output image. This paper will outline the steps necessary to combine the two techniques in a game engine, steps for visual quality improvements, and a performance and visual quality assessment.
For those interested in more background information on XeSS, Variable Rate Shading, and VALAR we recommend reading the following whitepapers published by Intel.
Upscaling with Intel® XeSS
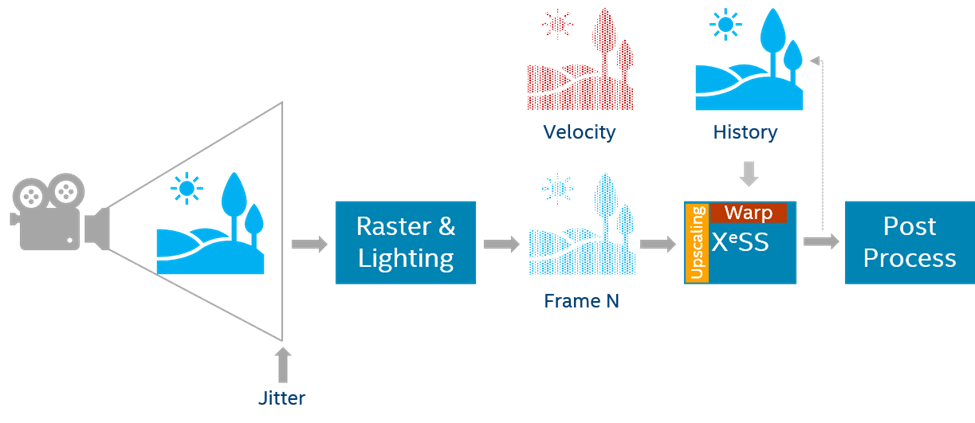
XeSS is designed to be a replacement of TAA (Temporal Anti-Antialiasing). TAA will take a rendered frame that is jittered and distributes spatial samples in time to provide amortized temporal super-sampling. This can occasionally cause ghosting and other visual artifacts. XeSS uses the same inputs and is meant to be used as a drop-in replacement. Instead of using a similar heuristic algorithm to TAA, XeSS uses a neural network using machine learning functions trained on game rendering techniques that results in improved image quality over TAA.
XeSS defines several quality modes ranging from Ultra Quality to Performance. Each mode defines a different upscale ratio which controls the resolution of the final output image based on the size of the input image resolution. XeSS quality and performance modes are defined as follows:
- Ultra-Quality: 1.3x (example: input 1477x831, output 1920x1080)
- Quality: 1.5x (example: input 1280x720, output 1920x1080)
- Balanced: 1.7x (example: input 1130x635, output 1920x1080)
- Performance: 2.0x (example: input 960x540, output 1920x1080)
To use XeSS, each frame will need to pass in the low-resolution input color, jitter, and motion vectors. Sub pixel jitter offsets are expected to be within -0.5f to 0.5f and are applied to the camera projection matrix (see figure ‘jitter offset example’) – typically this is at locations [2, 0] and [2, 1] in the projection matrix. The jitter sequence is recommended to be a quasi-random sequence (for example the Halton sequence). A bias based on the input value (importance sampling) is not recommended. The color input can be SDR (not recommended) or HDR (recommended) and can exceed 1.0 luminance in each color channel in the case of HDR.

For further details on integration see the XeSS Developer Guide and consult the basic sample and XeSS demo located at:
- Intel® Xe Super Sampling (XeSS) API Developer Guide [Intel, 2021]
- Intel® Xe Super Sampling (XeSS) Basic Demo Application [Intel, 2021]
Velocity And Luminance Adaptive Rasterization (VALAR)
Intel® first disclosed the Velocity and Luminance Adaptive Rasterization (VALAR) algorithm in a whitepaper published on Intel® Developer Zone in 2022. The technique uses a compute shader to generate a VRS Tier 2 shading rate buffer using the luminance and velocity of an input image from the previous frame. Our VALAR technique is based on the Visually Lossless Content and Motion Adaptive Shading technique introduced by Lei Yang in 2019 [Yang, et al. 2019]. VALAR uses the Weber-Fechner contrast law to compute a shading rate for each 8x8 or 16x16 tile depending on the hardware vendor (Intel® supports 8x8). VALAR converts a color buffer into luminance values and then approximates Weber-Fechner's contrast law using the Mean-Squared Error of Luminance and a Just-Noticeable-Difference Algorithm.
To determine the shading rate of the tile we first convert linear RGB (Red Green Blue) to luminance using a dot product.
\(L=R⋅0.212671+G⋅0.715160+B⋅0.072169 \)
Next, compute the total luminance of a tile, Lxy, to use in the Just Noticeable Difference Threshold equations later.
\(L_{xy}=Σ|L|\)
Take the sum of the luminance differences along the X and Y axis of the tile, Lx, Ly. These per-axis values are used in the average equation in the Mean-Squared Error estimator. The Lx and Ly, sums can either be computed as an approximation, as shown below, or can be computed as ground truth in Weber-Fechner Mode. For more information on Weber-Fechner mode see the original Velocity And Luminance Adaptive Rasterization [du Bois, et al. 2022] paper.
\(L_x=Σ|(L_x-L_{x-1} )/2|\)
\(L_y=Σ|(L_y-L_{y-1} )/2|\)
Average the total Luminance Lxy, and luminance differences Lx, and Ly by dividing by the total the number of pixels, N, in the tile.
\(L'_{xy} = L_{xy}/N\)
\(L'_x = L_x/N\)
\(L'_y = L_y/N\)
Compute the mean-squared error (MSE), of the average X and Y luminance differences of the tile using square root, for each axis, εx and εy.
\(ε_x=√(L'_x )\)
\(ε_y=√(L'_y )\)
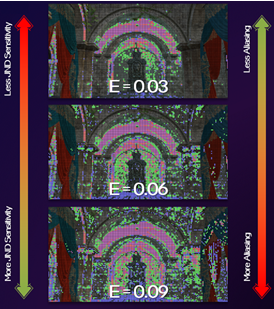
Derive the just-noticeable-difference (JND), J, by adding the optional environment luminance value, E (see the Visual Quality Improvement Strategies section on Environment Luminance), to the average tile luminance value, L’xy, and multiply it by the sensitivity threshold, T. Where T is a floating-point value between 0.0 and 1.0.
\(J = T (L'_{xy} + E)\)
After deriving the JND value and the average X and Y luminance error of the tile, perform a branchless thresholding evaluation to determine the per-axis shading rate of the tile. Where R1 is the 1x shading rate, R2, is the 2x shading rate and, R4 is the 4x shading rate.
\(R_x=R_1⋅(ε_x≥J)+R_2⋅¬((ε_x≥J)⋁(ε_x<J))+R_4⋅ (ε_x<J)\)
\(R_y=R_1⋅(ε_y≥J)+R_2⋅¬((ε_y ≥ J)⋁(ε_y<J)) + R_4⋅ (ε_y<J)\)
Since the R1 constant evaluates to zero the equations above can be reduced as follows.
\(R_x=R_2⋅¬((ε_x ≥ J)⋁(ε_x<J)) + R_4⋅ (ε_x<J)\)
\(R_y=R_2⋅¬((ε_y ≥ J)⋁(ε_y<J)) + R_4⋅ (ε_y<J)\)
Finally, combine the x and y shading rates to determine the total shading rate of the tile using bitwise and shift operations.
\(R_{xy}=R_x≪2 │ R_y\)
Velocity can be included in the half-rate and quarter-rate shading terms in the JND expression for additional sensitivity to camera movement. For more information on including velocity, please see the original Velocity and Luminance Adaptive Rasterization [du Bois, et al. 2022] whitepaper.
By applying the shading rate buffer generated by the VALAR compute shader it is possible to selectively sub-sample regions of an image to reduce Pixel Shader Invocations while rendering. The reduction in Pixel Shader Invocations can offer performance gains in workloads that are pixel bound, while maintaining a high degree of visual fidelity using Weber-Fechner's Contrast Law [Wikipedia, 2022].
Integrating Intel® XeSS + VALAR
To get the most performance and best visual fidelity when combining VRS Tier 2 with Intel® XeSS it is important to define how the two systems will interact at runtime. VRS Tier 2 works best when rendering the native resolution render target with a VRS Tier 2 mask applied before being upscaled by XeSS. We chose the Velocity and Luminance Adaptive Rasterization technique to minimize perceptible changes in visual quality when rendering to the native resolution render target. Other VRS Tier 2 techniques, like foveated rendering, can be considered, but may result in lower visual quality in the final upscaled output image. After rendering the current frame with the VRS mask applied, the VALAR compute shader is executed to generate a VRS mask for the next frame. Finally, the native resolution input buffer rendered with the VRS mask applied is then passed to XeSS for upscaling.

Compounding Performance Savings
When using XeSS to render an upscaled image, the native resolution render target can be rendered at a lower resolution than 1080p before upscaling. Coupled with the reduced render times from applying VRS Tier 2 to the native resolution buffer, we can achieve a greater speedup than using one or the other technique alone. With VALAR + XeSS there is a compounding effect on performance savings. XeSS only requires a low-resolution input buffer, which in general is faster than a high-resolution render target. VALAR can also reduce the time it takes to render geometry to the native resolution render target, plus there is also the time savings of invoking fewer thread dispatches to execute the VALAR compute shader before XeSS upscaling.
The VALAR compute shader runs at a fixed time cost relative to the size of the native resolution input buffer, which means smaller native resolution input buffers required by XeSS are perfect for reducing the number of thread dispatches required to produce a VRS mask. For example, generating an 8x8 VALAR mask for a 1920x1080 native resolution render target requires 240x135 (32,400) threads to create a 1/8th sized VRS buffer. Whereas, rendering an 8x8 VALAR mask for a 1280x720 native resolution render target only needs to dispatch 160x90 (14,400) threads to create a 1/8th sized VRS buffer, which is 2.25x fewer threads than the 1080p native resolution render target.
By reducing the overall time cost of the rendering pipeline with VALAR + XeSS it is possible to achieve higher resolutions while still maintaining a high degree of visual fidelity when compared to previous generation GPUs.
Mapping Coarse Pixels to Super Sampled Pixels
In some cases, it may be necessary to map a pixel from an upscaled render target down to the shading rate specified in the shading rate buffer. In the XeSS-VALAR-Demo application, the debug overlay used the following method to render shading rate tiles over the upscaled XeSS render target.

It is possible to convert a pixel coordinate in the upscaled render target to a position in the native resolution render target and then convert to the location of a shading rate tile in the VRS buffer. This can be useful if a post-processing feature needs to be “VRS Aware.”

First, dispatch a compute shader with upscaled width by upscaled height thread groups with [numthreads(1, 1, 1)] to cover the upscaled render target.
Context.Dispatch(UpscaledTarget.GetWidth(), UpscaledTarget.GetHeight());
In the compute shader, calculate the upscale ratio by dividing the native width and height by the upscaled width and height.
float2 upscaleRatio = float2(
	(float)NativeWidth / (float)UpscaledWidth,
    (float)NativeHeight / (float)UpscaledHeight);
Next, scale the Dispatch Thread ID X and Y pixel coordinates using the upscale ratio from the previous step to determine the native pixel coordinates.
float2 scaledPixelCoord = float2(
    (float)DTid.x * upscaleRatio.x,
    (float)DTid.y * upscaleRatio.y);
Divide the scaled X and Y pixel coordinates by the shading rate tile size (Intel = 8x8) to determine VRS shading rate buffer coordinates.
uint2 vrsBufferCoord = uint2(
    (uint)(scaledPixelCoord.x / (float)ShadingRateTileSize),
    (uint)(scaledPixelCoord.y / (float)ShadingRateTileSize));
Once the VRS buffer shading rate coordinates are determined, read or write to the VRS buffer.
uint shadingRate = VRSShadingRateBuffer[vrsBufferCoord];
// … Use shadingRate in compute shader.
Now that the shading rate is mapped to both the native render target and the upscaled render target, the shading rate can be used to inform the actions of the algorithm running in the compute shader.
Utilizing Velocity with VALAR & XeSS

Motion Vectors are an optional feature for VALAR, however, integrating XeSS requires Motion Vectors as an input to create a super-sampled output image. This makes the Motion Vector feature of VALAR complimentary to the use of Motion Vectors in XeSS. VALAR can use the low-resolution or high-resolution motion vectors needed for XeSS. However, when using the high-resolution Motion Vectors, it is necessary to modify the sampling pattern in the VALAR compute shader to sample at the correct location in the high-resolution velocity buffer.
const float2 upscaleRatio = float2((float)UpscaledWidth / (float)NativeWidth,
    (float)UpscaledHeight / (float)NativeHeight);

const uint2 uPixelCoord =
    float2((float)PixelCoord.x * upscaleRatio.x, (float)PixelCoord.y * upscaleRatio.y);

const float2 velocity = UpscaledVelocityBuffer[uPixelCoord].xy;

localWaveVelocityMin = WaveActiveMin(length(velocity));
Using Motion Vectors with VALAR is a great way to improve performance while obscuring quality loss introduced due to camera motion with the addition of motion blur. Additionally, the Just-Noticeable-Difference algorithm in VALAR is more sensitive when motion-vectors are used, which increases the aggressiveness of the shading rates written to the shading rate buffer. When using Motion Vectors, consider using a “Relaxed Mode” camera controller that disables VALAR when the camera is stationary and enables VALAR when the camera is in motion. See more details in the Visual Quality Improvement Strategies section of this paper.
Visual Quality Improvement Strategies
Once the two features are integrated, it is important to inspect the visual quality of the final output image to ensure no visual corruption or flickering was introduced. Both features have parameters that let the developer control the visual quality of the final output image. It is important to understand and tune XeSS and VALAR parameters carefully to meet the visual quality and art style expectations. However, some artifacts may be introduced that are not fully controllable through feature parameterization alone. In these cases, there are several other mitigation strategies to consider. These strategies may involve disallowing low resolution shading rates like 2x4, 4x2, or 4x4, while others may be controlled via camera movement like the Relaxed Mode Plus feature as demonstrated in Chivalry II by Tripwire [du Bois, Gibson 2020].
VALAR Parameter Tuning
Sensitivity Threshold: The value for determining the Just-Noticeable-Difference Threshold for VALAR and is in the range of 0.0 to 1.0. To preserve the most visual fidelity, the sensitivity threshold should be tuned as conservatively as possible. Biasing sensitivity values towards 0.0 increases visual quality at the cost of performance, while biasing values towards 1.0 can improve performance at the cost of visual quality. Pre-selecting sensitivity thresholds should be considered along with the quality pre-sets for XeSS. Consider a set of preset sensitivity values that match the Performance, Balanced, and Quality modes offered by XeSS. For example, Performance may be a value of 0.75, Balanced would be 0.50, and Quality would be 0.25.

Env. Luma: Environment Luminance additively increases the overall luminance in the Just Noticeable Difference threshold equation. Adding Environment Luma causes shading rates to be selected more aggressively as the environment luminance decreases local contrast. It is best to leave the environmental luminance value as close to zero as possible for the highest quality. When using the environmental luminance value, consider tying it to a parameter like global illumination.
Quarter Rate Shading Modifier (K): The quarter-rate shading modifier increases the aggressiveness of 4x4, 4x2, and 2x4 shading-rates. In some workloads, it has been observed that quarter rate shading rates can introduce flicker or visual corruption when upscaling with XeSS. This is due to less temporal information being encoded into the larger coarse pixels. Due to this limitation, it is important to tune the Quarter Rate Shading Modifier as close to zero as possible. This will preserve the directional bias of 2x4 and 4x2 shading rates as 1x2 or 2x1 while also reducing perceptible visual corruption issues.
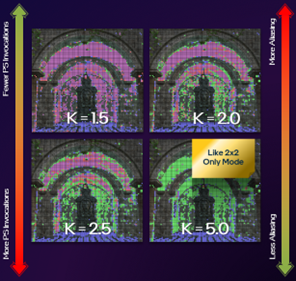
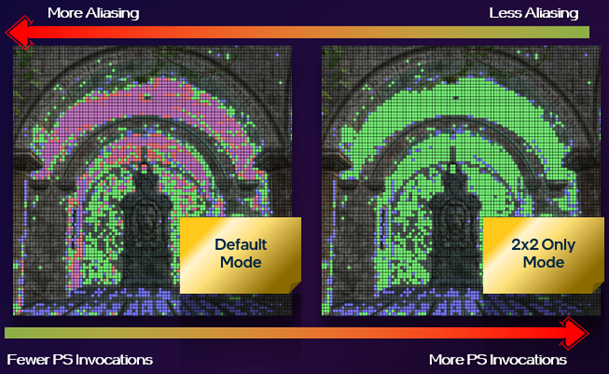
2x2 Only Mode
Tuning the Quarter Rate Shading Modifier can be useful but there can still be cases where the 4X shading rates could be introduced even when the K value is tuned close to zero. Since 4X shading rates can introduce visual artifacts, the 2x2 Only Mode was implemented to prevent the 4X shading rates from being used. It should be noted that asymmetrical 2x4 and 4x2 shading rates will both reduce to 2x2, which may not preserve some of the spatial information in the coarse pixels but will prevent 4X shading rate artifacts from being introduced into the final upscaled image.
VRS Combiners

Combiners were introduced in the VRS Tier 1 API (Application Programming Interface) but were not fully utilized until the release of VRS Tier 2 capable hardware. Combiners allow the developer to control which shading rates take precedence in the final output image. This may include per-vertex, per-primitive, per-draw, or screen-space shading rates or even a combination of shading rates depending on the combiners selected [Microsoft®, 2022]. VRS Combiners can be Passthrough, Override, Min, Max, and Sum. The Sum combiner is not supported on all hardware so be sure to check D3D12_FEATURE_DATA_D3D12_OPTIONS10 feature support before using.
if (SUCCEEDED(device->CheckFeatureSupport(
        D3D12_FEATURE_D3D12_OPTIONS10, &options, sizeof(options))))
{
        printf("VariableRateShadingSumCombiner: %d\n",
	                options.VariableRateShadingSumCombinerSupported);
}
Combiners can be a useful workaround when dealing with visual quality issues introduced by screen-space VRS techniques. For example, translucencies or opacity masks may have aliased internal edges that are not considered by the edge preservation feature in the VRS hardware. To allow the screen space shading rate to take priority, use a Passthrough + Override combiner.
D3D12_SHADING_RATE_COMBINER shadingRateCombinerScreenspace[2] = {
       D3D12_SHADING_RATE_COMBINER_PASSTHROUGH,
       D3D12_SHADING_RATE_COMBINER_OVERRIDE
};
GetCommandList()->RSSetShadingRate(<Per-Draw Shading Rate>, shadingRateCombinerScreenspace);
Using a Passthrough + Passthrough combiner will allow the per-draw shading rate to take precedence over the screen-space shading rate. This is useful for geometry that needs to be rendered with a 1x1 shading rate. Additionally, these combiners can be used on objects that need to be rendered at full resolution for art or gameplay reasons, these are sometimes referred to as “Hero” assets.
D3D12_SHADING_RATE_COMBINER shadingRateCombinerHero[2] = {
       D3D12_SHADING_RATE_COMBINER_PASSTHROUGH,
       D3D12_SHADING_RATE_COMBINER_PASSTHROUGH
};
GetCommandList()->RSSetShadingRate(<Per-Draw Shading Rate>, shadingRateCombinerHero);
Calling the RSSetShadingRate API may incur some performance costs if overused, consider sorting geometry by combiner, or use two command lists, i.e., one Opaque command list with a Passthrough + Override combiner and a Translucent command list with a Passthrough + Passthrough combiner.

Relaxed Mode & Relaxed Mode Plus

Relaxed Mode is a quality loss mitigation strategy that exploits the human eye’s inability to perceive detail in objects while in motion. Additionally, quality loss can further be obscured with the use of features like Motion Blur. Given two camera positions, the current position, CN and the previous position, CN-1. Take the difference between the X, Y, and Z coordinates and the yaw, pitch, and roll values of the current and previous camera positions. If the differences sum to 0 disable VALAR otherwise enable it.
\(VALAR = \begin{cases} DISABLED, & C_N - C_N-_1 = 0 \\ ENABLED, & C_N - C_N-_1 \neq 0\end{cases}\)
Relaxed Mode Plus is an iteration over relaxed mode and was introduced in Chivalry II by Tripwire® [du Bois, Gibson 2020]. Relaxed Mode Plus gives more control over how VRS Tier 1 shading rates are applied to the opaque base pass based in the direction of movement. Relaxed Mode Plus uses both the Camera position and the Player Controller to determine which Tier 1 shading rate is applied while the player or camera is in motion. While the player or camera are not in motion a uniform 1x1 shading rate is applied to the scene. When the player controller moves left or right, or the camera yaw moves left or right the player controller applies a horizontal shading rate of 2x1 to the opaque base-pass.
\(R_x= \begin{cases} R_2, & ⟵C⟶; \\ R_1, & otherwise.\end{cases}\)
When the character moves forward or backward, or the camera pitch moves up or down the player controller applies a vertical shading rate of 1x2.
\(R_y= \begin{cases} R_2, & ↑C↓; \\ R_1, & otherwise.\end{cases}\)
Finally, when the player controller or camera moves in some combination of Forward/Backward and Left/Right, or when the Camera’s Pitch and Yaw are both changing simultaneously, the player controller sets a uniform shading rate of 2x2.
\(R_{xy}= \begin{cases} R_2, & ↙C↗or ↖C↘; \\ R_1, & otherwise.\end{cases}\)
Because VALAR is more sensitive when Motion Vectors are enabled; Relaxed Mode or Relaxed Mode Plus can be complimentary to the use of Motion Vectors in a game engine. Selectively enabling or disabling VRS based on camera or player motion can give users a smoother gameplay experience while retaining the greatest amount of perceptual visual quality possible. The same principle holds true even when using a super-sampling technique like XeSS.
Weber-Fechner Mode
By default, VALAR uses an approximate luminance differencing mode to find the neighborhood luminosity of a shading rate tile. The approximate mode applies shading rates very aggressively and can be overly sensitive to areas of high and low brightness. However, the Weber-Fechner differencing mode solves this by sampling the neighboring pixels’ luminance values and performs ground truth calculations in the luminance differencing equations of the algorithm.
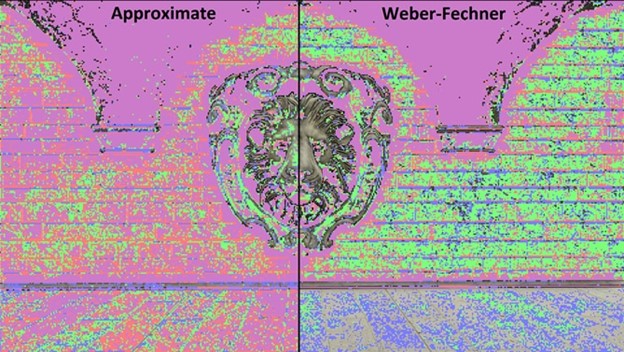
By using the Weber-Fechner mode, shading rates are applied much more conservatively compared to the approximate mode. Beware there is added overhead of sampling neighbor pixels and doing added floating-point math when using Weber-Fechner Mode, as such the VALAR compute shader can up to run 30% slower than the approximate mode. For more information on the performance estimates for the Weber-Fechner Mode please refer to the following Velocity and Luminance Adaptive Rasterization [du Bois, et al 2022] whitepaper.
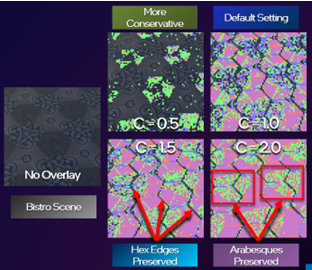
Weber-Fechner Constant: It is possible to control how conservative the Weber-Fechner mode is by dialing in the Weber-Fechner Constant. The Weber-Fechner Constant is a floating-point value in the range of 0 to FLT_MAX. Values closer to zero are more conservative while values closer to FLT_MAX select shading rates more aggressively. The increased sensitivity of a high Weber-Fechner Constant value may introduce temporal instability in the shading rates written to the shading rate buffer over time. It is important to consider the performance to quality trade off when using the Weber-Fechner Constant; when values are high it may be worth considering the approximate mode for better performance instead. The sensitivity of the Weber-Fechner mode can also be tuned by adjusting the Sensitivity Threshold, Quarter Rate Shading Modifier (K), and Environment Luminance values.
XeSS Parameter Tuning
Intel’s XeSS has several tunable parameters that can affect the final image quality. These setting can have a big impact on the behavior of VALAR so it is important to consider the interactions between both techniques prior to shipping a game.
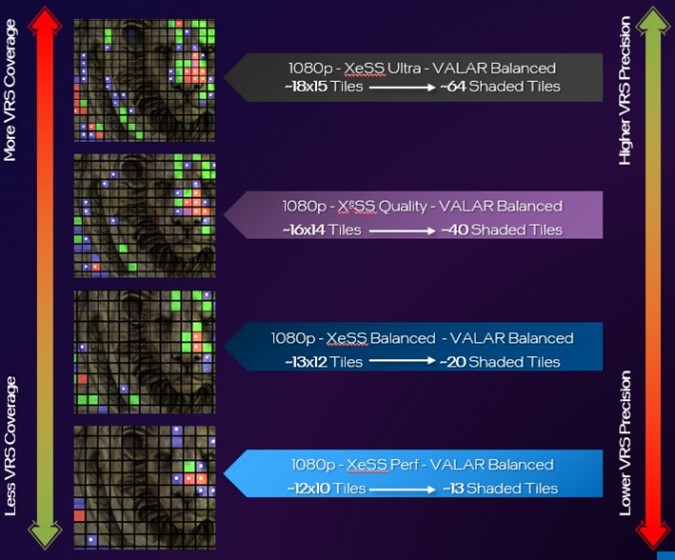
XeSS Scaling Factor: The XeSS scaling factor has the biggest impact on the behavior of VALAR. When the XeSS scaling factor is low (e.g. XeSS Ultra: 1.3x Scaling) VALAR tiles have more precise placement which would be closer to a ground truth image rendered with VALAR. As the XeSS scaling factor increases (e.g. XeSS Performance) the precision of VALAR decreases and reduces the number of tiles covering the input color buffer. In the example image, XeSS Ultra has ~18x15 VALAR tiles with ~64 tiles shaded with coarse pixels; while XeSS Performance has ~12x10 VALAR tiles with ~13 tiles shaded with coarse pixels.
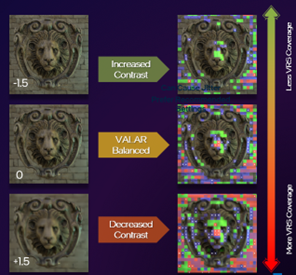
XeSS Mip-Bias: The XeSS mip-bias controls the mip-level used by XeSS. The mip-bias value is a floating-point value that can be positive or negative. Negative mip-bias values produce images with higher contrast but less VALAR tile coverage. While positive values produce images with lower contrast but more VALAR tile coverage. Choosing a neutral value near zero will give a more balanced VALAR tile coverage. Adjusting mip-bias incorrectly may result in visual quality issues such as flickering. In most cases the default mip-bias in the XeSS API is preferred except in cases where mip-bias may reduce moiré.
Pixel Shader Invocation Reductions
Using VALAR has been shown to reduce pixel shader invocations in the VALAR Mini-Engine demo released by Intel® in 2022. When combining VALAR with XeSS there is both a reduction in PSInvocations due to the smaller resolution of the input buffer and also a reduction in PSInvocations from varying the sensitivity threshold of VALAR. In this experimental setup an Intel® Arc A370M discrete GPU was used, and the scene was rendered at 4k in the XeSS-VALAR-Demo. Each XeSS Mode, Ultra, Quality, Balanced, Performance was used as a control with VALAR OFF and was compared to three experimental setups. The only value that was varied in the three experiments for each mode was the sensitivity threshold. VALAR Quality used a sensitivity threshold of 0.25 and resulted in a PSInvocation reduction of ~1-2%. VALAR Balanced used a sensitivity threshold of 0.50 and resulted in a PSInvocation reduction of ~15-20%. Finally, VALAR Performance used a sensitivity threshold of 0.75 and had the largest PSInvocation reduction of ~30-34%. The reduction is PSInvocations was consistent across all XeSS Modes.

Summary
Improving game performance to achieve higher resolutions, better quality, and better performance should be the goal of all game developers. In proposing this method of combining XeSS with VALAR, we hope to show the necessary steps of combining VRS Tier 2 and machine learning based super-sampling technologies as complimentary rendering features. VRS Tier 2 has a variety of use cases but the benefits of using the Just Noticeable Difference algorithm in VALAR can help preserve as much perceptual quality as possible when rendering to a native resolution render target prior to upscaling with XeSS. Be aware of the limitations of both techniques and carefully consider the proposed methods of improving visual quality while planning an integration of these features. By being more selective of sub-sampling and super-sampling it becomes easier to push higher resolutions with better quality, and greater performance on Intel® Arc™ Graphics.
Notices & Disclaimers
Performance varies by use, configuration and other factors. Learn more on the Performance Index site.
Performance results are based on testing as of dates shown in configurations and may not reflect all publicly available updates. See backup for configuration details. No product or component can be absolutely secure.
Your costs and results may vary.
Intel technologies may require enabled hardware, software or service activation.
© Intel Corporation. Intel, the Intel logo, and other Intel marks are trademarks of Intel Corporation or its subsidiaries. Other names and brands may be claimed as the property of others.
References
1. [Intel, et al. 2021] Intel Developer Zone. Intel® Xe Super Sampling (XeSS) API Developer Guide. https://www.intel.com/content/www/us/en/developer/articles/guide/xe-super-sampling-developer-guide.html
2. [Hargreaves, 2021] Shawn Hargreaves, DirectX Developer Blog. Announcing DirectX 12 Ultimate. https://devblogs.microsoft.com/directx/announcing-directx-12-ultimate/
3. [du Bois, et al. 2022] du Bois, Kraft, Lake, Weicht, Intel Developer Zone. Velocity and Luminance Adaptive Rasterization Using VRS Tier 2. https://www.intel.com/content/www/us/en/developer/articles/technical/velocity-luminance-adaptive-rasterization-vrs-tier.html
4. [Yang, et al. 2019] Visually Lossless Content and Motion Adaptive Shading in Games. http://leiy.cc/publications/nas/nas-pacmcgit.pdf
5. [Wikipedia, 2022] Weber–Fechner law https://en.wikipedia.org/wiki/Weber%E2%80%93Fechner_law
6. [Du Bois, Gibson 2020] VRS Tier1 with DirectX 12 From Theory to Practice, GDC 2020. https://www.gdcvault.com/play/1026691/Variable-Rate-Shading-Tier-1.
7. [Microsoft, 2022] Variable-rate shading (VRS) https://learn.microsoft.com/en-us/windows/win32/direct3d12/vrs
8. [Anderson et al. 2020] Pontus Andersson, Jim Nilsson, Tomas Akenine-Möller, Magnus Oskarsson, Kalle Åström, Mark D. Fairchild. FLIP: A Difference Evaluator for Alternating Images. https://research.nvidia.com/sites/default/files/node/3260/FLIP_Paper.pdf. Last Accessed February 8, 2022.
9. [Sara, Akter, Shorif Uddin 2019] Umme Sara, Morium Akter, Mohammad Shorif Uddin. Image Quality Assessment through FSIM, SSIM, MSE and PSNR—A Comparative Study. https://www.scirp.org/journal/paperinformation.aspx?paperid=90911
10. [Intel, et al, 2023] Intel® Xe Super Sampling (Xe SS) API Developer Guide https://www.intel.com/content/www/us/en/developer/articles/guide/xe-super-sampling-developer-guide.html