Introduction
This article introduces tools available to configure, benchmark, and perform analysis of applications on systems using persistent memory technology. Most of the tools discussed are vendor agnostic, but some are built specifically for Intel® Optane™ DC persistent memory modules.
Table 1 highlights the available tools. Configuration tools are used to provision Intel Optane DC persistent memory modules to operate in either Memory Mode or App Direct Mode. For an introduction to the available modes, see Intel® Optane™ DC Persistent Memory Operating Modes Explained. Benchmarking tools allow performance architects, system administrators, and application developers to benchmark systems with and without Intel Optane DC persistent memory modules and compare the results. While many benchmarking tools exist, not all have been adapted to utilize persistent memory fully. Finally, analysis tools are available to profile running applications to better understand CPU, memory, and input/output (I/O) utilization so they can be modified to take full advantage of persistent memory.
Table 1. Intel® Optane™ DC persistent memory enabled tools
| Configuration | Benchmarking | Analysis |
|---|---|---|
|
|
|
Many of these tools implement industry standards such as the SNIA Non-Volatile Memory Programming Model, Advanced Configuration and Power Interface Specification (ACPI) 6.0 or newer, and Unified Extensible Firmware Interface (UEFI) 2.6 or newer. Figure 1 overlays the tools mentioned in Table 1 onto the SNIA non-volatile programming model. As you can see, there is good coverage of each area.
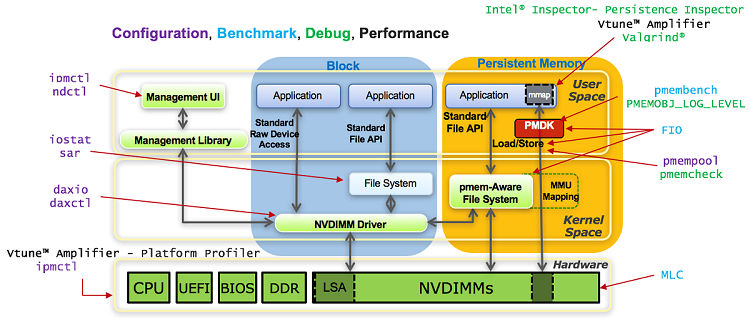
Figure 1. SNIA Non-Volatile Memory Programming Model and Tools
Configuration
Unlike traditional dynamic random-access memory (DRAM) where the operating system can see all available capacity without requiring the user to provision it manually, persistent memory must be configured before the operating system can access the media. This is accomplished by setting goals, regions, and namespaces using command line utilities such as ipmctl and ndctl on Linux*, or on Windows* with PowerShell* commands New-StoragePool and New-Volume.
ipmctl
Ipmctl is a utility specifically for managing Intel Optane DC persistent memory modules across operating systems. Use this tool to partition regions and select either Memory or App Direct mode. Additional functionality includes: discovering and provisioning Intel Optane DC persistent memory modules on the platform, monitoring health, updating firmware, and troubleshooting. Ipmctl works on Linux and Windows environments. More information and source code can be found on the ipmctl user guide.
ndctl
The ndctl utility and library are used to create, destroy, and edit namespaces using the libnvdimm (non-volatile memory device) subsystem within the Linux kernel. Whether the environment uses physical or emulated persistent memory devices on bare metal or in a virtualized environment, ndctl has no functional difference. The ndctl user guide is available as part of the Persistent Memory Development Kit (PMDK) documentation.
Goals, Regions, and Namespaces
Assuming no prior configuration exists, the first step is to configure the server for the required operating mode – Memory or App Direct. This is done by setting a goal with ipmctl:
$ ipmctl create –goal <options>
Execute this command either within the operating system or from the UEFI shell. Some BIOS versions may have a menu option to select the required mode manually.
To configure Memory Mode:
$ ipmctl create –goal MemoryMode=100
If the full Intel Optane DC persistent memory module capacity is assigned to Memory Mode, no further action is required. Once the system reboots, the operating system sees the entire capacity as volatile memory. However, the DRAM capacity is no longer visible as it is used as another level of cache before the Intel Optane DC persistent memory capacity.
App Direct Mode has two configuration options – interleaved or non-interleaved. This defines how the Intel Optane DC persistent memory modules are provisioned and ultimately how many devices are presented to the operating system. To configure App Direct, use either command:
$ ipmctl create –goal PersistentMemoryType=AppDirect
$ ipmctl create –goal PersistentMemoryType=AppDirectNotInterleaved
Figure 2 shows the App Direct configuration options using four Intel Optane DC persistent memory modules per CPU socket. Figure 2A shows a non-interleaved module configuration, meaning each module is its own separate region. Once namespaces are created, the operating system will see four devices. Figure 2B shows a single interleaved device using all four modules, which the operating system will recognize as one large device once a namespace is created. You can either configure the regions n-way (non-interleaved, one per memory module or 1-way (interleaved, one that spans all modules). There is no option to select the interleaving width, meaning you cannot interleave a subset of available Intel Optane DC persistent memory modules.
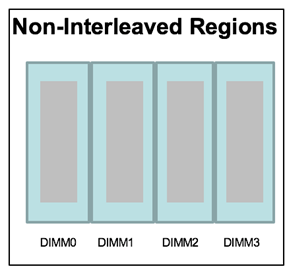
Regions are created within [non] interleaved sets. Interleaving can be 1 to n-way mapping.
(A) Non-interleaved
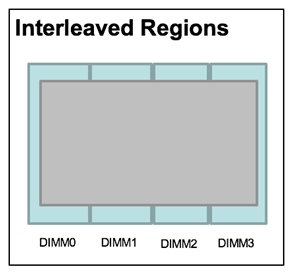
Creates contiguous physical address space and provides striped reads/writes for better throughput.
(B) Interleaved
Figure 2. App Direct Regions using Intel Optane DC persistent memory modules
Regions are automatically created based on the chosen configuration. Next, namespaces must be created to expose the region as a logical device. Multiple namespaces can span a region. A namespace can be provisioned to operate in one of four modes: Filesystem-DAX (fsdax), Device-DAX (devdax), sector, and raw.
Fsdax
Filesystem-DAX mode is the default mode of a namespace when specifying ndctl create-namespace with no options. It creates a block device (/dev/pmemX[.Y]) that supports the DAX capabilities of Linux file systems (xfs and ext4 to date). DAX removes the page cache from the I/O path and allows mmap(2) to establish direct mappings to persistent memory media. The DAX capability enables workloads/working-sets that would exceed the capacity of the page cache to scale up to the capacity of persistent memory. Workloads that fit in the page cache or perform bulk data transfers may not see a benefit from DAX. When in doubt, pick this mode.
Devdax
Device-DAX mode enables similar mmap(2) DAX mapping capabilities as Filesystem-DAX. However, instead of a block device that can support a DAX-enabled filesystem, this mode creates a single character device file (/dev/daxX.Y). Use this mode to assign persistent memory to a virtual machine, register persistent memory for RDMA, or when gigantic mappings are needed.
Sector
Use this mode to host legacy file systems that do not checksum metadata or applications that are not prepared for torn sectors after a crash. Expected usage for this mode is for small boot volumes. This mode is compatible with other operating systems.
Raw
Raw mode is effectively just a memory disk that does not support DAX. Typically, this indicates a namespace that was created by tooling or another operating system that did not know how to create a Linux fsdax or devdax mode namespace. This mode is compatible with other operating systems but again does not support DAX operation.
Figure 3 shows an example where two namespaces have been created within a single interleaved region.
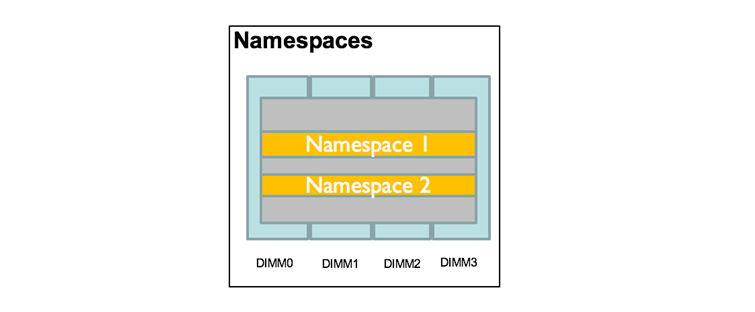
Figure 3. Namespaces created within a region
Similar to SSD, raw capacity of a region is partitioned into one or more logical devices called namespaces. Create namespaces using the ndctl create-namespace command. With no options, a namespace the size of the entire region will be created. Size and mode can be specified with additional flags. For non-interleaved regions, you can specify the region to create the namespace:
$ ndctl create-namespace –region=region1 –mode=devdax
Benchmarking Tools
Intel® Memory Latency Checker (Intel® MLC)
An important factor in determining application performance is the time required for the application to fetch data from the processor’s cache hierarchy and the memory subsystem. The Intel® MLC tool is used to measure memory latencies and bandwidth and show how they change when increasing the load on the system. Intel MLC also provides several options for more fine-grained investigation where bandwidth and latencies from a specific set of cores to caches or memory can be measured.
Running Intel MLC without additional arguments calls all the modes: latency and bandwidth matrix, peak bandwidth, and loaded latencies. Run each individually as follows:
$mlc –latency_matrix
$mlc –bandwidth_matrix
$mlc –peak_injection_bandwidth
$mlc –loaded_latency
The default behavior of Intel MLC is to test only DRAM or Intel Optane DC persistent memory modules when configured in Memory Mode. To test Intel Optane DC persistent memory modules in App Direct Mode using Intel MLC, the namespaces must be created using devdax mode. Intel MLC testing can be configured to use the /dev/daxN.M device(s). The Intel MLC documentation included in the download bundle has several examples for using devdax devices. To test fsdax, sector, or raw, a higher-level benchmark utility such as Flexible I/O Tester (FIO) should be used.
Flexible IO Tester (FIO)
FIO is a tool that simulates desired I/O workloads by using job files that describe a specific setup. The simplest job files have a global section to define shared parameters, and one or more job sections describing the jobs involved. FIO provides detailed documentation on their job file setup and runtime parameters.
FIO was adapted to understand I/O in regards to persistent memory-aware filesystems. When specifying an ioengine, choose one of the following choices for DAX enabled filesystems:
- mmap
- libpmem
- dev-dax
- pmemblk
FIO has been tested to work on Linux, Solaris*, AIX*, HP-UX*, OSX*, NetBSD*, OpenBSD, Windows*, FreeBSD*, and DragonFly. It will also likely work on other systems as well. The persistent memory engines will only work on operating systems that support persistent memory.
Analysis Tools
Of particular interest to application developers, system performance experts, and architects are Intel® VTune™ Amplifier, a performance profiler, and Intel® Inspector - Persistence Inspector, a persistence debugger. These tools are easy to use and provide useful insights into all layers of the stack from the application, through the operating system all the way down to the hardware counters.
Intel® VTune™ Amplifier
Memory and Storage Analysis
VTune Amplifier collects key profiling data and presents it with a powerful interface that simplifies its analysis and interpretation. Within the large array of available data collection options, Memory Analysis and Storage Analysis will benefit anyone needing to understand current CPU, memory, and I/O behavior. From the analysis results, it is possible to know where to optimize within the application.
Platform Profiler
The Platform Profiler analysis in VTune Amplifier is used by developers and system performance experts to determine how well applications are utilizing the underlying architecture. Compared to other analysis types, Platform Profiler has less overhead. This means that you can continue to use your system while Platform Profiler runs data collections for long periods of time in the background. This is useful to both system architects optimizing software and to infrastructure architects choosing the best configurations to run their existing workloads. VTune Amplifier is available as a standalone product and is also included in the 2019 edition of Intel® Parallel Studio XE.
Intel® Inspector - Persistence Inspector
Developers must keep track of cache flush misses, redundant cache flushes, memory fences, out-of-order persistent memory stores, and more. Intel Inspector – Persistence Inspector allows you to identify these issues earlier in their program life cycle. This tool is available as a standalone tool and as part of Intel Parallel Studio XE.
pmempool
The pmempool utility is an open source tool for analyzing applications written using PMDK. When using PMDK, persistent memory is exposed by the operating system to applications as memory mapped files called persistent pools. The pmempool tool allows developers to conduct offline analyses of those pools, check data consistency, and display user data within memory pools in a human-readable format. This can be especially helpful for debugging applications.
Valgrind* with pmemcheck
Similar to pmempool, the pmemcheck tool helps expose some common programming errors that happen when developing for persistent memory. This open source tool is a plugin to Valgrind* and receives information from a built-in Valgrind client request mechanism (CSR) with a set of predefined macros. Pmemcheck tracks all stores made to persistent memory and informs you of possible memory violations. This tool is open source and available on GitHub. We also have a tutorial to help you get started with pmemcheck.
Summary
After reading this article, you should be familiar with the tools available to help you provision Intel Optane DC persistent memory modules to the operating system, benchmark different server hardware configurations, and profile application and platform behavior to determine where improvements can be made. This should get you started; you’ll be up and running in no time. As always, let us know how it goes in the comments below.
About the Author
Kelly Lyon is a developer advocate at Intel Corporation with three years of experience as a software engineer. Kelly is dedicated to supporting users and looks forward to bringing clarity to complex ideas by researching and providing simple, easy-to-understand guides and tutorials.
Resources
- ACPI 6.0 Specifications
- Intel® Optane™ DC Persistent Memory Modules Operating Modes Explained
- Emulate Persistent Memory
- FIO
- FIO Documentation
- Intel® Parallel Studio XE
- ipmctl User Guide
- ipmctl and ndctl Cheat Sheets
- Intel® Memory Latency Checker (Intel® MLC) Documentation
- ndctl User Guide
- pmemcheck Documentation
- pmempool Documentation
- SNIA NVM Programming Model
- UEFI 2.6 Specifications
- Valgrind* Documentation
- VTune™ Amplifier Platform Profiler (Stand-alone)
- Valgrind* with Pmem Documentation