1. GTS SDI II IP Quick Reference
2. GTS SDI II IP Overview
3. GTS SDI II IP Core Getting Started
4. GTS SDI II IP Parameters
5. GTS SDI II IP Core Functional Description
6. GTS SDI II IP Core Signals
7. GTS SDI II IP Core Design Considerations
8. Design Limitations and Known Issues
9. GTS SDI II IP Core Testbench and Design Examples
10. Document Revision History for the GTS SDI II IP User Guide
5.3.1. Insert Line
5.3.2. Insert/Check CRC
5.3.3. Insert Payload ID
5.3.4. Match TRS
5.3.5. Scrambler
5.3.6. TX Sample
5.3.7. Clock Enable Generator
5.3.8. RX Sample
5.3.9. Detect Video Standard
5.3.10. Detect 1 and 1/1.001 Rates
5.3.11. Transceiver Controller
5.3.12. Descrambler
5.3.13. TRS Aligner
5.3.14. 3Gb Demux
5.3.15. Extract Line
5.3.16. Extract Payload ID
5.3.17. Detect Format
5.3.18. Sync Streams
5.3.19. Convert SD Bits
5.3.20. Insert Sync Bits
5.3.21. Remove Sync Bits
7.2.1. Using the HSSI Support Logic Assignment Editor
To implement dual simplex or dynamic reconfiguration mode in Agilex™ 3 or Agilex™ 5 devices, you must use the HSSI Support Logic Assignment Editor to create a dual simplex or dynamic reconfiguration group.
To create a dual simplex or dynamic reconfiguration group, you must first create an independent simplex TX IP (with one or more channels) and an independent simplex RX IP (with one or more channels) and subsequently use the HSSI Support Logic Assignment Editor to fit them into the duplex channel.
To create a dual simplex or dynamic reconfiguration group:
- Load HSSI Support Logic Assignment Editor, create the instance, and save the assignments. The assignments will be updated in qsf file.
Note: To use HSSI Support Logic Assignment Editor, you need to run IP Generation first to display the simplex IPs.
- Example: Configuring Static Rate (HD, 3G, and 12G) in Dual Simplex Mode with HSSI Support Logic Generation
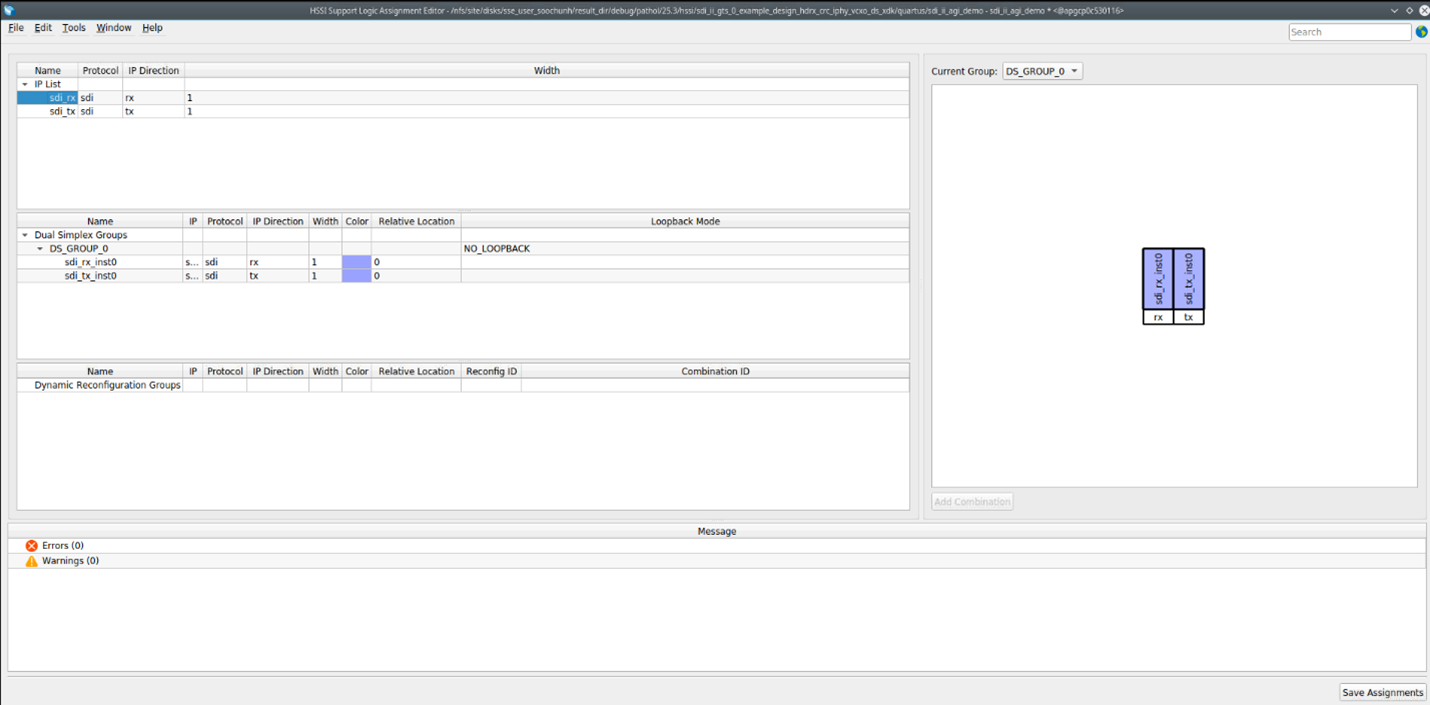
- Add your TX and RX instances to the Dual Simplex Group.
- Select sdi_rx_inst0 and sdi_tx_inst0, then create shared clock connections for system_pll_clk and system_pll_lock.
- Click the Save Assignments button to save your Dual Simplex Group configuration.
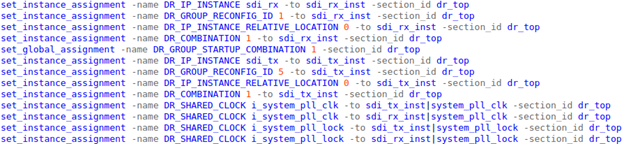
- Open your .qsf file to confirm that the following settings are applied.

- Example: Configuring Dynamic Reconfiguration (Multi-Rate [up to 12G SDI] and Triple-Rate [up to 3G SDI]) in Dual Simplex Mode with HSSI Support Logic Generation
- Add your TX and RX instances to the Dynamic Reconfiguration Group.
- Multi-rate—set the reconfigure ID to 5 for sdi_tx_inst and 1 for sdi_rx_inst.
Note: sdi_rx_inst supports a total of 4 profiles in a multi-rate design.
- Triple-rate—set the reconfigure ID to 3 for sdi_tx_inst and 1 for sdi_rx_inst.
Note: sdi_rx_inst supports a total of 2 profiles in a triple-rate design.
- Select sdi_rx_inst and sdi_tx_inst, then create shared clock connections for system_pll_clk and system_pll_lock.
- Click the Save Assignments button to save your Dynamic Reconfiguration Group configuration.
- Open your .qsf file to confirm that the following settings are applied.
- Example: Configuring Dynamic Reconfiguration (Multi-Rate [up to 12G SDI] and Triple-Rate [up to 3G SDI]) with HSSI Support Logic Generation—Non-DS Case
- Add your RX instances to the Dynamic Reconfiguration Group.
- Multi-rate—set the reconfigure ID to 1 for sdi_rx_inst.
Note: sdi_rx_inst supports a total of 4 profiles in a multi-rate design.
- Triple-rate—set the reconfigure ID to 1 for sdi_rx_inst.
Note: sdi_rx_inst supports a total of 2 profiles in a triple-rate design.
- Click the Save Assignments button to save your Dynamic Reconfiguration Group configuration.
- Open your .qsf file to confirm that the following settings are applied.
