Build and Run Sample Projects Using the Visual Studio* Command Line
Prerequisite: Configure your system.
To build and run a sample:
- Locate a sample project using the Code Sample Browser for Intel® oneAPI Toolkits.
NOTE:Alternatively, advanced users can acquire the source code with Git* from the oneAPI-samples repository:
git clone https://github.com/oneapi-src/oneAPI-samples.gitcd oneAPI-samples\RenderingToolkit\GettingStarted - Build and run a sample project using CMake*.
Download Samples using the Code Sample Browser for Intel® oneAPI Toolkits
Use the Code Sample Browser for Intel oneAPI Toolkits to browse the collection of online Intel® oneAPI samples. You can copy the samples to your local disk as buildable sample projects. Most Intel oneAPI sample projects are built using Make* or CMake, so the build instructions are included as part of the sample in a README file. Code Sample Browser for Intel oneAPI Toolkits is a stand-alone single-file executable that has no dependencies on dynamic runtime libraries.
For a list of components that support CMake, see Use CMake with oneAPI Applications.
An internet connection is required to download the samples for Intel oneAPI Toolkits. For information on how to use this toolkit offline, see Developing in Offline Systems.
Code Sample Browser for Intel oneAPI Toolkits does not work with system proxy settings and does not support WPAD proxy. If you have trouble connecting from behind a proxy, see Troubleshooting.
To download the Intel® Rendering Toolkit (Render Kit) samples:
- Open an x64 Native Tools Command Prompt for VS 2019 command window.
- Set up environment variables:
Component Directory Layout
call "C:\Program Files (x86)\Intel\oneAPI\setvars.bat"Unified Directory Layout
call "C:\Program Files (x86)\Intel\oneAPI\<toolkit-version>\oneapi-vars.bat"NOTE:If you installed the Render Kit to a custom location, make sure to replace C:\Program Files (x86)\Intel\oneAPI\ with the custom installation path before running the command. - From the terminal, run the Code Sample Browser for Intel oneAPI Toolkits with C++ and C samples.
oneapi-cli -l cpp,cThe oneAPI CLI menu appears:
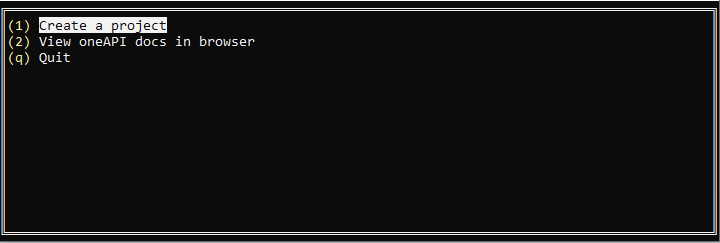
- Select Create a project using arrow keys, then press Enter.
The language selection will appear.
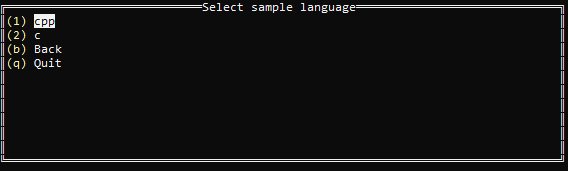
- Select the language for your sample. For your first project, select cpp, then press Enter.
The toolkit samples list appears. Render Kit samples are located underneath the oneAPI Libraries subtree.
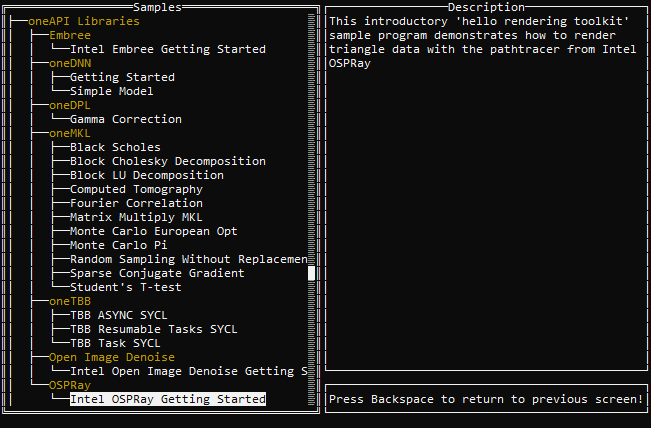
- Navigate to oneAPI Libraries > OSPRay > Intel OSPRay Getting Started, then press Enter.
- Specify a location to download the project to. By default, it is the path from where you ran the Code Sample Browser for Intel oneAPI Toolkits and project name. Intel OSPRay Getting Started by default extracts to a folder name of 01_ospray_gsg
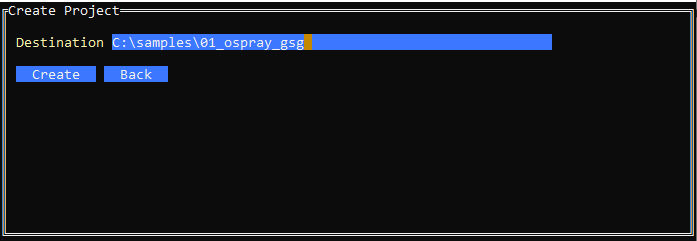
- Press Tab to select Create, then press Enter.
- Repeat the steps to download samples for other components: oneAPI Libraries > Embree > Intel Embree Getting Started (02_embree_gsg) for Intel® Embree, oneAPI Libraries > Open Image Denoise > Intel Open Image Denoise Getting Started (04_oidn_gsg) for Intel® Open Image Denoise, and oneAPI Libraries > ISPC > Intel Implicit SPMD Program Compiler Getting Started (05_ispc_gsg) for Intel® Implicit SPMD Program Compiler (Intel® ISPC). The samples are numbered and staged to be tried in order.
Intel Open Volume Kernel Library 03_openvkl_gsg sample is available in the C language menu option of the Code Sample Browser for Intel oneAPI Toolkits:
- Select c language:

- Select the Intel Open VKL sample oneAPI Libraries > Open VKL > Intel Open VKL Getting Started:
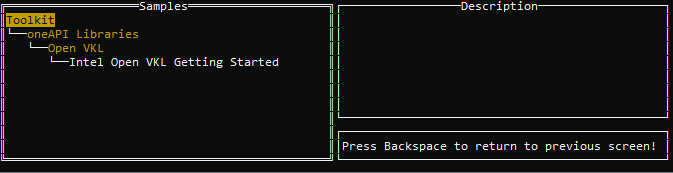
- Select c language:
See Exploring Intel oneAPI Samples from the Command Line for a video tutorial on creating a project with the command line.
Build and Run an Intel® OSPRay Sample using CMake*
- Navigate to the folder where you downloaded the 01_ospray_gsg sample.
- Run the following commands to build the sample:
mkdir buildcd buildcmake ..cmake --build . --config Release - Navigate to the Release directory.
- Run the application.
.\ospTutorialCpp.exe - Review the output images with an image viewer application for PPM file type. For example, with ImageMagick*:
<path-to-ImageMagick>\imdisplay.exe firstFrameCpp.ppm
<path-to-ImageMagick>\imdisplay.exe accumulatedFrameCpp.ppm
You should see the output images:
- Single-accumulation render firstFrameCpp:
- Ten-accumulation render accumulatedFrameCpp:

- Single-accumulation render firstFrameCpp:
GPU Users: Run Intel OSPRay on GPU
- Delete the CPU output images:
del *.ppm - On Intel® Data Center MAX Series GPU, set topology runtime control for running Intel OSPRay and Intel Embree programs:
set ZE_FLAT_DEVICE_HIERARCHY=COMPOSITE - Run the application and specify GPU as a device target:
.\ospTutorialCpp.exe --osp:load-modules=gpu --osp:device=gpu - Review firstFrameCpp.ppm and accumulatedFrameCpp.ppm output images.
Build and Run an Intel® Embree Sample using CMake*
- Navigate to the folder where you downloaded the 02_embree_gsg sample.
- Run the following commands to build the sample:
cd cpumkdir buildcd buildcmake ..cmake --build . --config Release - Navigate to the Release directory.
- Run the application.
.\minimal.exeThe sample application performs two ray-to-triangle intersect tests with the Intel Embree API. One test is successful, while the other test is a miss. Output is written to the terminal:
0.000000, 0.000000, -1.000000: Found intersection on geometry 0, primitive 0 at tfar=1.000000
1.000000, 1.000000, -1.000000: Did not find any intersection.
GPU Users: Build and Run an Intel® Embree Sample for GPU using CMake*
- On Intel® Data Center MAX Series GPU, set topology runtime control for running Intel OSPRay and Intel Embree programs:
set ZE_FLAT_DEVICE_HIERARCHY=COMPOSITE - Navigate to the folder where you downloaded the 02_embree_gsg sample.
- Run the following commands to build the sample:
cd gpumkdir buildcd buildcmake ..cmake --build . --config Release - Navigate to the Release directory.
- Run the application.
.\minimal_sycl.exeThe sample application performs two ray-to-triangle intersect tests with the Intel Embree API. One test is successful, while the other test is a miss. Output is written to the terminal:
0.330000, 0.330000, -1.000000: Found intersection on geometry 0, primitive 0 at tfar=1.000000
1.000000, 1.000000, -1.000000: Did not find any intersection.
Build and Run an Intel® Open Volume Kernel Library Sample using CMake*
- Navigate to the folder where you downloaded the 03_openvkl_gsg sample.
- Run the following commands to build the sample:
mkdir buildcd buildcmake ..cmake --build . --config Release - Navigate to the Release directory.
- Run the application.
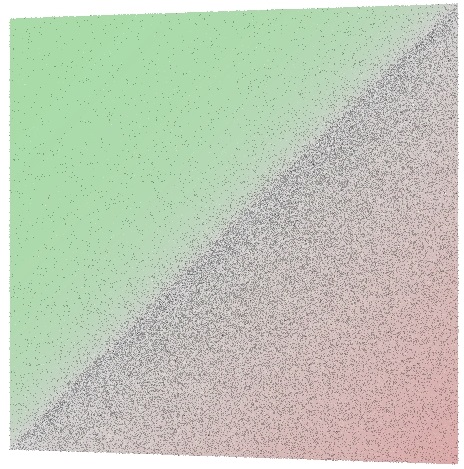
.\vklTutorial.exeThe sample application shows sampling within a procedurally generated volume and outputs. Sampling, gradient computation, and multi-attribute sampling. Output is written to the terminal.
GPU Users: Build and Run Intel Open VKL on GPU
- Navigate to the folder where you downloaded the 03_openvkl_gsg sample.
- Run the following commands to build the sample:
cd gpumkdir buildcd buildcmake -G"NMake Makefiles" -DCMAKE_BUILD_TYPE=Release -DCMAKE_CXX_COMPILER=icx-cl ..cmake --build . --config Releasecd Release - Run the application.
.\vklTutorialGPU.exeThe sample application shows sampling within a procedurally generated volume and outputs. Sampling, gradient computation, and multi-attribute sampling. Output is written to the terminal.
Build and Run an Intel® Open Image Denoise Sample using CMake*
- Navigate to the folder where you downloaded the 04_oidn_gsg sample.
- Run the following commands to build the sample:
mkdir buildcd buildcmake ..cmake --build . --config Release - Navigate to the Release directory.
- Convert the accumulatedFrameCpp.ppm image to PFM format with LSB data ordering. For example, with the ImageMagick* convert tool:
<path-to-ImageMagick>\magick.exe convert <path-to-sample>\01_ospray_gsg\build\Release\accumulatedFrameCpp.ppm -endian LSB PFM:accumulatedFrameCpp.pfm
NOTE:‘accumulatedFrameCpp.pfm’ is also already converted and available in the 04_oidn_gsg directory if you wish to skip this conversion. - Run the application to denoise the image.
.\oidnDenoise.exe -d cpu -hdr accumulatedFrameCpp.pfm -o denoised.pfm - Review the output image with an image viewer application for PPM file type. For example, with ImageMagick*:
<path-to-ImageMagick>\imdisplay.exe denoised.pfm
- Original ten-accumulation render accumulatedFrameCpp:
- Denoised result denoised.pfm:

- Original ten-accumulation render accumulatedFrameCpp:
- GPU Users: Run the application to denoise the image using Intel GPU:
.\oidnDenoise.exe -d gpu -hdr accumulatedFrameCpp.pfm -o denoised.pfm
- Review the output image with a PFM capable image viewer application. For example, with ImageMagick*:
<path-to-ImageMagick>\imdisplay.exe denoised.pfm
Build and Run an Intel® Implicit SPMD Program Compiler Sample using CMake*
- Navigate to the folder where you downloaded the 05_ispc_gsg sample.
- Run the following commands to build the sample:
mkdir buildcd buildcmake ..cmake --build . - Run a single-target sample application:
.\simple.exe - Run a multi-target sample application:
.\simple_multi.exeThe application executes a floating-point array arithmetic operation. The result is printed to stdout. Both applications emit the same results:
0: simple(0.000000) = 0.000000
1: simple(1.000000) = 1.000000
2: simple(2.000000) = 4.000000
3: simple(3.000000) = 1.732051
4: simple(4.000000) = 2.000000
5: simple(5.000000) = 2.236068
6: simple(6.000000) = 2.449490
7: simple(7.000000) = 2.645751
8: simple(8.000000) = 2.828427
9: simple(9.000000) = 3.000000
10: simple(10.000000) = 3.162278
11: simple(11.000000) = 3.316625
12: simple(12.000000) = 3.464102
13: simple(13.000000) = 3.605551
14: simple(14.000000) = 3.741657
15: simple(15.000000) = 3.872983
Build and Run an Intel® Open PGL Sample using CMake*
- Navigate to any new writable and empty folder:
cd %USERPROFILE%mkdir pgl_gsgcd pgl_gsg - Create a new file, openpgl_check.cpp, using a raw text editor (notepad, etc.). Save the below contents into the file:
#include <iostream> #include <openpgl/cpp/OpenPGL.h> int main(int argc, char *argv[]) { openpgl::cpp::Device device(PGL_DEVICE_TYPE_CPU_4); PGLFieldArguments fieldArgs; pglFieldArgumentsSetDefaults(fieldArgs, PGL_SPATIAL_STRUCTURE_KDTREE, PGL_DIRECTIONAL_DISTRIBUTION_PARALLAX_AWARE_VMM); openpgl::cpp::Field field(&device, fieldArgs); std::cout << "Field created successfully... exiting\n"; return 0; } - Create a new file, CMakeLists.txt, using a raw text editor (notepad, etc.). Save the below contents into the file:
cmake_minimum_required(VERSION 3.1) project(openpgl_check LANGUAGES CXX) include_directories("$ENV{ONEAPI_ROOT}/openpgl/latest/include") link_directories("$ENV{ONEAPI_ROOT}/openpgl/latest/lib") add_executable(openpgl_check openpgl_check.cpp) target_link_libraries(openpgl_check PRIVATE openpgl) set_property(TARGET openpgl_check PROPERTY CXX_STANDARD 11) - Run the following commands to build the sample:
mkdir buildcd buildcmake ..cmake --build . --config Release - Run the check application:
.\Release\openpgl_check.exe - If you see the below output without error, you have successfully built and runtime linked to the Intel® Open PGL library:
Field created successfully... exiting
Next Steps
All samples have detailed README.md instructions for further review. Next, try running pre-compiled sample applications included with the toolkit OR explore additional resources in Next Steps.