Run a Sample Project Using the Command Line
Intel® IoT Toolkit
To run the Intel IoT Toolkit on a remote system, see Running an Eclipse* Built Application on an SSH Target.
Command line development can be done with a terminal window or done through Visual Studio Code*. Some tasks can be automated using extensions. To learn more, see Using Visual Studio Code with Intel® oneAPI Toolkits.
To compile and run a sample:
- Download the sample using the oneAPI CLI Samples Browser.
- Compile and run the sample with CMake*.
Download Samples using the oneAPI CLI Samples Browser
Use the oneAPI CLI Samples Browser to browse the collection of online oneAPI samples. As you browse the oneAPI samples, you can copy them to your local disk as buildable sample projects. Most oneAPI sample projects are built using Make or CMake, so the build instructions are included as part of the sample in a README file. The oneAPI CLI utility is a single-file, stand-alone executable that has no dependencies on dynamic runtime libraries.
An internet connection is required to download the samples for oneAPI toolkits. For information on how to use this toolkit offline, see Developing with Offline Systems in the Troubleshooting section.
- Open a terminal session.
- If you did not complete the steps in One time set up for setvars.sh in the Configure Your System section, set system variables by sourcing setvars:
For system wide installations (requires root or sudo privileges):
. opt/intel/oneapi/setvars.sh
For private installations:
. ~/intel/oneapi/setvars.sh
The command above assumes you installed to the default folder. If you customized the installation folder, setvars.sh is in your custom folder.NOTE:The setvars.sh script can be managed using a configuration file, which is especially helpful if you need to initialize specific versions of libraries or the compiler, rather than defaulting to the "latest" version. For more details, see Using a Configuration File to Manage Setvars.sh.. If you need to setup the environment in a non-POSIX shell, seeoneAPI Development Environment Setup for more configuration options.
- In the same terminal window, run the application (it should be in your PATH):
The oneAPI CLI menu appears:oneapi-cli
- Move the arrow key down to select Create a project, then press Enter. The language selection will appear. If you installed Intel® oneAPI Base Toolkit, but you want to work with the Intel® IoT Toolkit and samples, ensure the IoT toolkit is installed. If it is not installed, install the toolkit then return to step 1 of this procedure.

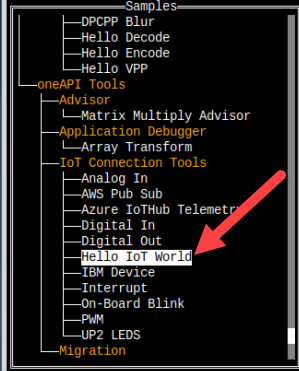
- Select the language for your sample. For your first project, select cpp, then press Enter. The toolkit samples list appears.
- Use the down arrow to move down the list until you find the Intel® oneAPI IoT Toolkit section. Select the Hello IoT World sample. Hello IoT World is a simple test application that will help verify that the tools are setup correctly and can access your system's GPU:
After you select a sample, press Enter.
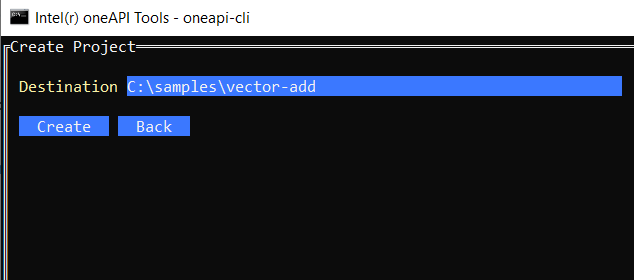
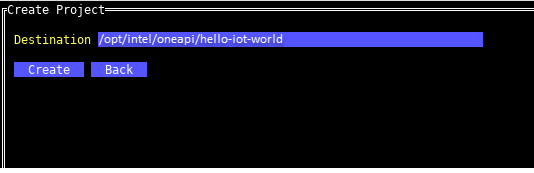
- Specify the location for the project. The default location includes the path from where the utility was run and the name of the project.
Press Tab to select Create, then press Enter:
Now that you have a sample downloaded, compile and run the sample with CMake:
Build and Run a Sample Project using CMake*
Build and Run the hello_iot_world Program using CMake:
From the hello_iot_world directory, run the following commands:
mkdir build
cd build
cmake ..
make
make run
make clean
A "Hello IoT" will appear on the command line.
Next, begin debugging the application with gdb-ia. GDB will break at start of code.
See Explore SYCL* Through Samples to learn more.