Build and Run a Sample Using the Visual Studio* Command Line
You can use a terminal window or Visual Studio Code* for command-line development. Some tasks can be automated using extensions. To learn more, seeUsing Visual Studio Code with Intel® oneAPI Toolkits.
Before you begin, make sure your development environment is set up. If you have not already configured your environment, go to Configure Your System before proceeding.
To compile and run a sample:
- Download the sample using the oneAPI CLI Samples Browser.
- Compile and run the sample with Microsoft Build*
Download Samples using the oneAPI CLI Samples Browser
Use the oneAPI CLI Samples Browser to explore the collection of online oneAPI samples. The oneAPI CLI utility is a single-file, stand-alone executable that has no dependencies on dynamic runtime libraries. You can copy samples to your local disk as buildable sample projects. The build instructions are included as part of the sample in a README file. Most oneAPI sample projects are built using Make or CMake.
Watch a video walkthrough of creating a sample project:Exploring Intel® oneAPI Samples from the Command Line.
The oneAPI CLI Samples Browser does not work with system proxy settings and does not support WPAD proxy. If you have trouble connecting from behind a proxy, please see Troubleshooting.
To download and set up a sample:
- Open a command window.
- Set system variables by running setvars:
Component Directory Layout:
"C:\Program Files (x86)\Intel\oneAPI\setvars.bat"NOTE:For Windows PowerShell*, execute this command:cmd.exe "/K" '"C:\Program Files (x86)\Intel\oneAPI\setvars.bat" && powershell'Unified Directory Layout:
"C:\Program Files (x86)\Intel\oneAPI\<toolkit-version>\oneapi-vars.bat"
The command above assumes you used the default install location. If you customized the installation folder, adjust the path to setvars | oneapi-vars accordingly.NOTE:For Windows PowerShell*, execute this command:cmd.exe "/K" '"C:\Program Files (x86)\Intel\oneAPI\<toolkit-version>\oneapi-vars.bat" && powershell'
- In the same command window, run the application :
The oneAPI CLI menu appears:oneapi-cli
- Move the arrow key down to select Create a project, then press Enter. The language selection will appear.

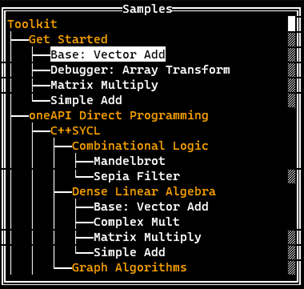
- Select the language for your sample. For your first project, select cpp, then press Enter. The toolkit samples list appears.
- Select the Matrix Multiply sample which appears at the top of the list:
After you select a sample, press Enter.
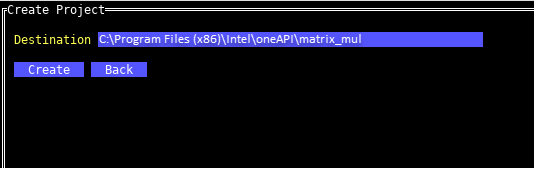
- Specify the location for the project. The default location includes the path from where the CLI Browser was run and the name of the project.
Press Tab to select Create, then press Enter:
Now that you have the samples downloaded, compile and run the sample with Microsoft Build* .
Build and Run a Sample Using Microsoft Build*
- Using the same command prompt window where you ran setvars.bat, navigate to the folder where you downloaded the samples.
- Build the program:
MSBuild matrix_mul.sln /t:Rebuild /p:Configuration="Release" - Navigate to the Release folder (example: x64/Release)
- Run the program:
matrix_mul_dpcpp.exe
A success message will appear.
See Explore SYCL* Through Samples to learn more.