Please see the following links to the online resources and documents for the latest information regarding Intel DAAL:
- Intel® DAAL Product Page
- Intel® DAAL 2017 Release Notes
- Intel® DAAL 2017 Installation Guide
- Intel® DAAL 2017 System Requirements
These instructions assume a standalone installation of Intel® Data Analytics Acceleration Library (Intel® DAAL). If your copy of Intel® DAAL was included as part of one of our "suite products" (e.g., Intel® Parallel Studio XE) your installation procedure may be different than that described below; in which case, please refer to the readme and installation guides for your "suite product" for specific installation details.
Before installing Intel® DAAL, check the Product Downloads section of Intel® Registration Center to see if a newer version of the library is available. The version listed in your electronic download license letter may not be the most current version available.
The installation of the product requires a valid license file or serial number. If you are evaluating the product, you can also choose the "Evaluate this product (no serial number required)" option during installation.
If you have a previous version of Intel® DAAL installed you do not need to uninstall it before installing a new version. If you choose to uninstall the older version, you may do so at any time.
Note: Installation on 32-bit hosts is no longer supported. However, the 32-bit library continues to exist, and can be used on 64-bit hosts.
Installing Intel® DAAL on Windows* OS
You can install multiple versions of Intel® DAAL and any combination of 32-bit and 64-bit variations of the library on your development system.
These instructions assume you to have an Internet connection. The installation program will automatically download a license key to your system. If you do not have an internet connection, see the manual installation instructions below.
Interactive installation on Windows* OS
- If you received the Intel® DAAL product as a download, double-click on the downloaded file to begin.
- You will be asked to choose a target directory ("c:\Users\<Username>\Downloads\" by default) in which the contents of the self-extracting setup file will be placed before the actual library installation begins. You can choose to remove or keep temporarily extracted files after installation is complete. You can safely remove the files in this "downloads" directory if you need to free up disk space; however, deleting these files will impact your ability to change your installation options at a later time using the add/remove applet, you will always be able to uninstall.)
- Click Next when the installation wizard appears.
- If you agree with the End User License Agreement, click Next to accept the license agreement.
- License Activation Options:
- If you do have an Internet connection, skip this step and proceed to the next numbered step (below).
- If you do not have an Internet connection, or require a floating or counted license installation, choose Alternative Activation and click Next; there will be two options to choose from:
- Activate Offline: requires a License File.
- Use a License manager: Floating License activation
- Enter your serial number to activate and install the product.
- Activation completed. Click Next to continue.
- If there is package from another update of Parallel Studio XE installed, you will be able to select update mode on Choose Product Update Mode dialog:
- I want to apply this update to the existing version.
Using this option will result in the original version being replaced by the updated version. - I want to install this update separate from the existing version.
Using this option will result in the update being installed in a different location, leaving the existing version unchanged.
- I want to apply this update to the existing version.
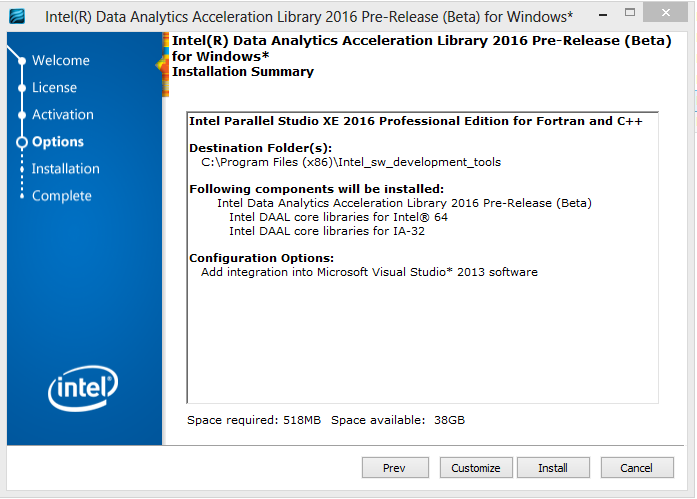
- The Installation Summary dialog box opens to show the summary of your installation options (chosen components, destination folder, etc.). Click Install to start installation (proceed to step 15) or click Customize to change settings. If you select "Customize", follow steps 10-14.
- In the Architecture Selection dialog box, select the architecture of the platform where your software will run.
- In the Choose a Destination Folder dialog box, choose the installation directory. By default, it is C:\Program Files (x86)\IntelSWTools. You may choose a different directory. All files are installed into the Intel Parallel Studio XE 2017 subdirectory (if you chose I want to install this update separate from the existing version, all files are installed into the parallel_studio_xe_2017.0.xxx directory, where xxx is the package number).
- Package contains components for integration into Microsoft Visual Studio*. You are able to select the Microsoft Visual Studio product(s) for integration on the Choose Integration target dialog box.
- If Microsoft Compute Cluster Pack* is present, and the installation detects that the installing system is a member of a cluster, the dialog box will be shown which provides you an option to install the product on all visible nodes of the cluster or on the current node only(by default installation on all visible nodes is performed).
- The Installation Summary dialog box opens to show the summary of your installation options (chosen components, destination folder, etc.). Click Install to start installation.
- Click Finish in the final screen to exit the Intel Software Setup Assistant.
Online Installation on Windows* OS
The default electronic installation package for Intel® DAAL for Windows now consists of a smaller installation package that dynamically downloads and then installs packages selected to be installed. This requires a working internet connection and potentially a proxy setting if you are behind an internet proxy. Full packages are provided alongside where you download this online install package if a working internet connection is not available.
Silent Installation on Windows* OS
Silent installation enables you to install Intel® DAAL on a single Windows* machine in a batch mode, without input prompts. Use this option if you need to install on multiple similarly configured machines, such as cluster nodes.
To invoke silent installation:
- Go to the folder where the Intel® DAAL package was extracted during unpacking; by default, it is the C:\Program Files (x86)\Intel\Download\w_daal_2017.y.xxx folder.
- Run setup.exe, located in this folder: setup.exe [command arguments]
If no command is specified, the installation proceeds in the Setup Wizard mode. If a command is specified, the installation proceeds in the non-interactive (silent) mode.
The table below lists possible values of and the corresponding arguments.
| Command |
Required Arguments | Optional Arguments |
Action |
|---|---|---|---|
| install | output=<file>, eula={accept|reject} |
installdir=<installdir>, license=<license>, sn=<s/n>, log=<log file> |
Installs the product as specified by the arguments. Use the output argument to define the file where the output will be redirected. This file contains all installer's messages that you may need: general communication, warning, and error messages. Explicitly indicate by eula=accept that you accept the End-user License Agreement. Use the license argument to specify a file or folder with the license to be used to activate the product. If a folder is specified, the installation program searches for *.lic files in the specified folder. You can specify multiple files/folders by supplying this argument several times or by concatenating path strings with the ";" separator. Use the sn argument to choose activation of the product through a serial number. This activation method requires Internet connection. Do not use the sn and license arguments together because they specify alternative activation methods. If you omit both arguments, the installer only checks whether the product is already activated. Use the log argument to specify the location for a log file. This file is used only for debugging. Support Engineers may request this file if your installation fails. |
| remove | output=<file> | log=<log file> | Removes the product. See the description of the install command for details of the output and log arguments. |
| repair | output=<file> | log=<log file> | Repairs the existing product installation. See the description of the install command for details of the output and log arguments. |
For example, the command line
setup.exe install -output=C:\log.txt -eula=accept
launches silent installation that prints output messages to the C:\log.txt file.
License File Installation for Windows* OS
If you have an evaluation license and decide to upgrade to a commercial license, you must complete the following steps after obtaining the commercial serial number:
- Replace your evaluation license file (.lic file) with the commercial license file you received in the license file directory (the default license directory is "C:\Program Files(x86)\Common Files\Intel\Licenses").
- Register the new serial number at https://lemcenter.intel.com.
- Re-installation of Intel® DAAL is not required.
Uninstalling Intel® DAAL for Windows* OS
To uninstall Intel® DAAL, select Add or Remove Programs from the Control Panel and locate the version of Intel® DAAL you wish to uninstall.
Note: Uninstalling Intel® DAAL does not delete the corresponding license file.
Installing Intel® DAAL on Linux* OS
You can install multiple versions of Intel® DAAL and any combination of 32-bit and 64-bit variations of the library on your development system.
These instructions assume you to have an Internet connection. The installation program will automatically download a license key to your system. If you do not have an Internet connection, see the manual installation instructions below.
Interactive installation on Linux* OS
- If you received the product as a downloadable archive, first unpack the Intel® DAAL package
tar -zxvf name_of_downloaded_file - Change the directory (cd) to the folder containing unpacked files.
- Run the installation script and follow the instructions in the dialog screens that are presented:
> ./install.sh - The install script checks your system and displays any optional and critical prerequisites necessary for a successful install. You should resolve all critical issues before continuing the installation. Optional issues can be skipped, but it is strongly recommended that you fix all issues before continuing with the installation.
GUI installation on Linux* OS
If on a Linux* system with GUI support, the installation will provide a GUI-based installation. If a GUI is not supported (for example if running from an ssh terminal), a command-line installation will be provided.
To install Intel® DAAL for Linux* OS in GUI mode, run shell script (install_GUI.sh).
If a GUI is not supported (for example, if running from an ssh terminal), a command-line installation will be provided.
Silent Installation on Linux* OS
To run the silent install, follow these steps:
- If you received the product as a downloadable archive, first unpack the Intel® DAAL package
>tar -zxvf name_of_downloaded_file - Change the directory (cd) to the folder containing unpacked files.
- Edit the configuration file silent.cfg following the instructions in it:
- Accept End User License Agreement by specifying ACCEPT_EULA=accept instead of default "decline" value;
- Specify activation option for the installation.
- Default option is to use existing license (ACTIVATION_TYPE=exist_lic), please make sure that a working product license file is in place before beginning. The file should be world-readable and located in a standard Intel license file directory, such as /opt/intel/licenses or ~/licenses.
- To use another way of activation, change the value of ACTIVATION_TYPE variable. You may also need to change the value of ACTIVATION_SERIAL_NUMBER and ACTIVATION_LICENSE_FILE variable for specific activation options.
- Run the silent install:
>./install.sh --silent ./silent.cfg
Tip: You can run install interactively and record all the options into custom configuration file using the following command.
>./install.sh --duplicate "./my_silent_config.cfg"
After this you can install the package on other machines with the same installation options using
>./install.sh --silent "./my_silent_config.cfg"
License File Installation for Linux* OS
If you have an evaluation license and decide to upgrade to a commercial license, you must complete the following steps after obtaining the commercial serial number:
- Replace your evaluation license file (.lic file) with the commercial license file you received in the license file directory (the default license directory is /opt/intel/licenses).
- Register the new serial number at https://lemcenter.intel.com.
- Re-installation of Intel® DAAL is not required.
Online Installation on Linux* OS
The default electronic installation package for Intel® DAAL for Linux consists of a smaller installation package that dynamically downloads and then installs packages selected to be installed. This requires a working internet connection and potentially a proxy setting if you are behind an internet proxy. Full packages are provided alongside where you download this online install package if a working internet connection is not available.
Offline Installation on Linux* OS
If the system where Intel® DAAL will be installed disconnected from internet, product may be installed in offline mode.
To install product offline user must provide to installer full path to license file.
License file (.lic file) is included as an attachment to email which sends after purchasing and registration product on IRC. User may request to resend .lic file from IRC. To achieve this go to "My Intel Products" page, select needed update for Intel® DAAL from "Download Latest Update" column. When page with information about selected product update will be opened, click on "Manage" reference in "Licenses" column. When "Manage License" page will be opened, press button "Resend license file to my email".
- If product installs in GUI mode: on "Activation options" dialog select "Choose alternative activation" radio button, press "Next" button. On following dialog select "Activate offline" radio button, press "Next" button. On next dialog type full path to license file and press "Next" button.
- If product installs in interactive mode: on step 3 "Activation step" select point 4 - "I want to activate by using a license file, or by using Intel(R) Software". On next step choose point 1 - "Activate offline [default]" and type full path to license file.
- If product installs in silent mode: in the file silent.cfg set value: license_file for variable: ACTIVATION_TYPE, set full path to license file to variable: ACTIVATION_LICENSE_FILE
Uninstalling Intel® DAAL for Linux* OS
If you installed as root, you will need to log in as root.
To uninstall Intel® DAAL run the uninstall script: <DAAL-install-dir>/uninstall.sh.
Alternatively, you may use GUI mode for uninstall Intel® DAAL for Linux* OS. First, run shell script install_GUI.sh, then select Remove option from menu and press "next" button.
If you installed in the default directory, use:
> /opt/intel/compilers_and_libraries_2017/linux/daal
Uninstalling Intel® DAAL will not delete your license file(s).
Installing Intel® DAAL on OS X*
There are several different product suites available, for example, Intel® Data Analytics Acceleration Library for OS X*, Intel® Parallel Studio XE Composer Edition for C++ OS X*, each including Intel DAAL as one of components. Please read the download web page carefully to determine which product is appropriate for you.
If you will be using Xcode*, please make sure that a supported version of Xcode is installed. If you install a new version of Xcode in the future, you must reinstall the Intel DAAL afterwards.
The installation of the product requires a valid license file or serial number. If you are evaluating the product, you can also choose the “Evaluate this product (no serial number required)” option during installation.
These instructions assume you to have an Internet connection. The installation program will automatically download a license key to your system. If you do not have an Internet connection, see the manual installation instructions below.
Interactive installation on OS X*
- If you received the Intel DAAL product as a download, double-click on the downloaded file to begin the installation.
- You will be asked to select installation mode. The option Install as root is recommended. Click Next and enter the password. The install wizard will proceed automatically.
- If you agree with the End User License Agreement, check the radio button of I accept the terms of the license agreement, and click Next
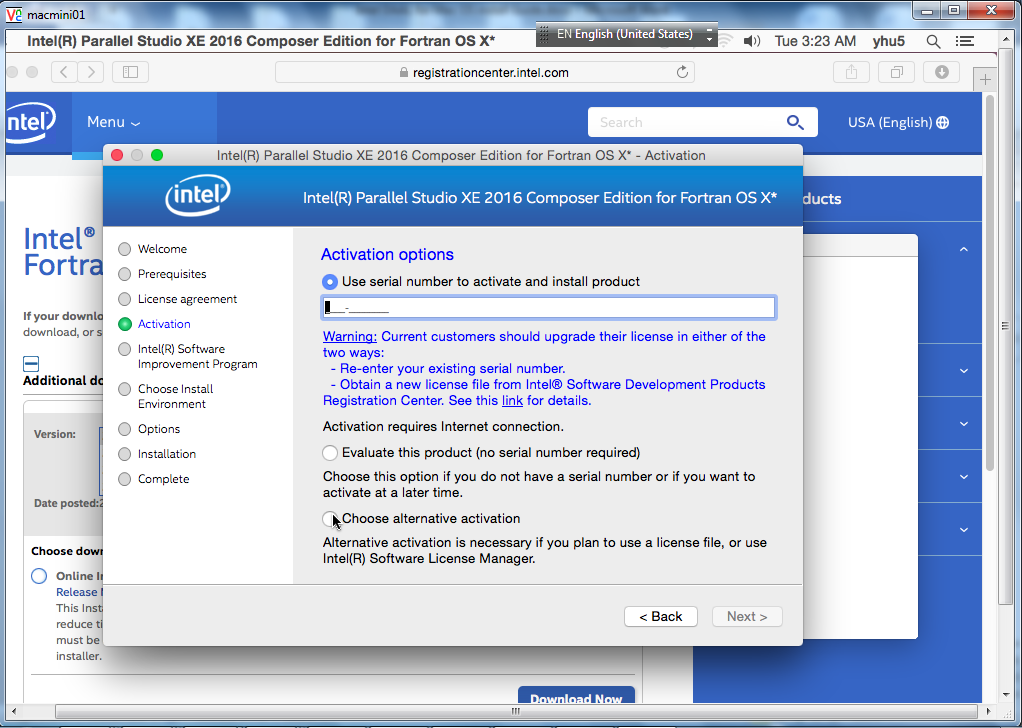
- License Activation Options:
-
Use serial number
If you do have an Internet connection, skip this step and proceed to the next numbered step (below).
-
Evaluate this product (no serial number required or if you want to activate at a later time).
-
Alternative Activation
If you do not have an Internet connection, choose Alternative Activation and click Next; there will be two options to choose from:
- Activate Offline: requires a License File.
- Use Intel® Software License manager: floating License activation
-
- Enter your serial number to activate and install the product.
- Activation completed. Click Next to continue.
- The Installation Summary dialog box opens to show the summary of your installation options (chosen components, destination folder, etc.). Click Install to start installation (proceed to step 10) or click Customize installation to change settings. If you select "Customize", follow steps 8-10.
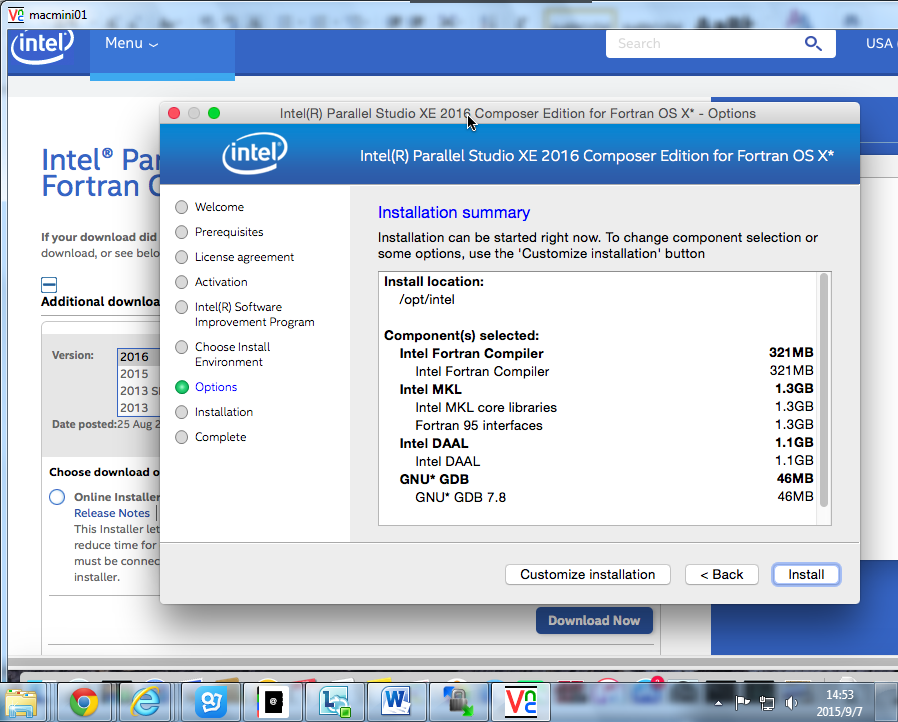
- In the Choose a Destination Folder dialog box, choose the installation directory. By default, it is /opt/intel. But you may choose a different directory. All files are installed into the Intel Parallel Studio XE 2017 subdirectory (by default/opt/intel/compilers_and_libraries_2017/mac/daal).
- If you install DAAL from a Parallel Studio XE product, the package contains components for integration into Xcode *. You are able to select the integration to Xcode* on the Choose Integration target dialog box.
- The Installation Summary dialog box opens to show the summary of your installation options (chosen components, destination folder, etc.). Click Install to start installation.
- Click Finish in the final screen to exit the Intel Software Setup Assistant.
Silent installation on OS X*
Silent installation enables you to install Intel DAAL on a single OS X* machine in a batch mode without input prompts. Use this option if you need to install on multiple similarly configured machines, such as cluster nodes. For information on automated or “silent” install capability, please seehttp://intel.ly/1gcW0Bl
Support of Non-Interactive Custom Installation
Intel DAAL can save user install choices during an ‘interactive’ install in a configuration file that can then be used for silent installs. This configuration file is created when the following option is used from the command line install:
- export INTEL_SWTOOLS_DUPLICATE_MODE=config_file_name: it specifies the configuration file name. If the full path is specified, the INTEL_SWTOOLS_DOWNLOAD_DIR environment variable is ignored and the installable package is created in the directory with the configuration file.
- export INTEL_SWTOOLS_DOWNLOAD_DIR=dir_name: optional, it specifies where the configuration file will be created. If this option is omitted, the installation package and the configuration file will be created in the default download directory: /tmp/intel/downloads/<package_id>
License File Installation for OS X*
If you have an evaluation license and decide to upgrade to a commercial license, you must complete the following steps after obtaining the commercial serial number:
- Replace your evaluation license file (.lic file) with the commercial license file you received in the license file directory (the default license directory is /opt/intel/licenses).
- Register the new serial number at https://lemcenter.intel.com.
- Re-installation of Intel® DAAL is not required.
Uninstalling Intel® DAAL for OS X*
It is not possible to remove the compiler while leaving any of the performance library components installed.
- Open the file
<install_dir>/parallel_studio_xe_2017.<n>.<pkg>/uninstall.app - Follow the prompts
If you are not currently logged in as root you will be asked for the root password.
Uninstalling Intel® DAAL will not delete your license file(s).
Legal Information
Intel, and the Intel logo are trademarks of Intel Corporation in the U.S. and/or other countries.
*Other names and brands may be claimed as the property of others.
Java is a registered trademark of Oracle and/or its affiliates.
© Copyright 2016, Intel Corporation