Overview
Intel® Device Manager for VMware* vCenter* Server is a user-friendly way to manage Intel devices on VMware’s vCenter platform. It is deployed as a plug-in to vCenter.
The plug-in lets you manage and configure devices right from the interface of VMware vCenter. You can:
- View information on supported devices.
- Monitor device counters and sensors.
- Customize device configuration.
- Save configurations as recipes for future reuse and apply these recipes to all your devices with a single click.
The plug-in requires the Intel® Accelerator Management Daemon for VMware ESXi on each host to discover and allow device management.
This document covers:
- Installation
- Setup and configuration
- Recipe creation
- Device monitoring and management
- Troubleshooting
Deployment Architecture
This diagram illustrates the relationship between the plug-in and other system components.
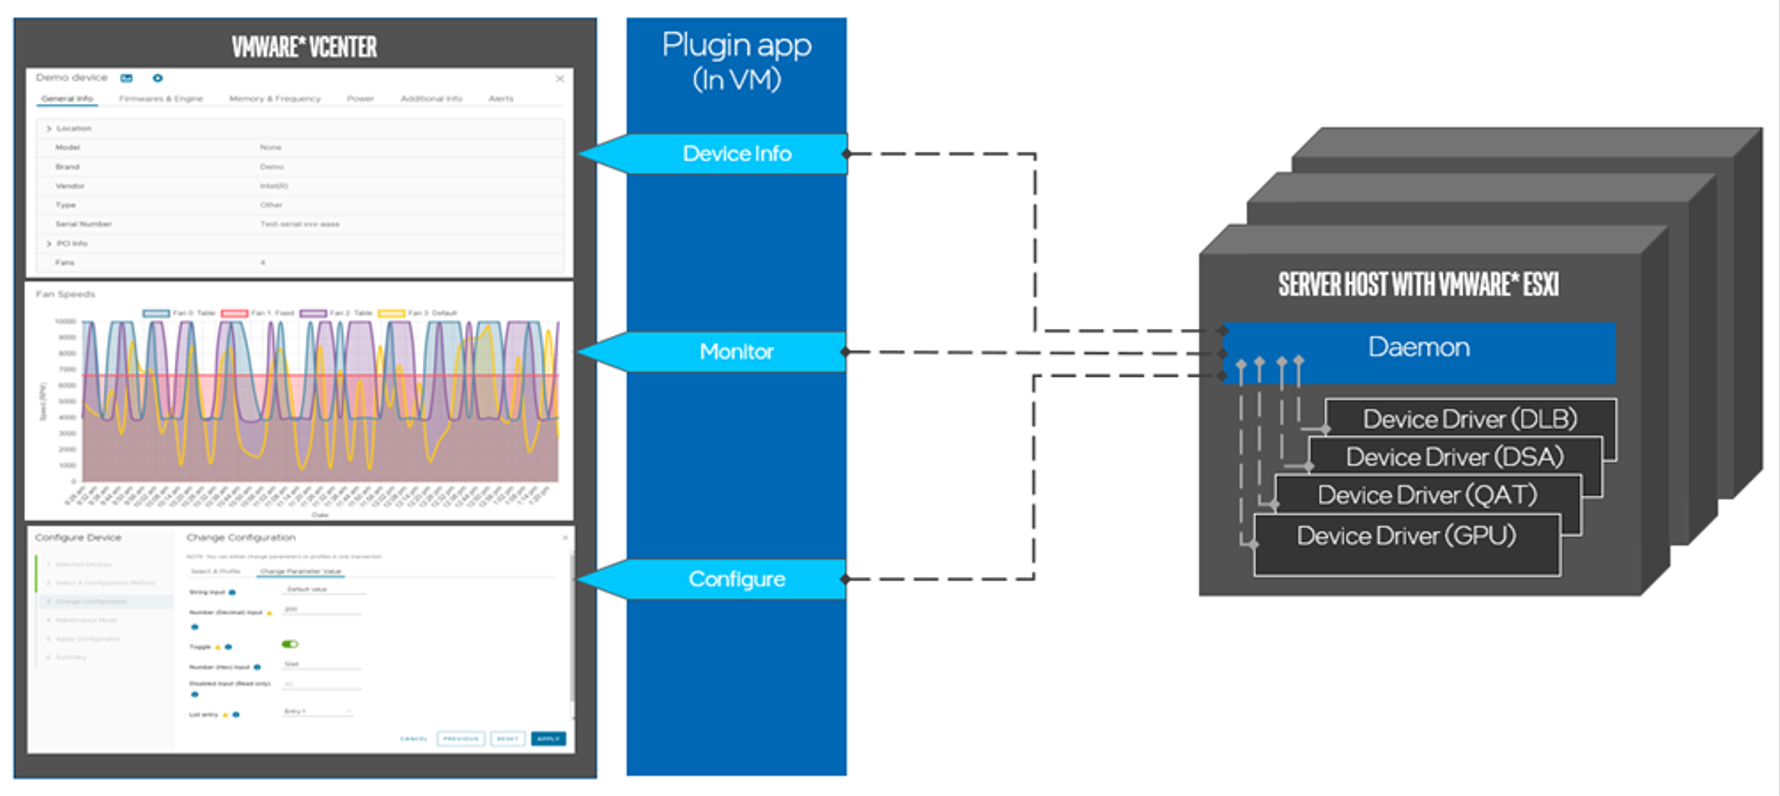
The plug-in is packaged into the VMware Photon* OS (5.0 GA) for ease setup. The Photon OS has its own source and security dispositions, which can be found on the Photon Security Advisories page. Intel recommends following these steps to keep the OS and its packages updated.
Setup
Prerequisites
- VMware vCenter (See Appendix A for a list of compatible versions.)
- VMware (See Appendix B for a list of compatible versions.)
- Supported Intel device on a host with driver installed (See Appendix B for a compatibility guide.)
Installing the Plug-in
Installing the Daemon on the Host
The Intel Accelerator Management Daemon for VMware ESXi provides an interface for the plug-in to communicate directly with device drivers to enable configuration and monitoring capabilities.
- Log in to the ESXi host via SSH or access the web console.
- Install the daemon bundle using the software install command.
Setting Up a User Account
The plug-in needs a user account to communicate with the Intel Accelerator Management daemon to enable the management of devices from the plug-in interface.
- Navigate to the Administration page in vCenter.
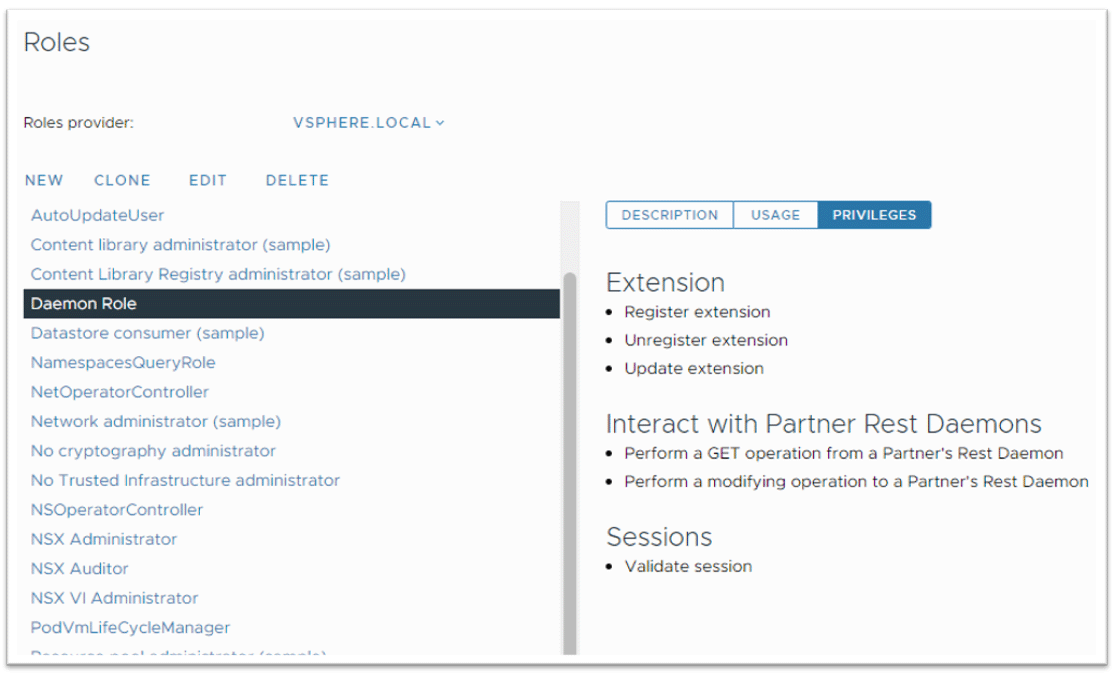
- Create a role for the daemon account to use:
- Under Access Control, select Roles and click New.
- In the New Role window, enter a suitable name in the Role Name field.
- In the left menu, select Interact with Partner Rest Daemons.

- Click All from the drop-down menu at the right and check Select All.
- In the left menu, select Extensions.
- Click All from the drop-down menu at the right and check Select All.
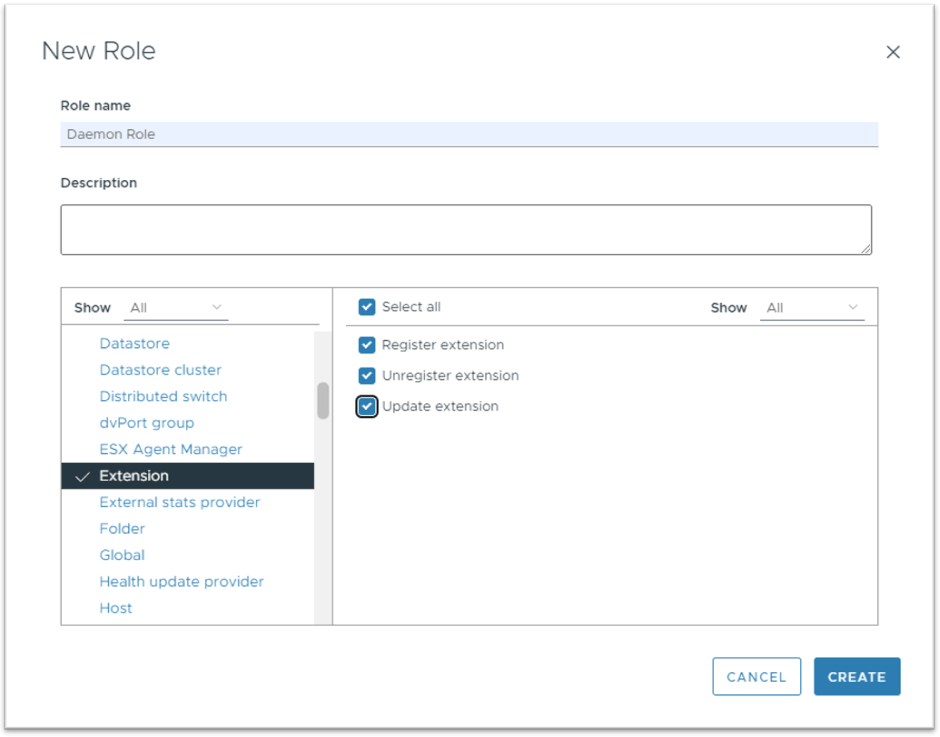
- In the left menu, select Sessions.
- Click All from the drop-down menu at the right and check the Validate Session option.

- Click Create.
- This will create the Daemon Role with the specified privileges.
- Set up a daemon user account:
- Under Single Sign On, select Users and Groups, and select your domain. This example uses the vsphere.local domain.
- Click Add.
- In the Add User window, enter the username intelplugin and a password of your choice, then click Add.
Note The daemon user account must be intelplugin for the plugin to interact with the daemon on the host.
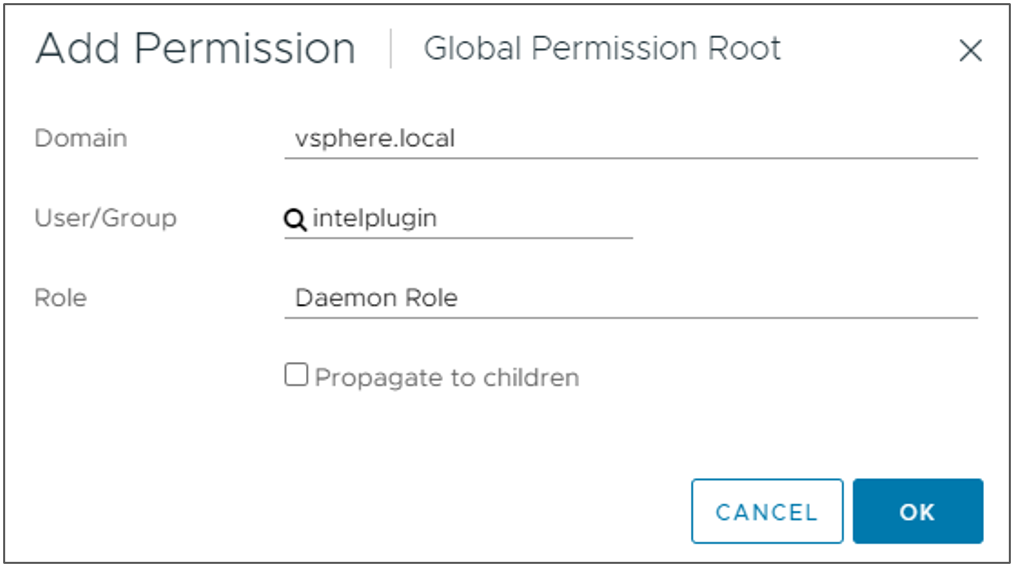
- Add the role to the account:
- Under Access Control, select Global Permissions, then click Add
- Select the domain and account created in the previous step, assign the previously created role to this account, and then click OK
.
Installing the Plug-in
- Navigate to the Administration page in vCenter.
- Select Add. Select to upload a local OVF template file you have downloaded or enter the URL for the template file.

- Select the location for the plug-in: Select a data center, the compute resource, and storage and network options.
Note: When choosing the compute resource, please avoid selecting the option to automatically power on deployed VMs. - Customize the template: Enter the details needed for setting up the plug-in VM. The following properties are available:
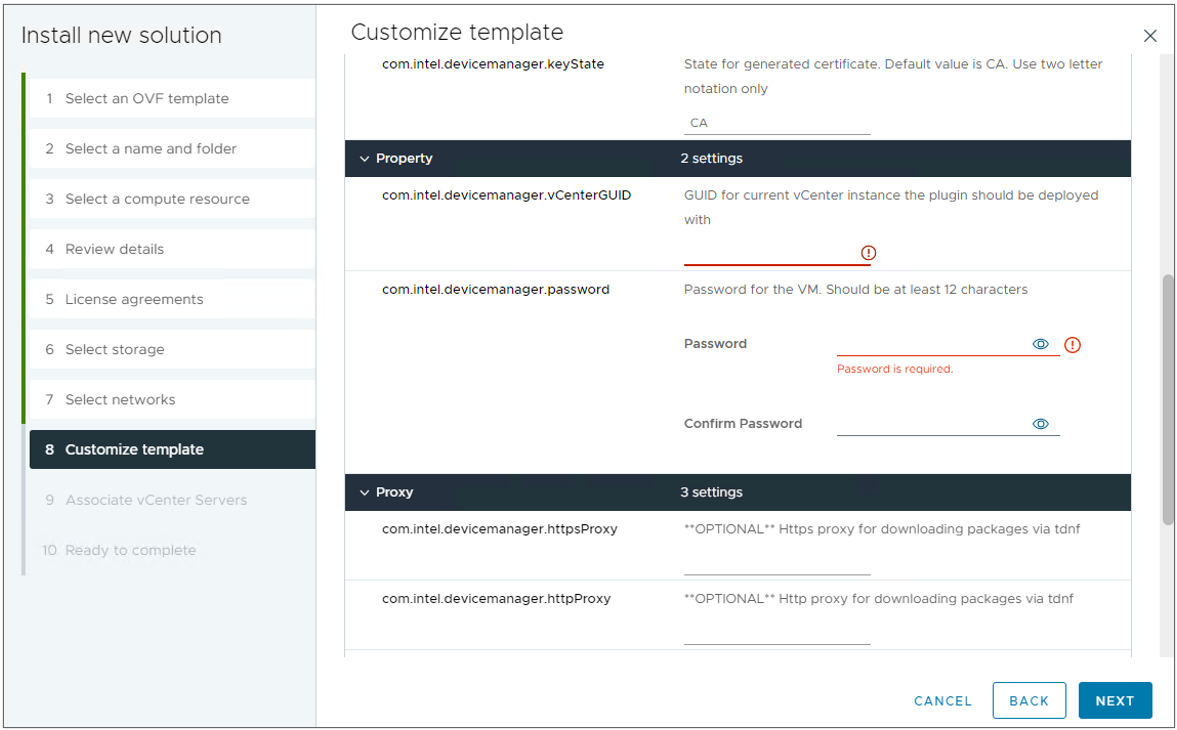
- Certificate properties: Properties to set for the self-generated certificate
- Daemon Account (required): Username and password for the daemon account created during the setup process
- Docker Registry (required): Docker tag for plugin container. Refer to the release description section for the latest tag
- Docker Repository: URL to the docker repository. Use this in case of a local harbor repository
- MAC: Specify a MAC for the VM’s network adapter to spoof. This is not recommended unless you have a MAC restriction

• NTP Server: The NTP Server to synchronize system time
• vCenterGUID (required): The GUID from vCenter that is required to authenticate a user session with the plug-in
• Password (required): The password for the VM, which will be set on the first boot, must be at least 12 characters long. Do not use common dictionary words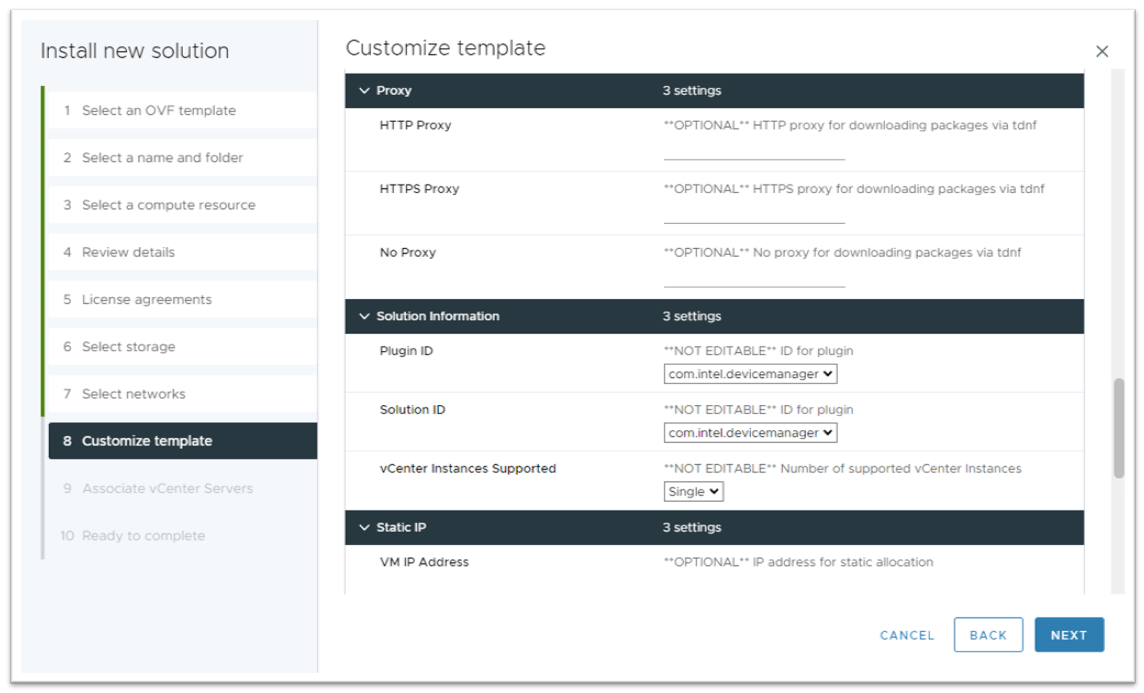
• Proxy: This is the proxy for installing Java into the VM. It only sets the proxy for tdnf
• Solution Information: Values that are not editable. Default values are required for registering the plug-in with vCenter
• Static IP: Skip this section if you have DHCP. Set a static IP for VM in this section. The IP is in CIDR notation, which includes a mask. For example, an IP of aa.bb.cc.dd with a mask of s255.255.255.0 is represented by aa.bb.cc.dd/24
• User KeyStore: Information about the user-generated keystore. After successfully creating and registering the plugin VM, users can proceed to update their private key information
- Associate vCenter: Select a vCenter for the plug-in to associate with. Currently, the plug-in supports only a single vCenter per VM.
- Proceeding to the next step will result in the creation and registration of the Plug-in VM with VCSA.
Updating the OVF Properties
- The OVF properties Daemon Account, Docker Registry and User Key Store can be updated after the plug-in VM creation.
- In order to update the User Key Store, start by copying the user key store to the plug-in VM, and note down the absolute path of the copied keystore.
- To initiate the update process, power off the plug-in VM. On the Configure tab for the VM, select vAppOptions and then set a new value for the OVF properties.
OVF property and the corresponding Key name are listed below.
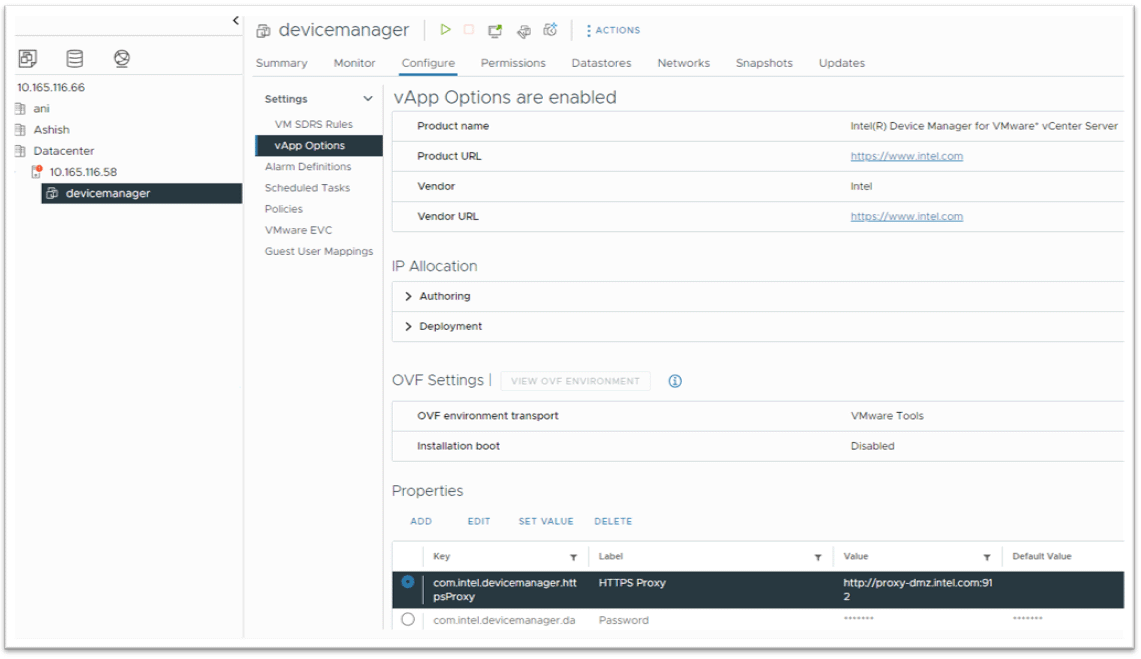
- To update the plug-in, set a new container path for the Docker Registry property.
- On power ON, the plugin will then utilize the updated values.
Uninstall the Plug-in
Uninstall the Daemon on the Host
- Log in to the ESXi host via SSH or access the web console.
- Uninstall the daemon bundle using the software remove command.
Uninstalling the Plug-in and Removing the VM
- Navigate to the Administration page in vCenter.
- Select Client Plug-in and select Intel Device Manager for VMware vCenter Server.
- Click Remove.
- Navigate to the VM in your inventory. You can now safely delete it.
Procedures
Discovering Devices
- A card on the Summary page for the host, cluster, or datacenter shows the available devices:

Viewing Device Information
- On the Configure tab for a host, cluster, or data center, select Managed Devices under the plug-in name. Alternatively, click Configure on the summary card.

- Select the double chevron (>>) to show the following information for this device:
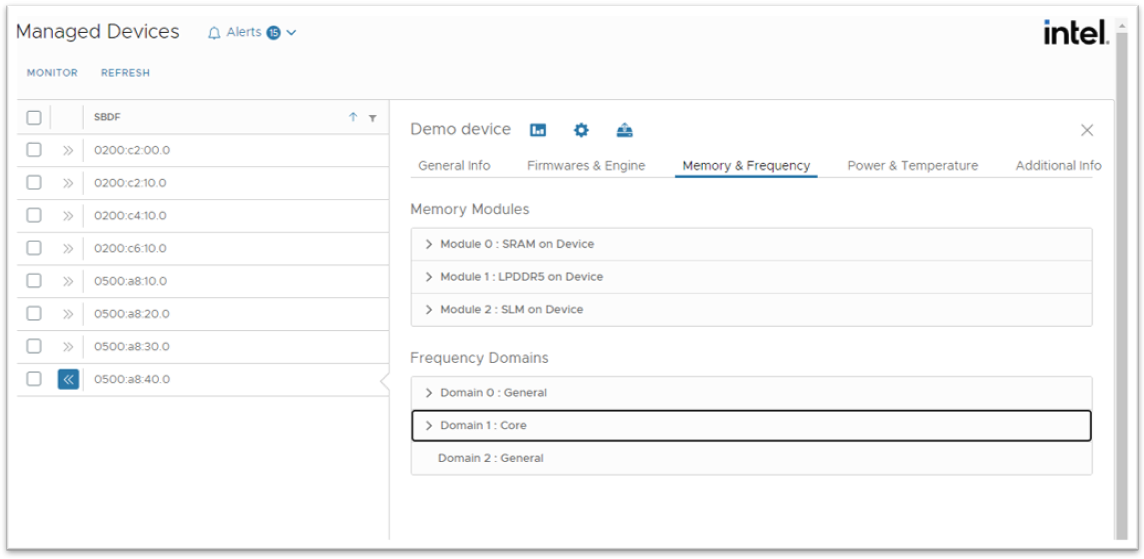
- General Info: Information regarding the location of a device, PCI information, type, and number of fans.
- Firmwares and Engine: List of available firmware and engines.
- Memory and Frequency: Memory modules and their information, along with frequency domains and their types. Click the edit icon to change the frequency minimum and maximum.

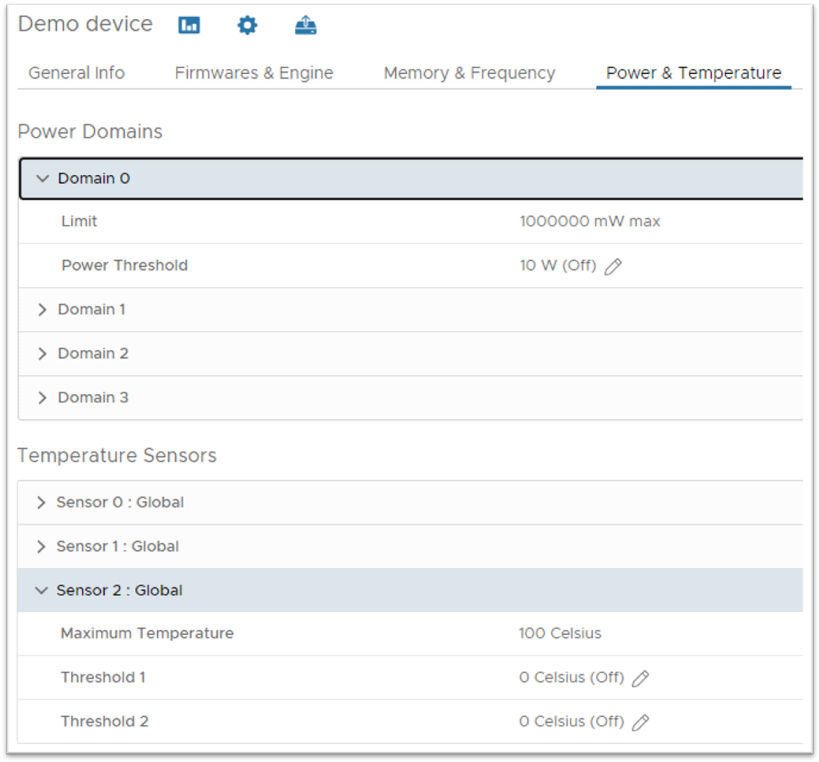
- Power and Temperature: Power supply units are present along with power domains. Temperature sensor information is provided. Click the edit icon to change the power threshold and temperature threshold values.
- Additional Info: Additional info defined by the driver specific to the device.
- Alerts: Recent alerts were raised for this device.
- Monitor this device: Selecting the chart icon will take you to monitor this device.
- Configure this device: Selecting the gear icon will allow you to configure this device.
- Reset this device: Selecting the reset icon will reset the device configuration to default.
Changing Device Configuration
- On the Configure tab for a host, cluster, or datacenter, select Managed Devices under the plug-in name. Alternatively, click Configure on the summary card.
- Select a device using the checkbox and click Configure.
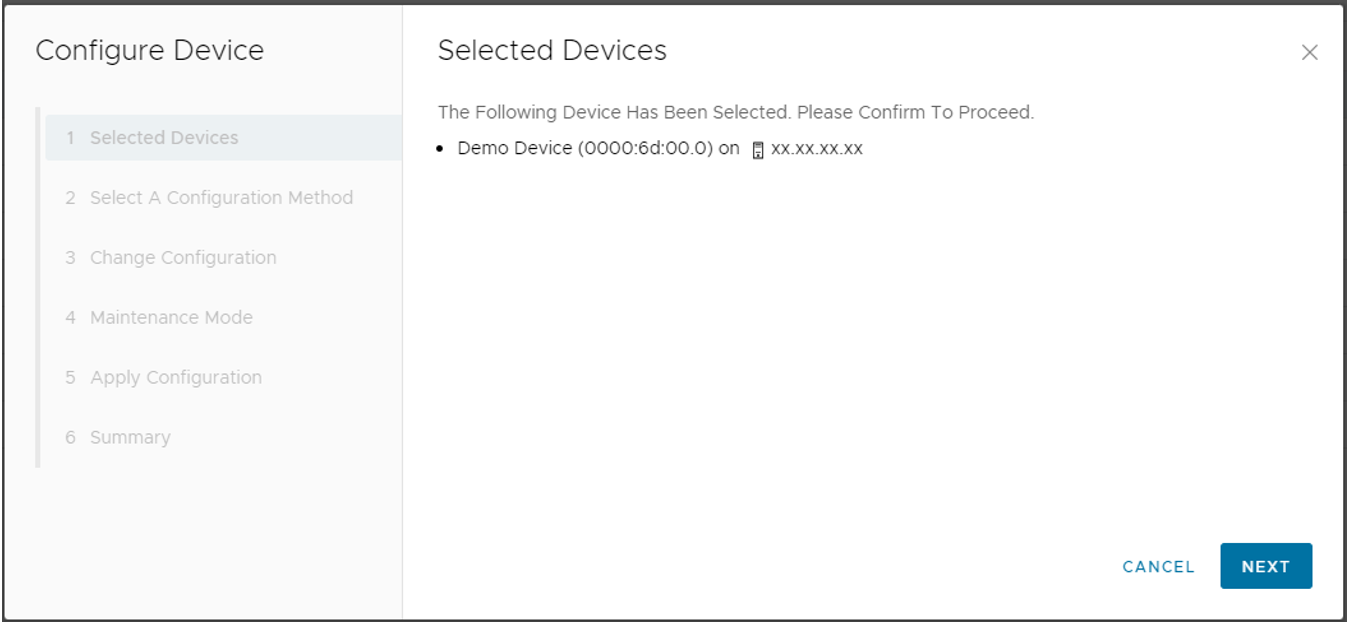
- Click Next to start the configuration wizard.
- On the Select a Configuration page, select a configuration method.
- Recipes: Refer to the next section, “Recipes.”
- Profiles and parameters: Follow the steps below.
Note: Configuring a device using parameters is only available when selecting a single device.
- Configure with a profile: In the Change Configuration window, choose the Select A Profile tab, select an existing profile, and click Apply.
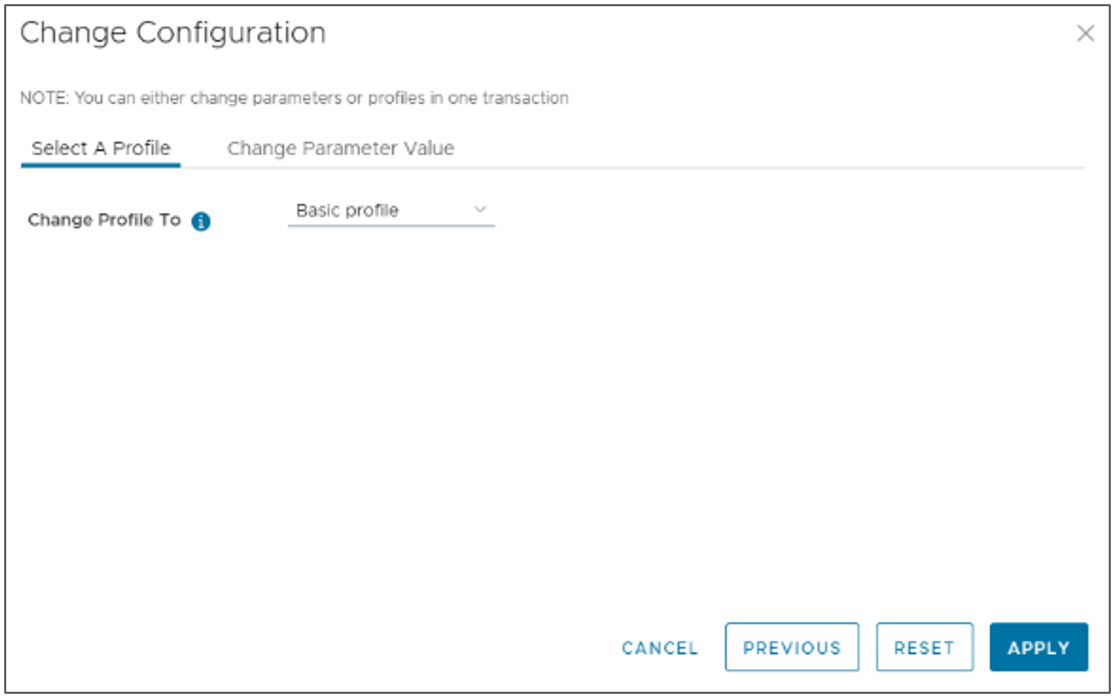
- Configure parameter values: In the Change Configuration window, choose the Change Parameter Value tab, modify the parameters, and click Apply.
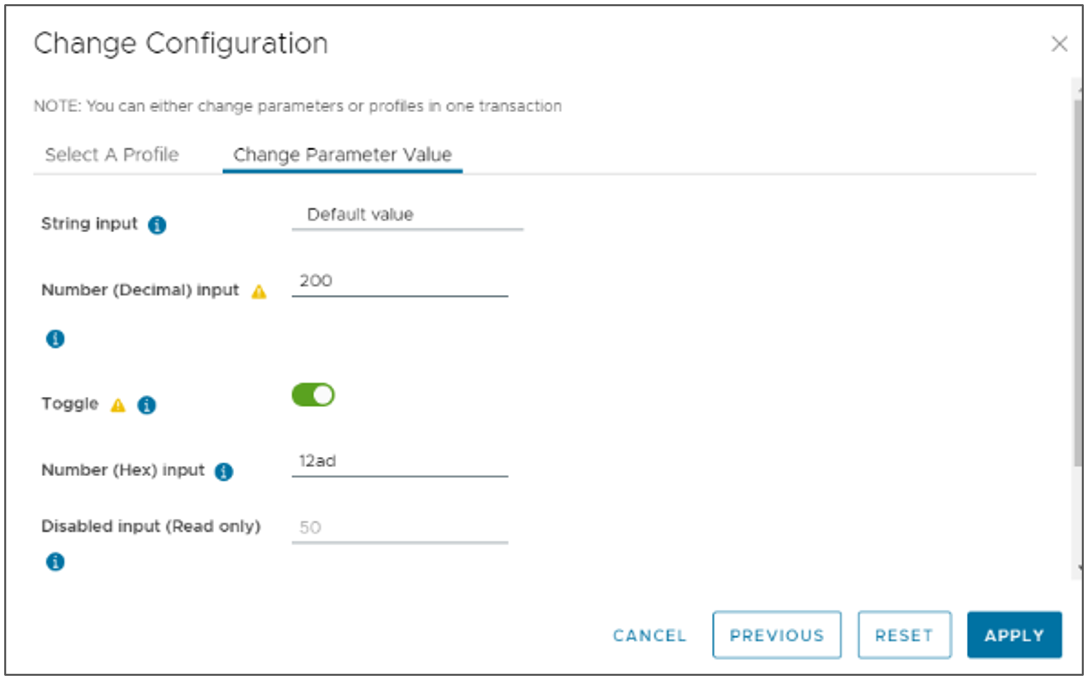
- Maintenance mode: Configuration changes that require executing maintenance mode are denoted by a yellow caution symbol. If this icon appears on any of the configuration parameters or profiles selected, the plug-in will ask to proceed with setting the host on maintenance mode. This will fail if the host has running VMs that need to be shut down manually.
- SR-IOV Configuration: The plug-in will automatically configure the SR-IOV state if the driver supports it.
- Apply configuration: This page shows the status of configuration changes and the operations results. For a single device, it only shows the configuration results. For multi-device operation, it shows the result per device.
- Summary: Summary of this operation. It also provides shortcuts to access the Recipes or Monitoring page.
Using Recipes
Applying Configuration Using Recipes
- On the Configure tab for a host, cluster, or datacenter, select Managed Devices under the plug-in name. Alternatively, click Configure on the summary card.
- Select a device using the checkbox and click Configure. This will open the configuration wizard.
- On the Select a Configuration page, choose Select A Recipe.
- When only a single device is selected, the wizard shows the change between the device’s current configuration and the selected recipe. When multiple devices are selected, only the recipe values are shown.

- In some cases, the recipe may not be compatible with the selected device. In these cases, you will get an error when selecting the recipe (with a single device selected) or when applying the recipe (if applying to multiple devices at once).


- Follow the rest of configuration steps to apply the recipe.
- Maintenance Mode and SR-IOV state change will be automatically performed using recipes if necessary.
Manage Recipes
- On the Configure tab for a host, cluster, or datacenter, select Managed Devices under the plug-in name. Alternatively, click Configure on the summary card.
- Select a device using the check box and click Manage Recipes. This opens the wizard.
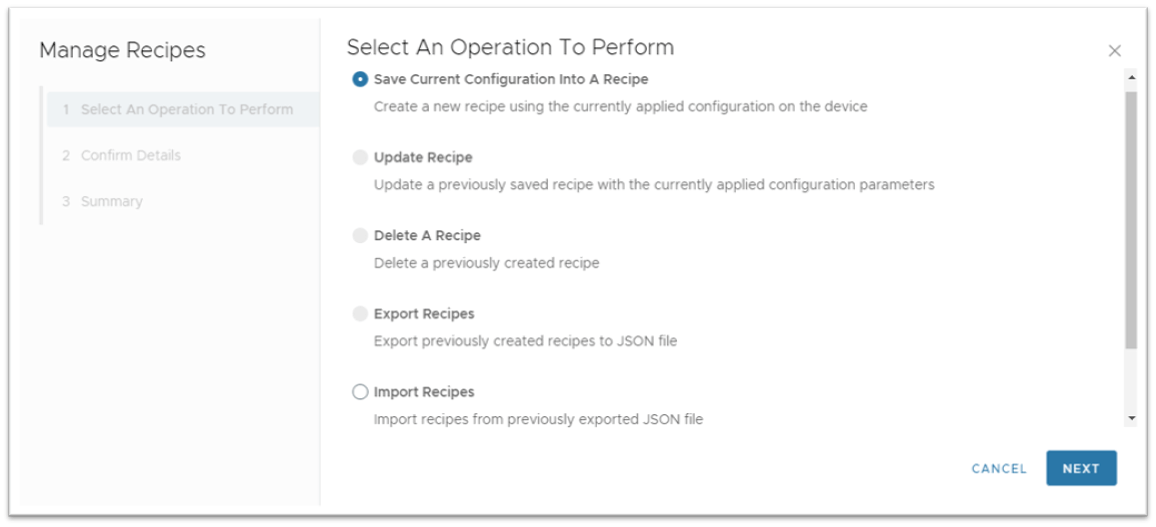
- You have five options:
- Save current configuration into a recipe: Save the currently applied device configuration to a recipe and set its name.
- Update recipe: Update an existing recipe with the current configuration on a device.
- Delete a recipe: Delete one or more existing recipes.
- Export recipes: Export the current recipes to a JSON file.
- Import Recipes: Import recipes from a JSON file that was exported previously.
Export Recipes
- Open the Manage Recipes wizard and select Export recipes. On the next page, choose the recipes to export and click Next.
The selected recipes will be downloaded as a single JSON file.
Import Recipes
- Open the Manage Recipes wizard and select Import recipes. On the next page, select the previously saved recipes JSON file.
This will list the available recipes in the file. Choose the recipes to import and click Next.
The recipes will be added to the device’s recipes list.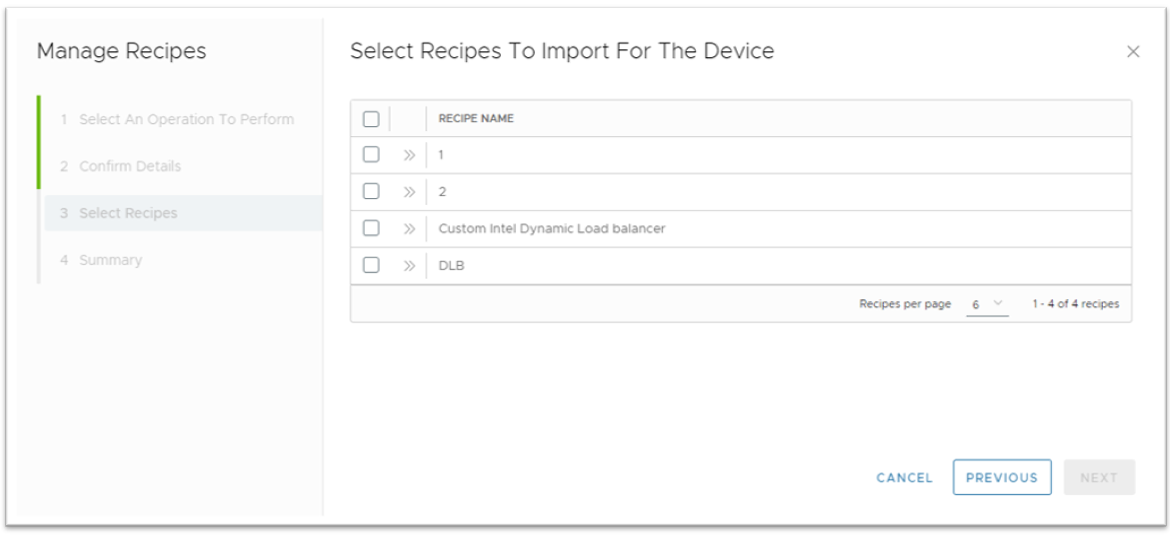
Bulk Export and Import of Recipes
- In the overflow menu, select Intel Device Manager for VMware vCenter Server.
Using the Export Recipes option, users can back up all recipes, regardless of device or host, to a single JSON file, eliminating the need to select individual recipes.
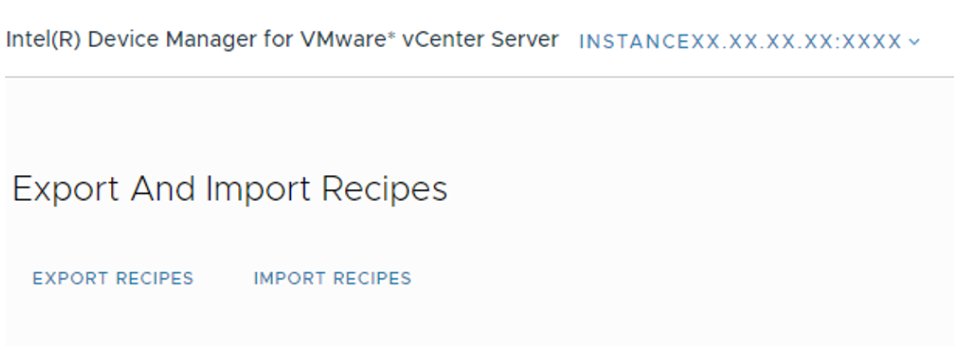
- Similarly, all the recipes in a file can be imported into the database without the need to select each recipe individually from the file.
- This feature will prove highly beneficial for backing up and restoring configurations during significant system updates.
Note: When the total number of recipes surpasses 10,000, the system may experience memory constraints, potentially leading to delayed responses from plugin and daemon. To avoid this, it's important to ensure that the combined size of all recipes remains below 2MB.
Reset Device
- On the Configure tab for a host, cluster, or datacenter, select Managed Devices under the plug-in name. Alternatively, click Configure on the summary card.
- Select a device using the checkbox and click Reset.

- On Reset the device configuration will be set to default.
Configure SRIOV
- On the Configure tab for a host, cluster, or datacenter, select Managed Devices under the plug-in name. Alternatively, click Configure on the summary card.
- Select a device using the checkbox and click Configure SR-IOV.

- Configure the VFs for the device.
Note: Improper SR-IOV configuration may result in an invalid device state. Refer to the driver documentation for guidance on the correct values for the virtual function.
Monitoring a Device
- On the Monitor tab for a host, cluster, or data center, select Managed Devices under the plug-in name. Alternatively, click Monitor on the summary card.
- To see the device status, select the double chevron (>>) to the left of the device address.

The following options are available:
- Status: General status of the device and PCI bus. It also allows users to select a refresh interval and export data as JSON.
- LEDs: LEDs on the device.
- RAS: RAS counters for the device.
- Sensors: Sensors such as temperature, voltage, fan speeds, etc. for the device, and additional monitoring data like engine utilization and memory speeds.
- Telemetry: Device-defined telemetry data with visualization.
- Performance: Device-defined performance data with visualization. Click the information icon at the top of the page to switch to the Configure page and view device information.
- Alerts: View alerts for the device (see the following section).
Note: The Memory Speed graph might not show zero during periods of inactivity because memory is utilized to retrieve telemetry data from the device.
Refreshing Devices
- On the Monitor or Configure tab for a host, cluster, or datacenter, select Managed Devices under the plug-in name.
- Click Refresh.
Viewing Alerts
- On the Monitor or Configure tab for a host, cluster, or datacenter, select Managed Devices under the plug-in name.
- Select the Alerts drop-down option. This window has three options: Dismiss, Dismiss All, and Older Alerts. You can select Older Alerts to view a table of all archived alerts, where you can delete selected alerts.
Adding a New Device or Host
- Follow the steps to install the daemon on the host if it is not available.
- On the Monitor or Configure tab for the host, select Managed Devices under the plug-in name.
- Click Refresh.
Restore config on Reboot
- Daemon will attempt to restore the last known configuration on the reboot of a host.
- In case of an unexpected shutdown, this will be the last configuration made via the plugin.
- In case of a graceful shutdown, this will be the configuration prior to the shutdown.
Troubleshooting
Status of Daemon

- Verify that the host has the daemon installed.
- Verify that the host has the daemon running. You can use the following command to check the status of the daemon on the host:
esxcli daemon info get -s acceleratormanagementd
Configuration Wizard is Empty, or Configuration Fails
- Verify that the device is in SR-IOV mode. For version 1.0.0, the plug-in and drivers support only SR-IOV mode configuration. To enable SR-IOV mode, refer to the driver documentation.

- Verify that virtual functions (VFs) are enabled for the device. To enable VFs for any device:Verify that virtual functions (VFs) are enabled for the device. To enable VFs for any device:
- Sign in to the ESXi Host Client by typing the IP address in the browser.
- Go to Manage > PCI Devices.
- Search for the device, select the device, configure for SR-IOV, and save the settings.
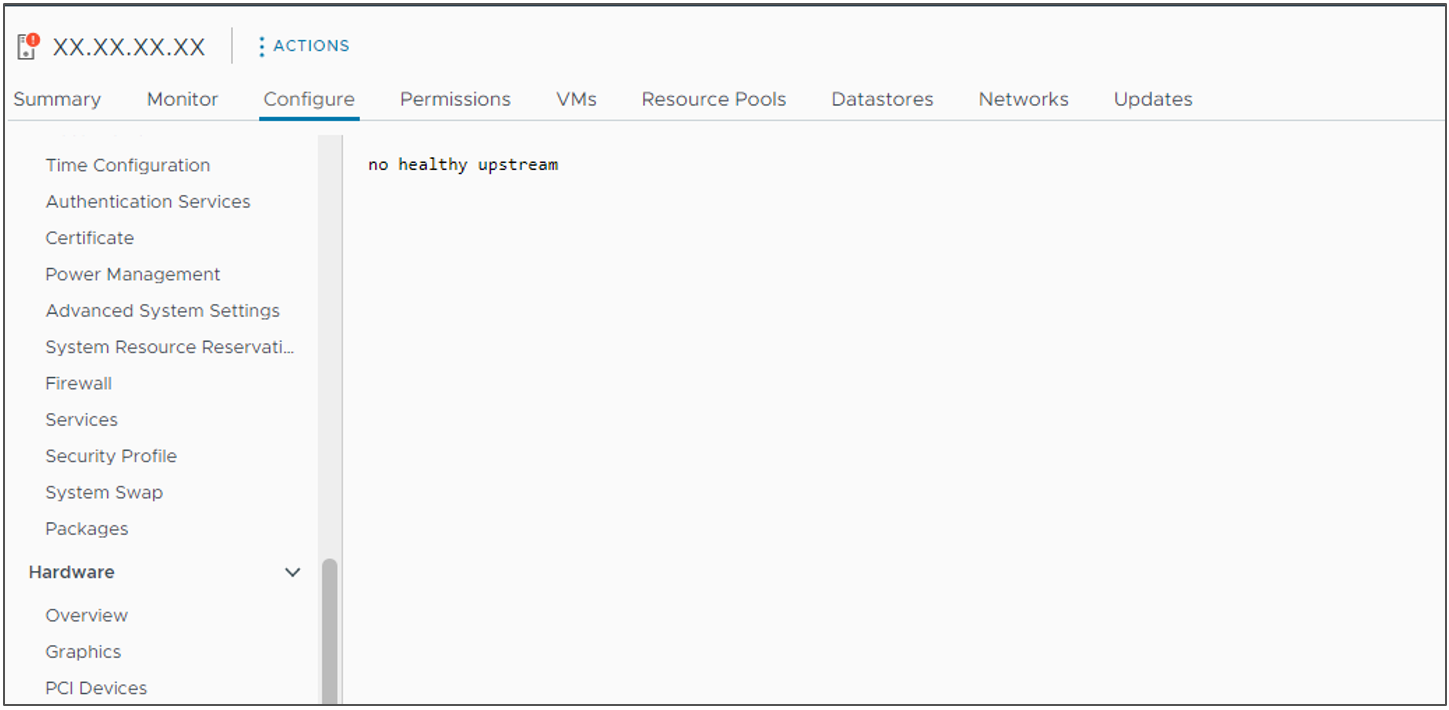
No Healthy Upstream
- Verify that the plug-in VM is up and running.
- Verify that the plug-in server is running on the VM.
General Errors
- Check the log file at /var/log/solutioninstall
- Contact Intel Support.
Resources
Intel Device Manager for VMware vCenter Plug-in
Intel QuickAssist Technology (Intel QAT)
Intel Dynamic Load Balancer (Intel DLB)
Intel Data Center GPU (Intel Data Center GPU Flex Series)
- Learn more about Intel Data Center GPU Flex Series
- Download supported Intel Data Center GPU Flex Series drivers
Learn more about the Intel and VMware partnership.
Version Compatibility
| Intel Device Manager for VMware vCenter Server - Version | Supported VMware vCenter Version(s) | Intel Accelerator Management Daemon for VMware ESXi – Version | Supported VMware ESXi Version(s) |
|---|---|---|---|
| 1.x.x | 8.0 | 1.x.x | 8.0 |
| 1.1.x | 8.0 and 8.0 U1 | 1.1.x | 8.0 and 8.0 U1 |
| 2.x.x | 8.0 and above | 2.x.x | 8.0 and above |
Appendix A: Driver Compatibility
| Driver Name | Driver Version | Intel Device Manager for VMware vCenter Server - Version | Intel Accelerator Management Daemon for VMware ESXi - Version |
|---|---|---|---|
| Intel® QuickAssist Technology Driver for VMware ESXi (Intel QAT Driver for VMware ESXi) | 2.x.x+ | Latest: 2.0.x | Latest: 2.0.x |
| Older: 1.0.x,1.1.x | Older: 1.0.x,1.1.x | ||
| Intel® Dynamic Load Balancer Driver for VMware ESXi (Intel DLB Driver for VMware ESXi) | 1.x.xs | Latest: 2.0.x | Latest: 2.0.x |
| Older: 1.0.x,1.1.x | Older: 1.0.x,1.1.x | ||
| Intel® Data Center Graphics Driver for VMware ESXi | 1.0.x-1.3.x |
Latest: 2.0.x |
Latest: 2.0.x |
| 1.4.x+ | Latest: 2.0.x | Latest: 2.0.x |
Appendix B: Changelog
2.0 - Feature Update
- Switched to a containerized delivery of plugin updates
- Moved daemon login to VM properties to persist login across VM reboots
- Added ability to change certificate of plugin server
- Added temperature threshold support
- Added device reset support
- Added SR-IOV configuration from plugin interface. SR-IOV configuration is also linked with device configuration to simplify configuration operations
- Daemon can restore config on reboot
- Added ability to export and import recipes as JSON objects, both on a per-device and a bulk scale
- Improved refresh action
- Updated base photon OS to 5.0
1.1 - Added support for Intel Data Center Graphics Driver
- Added frequency and power limits
- Added ability to delete older alerts