Aug. 8, 2022 – For those who know me, it’s no secret that I think Intel offers the widest breadth and depth of technologies providing an end-to-end, flexible and (via oneAPI) cross- architecture platform solution for graphics. With CPUs, GPUs, memory, networking and advanced ray tracing software, we uniquely support high-fidelity graphics for consumer and high-end laptops, workstations, data center/render farm, cloud - to the world’s largest supercomputers.
We rolled out our first discrete graphics, the Intel® Arc™ graphics product family for laptops, earlier this year. This week Intel announced the Intel® Arc™ Pro A-series professional range of GPUs, with built-in ray tracing hardware, machine learning capabilities, and industry-first AV1 hardware encoding acceleration. This is a next step in providing open and platform-wide solutions to democratize and scale visual computing workflows.
Really, we’re only just getting started - with so much more yet to come. I am excited for our upcoming high-performance GPUs (codenamed Ponte Vecchio) to see just how powerful that GPU in combination with Intel® Xeon® processors and oneAPI open, standards-based cross-architecture programming can be for exascale-level supercomputing. This also includes high-performance ray tracing for computation and visualization, scalable photoreal rendering, and AI.
At SIGGRAPH 2022, we have new technologies to highlight, along with demos showcasing industry leaders running pre-release software on Intel Arc and data center GPUs (you can find us at Intel Booth #427). If attendees can take away only one thing from connecting with Intel at this event, it should be:
Intel offers open, flexible, end-to-end platform solutions providing choice, performance, and scalability for the most advanced visual compute and ray traced graphics uses.
The graphics industry has for too long been hampered by proprietary architectures and programming languages, creating “walled gardens” and vendor-specific code duplication. Developers and content creators want freedom and choice when running their solutions on the best hardware available without managing multiple codebases, which is what oneAPI delivers.
What’s New in Advanced Ray Tracing Software
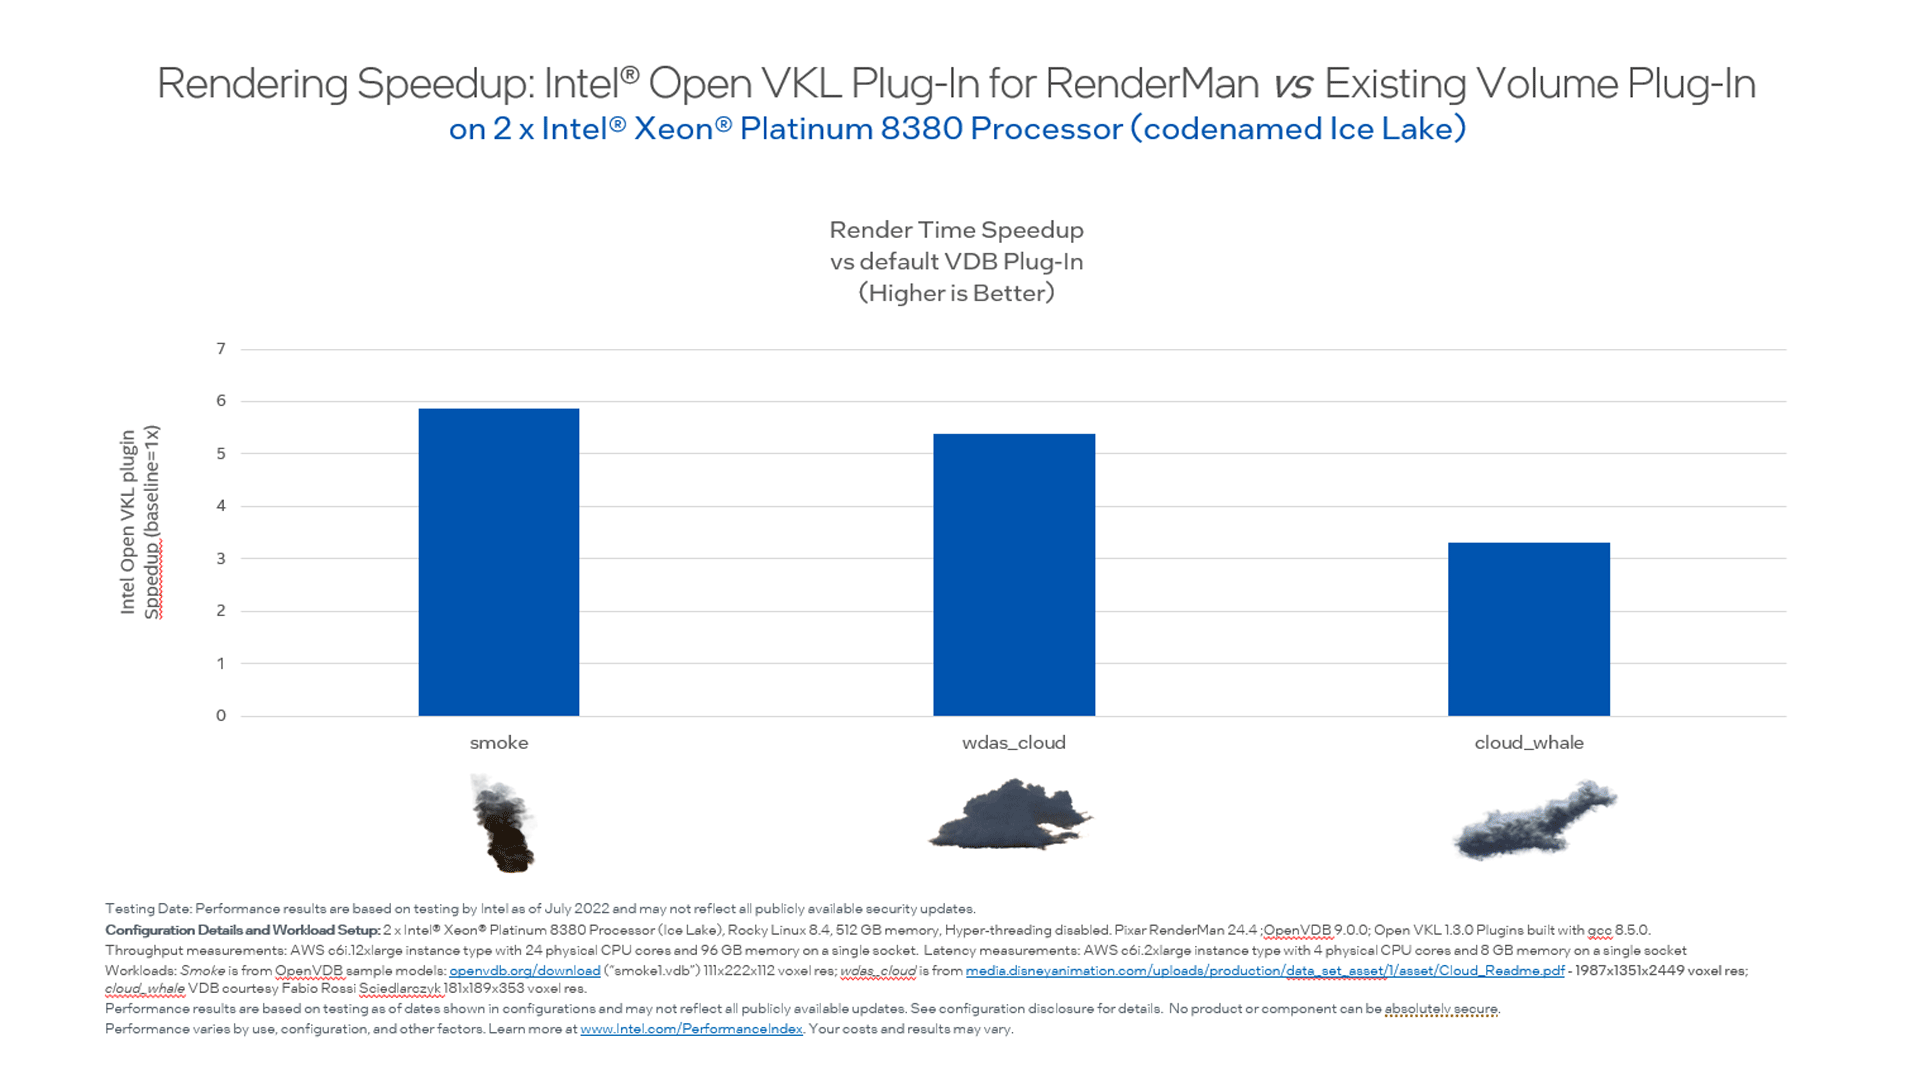
Today, we released the Intel® Open VKL plugin for RenderMan*. The plugin works with Pixar Animation’s RenderMan*, and utilizes Intel® Open Volume Kernel Library (Intel® Open VKL) to provide significant performance improvements for final frame volumetric rendering. Today, the plugin can be downloaded at GitHub, and added to existing RenderMan installations.

Rendered with Intel® OpenVKL plugin for RenderMan* Scene courtesy Fabio Rossi Sciedlarczyk.
My team also recently released a new open source library for improved path tracing. Intel® Open Path Guiding Library (Intel® Open PGL) is a flexible solution that utilizes important sampling techniques, learning the scene at hand, and then guiding geometric and volumetric path traced renderers to focus computation on the most challenging lighting scenarios while reducing computation. It can be integrated with most existing ray tracing renderers with minimum impact to existing code. This means Intel Open PGL delivers state-of-the art features and performance that enable 3D modeling, animation, and renderer developers to focus on their unique rendering methods that benefit their users most. (Current path guiding solutions are in-house, custom-built proprietary renderers, not available to most developers.)

A flooded version of Intel’s version of the famous Sponza rendered with Blender’s Cycles.1 The water surface generates directly visible caustics on the floor, which indirectly illuminate the scene. The image shows equal time renderings (5 minutes on an Intel® Core™ i9-7980XE Extreme Edition processor) where the left image is Cycles without Intel Open PGL optimizations, and the right with Intel® Open PGL optimizations. Without path guiding, Cycles is not able to resolve these caustics and the related indirect illumination effects.
OpenPGL can especially increase rendering performance through improved sampling for complex light transport effects such as caustics. Intel Open PGL is distributed via an Apache 2.0 license and can be downloaded at www.openpgl.org and on GitHub.2 Developers and content creators are invited to see the demo at our SIGGRAPH booth and to join the community. Get more details in this blog: Open Path Guided Rendering Made Easier.
Collaboration Success with Industry Leaders
Intel has a long history of leadership and collaboration on rendering and graphics with organizations such as the Academy Software Foundation (ASWF) and Open3D Foundation, and industry standards groups including Khronos’ SYCL, ANARI, and most recently the MetaVerse Standards Forum. We also engage with many leaders in entertainment, scientific visualization and design. In Intel’s SIGGRAPH booth, demos showcase innovative usages including Topaz and SketchUp running on the just announced Intel® Arc™ Pro graphics, and SideFX, Blender, and RenderMan optimized by the Intel® oneAPI Rendering Toolkit (Render Kit) on Intel GPUs and CPUs. Just a few other recent collaborations include:
- DreamWorks Animation announced plans to release its state-of-the-art MCRT renderer, MoonRay, as open source software later this year. MoonRay’s photoreal ray tracing rendering performance is supported by the open source Intel® Embree ray tracing kernel library for advanced rendering features and the Intel® Implicit SPMD Program Compiler (Intel® ISPC) for vector instruction parallelism providing dramatic performance improvements. Both components are also part of the Render Kit.
- Blender 3.3 is available in beta where oneAPI programming delivers one codebase support on Linux and Windows across Intel® Arc GPUs and upcoming Intel data center GPUs.
- Intel collaborated with leading Unity asset publisher Procedural Worlds, on creating the Intel Game Dev AI Toolkit with Gaia ML (for Unity). It enables developers to bring machine learning capabilities like real-time style transfer and object detection to their gaming experiences. A Unity-sponsored session at SIGGRAPH will demonstrate accelerated AI gaming workloads running on Intel Arc A-series desktop cards.
- Foundry’s Modo 16.0 release now supports the upcoming Intel® Arc GPU's in the realtime viewports. Modo was also updated to the latest Intel® Open Image Denoise providing unprecedented detail preservation capabilities, accelerating final frame rendering. (Modo also includes Intel Embree in its renderer from prior releases.)
What’s Next
Intel is continuing its cadence of releasing innovative, flexible platforms to accelerate graphics compute through open architecture solutions. There is more to come. In closing, at Intel we maintain this mantra in our journey of graphics acceleration:
No transistor, no pixel, no developer [ no content creator] left behind.
Jim
Discover More Related Content
Related Articles
- Fidelity-first Ray Tracing in the Heterogeneous Compute Era – Image quality comparisons with Nvidia Optix
- Open Path Guided Rendering Made Easier
- Advanced Ray Tracing APIs Proposed for the oneAPI Specification
Related Videos
- Intel® oneAPI Rendering Toolkit Overview [5:12]
- Ray Tracing Innovation Unleashed Using Intel® oneAPI Rendering Toolkit [2:35]
- Intel Architecture Day Demo: Moore’s Lane Rendering using Intel oneAPI Rendering Toolkit on Intel CPU and Xe architecture ray tracing-accelerated GPU
Get the Software
- Intel oneAPI Rendering Toolkit
- Learn more about oneAPI, free download to use Intel® oneAPI Toolkits locally or use in the Intel® DevCloud.