Single and Multi-Object Detection on CPU on Linux*
This tutorial uses the sample application called "Object Detection YOLO* V3 Python* Demo." Object Detection YOLO V3 Python Demo uses OpenCV, a component of OpenVINO™, to display a frame with detections that are rendered as bounding boxes and labels, if provided. By default, this sample application displays latency and FPS.
Instructions in this tutorial are provided for a CPU.
NOTE:
You can ignore any warning messages that may be shown before starting inference.
For each configuration, the sample demonstrates two detection types:
- Single detection uses a basic data set to perform one-by-one person detection.
- Multi-detection uses an advanced data set to perform multi-object detection, such as a person and a car.
While running the sample applications, you will gain familiarity with the Intel® Distribution of OpenVINO™ toolkit.
Single and Multi-Object Detection with Hardware Acceleration on a CPU
Run these steps on the target system.
The screenshots below were taken on a system with the following configuration:
- Model name/Processor: 11th Gen Intel® Core™ i7-1185GRE @ 2.80 GHz
- Graphics: Intel® Iris® Xe Graphics (TGL GT2)
- Memory: 8 GB
- Disk space: 500 GB
- OS: Ubuntu* 20.04
Step 1: Initialize the Intel® Distribution of OpenVINO™ toolkit Environment
Open a terminal window.
Go to the sample application directory in which the Object Detection YOLO V3 Python demo is located:
cd $HOME/Downloads/YOLOv3
Initialize the OpenVINO™ environment:
source /opt/intel/openvino_2021/bin/setupvars.sh
Leave the terminal window open for the next step.
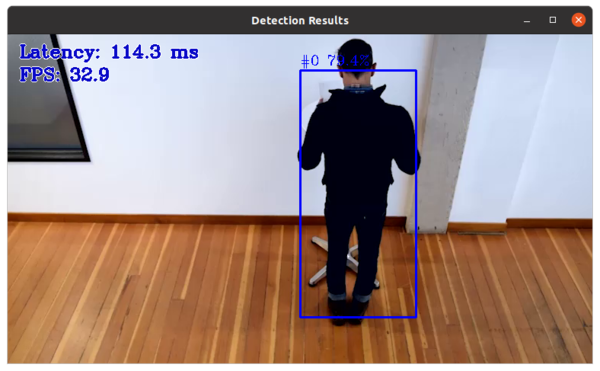
Step 2: Run the Single Detection Application on the CPU
Run the Object Detection YOLO V3 Python Demo sample application:
python3 object_detection_demo.py -i $HOME/Downloads/YOLOv3/Sample_videos/one-by-one-person-detection.mp4 -m $HOME/Downloads/YOLOv3/tensorflow-yolo-v3/FP32/frozen_darknet_yolov3_model.xml -t 0.1 -at yolo
Success is indicated by an image that shows a single individual in a bounding box. At the left side of the image you see the latency. You might not clearly see some bounding boxes and detections if scene components are the same color as the bounding box or text.
- Press CTRL+C on the terminal window to exit the demo.
Leave the terminal window open for the next step.
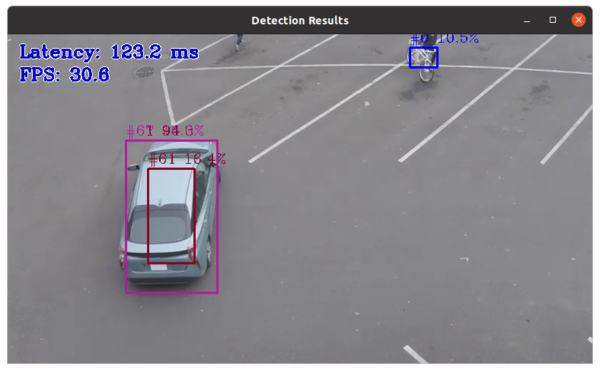
Step 3: Run the Multi-Detection Application on the CPU
Run the Object Detection YOLO V3 Python Demo sample application:
python3 object_detection_demo.py -i $HOME/Downloads/YOLOv3/Sample_videos/person-bicycle-car-detection.mp4 -m $HOME/Downloads/YOLOv3/tensorflow-yolo-v3/FP32/frozen_darknet_yolov3_model.xml -t 0.1 -at yolo
Success is indicated by an image that shows one or more objects and/or people. At the left side of the image you see the latency. You might not clearly see some bounding boxes and detections if scene components are the same color as the bounding box or text.
- Press CTRL+C on the terminal window to exit the demo.
If you want to run the sample application on a GPU or the Intel® Vision Accelerator, leave the terminal window open and begin with Step 2 of the GPU or Intel® Vision Accelerator instructions.
Summary and Next Steps
In this tutorial, you learned to run inference applications on different processing units using the sample application "Object Detection YOLO V3 Python Demo." In the process, you gained familiarity with the Intel® Distribution of OpenVINO™ toolkit, which was installed with the Edge Insights for Vision.
Go to Intel® Edge Software Configurator Documentation to learn how to use the tool to manage Edge Software Packages, create and manage Containers and Virtual Machines.
As a next step, see the Single and Multi-Object Detection on GPU on Linux* tutorial.