| Note |
- The instructions in this article will not work if you don't have an Intel® NUC.
- If you have a laptop or desktop system from another manufacturer such as Dell, HP, Lenovo, ASUS, ACER, etc., you MUST contact them for assistance in resolving the error message you're seeing. Click here for a list of popular system manufacturer’s and their support websites.
|
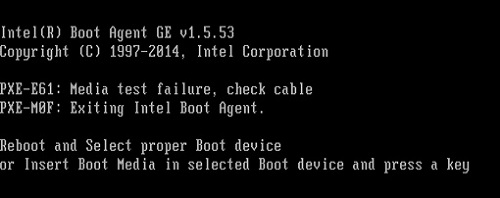
The PXE-E61 and PXE-M0F errors can happen in the following circumstances:
- The Intel NUC is configured to boot to a network, but a network cable isn't connected to the Intel NUC.
- The Intel NUC can't find the Windows installation on the hard drive (The drive is not detected).
The Troubleshooting PXE Boot With Network Protocol Analyzer or the Online PXE Error wizard are good resources to help resolve many issues.
If the above does not help, review the content below
If you are getting errors while trying to boot to a network drive:
- Make sure the Ethernet network cable is fully connected to the RJ45 jack on the Intel NUC.
- Try a different Ethernet network cable.
If you are attempting to boot to Windows on a local storage drive:
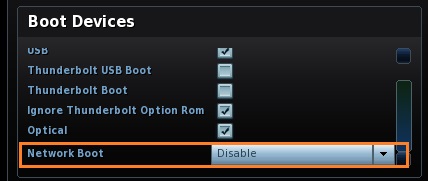
First, make sure that the BIOS is not configured to check for a network drive. You can disable the network boot as follows:
- Press F2 during boot to enter BIOS Setup.
- Navigate to Advanced > Boot > Boot Configuration.
- In the Boot Devices pane, disable Network Boot.
- Press F10 to exit BIOS Setup.
Next, confirm the drive that contains the OS is detected in BIOS Setup:
- Press F2 during boot to enter BIOS Setup.
- Navigate to Advanced > Boot > Boot Priority.
- Check to see what is listed under Boot Drive Order.
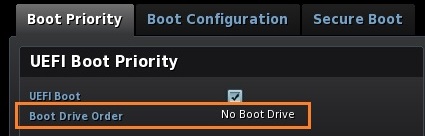
- If the Boot Drive Order shows No Boot Drive:
- Make sure the storage device is connected properly to the system
- M.2 drives, make sure the card is securely in the connector
- 2.5-inch drives, check that the cable connections to the motherboard are secure.
- If booting from a USB device, make sure it is completely inserted in the connector
- Try installing a different known good drive.
- Check to see if the drive is working—install it in a known good system
- If booting from a USB device
- Connect the USB device to a different USB port on the Intel NUC to make sure there isn't a problem with that specific port.
- Check that you enable the USB Boot option in BIOS Setup:
- Press F2 during boot to enter BIOS Setup.
- Go to Advanced > Boot > Boot Configuration.
- In the Boot Devices pane, enable (check) USB to enable USB boot.
- Press F10 to exit BIOS Setup.

- Be sure that the external USB device is a bootable device. You can use an application like Rufus* to create a bootable USB device.
| Note |
If you've tried all the steps listed above and your Intel NUC still doesn't start properly, Intel Customer Support can help.
Click Contact Support below to find the support options for your region. Be ready to explain the steps you tried.
|