Article ID: 000038739 Content Type: Install & Setup Last Reviewed: 12/06/2023

Problems Installing ESXi* 6.0.0.update03 driver for the Intel® Server Board S2600WFT

Environment

Intel® Ethernet Server Adapter I350-T2

OS Independent

BUILT IN - ARTICLE INTRO SECOND COMPONENT
Summary

Steps to install network driver post operating system (OS) installation resulting in error message: "No network adapters were detected...."

Description

When an attempt to install VMware ESXi* 6.0.0.update03 is not possible to see the Ethernet as the installation process is stopped with the following message “No network adapters were detected...."

Either no network adapters are physically connected to the system, or a suitable driver could not be located. A third party driver may be required. Ensure that there is at least one network adapter physically connected to the system before attempting installation. If the problem persists, refer to the VMware Knowledge Base.

Resolution

Installation is required to use an additional Intel® Ethernet Adapter. For this resolution, the Intel® Ethernet Server Adapter I350-T2 was used.

  1. Download the ESXI iso on the VMware* site.
  2. Have the VMware ESXi ISO prepare for its installation on a thumb drive.
    Note

    A third-party software is required to create the Bootable ISO. For this installation, Rufus* was chosen.

    1. Connect the USB flash drive to your computer.
    2. Open Rufus.
    3. Select your device.
    4. Select your ISO file.
    5. Select MBR partition scheme for BIOS or UEFI computers.
    6. Press Start.
    7. Select Yes when it asks to replace menu.c32.
    8. Rufus will now create your bootable ESXi Installer USB Flash Drive.

    This will take about 3 to 5 minutes.

  3. Turn off the server and install the Ethernet PCIe* adapter. 
  4. Turn the server board back on and proceed with the installation.
  5. Proceed to install ESXi. At this point, the operating system (OS) will only recognize the PCIe adapter.
  6. After the ESXi installation, it is necessary to enable SSH access to the server on the ESXi configuration menu. Select System customization > Troubleshooting option > Enable SSH. (Secure Shell.)
  7. Navigate into the ESXi configuration and find the Network Adapters configuration to preview the IP address assigned to the PCIe adapter. 
  8. Download an SSH agent to connect to the server. 
  9. For this configuration, the software used was MobaXterm*.
  10. Download the Network Driver for VMware ESXi* based on Intel® 62X Chipset.
  11. Unzip the driver(VIB File) to a preferred location on the remote computer that will be using the SSH connection to the server.
  12. For this configuration, the file was copied to the desktop.
  13. Connect to the server via SSH by using root credentials. Copy the VIB or offline bundle to the ESXi server. 
  14. Technically, you can place the file anywhere that is accessible to the ESX console shell, but for these instructions, use the location /tmp folder.
  15. Use the following command: esxcli software vib install -v {VIBFILE}
  16. The full path to the file must be specified, for instance, if the file was place it on the tmp folder it should look like the following:

[root@localhost:~] esxcli software vib install -v /temp/i40en-1.3.1-10EM.600.0.0.2768847 .x86_64.vib


Then press Enter to run the driver installation:


example image


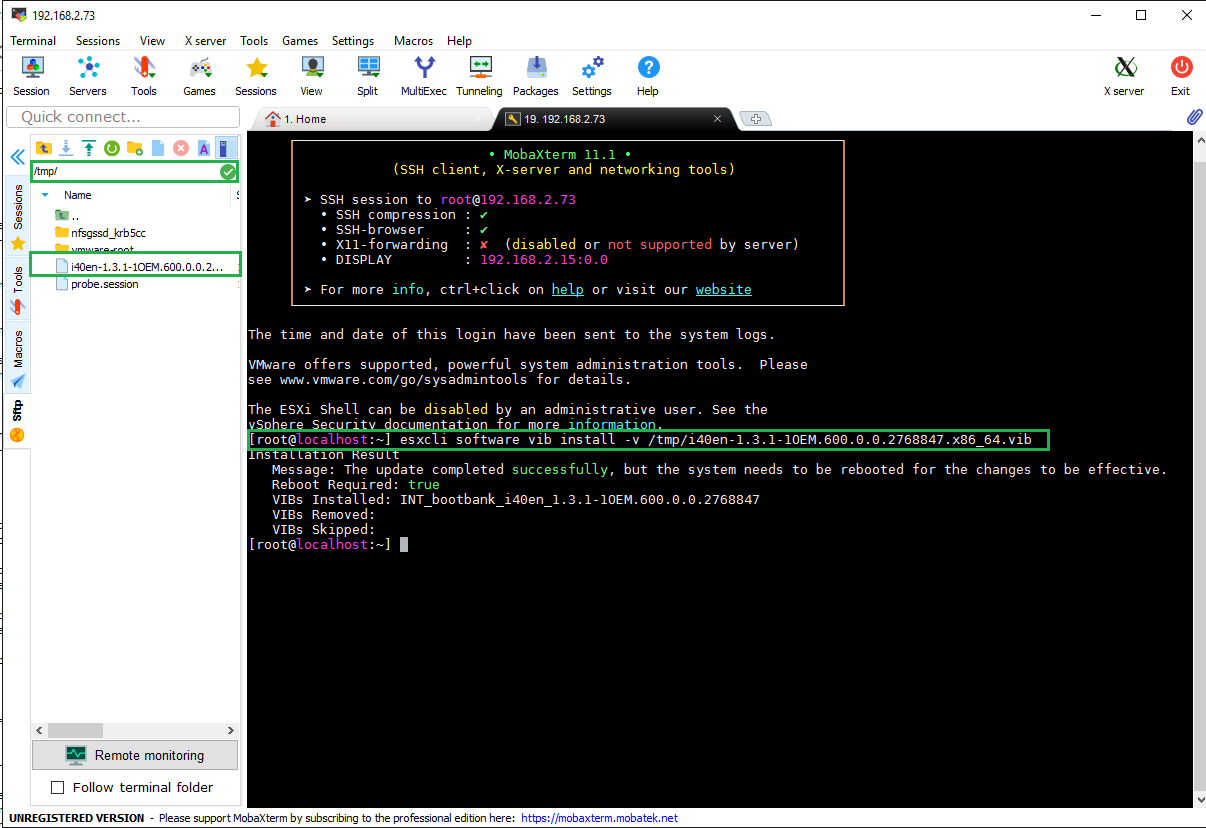
Installation result message


Message: The update completed successfully, but the system needs to be rebooted for the changes to be effective.

Reboot Required: true

VIBs Installed: INT_bootbank_i40en_1.3.1-10EM.600.0.0.2768847

VIBs Removed:

VIBs Skipped:

[root@localhost:~]


Download and install the vSphere* client for ESXi* to connect to the server.


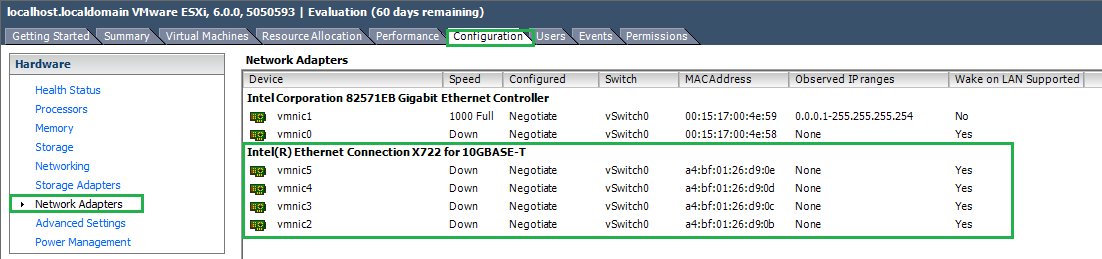
After the server is accessed, go to the Host>Configuration>Network Adapters and check if the Adapters are present.


example image


Shut down the server and remove the PCIe adapter if it will not be used. Restart the server and start using the embedded Network Adapter.

Additional information

The embedded Intel® Network Adapters are not detected when attempting to install the OS.

Related Products

This article applies to 1 products