WARNING: Electrostatic Discharge (ESD)
Electrostatic discharge can cause damage to your computer or the components within it. ESD can occur without the user feeling a shock while working inside the system chassis or while improperly handling electronic devices like processors, memory or other storage devices, and add-in cards.
Intel recommends the following steps be taken when performing any procedures described within this document or while performing service to any computer system:
- Where available, all system integration and/or service should be performed at a properly equipped ESD workstation.
- Wear ESD protective gear like a grounded antistatic wrist strap, sole grounders, and/or conductive shoes.
- Wear an anti-static smock or gown to cover any clothing that may generate an electrostatic charge.
- Remove all jewelry.
- Disconnect all cables and cords attached to the server before performing any integration or service.
- Touch any unpainted metal surface of the chassis before performing any integration or service.
- Hold all circuit boards and other electronic components by their edges only.
- After removing electronic devices from the system or from their protective packaging, place them component side up on to a grounded anti-static surface or conductive foam pad. Do not place electronic devices onto the outside of any protective packaging.
Requirements
The following items are required to install an Intel® RAID Module:
- Intel® RAID Module
- Intel® Server Board–based server system with support for an Intel® Integrated RAID Module
- Internal SAS/SATA data cables
- SAS drives or SATA drives
Packing List
(1) – Intel Integrated RAID Module
(4) – White Plastic Barrel Stand-offs
(4) – White Plastic Locking Pins
(1) – Attention Document
(1) – Warranty Document
| Note | Intel® RAID Products do not include SAS / SATA data cables. Appropriate SAS / SATA data cables may be included with your server system or must be purchased separately. |
Installation instructions
- Unpack the Intel® RAID Module.
Unpack and remove your RAID module. Inspect your module for damage. If your module appears damaged, contact your Intel Customer and Technical Support representative. - Turn off the power to the computer and disconnect the AC power cord.
- Remove the computer cover. Refer to the system documentation for instructions.
- Install the barrel standoffs:
- Locate the 80-pin SAS module connector on your server board. See your server board documentation.
- Insert the barrel standoffs into the matching holes in the server board.

Figure 3. Install the Barrel Standoff
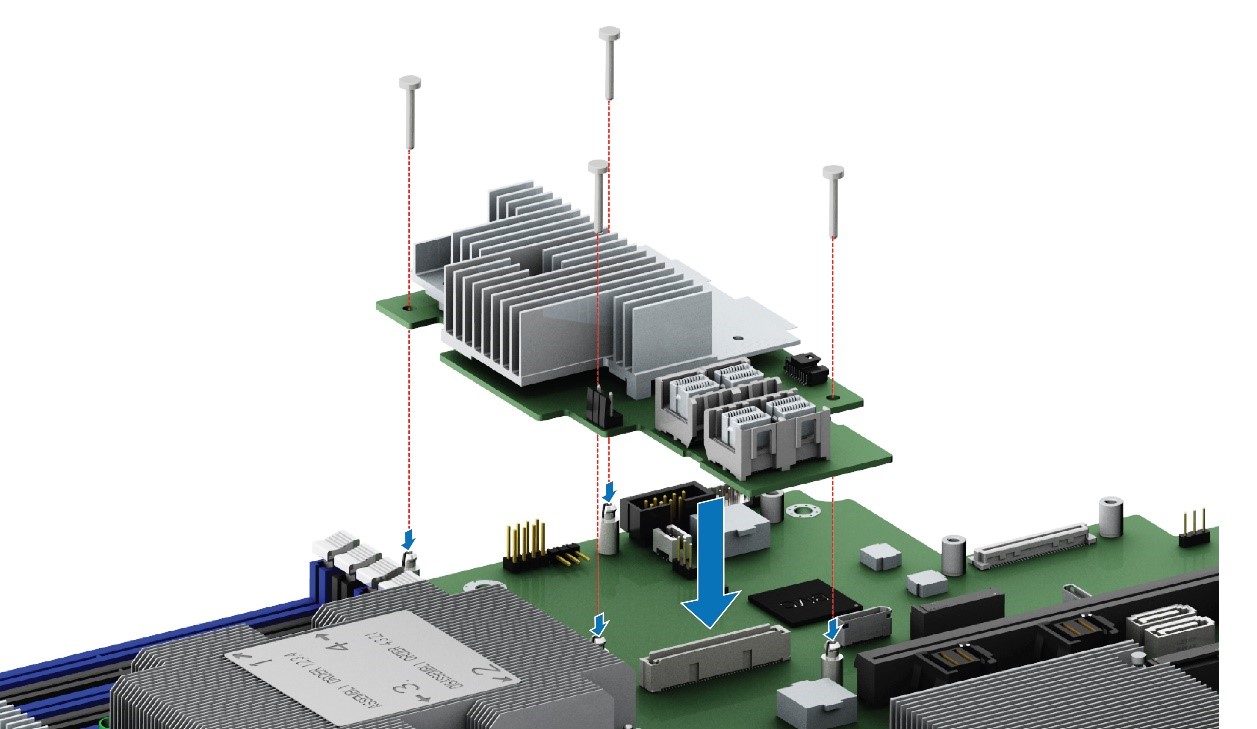
- Install the RAID module:
- Align the module mounting holes over the barrel stand-offs
- Press down firmly until the module connector is fully engaged with the matching connector on the server board and the module is firmly seated over each barrel standoff.
- Insert a locking pin into each barrel standoff.

Figure 4. Intel® RAID Module Installation
- Install SAS and/or SATA drives in the host computer case. Refer to the documentation for the devices for any pre-installation configuration requirements.
- Connect internal SAS/SATA data cables to appropriate Drives/Backplane/or Expander card.
- Carefully route SAS/SATA data cables back to the Intel RAID Module.
- Attach SAS/SATA data cables to the Intel RAID Module.
- Reinstall the computer cover and reconnect the AC power cords to the system.
The hardware installation is now complete, and the Intel RAID Module is ready to be configured. For complete Intel RAID module configuration information, refer to the Intel® RAID Software Users Guide.