Multiple steps are involved in creating a RAID 10 array. To begin the process, the BIOS entry screen or Intel® RAID BIOS Console prompts must be visible.
- If the Intel or OEM Logo Screen displays during POST, see steps to disable logo screen.
- If you see the BIOS entry screen, or the Intel® RAID BIOS command prompt, proceed to step 1.
Follow these steps to select the drives to create drive groups. See the Drive Group Definition screen image in this section. Each drive group must have the identical quantity and size of drives. For RAID 10, use two drives per drive group.
- When the server boots, press and hold Ctrl+G to enter the Intel RAID BIOS Console. The Controller Selection screen displays.
- Select a controller and click Start to begin the configuration.
- Select Custom Configuration and click Next. The Drive Group Definition screen displays.
- Press and hold Ctrl, and click two Drives in the left pane that you want in the first Drive Group.
- Click Add To Array. Click Accept DG to confirm. The first group of drives displays under Drive Groups in the right pane.
- From the drives that remain available, repeat steps 4 and 5.
The right pane now displays multiple Drive Groups. You can add up to eight arrays to the right pane for RAID 10. - In the Drive Group Definition screen, press and hold Ctrl and select the related Drive Groups to span for the RAID 10 array.
- Click Next.
- Click Add to SPAN.
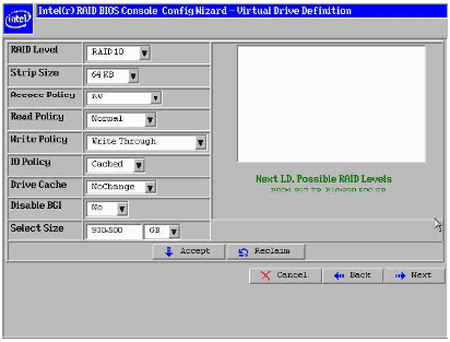
- Click Next. The Virtual Drive Definition screen displays. Refer to the image in this section.
- Click the RAID Level drop-down menu and select RAID 10.
- Make the appropriate selections for your application for these categories: Stripe Size, Access Policy, Read Policy, Write Policy, I/O Policy, Disk Cache, and Disable BGI (Y/N). For information, see Setting Drive Parameters in the Intel® RAID Software User’s Guide.
- Click the Select Size drop-down menu, and set the drive size to a number that is greater than the size of the Drive Group. Example: If Drive Group RAID1 = 465.250 GB, set the drive size to a minimum of 465.300, and a maximum of 930.500 GB.
- Click Accept.
- Click Next if the application does not automatically progress to the next screen.
- When asked to save the configuration, click Yes. The configuration is stored in the Intel® RAID Controller.

- When asked to initialize the drive, click Yes.
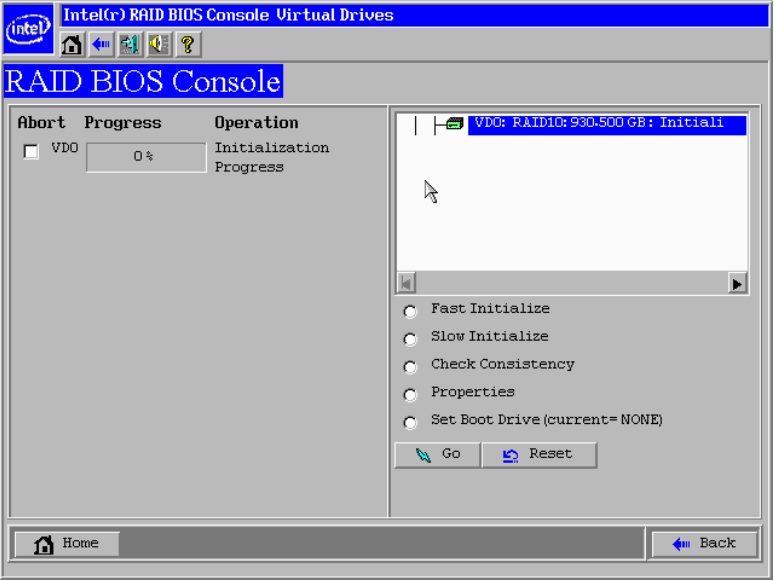
- Select Fast Initialize and click Go. The drives initialize based on the RAID settings. If you select Slow Initialize, the action initializes the entire drive, and can take several hours to complete.
- Click Home at the bottom to return to the main screen.

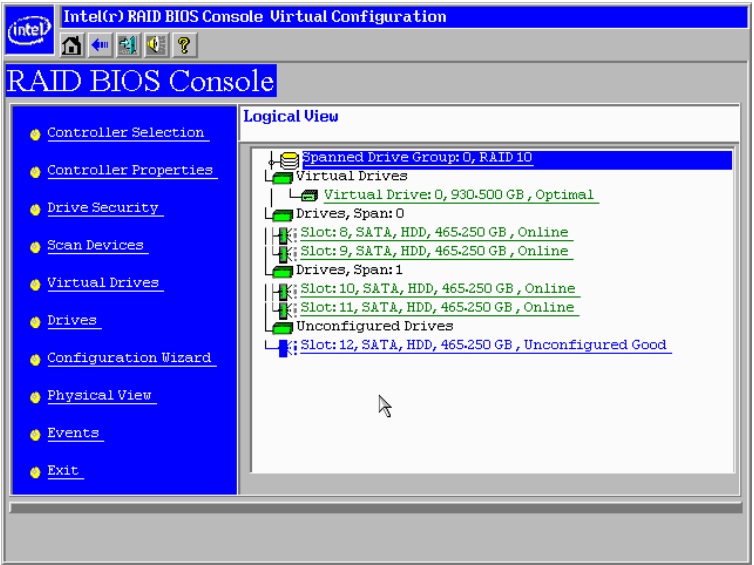
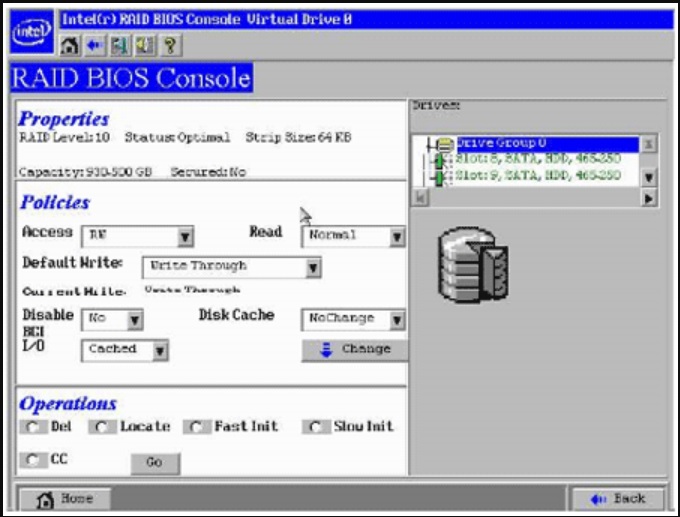
To see the drives, click Virtual Drives from the list on the left side of the Intel® RAID BIOS Console.

On the right side of the screen, select the Drive to view properties.
Where do I go for more information?
For information on how to create a spanned virtual drive (RAID 10, too) using the Intel® RAID BIOS Console 2 Utility, refer to Appendix A of the previously mentioned Intel® RAID Software User’s Guide.