Due to a problem in Intel® Quartus® Prime software version 19.2 and earlier, when using Remote System Upgrade (RSU) in Intel® Arria® 10 and Intel Cyclone® 10 GX devices, a reconfiguration triggered by nCONFIG fails to load the initial configuration image specified in the address pointer when multiple configuration devices are used and the current image is configured from the 2nd or 3rd configuration device.
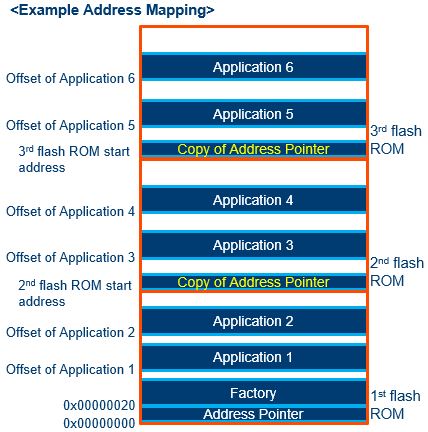
To work around this problem it is required to copy the address pointer block to each start address (0x0) of the 2nd and 3rd configuration devices as shown in the example address mapping below.
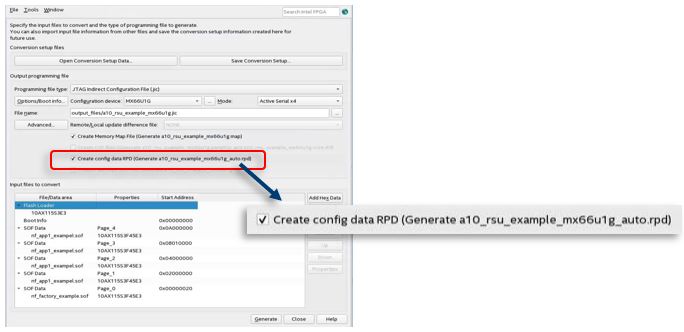
You can apply this work around when creating a .jic file using the following procedure.
1. Open the Convert Programming File tool and generate a .jic file
• Enable Create config data RPD (Generated <file name>_auto.rpd) option
(Options/boot info... > RPD file bit-level endianness = little endian)
• Set other parameters as usual
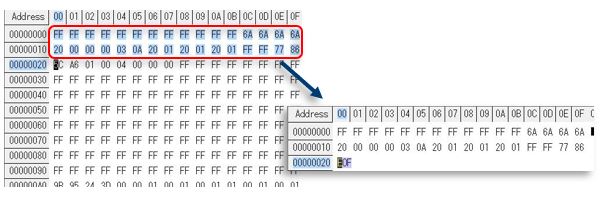
2. Open <file name>_flash1_auto.rpd with binary file editor
3. Extract data from 0x0 to 0x1F and save it as a binary file (ex. boot_info.bin)
4. Open a command shell or a NIOS II command shell and execute the following command to convert the binary file to a hex file
nios2-elf-objecopy –I binary –O ihex <input file>.bin <output file>.hex
ex.
nios2-elf-objecopy –I binary –O ihex boot_info.bin boot_info.hex
5. Open the Convert Programming File again and set parameters and options
6. Click Add Hex Data button and set the options on the Add Hex Data window
1) Select Relative addressing in Addressing mode,
2) Enable Set start address and enter the 2nd configuration device start address to the column (ex. 0x08000000 when two 1G-bit configuration devices are used)
3) Select Little Endian in Bit-level Endianness
4) Specify the hex file created in step 4 to Hex file column
5) Click OK
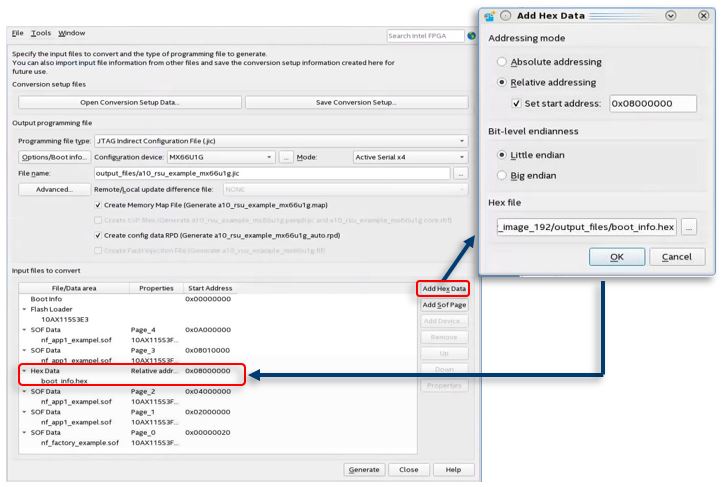
If 3rd configuration device is used, repeat step 6.
7. Click Generate to generate a workaround .jic file with the workaround
Note:
• When an application image on 2nd or 3rd configuration device is updated, it is recommended to use an offset address to avoid erasing a copy of address pointer block.
For example, if 64KB erase is used, a 0x10000 or larger offset address is recommended for the application image.
• An image can’t be stored across configuration device boundary since an address pointer block is stored at the start address (0x0) of every configuration device.
• The content of the address pointer won’t be changed unless the configuration device part number is changed. So you can reuse the hex file in step 4 when you update the .jic file with a new design image.
This problem has been fixed since the Intel Quartus® Prime software version 20.3.