This article shows how to run a typical inference use case on the Intel® Gaudi® AI accelerator. Learn how to select a model, set up the environment, run the workload, and then see a price-performance comparison. The accelerator supports PyTorch* as the main framework for inference.
The following code guides you in how to:
- Get access to a node for Intel Gaudi AI accelerator on the Intel® Tiber™ Developer Cloud.
- Ensure that all the software is installed and configured properly by running the PyTorch version of the Docker* image for the accelerator
- Select the model to run by loading the desired model repository and appropriate libraries for model acceleration.
- Run the model and extract the details for evaluation.
There are four methods for running inference on models:
- Using Hugging Face* models with the Optimum Habana library
- Using built-in PyTorch models with the Model References repository
- Automatically converting GPU-based models to be compatible with Intel Gaudi AI accelerators using the GPU Migration toolkit
- Manually migrating PyTorch models in the public domain
The Optimum Habana library and the Model References repository contain fully optimized and fully documented model examples. Use them as a starting point for running a model.
This example shows model inference with Hugging Face by running the Meta* Llama-2-70b model using the Optimum Habana library. Since Hugging Face models are used with an associated task, inference is run with the text-generation task.
Performance Evaluation
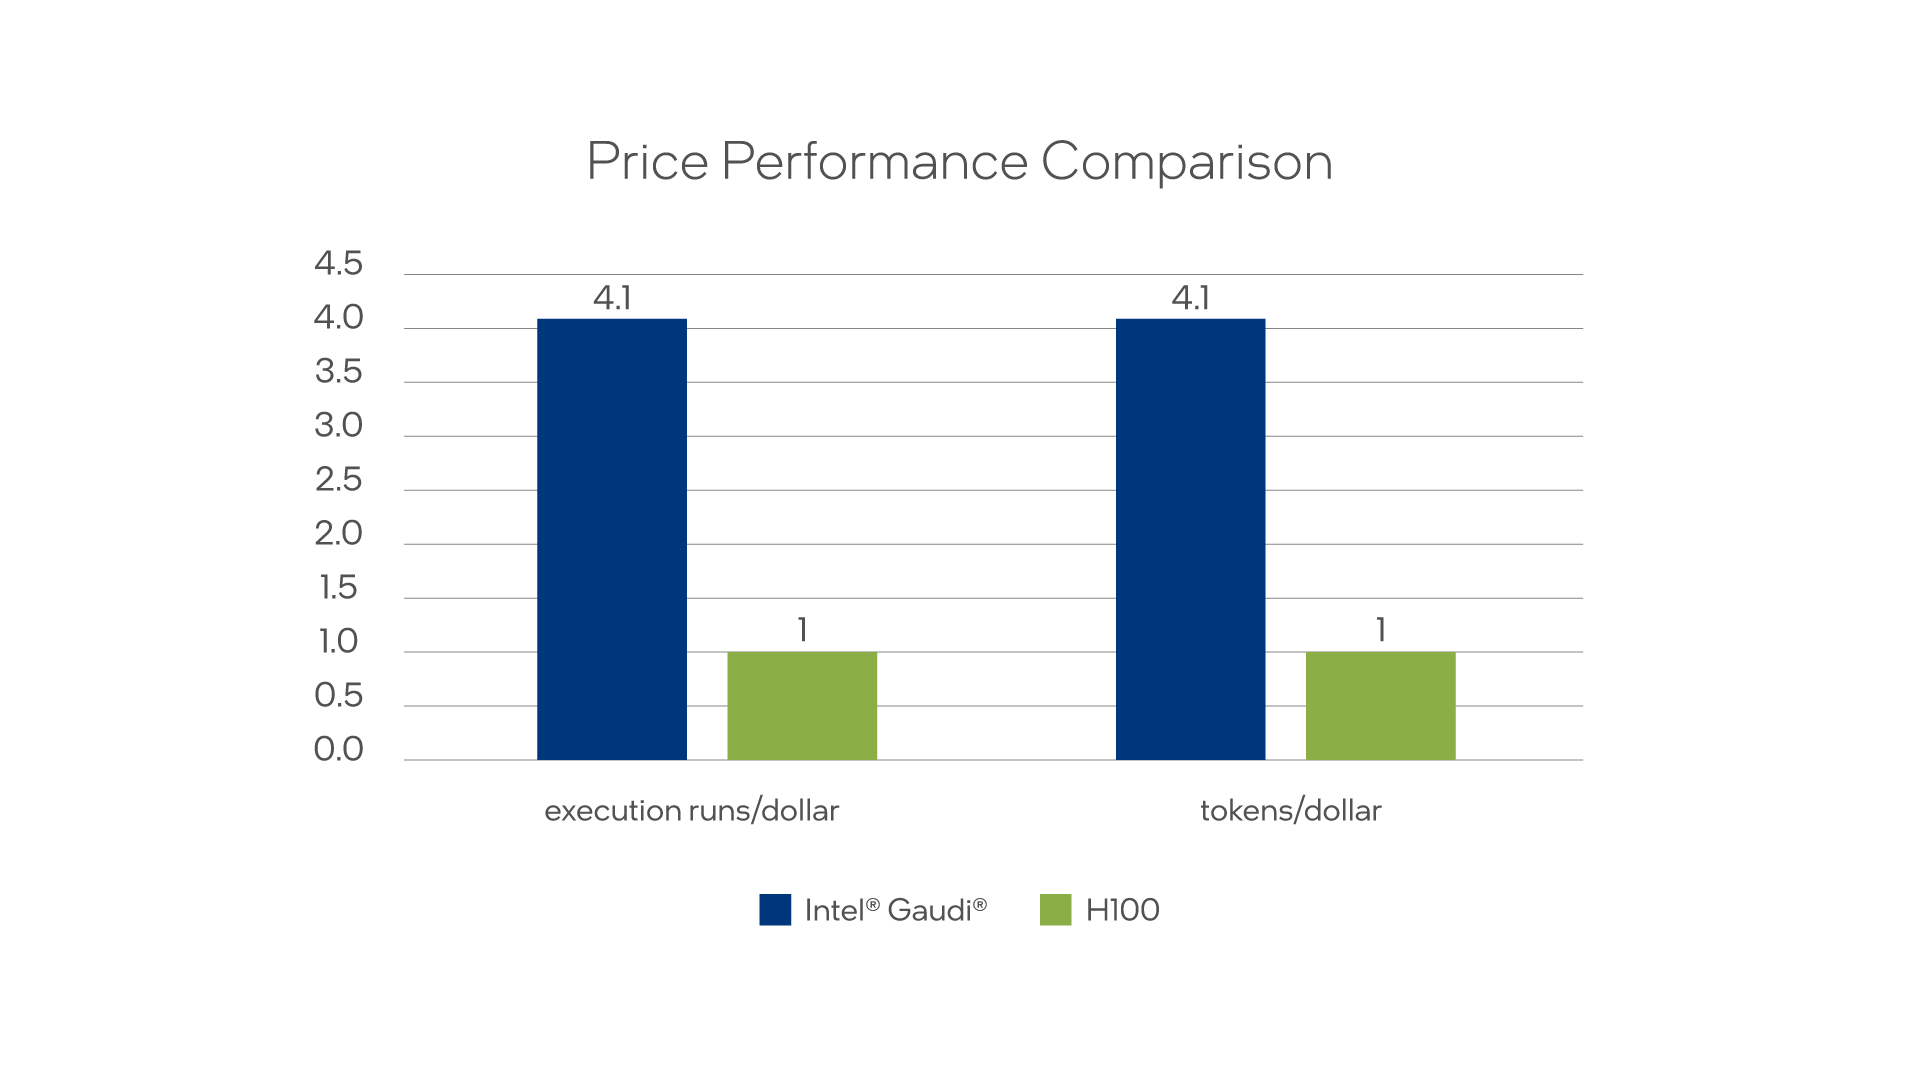
Before running the model, let's look at the performance measurements and a price-performance comparison to an equivalent H100 inference. In this case, the Llama-2-70b parameter model was selected using FP8, with 128 input tokens, 2048 output tokens, and four Intel Gaudi AI accelerators.1, 2

Figure 1. Performance cost differences
The tokens per dollar or inference runs per dollar are significantly higher than the NVIDIA* solution.
1 Benchmarks and performance data are published on the developer site.
2 The model is compared to the same model configuration using the H100 GPU using NVIDIA published inference benchmarks from June 25, 2024.
Runtime Instructions
The following are instructions to set up the node, the model infrastructure, and the full runtimes for the model.
Access the Node for Intel Gaudi AI Accelerators
To access a node in the Intel Tiber Developer Cloud:
- Go to the Intel Tiber AI Cloud Console
- Access the hardware instances.
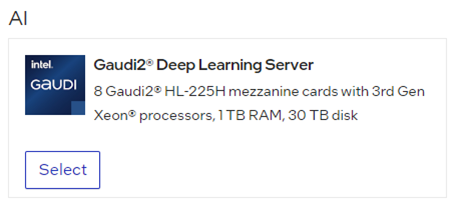
- For deep learning, select Gaudi2® Deep Learning Server.

Figure 2. Screenshot of the platform in Intel Tiber Developer Cloud
4. Follow the steps to start and connect to the node.
5. To sign into the node, use the website's ssh command. To access a local Jupyter* Notebook, add a local port that forwards the command. For example, add the command: ssh -L 8888:localhost:8888 ..
Set Up a Docker* Image
Now that you have access to the node, use the latest Docker image for Intel Gaudi AI accelerators:
- Call the Docker run command that automatically downloads and runs the image:
docker run -itd --name Gaudi_Docker --runtime=habana -e HABANA_VISIBLE_DEVICES=all -e OMPI_MCA_btl_vader_single_copy_mechanism=none --cap-add=sys_nice --net=host --ipc=host vault.habana.ai/gaudi-docker/1.16.2/ubuntu22.04/habanalabs/pytorch-installer-2.2.2:latest - To start the Docker image and enter the Docker environment, enter the following command:
docker exec -it Gaudi_Docker bash
Set Up the Model
Now that you're running in a Docker environment, let's install the remaining libraries and model repositories:
- Start in the root directory and install the Microsoft DeepSpeed* library:
Note DeepSpeed improves memory consumption on Intel Gaudi AI accelerators while running large language models (LLM).cd ~ pip install git+https://github.com/HabanaAI/DeepSpeed.git@1.16.2 - Install the Optimum Habana library and GitHub* examples.
Note You are selecting the latest validated release of Optimum Habana:pip install optimum-habana==1.12.0 git clone -b v1.12.0 https://github.com/huggingface/optimum-habana - To install the final set of requirements to run the model, transition to the text-generation example:
cd ~/optimum-habana/examples/text-generation
pip install -r requirements.txt
pip install -r requirements_lm_eval.txt
Access and Use the Llama 2 Model
Use of the pretrained model is subject to compliance with third-party licenses, including the Llama 2 Community License Agreement. For guidance on the intended use of the Llama 2 model, what is considered misuse and out-of-scope uses, who the intended users are, and additional terms, see License.3
To run gated models like Llama-2-70b-hf, you need to:
- Use a Hugging Face account and agree to the model terms of use.
- Create a read token and request access to the Llama 2 model from Meta Llama.
- Sign into your account using the Hugging Face command-line interface:
huggingface-cli login --token <your_hugging_face_token_here>
To run inference with the associated Jupyter Notebook, see Set Up a Jupyter Notebook.
3 Users bear sole liability and responsibility to follow and comply with any third-party licenses. Intel disclaims and bears no liability with respect to use or compliance with third-party licenses.
Run the Model Using the Bfloat16 Datatype
You're now ready to start running the model for inference. In this example, start with the standard inference example using bfloat16. Since Llama-2-70b is large, to more efficiently manage the memory use of the local high-bandwidth memory on each Intel® Gaudi® card, employ the DeepSpeed library. The following output with default settings is as follows:
python ../gaudi_spawn.py --use_deepspeed --world_size 8 run_generation.py \
--model_name_or_path meta-llama/Llama-2-70b-hf \
--max_new_tokens 4096 \
--bf16 \
--use_hpu_graphs \
--use_kv_cache \
--batch_size 52 \
--attn_softmax_bf16 \
--limit_hpu_graphs \
--reuse_cache \
--trim_logits
For more options for running inference with Llama 2 and other LLMs, see the Readme for the text-generation task example.
Stats:
-------------------------------------------------------------------------
Throughput (including tokenization) = 2388.9589733145144 tokens/second
Number of HPU graphs = 21
Memory allocated = 24.94 GB
Max memory allocated = 25.8 GB
Total memory available = 94.62 GB
Graph compilation duration = 269.2876660169568 seconds
-------------------------------------------------------------------------
Run the Model Using the FP8 Datatype
Using FP8 can give significantly better performance than bfloat16.
Note To learn more about FP8 quantization for Intel Gaudi AI accelerators, see the user guide.
- Run a quantization measurement. This is provided by running the local quantization tool using the maxabs_measure.json file that is already loaded on the Hugging Face library on GitHub.
QUANT_CONFIG=./quantization_config/maxabs_measure.json TQDM_DISABLE=1 \ python3 ../gaudi_spawn.py --use_deepspeed --world_size 4 \ run_lm_eval.py --model_name_or_path meta-llama/Llama-2-70b-hf \ -o acc_70b_bs1_measure4.txt \ --attn_softmax_bf16 \ --use_hpu_graphs \ --trim_logits \ --use_kv_cache \ --bucket_size=128 \ --bucket_internal \ --bf16 \ --batch_size 1 \ --use_flash_attention \ --flash_attention_recompute - The code generates a set of measurement values in an hqt_output folder that show what operations were converted to the FP8 datatype.
-rw-r--r-- 1 root root 347867 Jul 13 07:52 measure_hooks_maxabs_0_4.json -rw-r--r-- 1 root root 185480 Jul 13 07:52 measure_hooks_maxabs_0_4.npz -rw-r--r-- 1 root root 40297 Jul 13 07:52 measure_hooks_maxabs_0_4_mod_list.json -rw-r--r-- 1 root root 347892 Jul 13 07:52 measure_hooks_maxabs_1_4.json -rw-r--r-- 1 root root 185480 Jul 13 07:52 measure_hooks_maxabs_1_4.npz -rw-r--r-- 1 root root 40297 Jul 13 07:52 measure_hooks_maxabs_1_4_mod_list.json -rw-r--r-- 1 root root 347903 Jul 13 07:52 measure_hooks_maxabs_2_4.json -rw-r--r-- 1 root root 185480 Jul 13 07:52 measure_hooks_maxabs_2_4.npz -rw-r--r-- 1 root root 40297 Jul 13 07:52 measure_hooks_maxabs_2_4_mod_list.json -rw-r--r-- 1 root root 347880 Jul 13 07:52 measure_hooks_maxabs_3_4.json -rw-r--r-- 1 root root 185480 Jul 13 07:52 measure_hooks_maxabs_3_4.npz -rw-r--r-- 1 root root 40297 Jul 13 07:52 measure_hooks_maxabs_3_4_mod_list.json - You can use these measurements to run the throughput running of the model. In this case, a standard input prompt is used:
QUANT_CONFIG=./quantization_config/maxabs_quant.json TQDM_DISABLE=1 \
python3 ../gaudi_spawn.py --use_deepspeed --world_size 4 \
run_generation.py --model_name_or_path meta-llama/Llama-2-70b-hf \
--attn_softmax_bf16 \
--use_hpu_graphs \
--trim_logits \
--use_kv_cache \
--bucket_size=128 \
--bucket_internal \
--max_new_tokens 2048 \
--max_input_tokens 128 \
--bf16 \
--batch_size 750 \
--use_flash_attention \
--flash_attention_recompute
Notice that the quantization .json config file is used instead of the measurement file and additional input and output parameters are added. In this case, --max_new_tokens 2048 appears, which determines the size of the output text generated and --max_input_tokens 128 appears, which defines the size of the number of input tokens.
- You can now see the final values that align with the published numbers:
Stats:
------------------------------------------------------------------
Throughput (including tokenization) = 7429.9682811444545 tokens/second
Number of HPU graphs = 1554
Memory allocated = 20.64 GB
Max memory allocated = 94.11 GB
Total memory available = 94.62 GB
Graph compilation duration = 872.1275488010142 seconds
------------------------------------------------------------------
Additional Resources
For more options on running inference, see the Optimum Habana validated models.
Set Up a Jupyter* Notebook
Run these steps directly in the Jupyter Notebook interface or copy the following commands directly into the terminal window.
To set up a Jupyter Notebook:
-
To access a local Jupyter Notebook, add local port forwarding to the ssh command. For example, add the command: ssh -L 8888:localhost:8888 ..
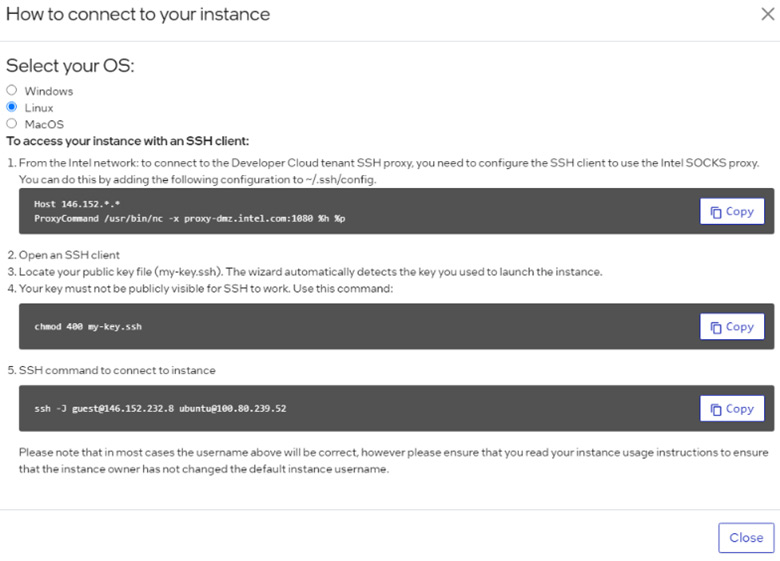
The standard sign-in is ssh -J guest@146.152.232.8 ubuntu 100.80.239.52 but to forward the port, change it to:ssh -L 8888:localhost:8888 -J guest@146.152.232.8 ubuntu 100.80.239.52

Figure 3. Screenshot of accessing your instance with an SSH client
- After you sign into the system, follow the steps in Set Up a Docker Image, Set Up the Model, and Access and Use the Llama 2 Model.
- You can now run the following command to install and run the Jupyter Notebook:
python3 -m pip install jupyterlab python3 -m jupyterlab_server --IdentityProvider.token='' --ServerApp.password='' --allow-root --port 8888 --ServerApp.root_dir=/root & - Open a browser, and then enter http://127.0.0.1:8888/lab.
- In the left pane, select /Gaudi-tutorials/PyTorch/Inference, and then select Intel_Gaudi_Inference.ipynb. The Jupyter Notebook appears as shown in Figure 4.

Figure 4. Screenshot of the UI for running inference