By Christian Mills, with Introduction by Peter Cross
Introduction
As part of this ongoing series focused on style transfer technology, we feel privileged that Graphics Innovator, Christian Mills, allowed us to repurpose much of his training in the Machine Learning and Style Transfer world, and share it with the game developer community.
Overview
In Part 1, we installed Unity* and selected an image for style transfer, and optionally used Unity* Recorder to record in-game footage. In Part 2, we practiced machine learning by using the free tier of Google Colab* to train a style transfer model. In this chapter, we will implement the trained style transfer model in the Unity* environment.
Create Style Transfer Folder
Back to the Unity* project, place all the additions in a new asset folder called Style_Transfer. This will keep things organized.

Import Model
Next, import the trained ONNX file that was created in Part 2.
Download ONNX Files
Right-click on the final.onnx in your Google Drive project folder and click Download.
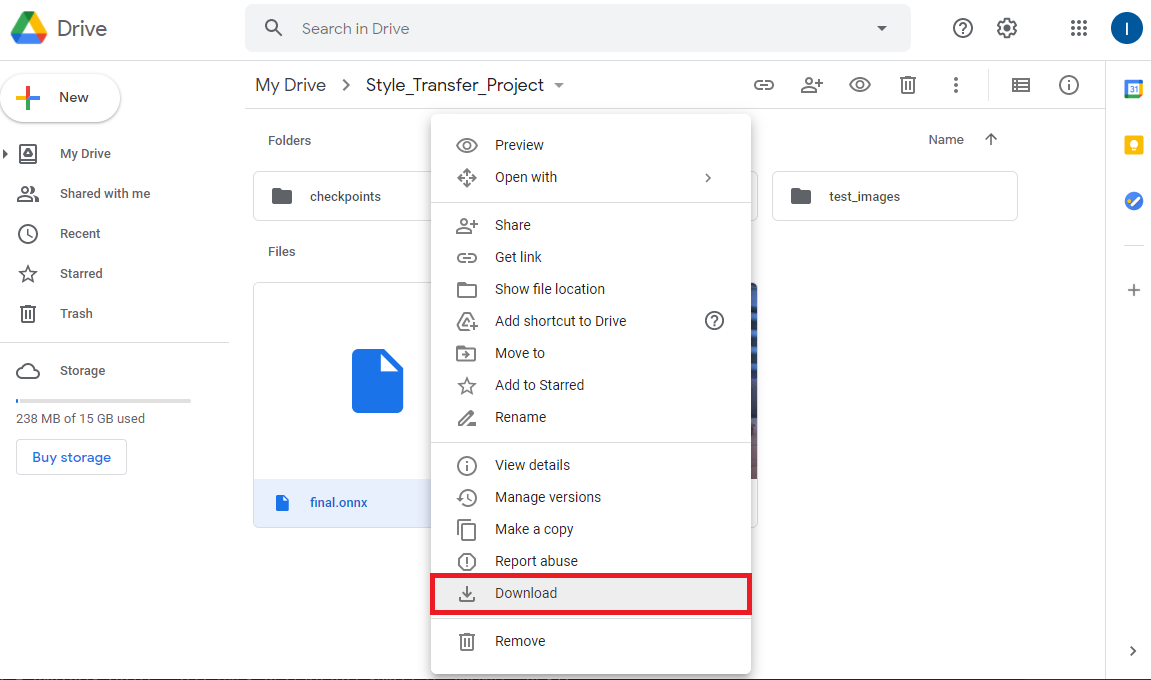
Alternatively, you can download this pretrained model instead that is geared towards the Raja tweet image we chose in Part 1.
Import ONNX Files to Assets
Open the Style_Transfer folder and create a new folder called Models.
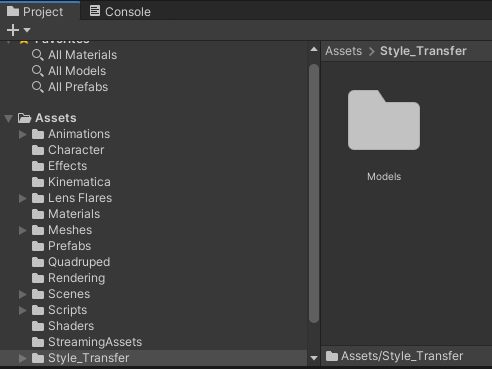
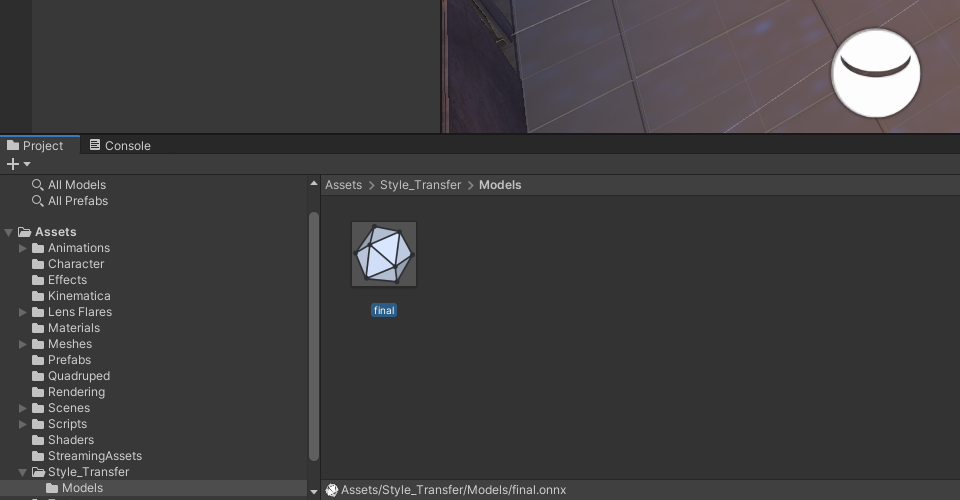
Drag and drop the ONNX files into the Models folder.
Create Compute Shader
You can perform both the pre-processing and post-processing operations on the GPU since both the input and output are images. Implement these steps in a compute shader.
Create the Asset File
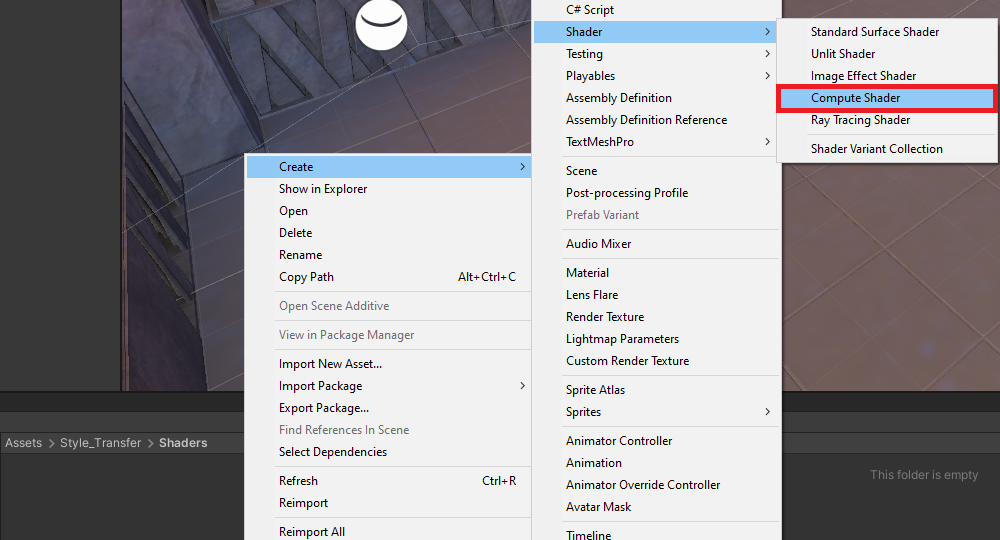
Open the Style_Transfer folder and create a new folder called Shaders. Select the Shaders folder and right-click an empty space. Select Shader in the Create submenu and click Compute Shader and name it StyleTransferShader.
Remove the Default Code
Open the StyleTransferShader in your code editor. By default, the ComputeShader contains the following code.
// Each #kernel tells which function to compile; you can have many kernels
#pragma kernel CSMain

// Create a RenderTexture with enableRandomWrite flag and set it
// with cs.SetTexture
RWTexture2D<float4> Result;

[numthreads(8,8,1)]
void CSMain (uint3 id : SV_DispatchThreadID)
{
// TODO: insert actual code here!

Result[id.xy] = float4(id.x & id.y, (id.x & 15)/15.0, (id.y & 15)/15.0,
0.0);
}
Delete the CSMain function along with the #pragma kernel CSMain. Next, add a Texture2D variable to store the input image. Name it as InputImage and give it a data type of . Use the same data type for the Result variable as well.
// Each #kernel tells which function to compile; you can have many
kernels
// Create a RenderTexture with enableRandomWrite flag and set it
// with cs.SetTexture
RWTexture2D<half4> Result;
Texture2D<half4> InputImage;
Create ProcessInput Function
The style transfer models expect RGB channel values are in the range [0, 255]. Color values in Unity are in the range [0,1]. Therefore, it is required to scale the three channel values for the InputImage by 255. Perform this step in a new function called ProcessInput as shown below.
// Each #kernel tells which function to compile; you can have many
kernels
#pragma kernel ProcessInput

// Create a RenderTexture with enableRandomWrite flag and set it
// with cs.SetTexture
RWTexture2D<half4> Result;
// Stores the input image and is set with cs.SetTexture
Texture2D<half4> InputImage;

[numthreads(8, 8, 1)]
void ProcessInput(uint3 id : SV_DispatchThreadID)
{
   Result[id.xy] = half4((InputImage[id.xy].x * 255.0h),
     (InputImage[id.xy].y * 255.0h),
     (InputImage[id.xy].z * 255.0h), 1.0h);
}
Create ProcessOutput Function
The models are supposed to output an image with RGB channel values in the range [0, 255]. However, it can sometimes return values a little outside that range. You can use the built-in clamp() method to make sure all values are in the correct range. Then scale the values back down to [0, 1] for Unity*. Perform these steps in a new function called ProcessOutput as shown below.
// Each #kernel tells which function to compile; you can have many kernels
#pragma kernel ProcessInput
#pragma kernel ProcessOutput

// Create a RenderTexture with enableRandomWrite flag and set it
// with cs.SetTexture
RWTexture2D<half4> Result;
9// Stores the input image and is set with cs.SetTexture
Texture2D<half4> InputImage;

[numthreads(8, 8, 1)]
void ProcessInput(uint3 id : SV_DispatchThreadID)
{
    Result[id.xy] = half4((InputImage[id.xy].x * 255.0h),
      (InputImage[id.xy].y * 255.0h),
      (InputImage[id.xy].z * 255.0h), 1.0h);
}

[numthreads(8, 8, 1)]
void ProcessOutput(uint3 id : SV_DispatchThreadID)
{
    Result[id.xy] = half4((clamp(InputImage[id.xy].x, 0.0f, 255.0f) / 255.0f),
      (clamp(InputImage[id.xy].y, 0.0f, 255.0f) / 255.0f),
      (clamp(InputImage[id.xy].z, 0.0f, 255.0f) / 255.0f), 1.0h);
}
Now that you have created the ComputeShader, execute it using a C# script.
Create StyleTransfer Script
Make a new C# script to perform inference with the style transfer model. This script will load the model, process the input, run the model, and process the output.
Create the Asset File
Open the Style_Transfer folder and create a new folder called Scripts. In the Scripts folder, right-click in empty space and select C# Script in the Create submenu.
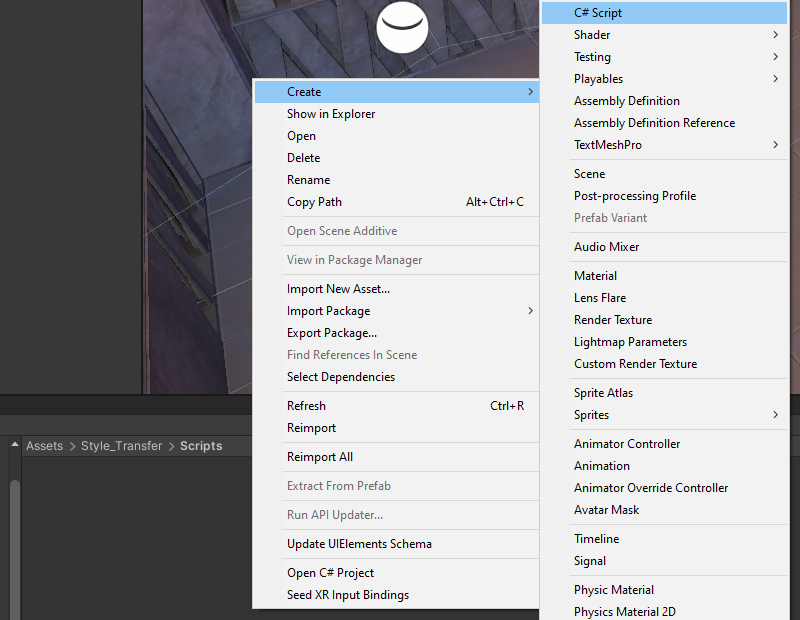
Name the script as StyleTransfer.
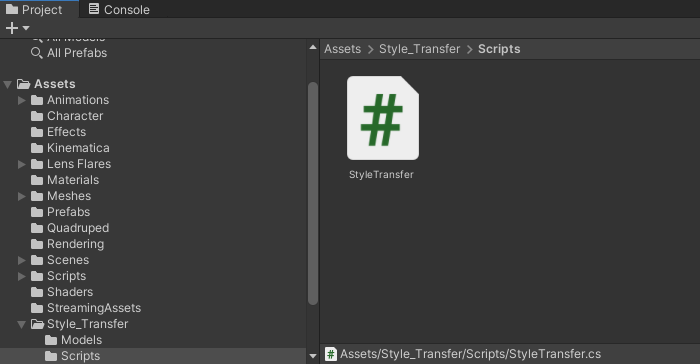
Add Unity.Barracuda Namespace
Open the StyleTransfer script and add the Unity.Barracuda namespace at the top of the script.
using System.Collections;
using System.Collections.Generic;
using UnityEngine;
using Unity.Barracuda;

public class StyleTransfer : MonoBehaviour
Create StyleTransferShader Variable
Next, add a public variable to access the compute shader.
public class StyleTransfer : MonoBehaviour
{
    [Tooltip("Performs the preprocessing and postprocessing steps")]
     public ComputeShader styleTransferShader;

    // Start is called before the first frame update
    void Start()
Create Style Transfer Toggle
Add a public bool variable to indicate whether you want to stylize the scene. This will create a checkbox in the Inspector tab that can be used to toggle the style transfer on and off while the game is running.
public class StyleTransfer : MonoBehaviour
{
   [Tooltip("Performs the preprocessing and postprocessing steps")]
    public ComputeShader styleTransferShader;

   [Tooltip("Stylize the camera feed")
    public bool stylizeImage = true;

   // Start is called before the first frame update
   void Start()
Create TargetHeight Variable
Getting playable frame rates at higher resolutions can be difficult even when using a smaller model. You can help the GPU by scaling down the camera input to a lower resolution before feeding it to the model. Then scale the output image up to the source resolution. This can also yield results closer to the test results during training if you trained the model with lower resolution images.
Create a new public int variable named targetHeight. Set the default value to 540 which is the same as the test image used in the Colab Notebook.
public class StyleTransfer : MonoBehaviour
{
   [Tooltip("Performs the preprocessing and postprocessing steps")]
   public ComputeShader styleTransferShader;

   [Tooltip("Stylize the camera feed")]
    public bool stylizeImage = true;

   [Tooltip("The height of the image being fed to the model")]
    public int targetHeight = 540;

   // Start is called before the first frame update
   void Start()
Create Barracuda Variables
Now add a few variables to perform inference with the style transfer model.
Create modelAsset Variable
Make a new public NNModel variable called modelAsset. Assign the ONNX file to this variable in the Unity* Editor.
[Tooltip("Stylize the camera feed")]
public bool stylizeImage = true;

[Tooltip("The height of the image being fed to the model")]
public int targetHeight = 540;

[Tooltip("The model asset file that will be used when performing inference")]
public NNModel modelAsset;

// Start is called before the first frame update
void Start()
Create workerType Variable
Add a variable that lets us choose which backend to use when performing inference. The options are divided into CPU and GPU. The image processing steps run entirely on the GPU so we will be sticking with the GPU options for this tutorial series.
Make a new public WorkerFactory.Type called workerType. Give it a default value of WorkerFactory.Type.Auto.
[Tooltip("The height of the image being fed to the model")]
public int targetHeight = 540;

[Tooltip("The model asset file that will be used when performing inference")]
public NNModel modelAsset;

[Tooltip("The backend used when performing inference")]
public WorkerFactory.Type workerType = WorkerFactory.Type.Auto;

// Start is called before the first frame update
void Start()
Create m_RuntimeModel Variable
Youcneed to compile the modelAsset into a run-time model to perform inference. Store the compiled model in a new private Model variable called m_RuntimeModel.
[Tooltip("The model asset file that will be used when performing inference")]
public NNModel modelAsset;

[Tooltip("The backend used when performing inference")]
public WorkerFactory.Type workerType = WorkerFactory.Type.Auto;

// The compiled model used for performing inference private Model m_RuntimeModel;

// Start is called before the first frame update
void Start()
Create engine Variable
Next, create a new private IWorker variable to store the inference engine. Name the variable as engine.
[Tooltip("The backend used when performing inference")]
public WorkerFactory.Type workerType = WorkerFactory.Type.Auto;

// The compiled model used for performing inference
private Model m_RuntimeModel;

// The interface used to execute the neural network
private IWorker engine;

// Start is called before the first frame update
void Start()
Compile the Model
It is required to get an object oriented representation of the model using the ModelLoader.Load() method before you can work with it. Do this step in the Start() method and store it in the m_RuntimeModel.
// Start is called before the first frame update
void Start()

{
   // Compile the model asset into an object oriented representation
   m_RuntimeModel = ModelLoader.Load(modelAsset);
}
Initialize Inference Engine
Now create a worker to execute the model using the selected backend. Perform this step by using the WorkerFactory.CreateWorker() method.
// Start is called before the first frame update
void Start()
{
   // Compile the model asset into an object oriented representation
   m_RuntimeModel = ModelLoader.Load(modelAsset);

   // Create a worker that will execute the model with the selected
backend
   engine = WorkerFactory.CreateWorker(workerType, m_RuntimeModel);
}
Release Inference Engine Resources
Manually release the resources that get allocated for the inference engine. This should be one of the last actions to be performed. Therefore, perform this step by the OnDisable() method. This method gets called when the Unity* project exits.
// OnDisable is called when the MonoBehavior becomes disabled or
inactive
private void OnDisable()
{
   // Release the resources allocated for the inference
   engine engine.Dispose();
}
Create ProcessImage() Method
Next, make a new method to execute the ProcessInput() and ProcessOutput() functions in our ComputeShader. This method will take the image that needs to be processed as well as a function name to indicate which function is to be executed. Store the processed images in textures with HDR formats. This will allow us to use color values outside the default range of [0, 1]. As mentioned previously, the model expects values in the range of [0, 255].
Method Steps
- Get the ComputeShader index for the specified function
- Create a temporary RenderTexture with random write access enabled to store the processed image
- Execute the ComputeShader
- Copy the processed image back into the original RenderTexture
- Release the temporary RenderTexture
Method Code
/// <summary>]/// Process the provided image using the specified function on the
GPU
/// </summary>
/// <param name="image"></param>
/// <param name="functionName"></param>
/// <returns>The processed image</returns>
private void ProcessImage(RenderTexture image, string functionName)
{
   // Specify the number of threads on the GPU
   int numthreads = 8;
   // Get the index for the specified function in the ComputeShader
   int kernelHandle = styleTransferShader.FindKernel(functionName);
   // Define a temporary HDR RenderTexture
   RenderTexture result = RenderTexture.GetTemporary(image.width,
image.height, 24, RenderTextureFormat.ARGBHalf);
   // Enable random write access
   result.enableRandomWrite = true;
   // Create the HDR RenderTexture
   result.Create();

   // Set the value for the Result variable in the ComputeShader
   styleTransferShader.SetTexture(kernelHandle, "Result", result);
   // Set the value for the InputImage variable in the ComputeShader
   styleTransferShader.SetTexture(kernelHandle, "InputImage",
image);

   // Execute the ComputeShader
   styleTransferShader.Dispatch(kernelHandle, result.width /
numthreads, result.height / numthreads, 1);
   // Copy the result into the source RenderTexture
   Graphics.Blit(result, image);
   // Release the temporary
   RenderTexture RenderTexture.ReleaseTemporary(result);
}
Create StylizeImage() Method
Create a new method to handle stylizing individual frames from the camera. This method will take in the src RenderTexture from the game camera and copy the stylized image back into that same RenderTexture.
Method Steps:
- Resize the camera input to the targetHeight
If the height of src is larger than the targetHeight, calculate the new dimensions to downscale the camera input. Adjust the new dimensions to be multiples of 8. This is to make sure we don’t lose parts of the image after applying the processing steps with the Compute shader. - Apply preprocessing steps to the image
Call the ProcessImage() method and pass rTex along with the name for the ProcessInput() function in the ComputeShader. The result will be stored in rTex. - Execute the model
Use the engine.Execute() method to run the model with the current input. We can store the raw output from the model in a new Tensor. - Apply the postprocessing steps to the model output
Call the ProcessImage() method and pass rTex along with the name for the ProcessOutput() function in the ComputeShader. The result will be stored in rTex. - Copy the stylized image to the src RenderTexture
Use the Graphics.Blit() method to copy the final stylized image into the src RenderTexture. - Release the temporary RenderTexture
Finally, release the temporary RenderTexture.
Method Code
/// <summary>
/// Stylize the provided image
/// </summary>
/// <param name="src"></param>
/// <returns></returns>
private void StylizeImage(RenderTexture src)
{
   // Create a new RenderTexture variable
   RenderTexture rTex;

   // Check if the target display is larger than the targetHeight
  // and make sure the targetHeight is at least 8
  if (src.height > targetHeight && targetHeight >= 8)
  {
     // Calculate the scale value for reducing the size of the
input image
     float scale = src.height / targetHeight;
    // Calculate the new image width
    int targetWidth = (int)(src.width / scale);

   // Adjust the target image dimensions to be multiples of 8
   targetHeight -= (targetHeight % 8);
   targetWidth -= (targetWidth % 8);

  // Assign a temporary RenderTexture with the new dimensions
  rTex = RenderTexture.GetTemporary(targetWidth, targetHeight,
24, src.format);
    }
    else
    {
       // Assign a temporary RenderTexture with the src dimensions
       rTex = RenderTexture.GetTemporary(src.width, src.height, 24,
src.format);
    }

     // Copy the src RenderTexture to the new rTex RenderTexture
     Graphics.Blit(src, rTex);

     // Apply preprocessing steps
     ProcessImage(rTex, "ProcessInput");

    // Create a Tensor of shape [1, rTex.height, rTex.width, 3]
    Tensor input = new Tensor(rTex, channels: 3);

    // Execute neural network with the provided input
    engine.Execute(input);

    // Get the raw model output
    Tensor prediction = engine.PeekOutput();
    // Release GPU resources allocated for the Tensor
    input.Dispose();

    // Make sure rTex is not the active RenderTexture
    RenderTexture.active = null;
    // Copy the model output to rTex
    prediction.ToRenderTexture(rTex);
    // Release GPU resources allocated for the Tensor
    prediction.Dispose();

    // Apply post processing steps
    ProcessImage(rTex, "ProcessOutput");
    // Copy rTex into src
    Graphics.Blit(rTex, src);

    // Release the temporary RenderTexture
    RenderTexture.ReleaseTemporary(rTex);
}
Define OnRenderImage() Method
Call the StylizeImage() method from the OnRenderImage() method instead of the Update() method. This will give access to the RenderTexture for the game camera as well as the RenderTexture for the target display. We will only call the StylizeImage() method if stylizeImage is set to true. Delete the empty Update() method as it is not needed in this tutorial.
Method Steps:
- Stylize the RenderTexture for the game camera.
- Copy the RenderTexture for the camera to the RenderTexture for the target display.
Method Code
/// <summary>
/// OnRenderImage is called after the Camera had finished rendering
/// </summary>
/// <param name="src">Input from the Camera</param>
/// <param name="dest">The texture for the target display</param>
void OnRenderImage(RenderTexture src, RenderTexture dest)
{
   if (stylizeImage)
   {
     StylizeImage(src);
   }

   Graphics.Blit(src, dest);
}
This completes the StyleTransfer script.
Attach Script to Camera
To run the StyleTransfer script, attach it to the active Camera in the scene.
Select the Camera
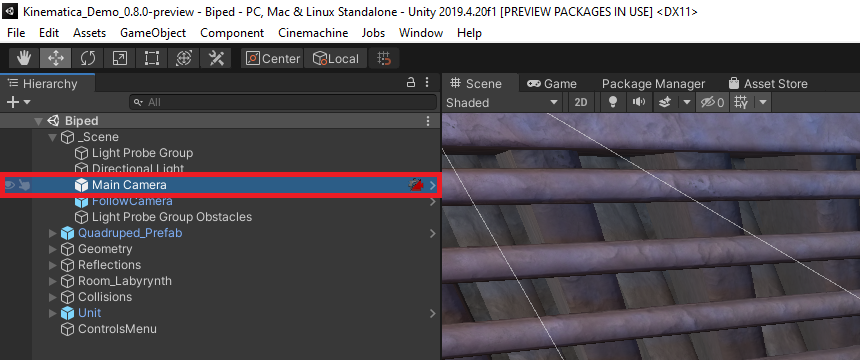
Open the Biped scene and expand the _Scene object in the Hierarchy tab. Select the Main Camera object from the dropdown list.
Attach the StyleTransfer Script
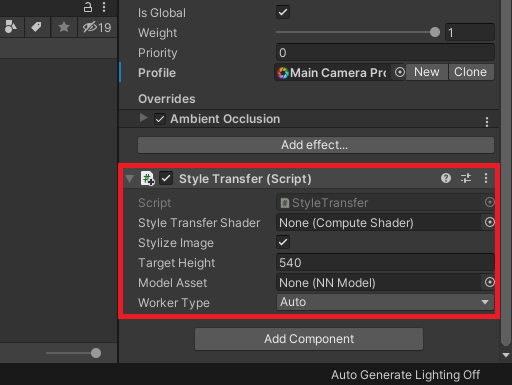
With the Main Camera object still selected, drag and drop the StyleTransfer script into the bottom of the Inspector tab.
Assign the Assets
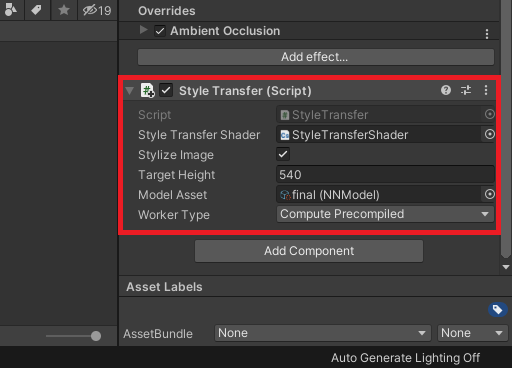
Now, assign the ComputeShader and model assets and set the inference backend. Drag and drop the StyleTransferShader asset into the StyleTransferShader spot in the Inspector tab. Then, drag and drop the final.onnx asset into the Model Asset spot in the Inspector tab. Finally, select Compute Precompiled from the WorkerType dropdown. This is the most efficient GPU backend.
Reduce Flickering
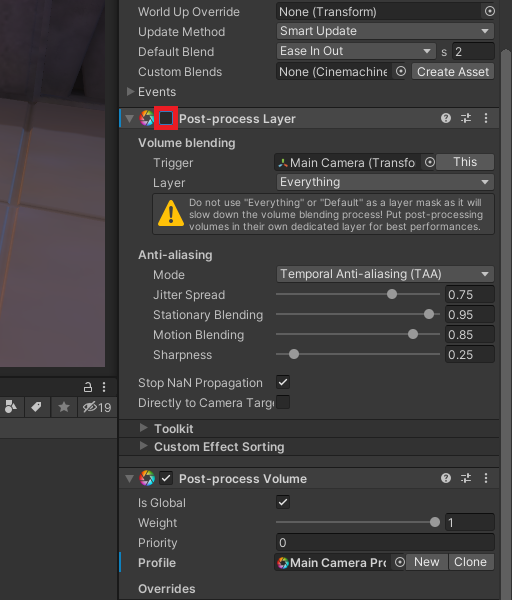
The style transfer model used in this tutorial series does not account for consistency between frames. This results in a flickering effect that can be distracting. Getting rid of this flickering entirely would require using a different, less efficient, model. However, we can minimize flickering when the camera is not moving by disabling the Post-process Layer attached to the Main Camera object.
Test it Out
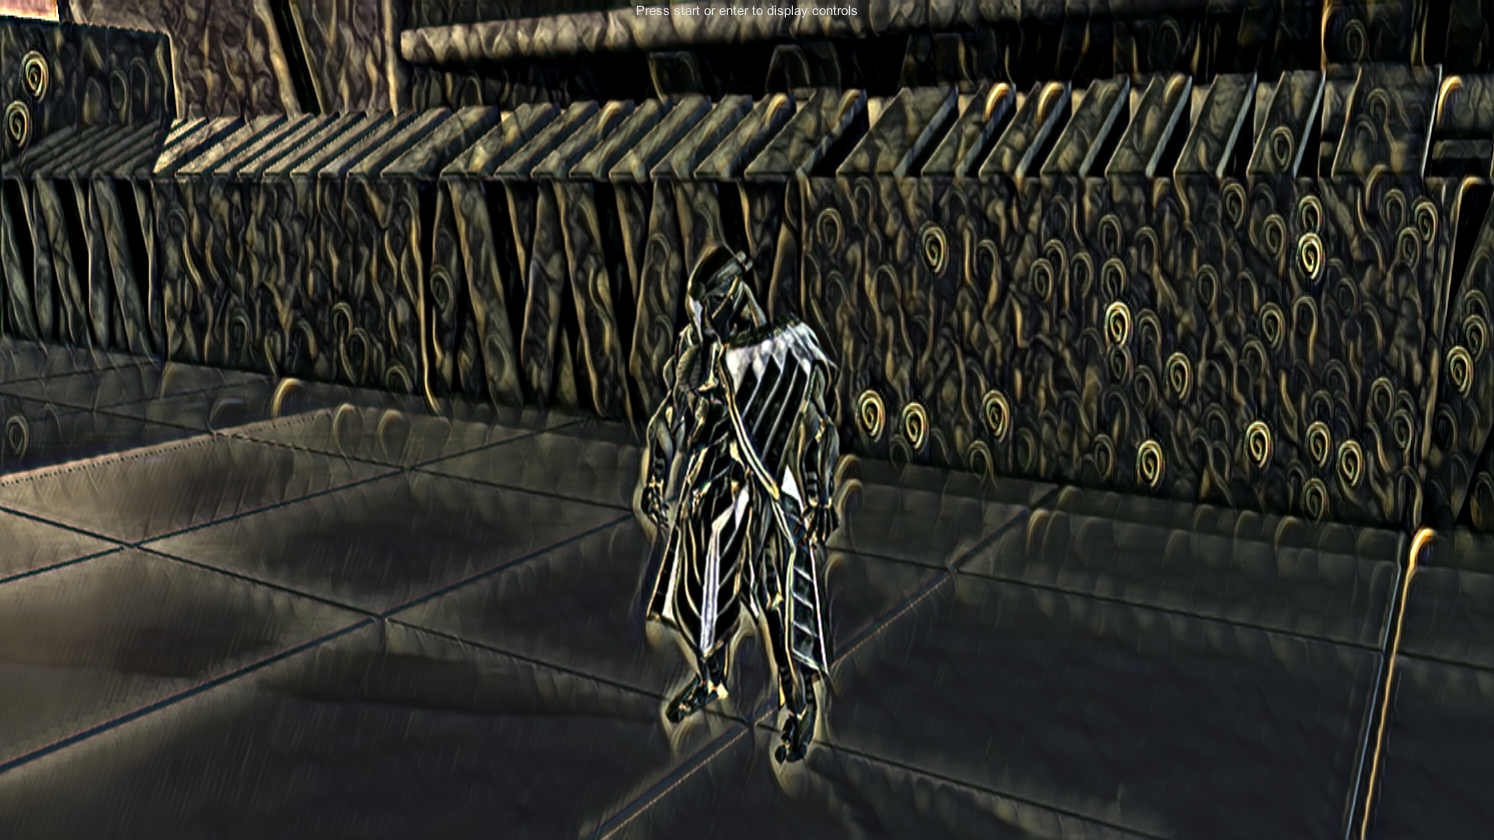
At last, click the play button to see how it runs. You can get higher frame rates by lowering the Target Height value in the Inspector tab.
Conclusion
We now have a complete workflow for implementing in-game style transfer in Unity* using the Barracuda inference engine. You can train as many style transfer models as you want using the Colab Notebook and drop them into our project.
Future tutorials will show how you can selectively target GameObjects for style transfer, as well as using different inference engines (like Intel® Distribution of OpenVINO™ toolkit) to assess performance improvements.
Previous Tutorial Sections:
Part 1
Part 1.5
Part 2
Related Links:
Targeted GameObject Style Transfer Tutorial in Unity
GitHub Repository