Introduction
Network function virtualization (NFV) brings numerous benefits to communication service providers (CSPs). These include the ability to quickly introduce new services, improved customer satisfaction, reduced capital expenditure (CAPEX) and operational expenditure (OPEX) and the disaggregation of the solution stack. Disaggregation allows CSPs to choose best-in-class components but moves the burden of tasks such as virtual network function (VNF) performance validation and onboarding to the CSP.
The CSP conducts VNF performance validation for a simple reason — their environment and the VNF vendor’s environment is unlikely to match. In fact, the vendor is incentivized to use an unrealistic environment to maximize their performance, such as using ten 10 GbE network interface cards (NICs) attached to one server. Furthermore, NFV requires that the VNF be onboarded to the management and orchestration (MANO) software being used. There was nothing equivalent to this in the pre-NFV world.
The good news is that there are open source tools to simplify performance validation and VNF onboarding tasks. In this article, we will explain these tools and apply them to an open source VNF. Finally, we will discuss how to deploy the onboarded VNF.
Open Source Software Used
We will use the following open source tools:
- OPNFV Yardstick Network Service Benchmarking (NSB)
- OPNFV Sample VNF
- Open Network Automation Platform (ONAP)
- OPNFV OpenStack* Scenario
Methodology
We will use a six-step methodology:
- Conduct network service benchmarking (NSB) performance testing on the L2 Forwarding VNF
- Create a VNF package for the VNF as per Open Network Automation Platform (ONAP) specifications using OpenStack* Heat
- Create a VNF package for a traffic generator
- Onboard both VNFs onto ONAP
- Create a network service using the two VNFs
- Deploy network service and verify that the service is operational, i.e., the traffic is flowing
Performance Validation
The first step involves conducting NSB performance testing on the L2 Forwarder VNF. Here is a list of detailed steps to do so in a Google Cloud Platform* service environment. These steps can be modified to run on a bare metal server as well.
- Get access to the Aarna Networks* ONAP Distribution (ANOD). This fully open source ONAP distribution includes an OPNFV (OpenStack) scenario as well.
- Deploy OPNFV on CentOS* 7.x server or a Google Compute Engine instance, with vCPUs = 16, and RAM = 32 GB. This virtual machine (VM) will also be referred to as the jump host. Next:
sudo -i cd /opnfv_deploy nohup opnfv-deploy -v --debug --virtual-cpus 16 --virtual-default-ram 32 -n network_settings.yaml -d os-nosdn-nofeature-noha.yaml # This takes about 90 minutes to complete! - You can find the IP address of the OpenStack Horizon interface in the OpenStack credentials file on the Undercloud instance of OpenStack (log in using the command
opnfv-utilundercloud, and refer to the fileovercloudrc.v3).sudo -i opnfv-util undercloud cat overcloudrc.v3 - Log into the Horizon dashboard to examine OpenStack parameters such as the number of resources for hypervisors and so on (after setting up a SOCKS proxy tunnel).
- Create a Kernel-based Virtual Machine (KVM) instance of Ubuntu* 16.04, with the following resources in the jump host. If you are running this on a local server, you need to create this VM using a standard Ubuntu 16.04 cloud image. This VM requires the following resources:
- vCPUs = 8
- RAM = 100 GB
Note NSB scripts do not work on CentOS distributions, so cannot be run from the base jump host
- Log in to an Ubuntu instance as user aarna and copy the OpenStack credentials file to this directory (
/opnfv-yardstick). Edit this file, remove comments and shell commands, and retain only the environment variables (openstack.creds.sh). - Run the following as a sudo user on the Ubuntu VM:
sudo -i cd /home/aarna git clone https://gerrit.opnfv.org/gerrit/yardstick cd yardstick # Switch to latest stable branch # git checkout <tag or stable branch> git checkout stable/euphrates # Run as sudo user... nohup ./nsb_setup.sh /opnfv-yardstick/openstack.creds.sh & # This command takes about 1 hour to complete - Once this command completes successfully, you can see a Yardstick container created on this VM. Run the bash shell on this container. There is no need to explicitly start the container (
nsb_setupdoes it).docker ps -a # You should see yardstick container docker exec -it yardstick /bin/bash # execute shell in the container - The
nsb_setupscript also prepares the cloud image (yardstick-samplevnfs) for OpenStack and adds it to Glance on the OpenStack. This image contains the needed utilities for running any Sample VNFs. - Create the configuration file for Yardstick:
cp ./etc/yardstick/yardstick.conf.sample /etc/yardstick/yardstick.conf # Edit this file and add the file as the destination (in addition to http). To view the results in Grafana, set it to influxdb - For this article, we will use the sample VNF
L2FWD, which does L2 forwarding functions.Edit the
L2FWDtest case from prox VNF (yardstick/samples/vnf_samples/nsut/prox/tc_prox_heat_context_l2fwd-2.yaml), and reduce the resource requirements in the context section of the file.- CPUs = 8
- RAM = 10 GB
- Edit the following file and make the following changes. A bare metal deployment does not require these changes; however, a VM deployment on OpenStack takes more time to boot up and does need these edits.
- File: yardstick/ssh.py
i. Change the timeout from 120 to 480 (seconds)
ii. Change SSH retry interval from 1 sec to 2 sec
- File: yardstick/ssh.py
- Set up the environment to run the test:
source /etc/yardstick/openstack.creds export EXTERNAL_NETWORK="external” - Run the sample NSB test from Yardstick
yardstick --debug task start samples/vnf_samples/nsut/prox/tc_prox_heat_context_l2fwd-2.yaml - This step takes a few minutes to complete. While this is running, you can examine the Horizon dashboard, and look at the stack being created (which includes all the resources needed to run the tests and the two VM instances). At the end of the test, the stack will be torn down.
- The results of the test will be in /tmp/yardstick.out, which you can examine.
- Influxdb/Grafana can be configured to view the results graphically.
Note This is not included in this article.
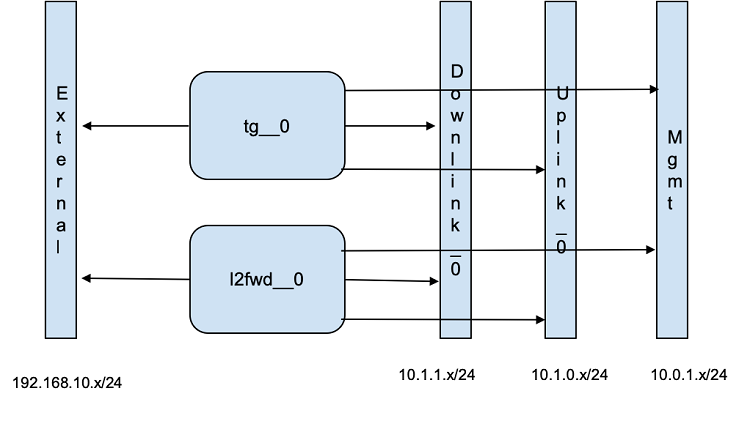
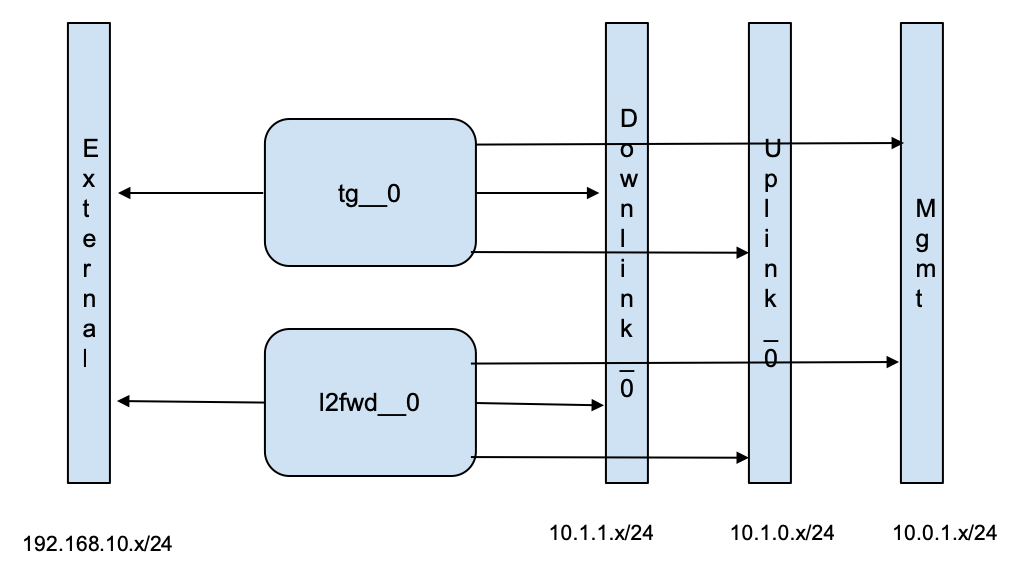
The L2 forwarding service consists of two VNFs - TG (Traffic Generator) and L2FWD (L2 Forwarding function). Both these functions are implemented using the open source tool called prox (Packet Processing Execution engine). prox can be configured to run in various modes, and for this network service, we will be running prox on both the VNFs, in different modes. On the TG VNF, prox will run as a traffic generator, by passing the appropriate configuration file (gen-l2fwd-2.cfg). On the L2FWD VNF, prox will be run as a L2 forwarding function, by passing the configuration file (handle-l2fwd-2.cfg).
Note That prox applications are built using the open source library Data Plane Development Kit (DPDK).
The network configuration of the Network Service is as shown below:
VNF Onboarding
Steps 2-5 from the methodology section above involve creating VNF packages, onboarding VNFs using ONAP Service Design and Creation (SDC)) and then creating the network service using SDC as well. The steps are as follows:
- Build a cloud image (using the base Ubuntu 16.04 distribution) that contains the libraries and applications needed for running the VNF. In case of the L2FWD service, this includes the DPDK library and prox application (which uses the DPDK libraries). This process can be done manually, by downloading the required cloud image (eg., Ubuntu 16.04), mounting it locally, and installing the required packages/applications. Once the image is built, upload it to the OpenStack Glance service. We will show this using one of the tools provided by the OPNFV Yardstick project to automate the above steps. This script uses Ansible* playbooks.
git clone https://git.opnfv.org/yardstick cd yardstick ./nsb_setup.sh -o <openstack_credentials_file> - The above script downloads the Ubuntu cloud image, installs the required packages (including DPDK), uploads this image to OpenStack Glance and names it <yardstick-samplevnf>.
If we need to customize this further, here are the steps:
Download the raw image file (eg.,
nsb-samplevnfs.raw)openstack image list glance image-download --file yardstick-samplevnfs.raw --progress 447eba0f-370e-49dc-9d8c-cd2d525b8476 losetup -f -P <image-file> losetup -l # this will show the loop device where the image can be mounted mount /dev/loop0p1 /mnt # This mounts partition 1 of the image cd /mntMake the required changes on this, including installing any other packages
umount /mntCreate the new image in OpenStack
openstack image create --public --disk-format qcow2 --container-format bare --file nsb-samplevnfs.raw nsb-samplevnfs openstack image list - Create a flavor on OpenStack that is required to run the VNFs
- vCPUs = 10
- RAM = 16 GB
- Disk = 6 GB
- From the OpenStack jump host, run the following command:
openstack flavor create m1.xlarge --id auto --ram 16384 --disk 6 --vcpus 10 - Create OpenStack Heat template files for these VNFs
- L2 Forwarding function
- L2FWDbase_l2f.envbase_l2f.yamlMANIFEST.json
The
L2FWDenvironment file (base_l2f.env) is as follows:parameters: image_name: yardstick-samplevnfs flavor_name: m1.large public_net_id: ab42411a-34b4-4f91-8ff4-49da55b8d113 unprotected_private_net_id: zdfw1fwl01_unprotected unprotected_private_subnet_id: zdfw1fwl01_unprotected_sub unprotected_private_net_cidr: 192.168.10.0/24 protected_private_net_id: zdfw1fwl01_protected protected_private_subnet_id: zdfw1fwl01_protected_sub protected_private_net_cidr: 192.168.20.0/24 onap_private_net_id: d3146880-00ca-410f-ad9f-55c40d2234ed onap_private_subnet_id: 8fb7106e-12a2-44a9-bbb5-0642a3c4cbed onap_private_net_cidr: 10.1.0.0/24 vl2_private_ip_0: 192.168.10.100 vl2_private_ip_1: 10.1.0.11 vl2_private_ip_2: 10.1.1.11 vtg_private_ip_0: 192.168.10.200 vl2_name_0: zdfw1fwl01l2l01 vnf_id: vL2F_NSB_demo_app vf_module_id: vL2FWD dcae_collector_ip: 127.0.0.1 dcae_collector_port: 8080 repo_url_blob: https://nexus.onap.org/content/sites/raw repo_url_artifacts: https://nexus.onap.org/content/groups/staging demo_artifacts_version: 1.1.0 install_script_version: 1.1.0-SNAPSHOT key_name: onap_key_k0H4 pub_key: ssh-rsa AAAAB3NzaC1yc2EAAAADAQABAAABAQCYVswUVYWP1JzmiM5Vu5cjsZEcBy8253Uae4pmUPVhumJc5yQFjgf/N5ikZvkOFQx3AaT0lX/5pRac7/ajN3pEMVSp/JEhov9BJbIUDaKfZVKeGZ8nO3o+tbeFtONOCRd6GcoGWAG/ZpNsmmSuWeUfOxMnIGiFMmy/mkcvfhmx7YnjWTt43Li2XYr/gzaxMSXhEMbVrrMnaxaYsFinF10kISp6hwqEafmgmMko6cnjSixfYH7amTZxRKUkhtLFGIAVYCSpESj8mqamI/3P1lAyV09FGPoi1BHSW6t7EtR70rzXhNUdWk0qdXdaPR8A6bO6hdVE7aUdSacp5YQ/n1Jz aarna@ubuntu cloud_env: openstack - Traffic Generator function
- TGbase_tg.envbase_tg.yamlMANIFEST.json
The
TGenvironment file (base_tg.env) is as follows:parameters: image_name: yardstick-samplevnfs flavor_name: m1.large public_net_id: ab42411a-34b4-4f91-8ff4-49da55b8d113 unprotected_private_net_id: zdfw1fwl01_unprotected unprotected_private_subnet_id: zdfw1fwl01_unprotected_sub unprotected_private_net_cidr: 192.168.10.0/24 onap_private_net_id: d3146880-00ca-410f-ad9f-55c40d2234ed onap_private_subnet_id: 8fb7106e-12a2-44a9-bbb5-0642a3c4cbed onap_private_net_cidr: 10.1.0.0/24 protected_private_net_cidr: 192.168.20.0/24 vl2_private_ip_0: 192.168.10.100 vl2_private_ip_1: 10.1.0.11 vl2_private_ip_2: 10.1.1.11 vtg_private_ip_0: 192.168.10.200 vtg_private_ip_1: 10.1.0.12 vtg_private_ip_2: 10.1.1.12 vtg_name_0: zdfw1fwl01tgn01 vnf_id: vTG_NSB_demo_app vf_module_id: vTrafficTG repo_url_blob: https://nexus.onap.org/content/sites/raw repo_url_artifacts: https://nexus.onap.org/content/groups/staging demo_artifacts_version: 1.1.0 install_script_version: 1.1.0-SNAPSHOT key_name: onap_key_k0H4 pub_key: ssh-rsa AAAAB3NzaC1yc2EAAAADAQABAAABAQCYVswUVYWP1JzmiM5Vu5cjsZEcBy8253Uae4pmUPVhumJc5yQFjgf/N5ikZvkOFQx3AaT0lX/5pRac7/ajN3pEMVSp/JEhov9BJbIUDaKfZVKeGZ8nO3o+tbeFtONOCRd6GcoGWAG/ZpNsmmSuWeUfOxMnIGiFMmy/mkcvfhmx7YnjWTt43Li2XYr/gzaxMSXhEMbVrrMnaxaYsFinF10kISp6hwqEafmgmMko6cnjSixfYH7amTZxRKUkhtLFGIAVYCSpESj8mqamI/3P1lAyV09FGPoi1BHSW6t7EtR70rzXhNUdWk0qdXdaPR8A6bO6hdVE7aUdSacp5YQ/n1Jz aarna@ubuntu cloud_env: openstack
- L2 Forwarding function
- In the YAML files of these VNFs, add the command to start the
proxprocess:base_l2f.yaml: # Run PROX as L2FWD /opt/nsb_bin/prox -o cli -t -f /opt/nsb_bin/handle_l2fwd-2.cfg base_tg.yaml: # Run PROX as a TG /opt/nsb_bin/prox -e -t -o cli -f /opt/nsb_bin/gen_l2fwd-2.cfg - Copy these files on the Server/VM from where ONAP onboarding executes.
- Edit the environment files (.env) and update the following parameters based on the cloud resources (OpenStack deployment in this case). This process should ideally be automated with a script to eliminate manual intervention or errors.
public_net_id: <SET THIS TO THE ID OF PUBLIC NETWORK>
onap_private_net_id: <SET THIS TO THE ID OF OAM NETWORK>
onap_private_subnet_id: <SET THIS TO THE ID OF OAM SUBNET>
The following commands can be used to extract the relevant information from the OpenStack deployment:
EXTERNAL_NET_ID=`openstack network show external | grep -w 'id' | awk -F '|' '{print $3}' | tr -d ' '`
OAM_NET_ID=`openstack network show OAM_NETWORK | grep -w 'id' | awk -F '|' '{print $3}' | tr -d ' '`
OAM_SUBNET_ID=`openstack subnet show OAM_SUBNET | grep -w 'id' | awk -F '|' '{print $3}' | tr -d ' '`
Replace the
pub_keyparameter with the public key credentials of the host from where you would like to log into the cloud VMs. The following is an example (you should replace with your own public key):ssh-rsa AAAAB3NzaC1yc2EAAAADAQABAAABAQDO7J6wPbuIYwsVrIfKF4/pdq6J9iWE1JTF2W6DpSbp2EVi8DLOxle7rAED+GaRZFmNft+wVjPH1m89mVeIA6fzdI0gWQBRz9LraEqFlFkL7PLUD/6sXOugSM4YFjSYxA69FpqXUQNuFvythBEc1JAya2LXpnmI8WeXQuKcFtIxZje9upRalyaeWmb51do+nVhJgz9FN4l/xNusxvs2abng1gRxVc2WWhoEaPTzFVN8lCPR7EVGIVGh/soRjC/I9v0QgP39hr7uveYJqk10Qlk6vOXmrGGwsyCSt7XaankyMEwGrIwqg82BFThqyv2DConDidGj1kH37OXsyFkSI0Hz aarna@beijing01 - Create ZIP files containing all the above files in each of these VNFs (l2f_fwd.zip and l2f_tg.zip)
- Upload these files during SDC Vendor Software Product (VSP) creation phase and make sure there are no errors. Create a VSP for each of these VNFs.
- During the SDC phase, select these two VNFs and create a network service.
Note There is no need to link them using virtual links (VLs) since these VNFs have the details in their Heat template.
Approve and distribute this network service to runtime.
VNF Deployment
Once the entire onboarding and design portion is over, the network service is ready for deployment. Here are the steps to do so:
- Using the Virtual Infrastructure Deployment (VID) GUI, instantiate VNF
L2FWD, which creates the VM and runs theproxprocess with the appropriate configuration file. - After this, instantiate VNF
TG, which creates the VM and runs theproxprocess with traffic generator options. - Once the traffic generator runs to completion, it displays the statistics related to the performance of
L2FWD.
Conclusion
In this article we saw how to conduct performance validation on a VNF, how to package it for ONAP, how to onboard it, and ultimately how to deploy it onto OpenStack. With disaggregation, it is important for CSPs to know how to perform these steps as the traditional mechanism of having the vendors do this work may or may not be effective.
About the Author
Sriram Rupanagunta is an ONAP specialist and co-founder at Aarna Networks. Aarna Networks provides products and services around the Linux* Foundation ONAP project. We believe that NFV is a once in a generation disruption in the telecommunications industry that will transform every facet of the industry, creating huge opportunities for all participants. Orchestration, management, and automation are critical elements of next-generation networks, and ONAP fills this gap.
References
- OPNFV Gambia Plugfest presentation: Full life cycle of L2 forwarder using Yardstick NSB and ONAP
- Blog: Trying out Yardstick NSB with Aarna Networks ONAP Distribution
- Blog: OPNFV Yardstick NSB: The prequel to VNF onboarding
- Free: ONAP Demystified” eBook