Introduction
Many developers have created great works and games using Unity* games for PC or mobile devices. And now with VR capabilities integrated into Unity 3D, it’s worth a look at how to update any of these older games for a good VR experience.This post will show developers how to convert existing Unity games to be compatible with the HTC Vive* VR hardware.
- Target VR Category: Premium VR
- Target VR Hardware: HTC Vive
- Target Unity Version: Unity 5.0
This post will cover the following topics:
- Redesigning your old game for a new VR experience
- Tips for integrating the STEAM*VR plugin
- Starting to use the controller scripts
- New C# to old JavaScript* solutions
- Migrating 2D GUIs to 3D UIs
Designing Your New VR Experience
Your existing Unity games were not designed for VR, but it is more likely than not that a good portion of the work is already done to make it a good VR experience, as Unity is a 3D environment made to simulate real-world graphics and physics. So the first thing you need to do before adding controller scripts is to think through your old game as a new VR experience. Here are some tips to designing the right VR experience for your old game.
Design Out Motion Sickness
A standard Unity game or application when played can be an amazing experience, but it doesn’t fool your senses. This is important to realize. If you had created an amazing high-speed racing game and then ported it to VR, it would throw a mess of bad brain signals to the user’s reflexes. The issue is that as your brain sees a first-person motion in VR, it will send signals to your legs and torso to counterbalance the motion it sees. While for some people this might be fun, for most it's just a bad experience, especially if the user is standing upright while this is happening and could fall over. However, if they are in a seated experience, perceived motion is much less of an issue for the user and is safer. Evaluate the best experience for your game and consider recommending a seated or standing position, as well as adjusting the locomotion so users can move in the scene without having balance issues.
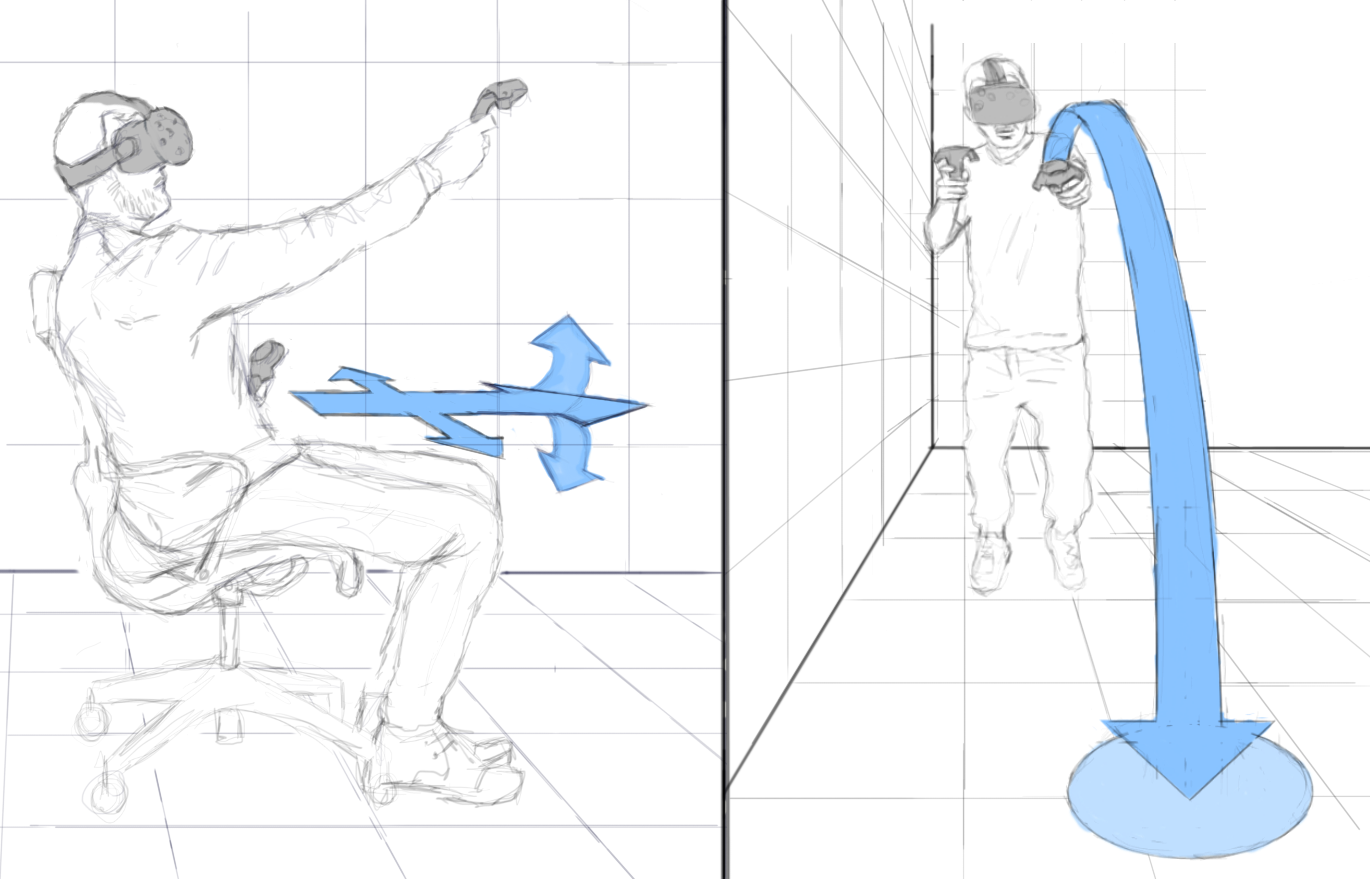
For standing users, one way to design out motion sickness is to remove motion entirely and choose to add a teleport feature to move from space to space in the game. With the Teleport feature, you can stand as a user and confine the experience to a few feet in any direction, then allow the user to point their controller to a space in the game and teleport to that space. For example, FPS shooters might be better to be limited to a few steps forward and back, then use the Teleport feature to go farther than a few steps.
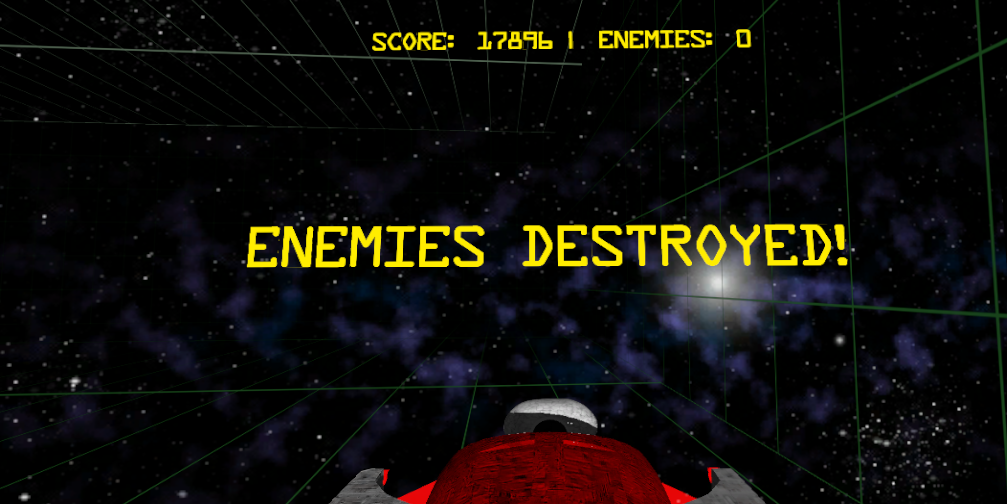
My game sample was originally designed as a first-person space driving experience. Thus, I’ve made the decision for the game to be a seated experience and not a room-scale experience.This will avoid the “jimmy” leg problem of mixed brain signals as a user tries to maintain balance on their legs, and allow the user to move around the scene naturally. I also made the decision to have a lot of motion damping so any movement is eased for the user. This is a space game, so that works out well; there are no hard turns or movements as you float in space. As a seated experience, you still get the feeling of motion, but it feels more controlled without the crazy signals of your brain trying to adjust and account for the motion. (To learn aboutthe original source gameI amporting to VR, read this post on using an Ultrabook™ to create a Unitygame.)
Design for First Person
Another issue in VR that it is primarily a first-person experience. If your old game was not designed from a first-person perspective, you may want to consider how to make the third-person view an interesting first-person experience, or how to shift your game into a first-person perspective.
My game was a hybrid first-person game, but there was a camera follow-the-action feature. I felt this was too passive or an indirect first-person experience. Thus, I made the decision to anchor the person directly to the action rather than follow indirectly via a script.
Natural Interactive UI or Controls
Interactive UI and controls are another issue as there is not set camera position where typical onscreen menus might work. The position of the camera is wherever the user is looking. Thus be sure you address controls, menus and interactivity that are natural. Anyone who developed a console game is in a good position, as most console controls are on a game pad and not on screen. If you designed a mobile game with touch controls, or a complex key or mousable screen controls, you’ll need to rethink you control scheme
For my game, I have four controls: turn left, turn right, forward momentum, and fire. The mobile version of the game had on-screen touchable controls while the PC version used key commands. For the VR version, I started to design it with tanklike controls: Left Controller rotates clockwise, Right rotates right counterclockwise, etc. This seemed to make sense until I tested it. I quickly found that my left thumb wanted to control both spin directions. Turns out I have muscle memory for gamepad driving games that I could not avoid. Thus I redesigned, since HTC Vive controllers are held in hand with thumbs and fingers free similar to gamepads. I made the Left Controller Pad control the steering while the Right Trigger fuels the vehicle forward, and my right thumb fires lasers similar to where the A or X buttons would be for a gamepad.
Leverage 360 degrees
A VR experience allows for a 360 view of the world, so the game would be a waste if I’ve created a forward-only experience. This was actually a problem with the regular version of the game. In that game I had designed a mini-HUD display of all the enemies, so you could see if an enemy was approaching from the side or back of the ship. With VR, this is elegantly solved by just looking left or right. I am also going to more purposely design in hazards that will be out of forward view, thus taking advantage of the full 360 VR experience.
VR Redesign Decisions For Sample Game as Follows
- Seated position to avoid motion sickness and twitchy leg syndrome
- Disable follow-me camera and lock the camera to the vehicle forward position
- Dampen rotation to avoid balance issues and ease the movement of the game
- Map controls to the HTC Vive controllers similar to the layout of gamepad controls
- Build in features to leverage views and action from a wider panoramic experience
Adding The STEAM*VR Plugin
This is either the simplest thing you’ll do or potentially the biggest pain. It all depends on how old your code is and to what degree it will allow the SteamVR Toolkit to work and operate. I’ll explain the way it is supposed to work, as well as the way you may need to get it to work.
Clean Your Game for the Latest Unity Build
First, make a copy of your original game. Download the latest version of Unity. Open the old game in that version. If prompted, update the APIs. Play the game and review the console for any outdated APIs the game suggests you update.
Install STEAM*VR Plugin
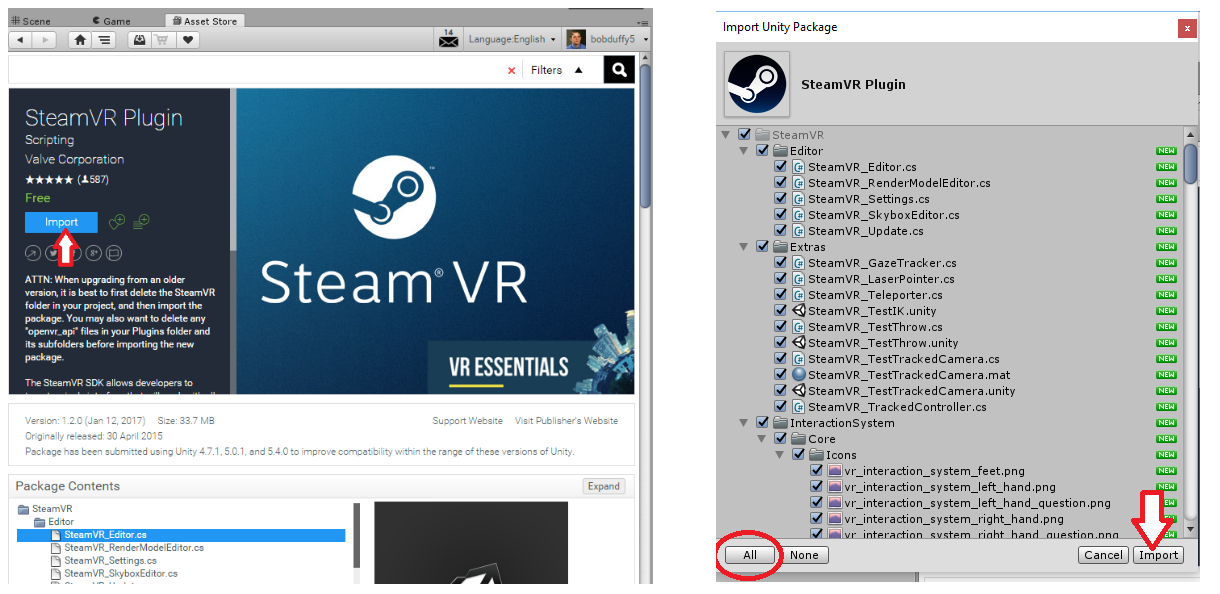
If the game works as expected with a modern version of Unity, you are ready to download and import the SteamVR Plugin. Go to the Unity Store. Search for SteamVR Plugin. It is the only one with the familiar Steam logo. Click Import.
Select All and import all features, models and scripts. Everything will be neatly put in the SteamVR folder so you can know what scripts and assets came from the plugin.
Test Example Scene
Before going to the next step, be sure your HTC Vive hardware is connected and working. Now, in Unity, go to the Project Tab and open the SteamVR folder, select the Scenes Folder, and Select Example scene. You’ll see a scene with a bunch of boxes and SteamVR screenshots. Play the scene and put on the headset. You should be able to see the scene in full VR and see the HTC Vive controllers. If that is working, then it is safe to assume the SteamVR plugin is working.
Doesn’t Work – Try New Project
If you can’t see the controllers or the SteamVR example doesn’t load in the headset, you’ll need to create a new blank project. Import the SteamVR Toolkit and then try the example scene. If that doesn’t work then something is up with your version of Unity or Steam hardware.
New Project Works, but Not the Old
If a brand new projects works great BUT your original game doesn’t work with the SteamVR plugin, then you’ll have to again create a blank project, install SteamVR Toolkit, test that it works, THEN you’ll have to move your game into this new project. To do this, first close the project. Copy EVERYTHING in the Assets folder of your cleaned Unity project. Then go to the Asset folder on your new project and paste. Now open your Unity project and test the VR. It should work because it just works. However, your game will be busted. All the project settings for many of your assets are lost, including links from your project components to your game assets such as models, sound files, etc. Go to each asset and each component and make sure your game objects and sound files are linked correctly. This is the painful part. I’ve done this 2 or 3 times. It’s not that bad; it's just busywork.
Replacing the Camera
Before you do anything more, you should be able to put in the HTC Vive headset and run your game as you normally would, and be able to turn your head to move the camera and look around your game. But you will not have the HTC Vive controllers and what’s really needed for VR to work with your camera. The biggest and most key step of this integration is what is next. It’s so simple it’s kind of silly. To get VR to work in your application, you simply need to replace the Main Camera in your scene with the Prefab camera in the SteamVR folder. That’s it. However, you may have a ton of scripts or settings on your existing camera. My suggestion is not to immediately replace the camera. My suggestion is to drop the Prefab camera as a child to your existing camera.
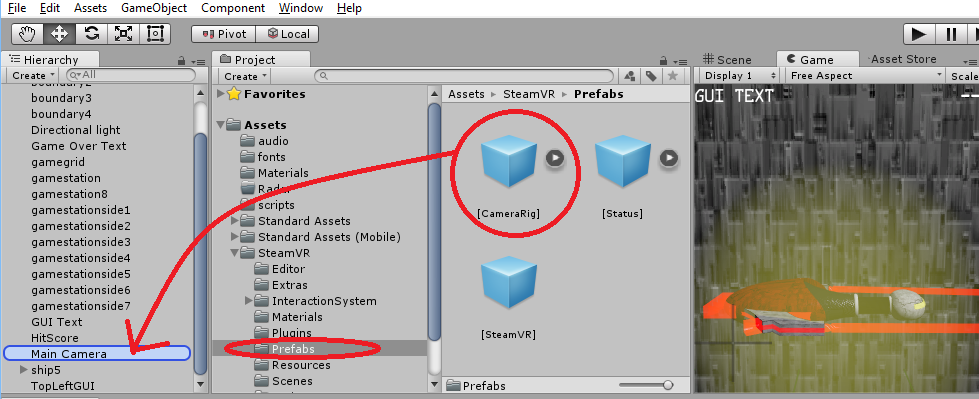
Next, in the Properties panel of your existing camera, turn off the camera and all of its components. Be sure the checkmark next to Camera in the Properties panel is unchecked.
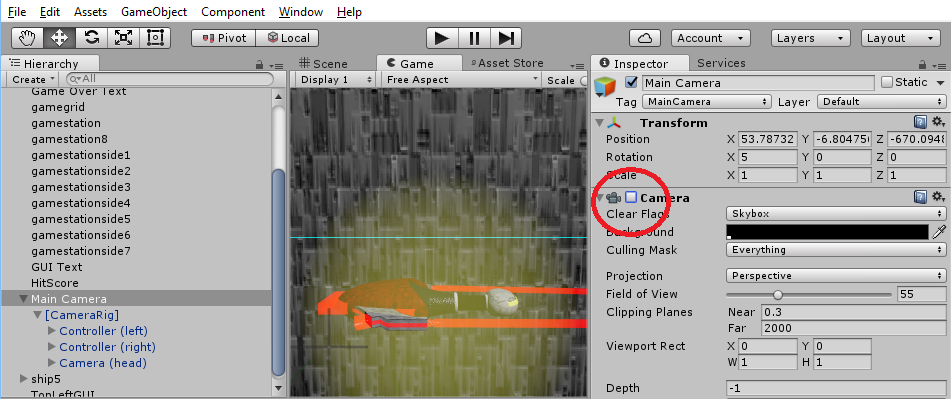
Then, start to copy and paste the camera components and settings to either the Camera Head or Camera Eye child inside the Prefab.Move, copy and tweak the settings so that your skyboxes and things work as you expect them to with the HTC Vive headset on.
At this point, your old game is now VR-enabled. You should be able to play this scene, put on your VR headset, look around your game, and see the controllers in your hand. The rest is getting the controllers and scripts to work with your existing game logic.
Controller Scripts
If you are like me and you developed your game using JavaScript, it may be a bit more challenging, but either way it’s fairly straightforward to get the controller scripts working with your game. For those who have JavaScript in their game and need the controllers to work with those scripts, see the section below. You’ll want to do the following to the Left and Right Controllers in your scene. Your controllers have been added as child assets to the Prefab camera you dropped under your main camera. The Tracked Controller Script is located in the Extra folder. Drag it to the Controller (Left) inside the Camera Prefab. Do the same for the Controller (Right).

With this done, you should be able to see the Trigger Pressed and other items in the Inspector, and these will check on and off as you use them in your game.
The concept of using the controllers is similar to an event listener method. To capture an event like a trigger pull or touchpad, you'll need to create a C# script. The following script is a technique I found available from a number of forums. In my example, I show how you can create the event triggers for pulling the trigger, letting go a trigger, touching a controller pad, and lifting your finger off a controller pad.
C# Script For Triggering Events when Trigger Pulled or TouchPad touched
using UnityEngine;
using System.Collections;

public class EasyController : MonoBehaviour {
    private SteamVR_TrackedController device;
    void Start () {
        device.TriggerClicked += Trigger
        device.TriggerUnclicked += UnTrigger ;

        device.PadTouched += PadTouch;
        device.PadUntouched += PadLift;
    }

    void Trigger(object sender, ClickedEventArgs e)
        {
//        Place Code Here for Trigger
        }
    void UnTrigger(object sender, ClickedEventArgs e)
    {
 //        Place Code Here for Lifting Trigger
            }

    void PadTouch(object sender, ClickedEventArgs e)
    {
//        Place Code Here for Touching Pad
      }
    void  PadLift(object sender, ClickedEventArgs e)
    {
 //        Place Code Here for UnTouching Pad
    }
}
Controller Tip: As you develop your experience, you will find that you will not know what controller is the left vs. the right when in VR. I suggest adding a 3D asset to one of the controllers, e.g., a light, a sphere, or anything that tells you which one is which. This is for development purposes. Later I suggest in the UI section how to provide icons and labels to help the user know how to use the controllers.
Additionally you may want to use the touchpad for more than an on-or-off situation. In that case, this script will allow you to control your game based on location of the tap in the touchpads. The following script will allow you to trigger activity depending on whether the left side or the right side of the touchpad is tapped.
C# Script For Using X or Y Values from VR Touchpad
using UnityEngine;
using System.Collections;
using Valve.VR;

public class myTouchpad : MonoBehaviour
{
    SteamVR_Controller.Device device;
    SteamVR_TrackedObject controller;

    void Start()
    {
        controller = gameObject.GetComponent<SteamVR_TrackedObject>();
    }

    void Update()
    {
        device = SteamVR_Controller.Input((int)controller.index);
        //If finger is on touchpad

        if (device.GetTouch(SteamVR_Controller.ButtonMask.Touchpad))
        {
            //Read the touchpad values
            touchpad = device.GetAxis(EVRButtonId.k_EButton_SteamVR_Touchpad);
            touchstate = device.GetPress(EVRButtonId.k_EButton_SteamVR_Touchpad);

        if (touchpad.x < 0)
            {
                //  Add code if left side of controller is touched
            }

        if (touchpad.x > 0)
            {
                //  Add code if right side of controller is touched
            }
       }

     else
       {
            // Add code if pad is not touched
        }

    }

}
C# and JavaScript Issues
SteamVR scripts are C#, and that may make it difficult or impossible to have the HTC Vive controllers interact with your existing JavaScript game logic. The following are simple techniques to get this going without conversion. However, it is highly recommended that you eventually port JavaScript to C#.
Why They Don’t Talk to Each Other
There is a compiling order for scripts in Unity. While it is possible to get C# variables to JavaScript or the other way around, to do that you’d need to move those scripts into the Standard Assets folder. That folder compiles first, thus making them available. But, since you need JavaScript to see SteamVR values, you’d need the Steam scripts to be in the Standard Assets folder and compile first. But if you move them, you break the SteamVR Plugin. Thus you can’t get the C# variables to pass to JavaScript.
BUT there is another way.
A Simple Workaround
It dawned on me that both C# and JavaScript can GET and SET values on game objects. For example, both types of scripts can get and/or define the tag value on a game object in the scene. Game Object Tags themselves are variables that can pass between the scripts. For example, if the LaserCannon in the scene is initially tagged “notfired”, you can have a touchpad event set the LaserCannon.tag to “fired” in C#. Your existing JavaScript can look for the value of that object's tag each frame. When the LaserCannon.tag = “fired” (written by the C# script), the JavaScript can pick that up and thus run a function that fires the laser cannon. This trick allows C# to pass events and values to JavaScript or back in the other direction.
Using the previous C# sample above, let me show you how to share variables with JavaScript. The idea is that if I tap one side of the touchpad, the appropriate particle emitter will have its tag value changed in C#.Thecode for turning on the particle emitter, playing a sound, collision detection, and associated points are all in an existing JavaScript attached tothe left and right particle emitters. So the first thing I need to do is to identifythese particle emitters in C#. I first declare 'rthrust' and 'lthrust' as GameObjects. Then in the Start section, I define the objects 'lthrust' as the left particle emitter in my scene, and 'rthrust' as the right.
C# Adding Game Object To Script
public class myTouchpad : MonoBehaviour
{
    public GameObject rthrust;
    public GameObject lthrust;

    SteamVR_Controller.Device device;
    SteamVR_TrackedObject controller;


    void Start()
    {
        controller = gameObject.GetComponent<SteamVR_TrackedObject>();
        rthrust = GameObject.Find("PartSysEngineRight");
        lthrust = GameObject.Find("PartSysEngineLeft");
    }
Next, inside the If statement that determines if the left or right side of the trackpad is touch, I add code to change the tag names for 'lthrust' and 'rthrust'. (By the way: you might think this is backwards, but in space, to turn right, your left thruster must fire.)
C# Changing Tag Value of Object When Touching Pad
if (touchpad.x < 0)
            {
                lthrust.tag = "nolthrust";
                rthrust.tag = "rthrust";
            }

 if (touchpad.x > 0)
            {
                rthrust.tag = "northrust";
                lthrust.tag = "lthrust";
            }
Finally, in the existing JavaScript attached to my each particle emitter, I add an additional condition "|| this.gameObject.tag='rthrust'" at end of the If Statement, which checks if the tag equals a value set in the C# script.
JavaScript Executing Game Logic Based On Tag Updated From C#
if (Input.GetKey ("left") || this.gameObject.tag=="rthrust"){
         GetComponent.<ParticleSystem>().enableEmission= true;
         GetComponent.<AudioSource>().PlayOneShot(thrustersright);
    }
And there you have it: C# talking to JavaScript. The same technique can be used the other way around. This is a simple workaround solution to get controllers to work and build the basic gaming experience between the two languages and scripts. Once you have things ironed out, I suggest taking the time to convert the JavaScript to C#.
C# Tips:
If you are new to C#, here are some tips to consider. If you plan to add, multiple or divide numbers that will leave decimals, you will need to declare those variables as floats. You will need to be sure the number you add, subtract, multiply, or divide is also set as a float.
- Declarations look like this: publicfloat: myVar ;
- Calculations should look like this: myVar = (float)otherVar +1f
2D GUI to 3D UI
Depending how long ago you built this Unity game, you may have been using GUI menus, buttons, or other on-screen controls and UI elements. My old game was designed to work on tablets and PCs, so it had both onscreen and GUIs. I used GUIs for startup menus, title graphics, on-screen scores, and alerts. All of them were disabled inside the headset, but viewable on my PC screen. With some Google searches I found that you’ll need to convert GUIs to UIs, as UIs can sit in 3D space inside your game, allowing them to be viewable and interactive in VR, but GUIs cannot.
UI Tips for VR
To get UIs going, simply right-click in your Hierarchy panel and add in UI and select Canvas. By default, Canvas is set to Screen Space, thus all the dimension and location attributes are greyed out in the Inspector. But you will see that in the Canvas module of the Properties Inspector, you can change Screen View to World Space.

This will make it so the UI features can be placed and sized anywhere in the scene. Once you have this Canvas you can add in specific UI items like buttons, images or text items into the canvas.
To test, add in a Text UI element as a child to the Canvas item (see left side of image below). Then in the inspector, type "Hello World" in the Text Input field. If you do not see these words in the scene, go to the Properties Inspector of the Text. Under Paragraph, change the Horizontal and Vertical Overflow to “Overflow”. I found the scaling to be way off and things to be oversized by default, and the overflow setting allows you to see the words even if they are too big. You may need to either scale down the Canvas or the text using the Scale features in the Inspector. Play with the scaling and the font to be sure your fonts are clean. If you are getting jagged fonts, change down the scaling and upsize the font.
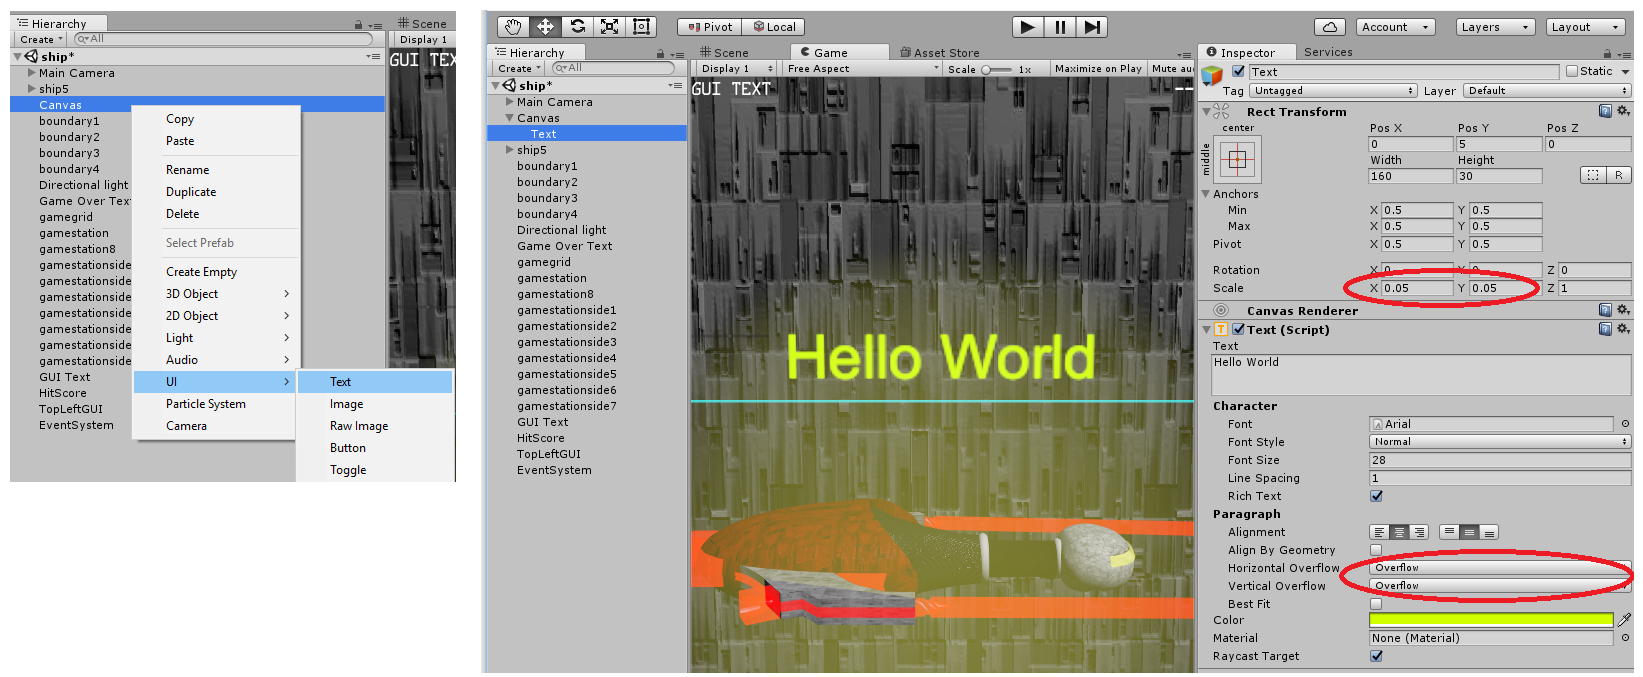
Controller UIs
A great use case for UI is to provide some instructions to your controllers. Label which controller is left vs right, and put icons that explain what the controllers do and where. On the left is my startup scene with UI added to each controller to guide the user on which controllers belong to which hands. Then in the main game scene, the controllers have graphic UIs to explain how to operate the game.
![]()
In the end I found that updating this game wasn't terribly difficult, and it allowed me to think through the interaction to be a more immersive and intuitive experience than originally designed. From the exercise alone I now have a lot more knowledge on how to tackle an original VR game. See example of the game working in VR in the video below.
If you have thoughts or would like to connect with me on this experience, add a comment below or connect with me on Twitter: @bobduffy.