The Target
Like most other training content experts, we started our virtual reality (VR) journey through safety training for a global shipping company that we have provided training support to for over a decade. The benefits of virtual reality safety training (VRST), as opposed to instructor-led training, videos, regular e-learning courses, or serious games and simulations are far higher the way we see it. VRST puts the learner into the very situation that calls for safety protocols or real-action behaviors, and still manages to keep the learner safely away from the real danger.
VRST was implemented much before head-mounted displays, or HMDs, were invented (HMDs have been around since the 1990s). In the truest sense, virtual can be described as anything that's almost like reality and yet isn't, for a few reasons. In computer science, this emulation is brought about through a combination of software and hardware, and flight simulators have consistently excelled at this.
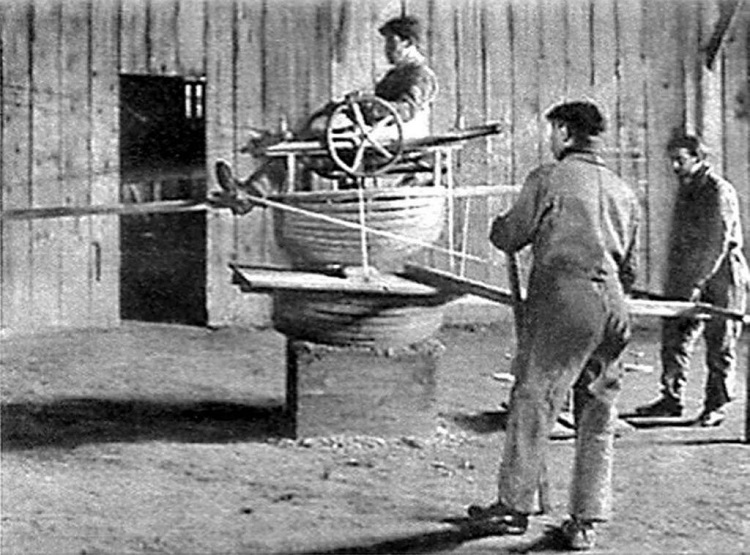
Figure 1. An Image of an early flight simulator, circa 1909, by Antoinette Aircraft Company (Antoinette Aircraft Company, FAL).
If it's too hard to see the connection, imagine the man in the above image wearing a head-mounted device while on the simulator.
Everything about flying has to be absolutely perfect because, unlike any other mode of transport, the risks to safety are exponentially high. With this objective, it is commendable how every evolution that can add value to simulating a flight experience has been assimilated, thereby constantly and tangibly pushing the boundaries closer to reality. For a good read on how complex VR is used in pilot training, see the paper on the training imparted to pilots in the German Air Force.
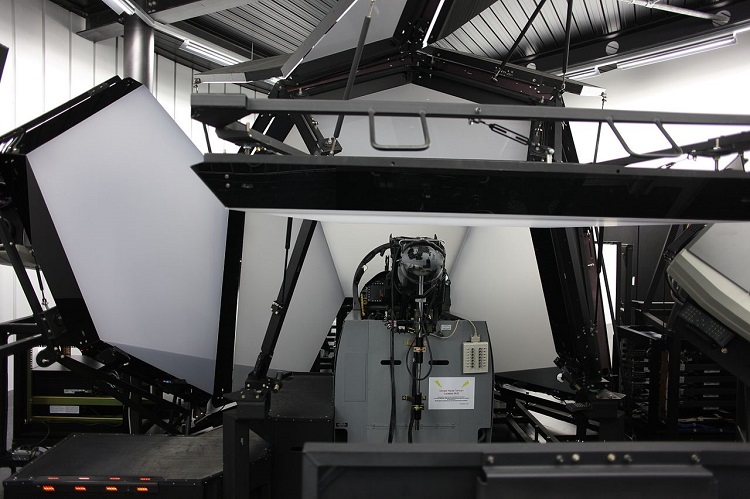
Figure 2. A military flight simulator at Payerne Air Base, Switzerland (photograph by Rama, Wikimedia Commons, Cc-by-sa-2.0-fr, CC BY-SA 2.0 fr.).
It's in line with a trend that we, as the educators and training content developers' community have been following with every evolution of media—an evolved medium is invented for a specific use case, and we implement it for a heightened impact of our training.
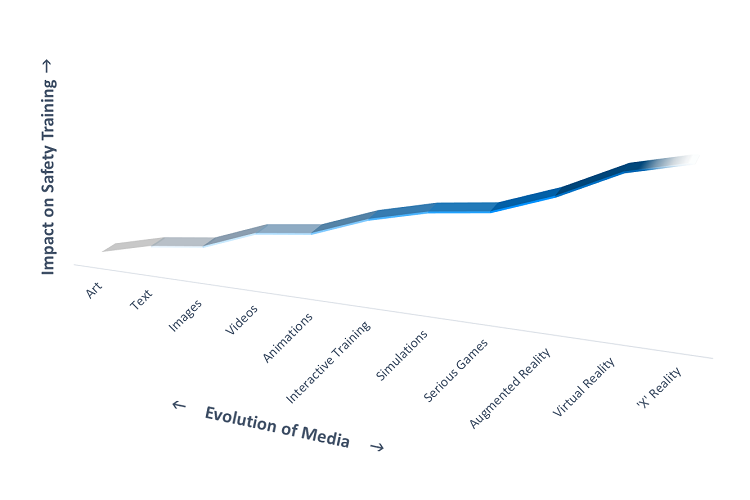
Figure 3. A representation of the comparative increase in impact with media's evolution.
Think of it, all of us educators and training experts have literally gone a whole circle; we've set off a virtuous cycle.
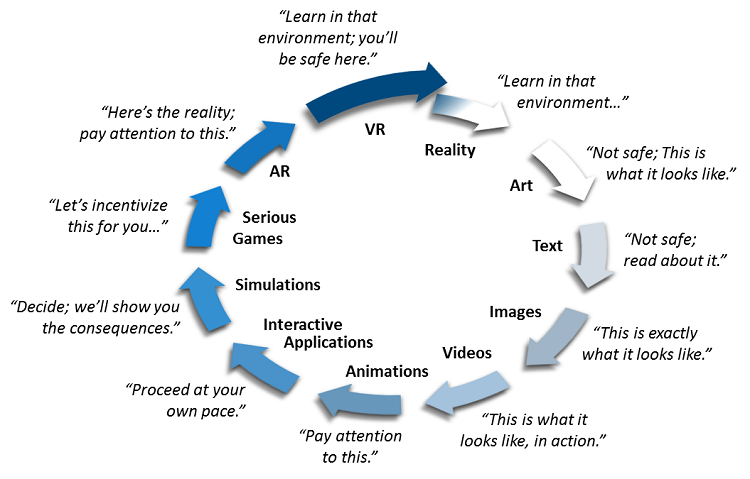
Figure 4. Back to the roots with VRST—to action-oriented in situ learning.
With this background, we readily agreed to demo VRST to demonstrate some principles and features we've subscribed to over the years and think are generally fundamental to VR training; specifically to VRST. Let's start this off with two objectives that any VRST should achieve:
- Absolute realism: The experience should mimic the real environment as closely as possible, so as to sufficiently emulate the potential risks involved; this should include both objects that the learner deals with and those that he or she views at its complete expanse, from a distance.
- Action orientation: Action-oriented immersion and guidance is key, so the learner virtually performs all the steps himself. This ensures direct transferability of learning.
We consider these objectives so primary to VRST that we've modeled our demo application completely on them.
Equipment and Gear
To ensure these objectives are satisfactorily fulfilled, We've listed our choice of software and hardware:
- Intel® Core™ i7-8700k processor
Twelve virtual cores—that itself makes enough of a case for any content creator. Add to that, we've also noticed the evolved fabrication of architecture reflecting in its performance.
This processor make is apt for heavy content creation. Check the complete specification list and compare it to other Intel® processors for yourself. - NVIDIA GeForce* GTX 1080
In our opinion, the GTX 1080 or any equivalent is required to complement the Intel Core i7-8700k processor's heavy processing capabilities; however, we haven't specifically benchmark-tested the GTX 1080's performance with other graphic cards. - Oculus Rift* and Touch* (hardware)
Of all the VR hardware available in the market, much of our internal playtests have shown us that our end users find this the most ergonomic. We use this as our default hardware now. - Oculus Integration for Unity* SDK 3.4.1
As a matter of choice, the Oculus SDK is a default with the Oculus hardware. However, we find this SDK very flexible, given most of our customers' specific training needs. Additionally, the amount of documentation available on the SDK makes it easy to implement new features. - Unity Editor (version 5.6.4f1)
Much of our training, though content heavy, is not massive. So, we've been doing pretty well with the Unity editor. And, we think Unity has simplified component-based development very well. We recommend Unity, since it is easier to learn, experiment, develop, and deliver; however, this could be a matter of personal choice. - Microsoft Visual Studio* Express, 2017
C# is our primary scripting language, and typically our projects' lifecycle requires us to be as flexible as possible. We find Microsoft Visual Studio Express to be as seamless and responsive an integrated development environment as we need, allowing for the right amount of experimentation and output.
Plan of Action
While most of our hardware and software choices reflect our larger VR projects, the application on which we are basing this article is demo. We wanted to simply and effectively communicate how VRST's objectives can be achieved, and what some of the principles are that need to be kept in mind while doing so. To that effect, we finalized the following flow:
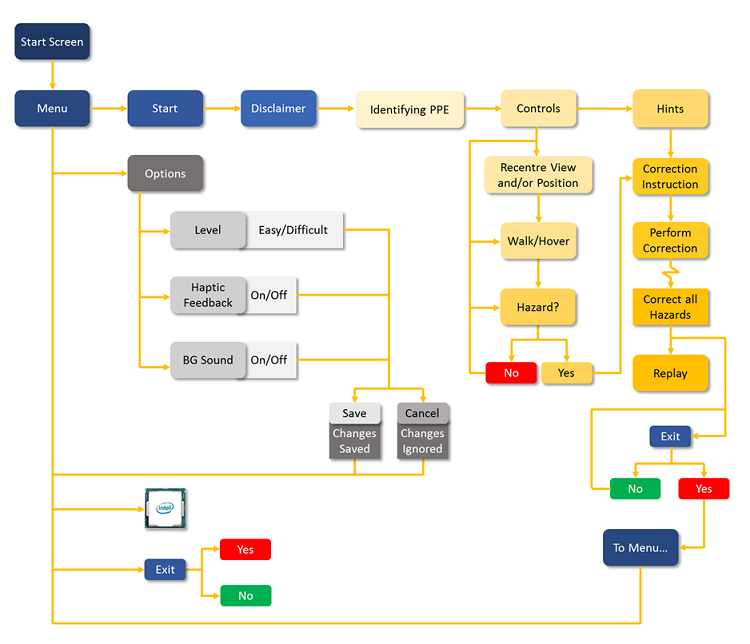
Figure 5. The VRST demo application's flow.
While this is a very basic-level app flow, the point we are making is that you can effectively adhere to VRST's objectives and principles in a limited scope of design too. According to us, all other features and functionalities will be only as effective as this foundation.
Learning from most of our VR training's target groups, we targeted the following end-user specifications:
- Intel® Core™ i5-6400k processor, any 6th generation processor, equivalent or higher
- NVIDIA GeForce* GTX 970, equivalent or higher
- 8 GB RAM
- 1 GB free space
- Oculus Rift and Touch
- Oculus App Version 1.20.0.474906 (1.20.0.501061)
- Windows® 10
If there's one conspicuous difference between the Intel Core i5-6400k processor and the Intel Core i7-8700k processor, it has to be the number of cores—that's 4 versus 12. Most of our end users are corporate employees, and this is at times the most specific we get (sometimes we have to ask our customers' support teams to arrange for graphic cards for end-user systems). The Intel Core i7-8700k processor's bandwidth wasn't tapped in to for the end application, but despite our best efforts to overload the system, we averaged at around 30 percent to 50 percent CPU usage. This allowed us to fluidly multitask, and also save 40 percent to 50 percent of our time over loading time and uneventful crashes.
Loading true-to-scale models and terrains is one of the principles we follow for VR in general, and the GTX 1080 efficiently complemented the Intel Core i7-8700k processor to this end—editing and rendering high-poly models, 4k and 8k textures, heavy particle systems, and so on. To top it all, we always got a constant in-production frames per second of around 45.
With Unity's flexible engine, our entire development could be experimented with as required; we've shown some of our folder structures in this article. In fact, a special mention must be made for Unity's well-detailed documentation and responsive community; many of our designs are referenced and inspired from them.
Target Engaged
With the production details in place, we're good to dive straight into the essence of VRST. Let's discuss them, one at a time.
Inspection and reporting
A lot of our real practices and processes involve decision making and tracking. Given its vitality in training too, we went ahead making these features UI driven, which spring up at the required moment. Now, this is your ticket to push your visual creativity, since decisions and tracking is a largely abstract concept.
![]()
Figure 6. The Tracker being called through a pseudo-gesture.
We first set up an interactive hand to trigger a button click and used a collider around the fingers to trigger the interaction.
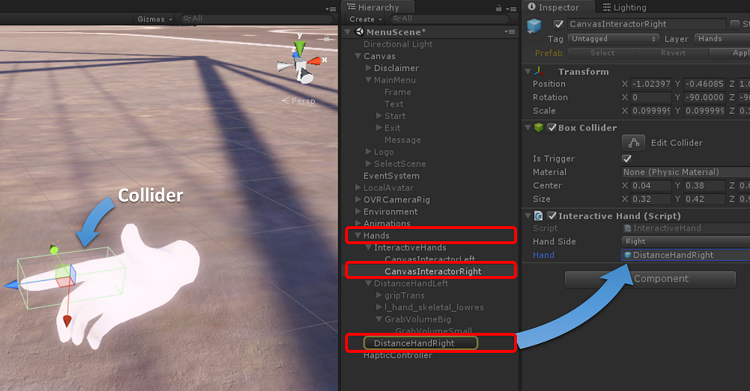
Figure 7. Setting up the interactive hand.
In the Interactive Hand script, we've used the following code.
    private void OnTriggerExit(Collider other)
    {
        GameObject go = other.transform.gameObject;
		//handle gameobject go with necessary code behaviour.
    }

    private void OnTriggerEnter(Collider other)
    {
        GameObject go = other.transform.gameObject;
    }
Once our touch-interactive hands are ready, we've called a UI canvas on-collision, which displays the tracker. For the sake of this document, we've kept the Open button visible. We implemented this as follows:
![]()
Figure 8. The interactive tracker in the World* UI.
Since this feature appears on the learner's left hand, we've set it there. We've used a button that calls the canvas, and a Close button on the canvas to close it.
Since it is on a World* UI button click, this interactivity is coded as follows:
void Start () {
        RectTransform rect = GetComponent<RectTransform>();
        BoxCollider bc = gameObject.AddComponent<BoxCollider>();
        bc.size = new Vector3(rect.sizeDelta.x, rect.sizeDelta.y, 4.0f);
        bc.isTrigger = true;
        thisButton = GetComponent<Button>();

        Rigidbody rb = gameObject.AddComponent<Rigidbody>();
        rb.isKinematic = true;
        rb.useGravity = false;
	}

    private void OnTriggerEnter(Collider other)
    {
        InteractiveHand hand = other.transform.GetComponent<InteractiveHand>();
        if (hand != null)
        {
            var pointer = new PointerEventData(EventSystem.current);
            ExecuteEvents.Execute(gameObject, pointer, ExecuteEvents.pointerEnterHandler);
        }
    }

    private void OnTriggerExit(Collider other)
    {
        InteractiveHand hand = other.transform.GetComponent<InteractiveHand>();
        if(hand != null)
        {
            var pointer = new PointerEventData(EventSystem.current);
            ExecuteEvents.Execute(gameObject, pointer, ExecuteEvents.pointerExitHandler);
            thisButton.onClick.Invoke();
        }
    }
The feature's complete implementation, perhaps, would be to add it to an object ("smart notepad") that learners can pick from their utility belts and check for updates.
However, in the same vein of design for safety hazards that need to be reported since they cannot be immediately rectified, a UI image will appear for the learner to make a decision.
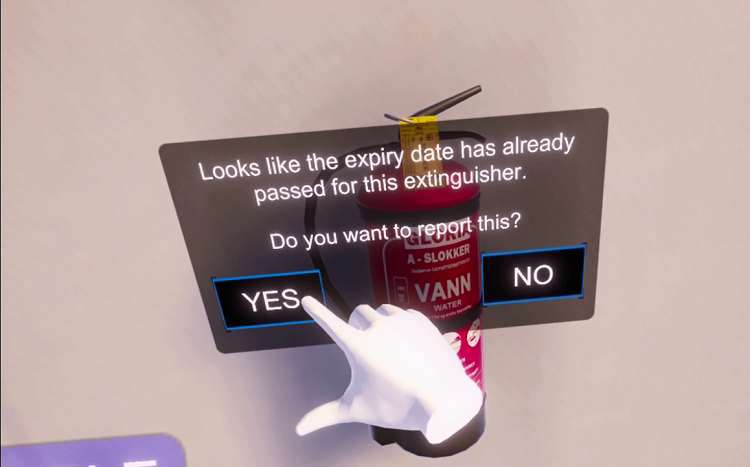
Figure 9. Learners will need to select if they want to report certain hazards.
Note on visualization: In our 25 years of training experience, we've often seen that adding something too sci-fi may be counterproductive, especially if it's a mismatch with the experience's theme. There have been exceptions, though, so it is totally worth a couple of playtests at least.
Touch-oriented UI
Unity has neatly summed up the documentation on UI for VR (including Spatial UI).
There's also some more on the implementation that Oculus has documented. Taking a cue from the previous subsection, here's a different take on the demo's UI. In our opinion, a VRST is most effective when completely action oriented.
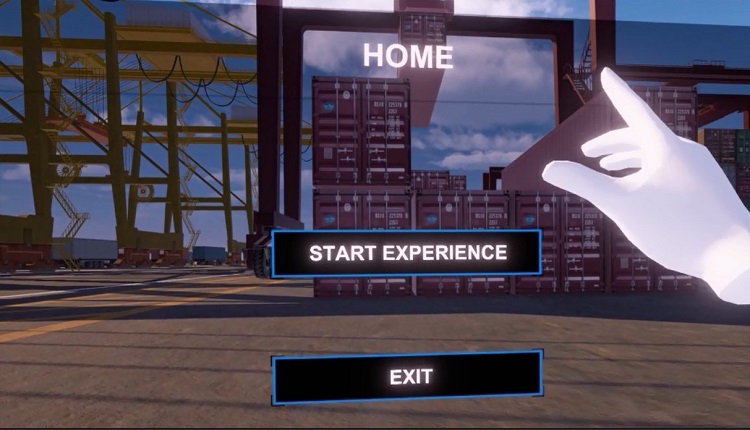
Figure 10. Touch interactive menu.
We've often noticed in action, six degrees of freedom (6DoF) VR applications, the menu and other UI is usually interactive through the ray cursor or gaze pointer. While it's got its pros and supporters, we began making this touch interactive (from our customer experience-center design skills bleeding in), and we've seen a positive impact on the overall experience. It feels like true VR, much like in the movies, but also encourages a desirable level of activeness in the learner, especially instrumental to VRST since learners are sufficiently on-boarded with VR and using the Touch by the time they get to the walkthrough.
We've followed much of the Unity and Oculus guidelines, but we've creatively differed in its final implementation.
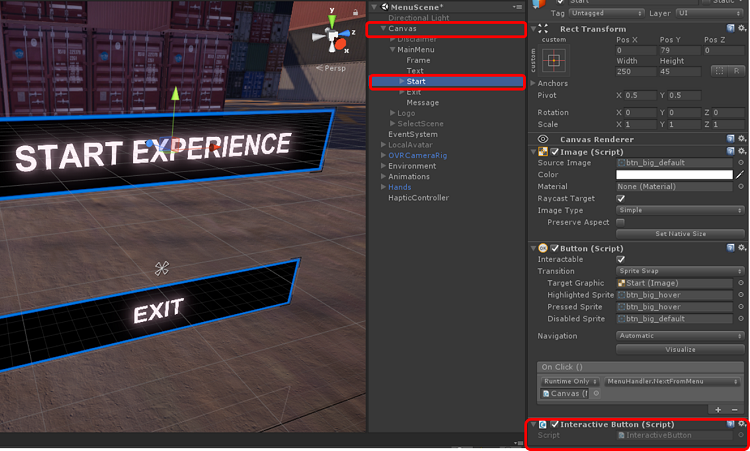
Figure11. Setting up the interactive Menu button.
This functionality's implementation is similar to how the Tracker has been implemented. Though the .gif shows the Start Experience functionality, this code can be used in any button. You can then use the same code available in that section for your Interactive Hand and Button. The only difference is where and how you use this script.
We are aware that this has its UI-designing implications (including colors and animations) too and have given it a shot in our demo application.
Grabbing and placing interactions
If the argument of pedagogical evolution piggybacking popular media evolution is well received, you will see this as one of VR's major differentiators. Yes, a non-VR serious game may allow you to act and track behavior, or even a simulation, and take decisions. However, there is a marked difference between jamming the X button on your gamepad to kick a football versus literally swinging your leg while maintaining your balance. As a drawback to today's technology, we agree that you won't feel the football press against your feet, but it suffices that VR is one step closer to real practice.
In the case of VRST, it is the difference between clicking on an object with the mouse or ray cursor, and actually picking it up. So, for our demo we went as far as emulating the required grip you need when correcting each safety hazard.
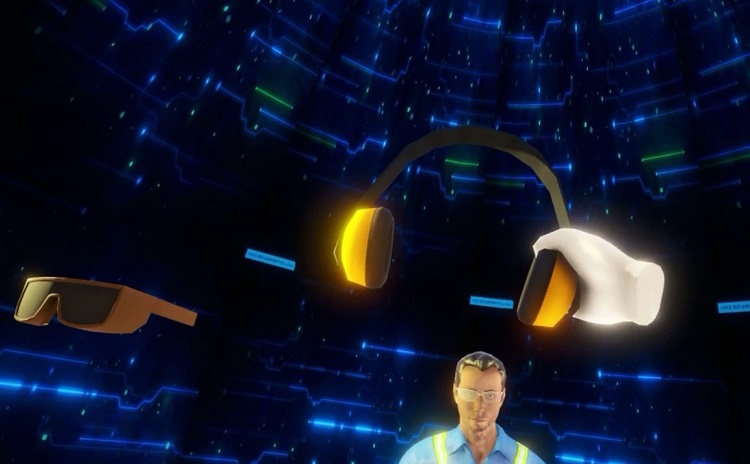
Figure 12. One of the hand grabs used in the demo application.
See the complete documentation on how to work with grips.
See the complete details on how to customize them to your requirements.
In our demo application, we've implemented the same as follows:
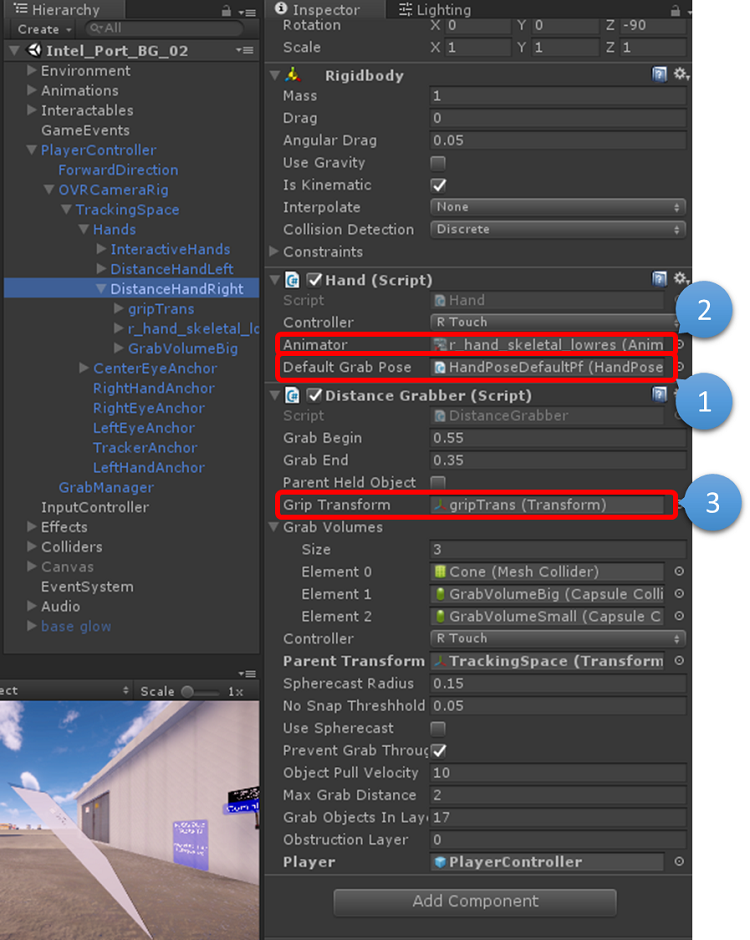
Figure 13. Setting up a specific hand pose in the Inspector
- Your default hand pose is how your avatar's hands will normally be.
- In the Animator, you can tweak animation as required, and call it here.
Before we get to "Grabbing and placing interactions", here's a little on Lazy Reality. It's a simple principle, where users are allowed some amount of leeway. For example, if the user has to pick something up (assuming that's not what the training is about), we simulate an easier experience, so she or he does not have to work to get it right. In reality, the user has to position their hands centrally and balance the object while applying enough force to lift it. Lazy Reality only needs the player to indicate to the application that he or she wants to pick up the object; the application correctly positions the object into the user's hands.
To do this, in the section, "Grabbing and placing interactions", we've set up a simple Grip-Transform call, using Unity's event trigger.
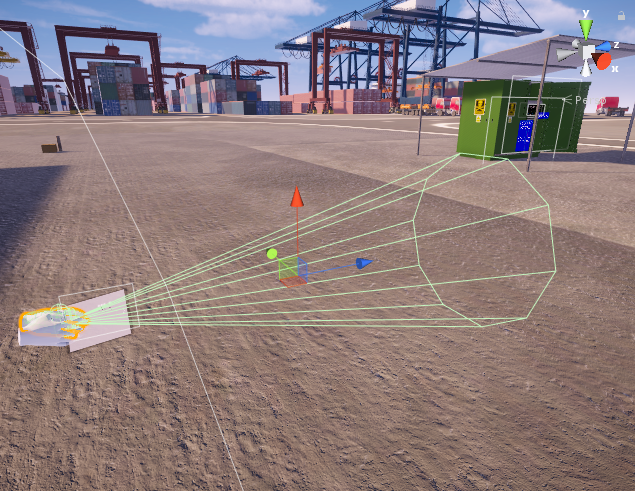
Figure 14. The grip transform cone that enables Lazy Reality.
We set an object cone that calls the object as intended if the cone collides with it, and the learner presses the grip on the Touch. It feels easy, so the learner can proceed with learning and performing the correct steps to rectification.
One point with feeling the object we interact with, or haptic feedback. Currently the Oculus Touch allows for a single feedback—vibration. Read the Oculus documentation on the subject.
There are two types of haptic feedback covered by Oculus—non-buffered haptics, a single-string haptic feedback set at a constant level for all instances it is implemented in, and buffered haptics, the cooler, more difficult-to-implement feature that can completely customize the haptic feedback, specific to the instance.
In our demo VRST we included non-buffered haptics. We've followed the Oculus documentation on the same, and enhanced the Interactive Hand code as shown below:
public class InteractiveHand : MonoBehaviour {

    public Hand handSide;
    public GameObject hand = null;
    byte[] noise = { 255 };

	void Update () {
        transform.position = hand.transform.position;
        transform.rotation = hand.transform.rotation;
	}

    private void OnTriggerExit(Collider other)
    {
        Button button = other.transform.GetComponent<Button>();
        if(button != null)
        {
            TriggerHaptic();
        }
    }

    private void OnTriggerEnter(Collider other)
    {
        Button button = other.transform.GetComponent<Button>();
        if (button != null)
        {
            TriggerHaptic();
        }
    }

    void TriggerHaptic()
    {
        if (handSide == Hand.Left)
        {
            OVRHaptics.Channels[0].Preempt(new OVRHapticsClip(noise, 1));
        }
        else
        {
            OVRHaptics.Channels[1].Preempt(new OVRHapticsClip(noise, 1));
        }
    }
}
The only challenge to this is on two fronts. First, its implementation requires quite some experimenting to be absolutely convinced that the feedback is pseudo-real. Second, since it's directly implemented through the API, it's much like writing code. There are plug-ins available that help, though at the time of writing we are not aware of any for the Unity or Touch combination. We're sure it'll be covered sooner than later.
Social decorum
As a recap, one of the benefits of VR is that along with it being the next most-immersive experience to reality, it's safe and personal. This indulges the capability of bringing learners to their most candid selves while experiencing VR. So, it becomes a major responsibility for designers and developers to ensure that their application in no way encourages a suspension of decorum under whatever circumstances the learner may be consuming the training.
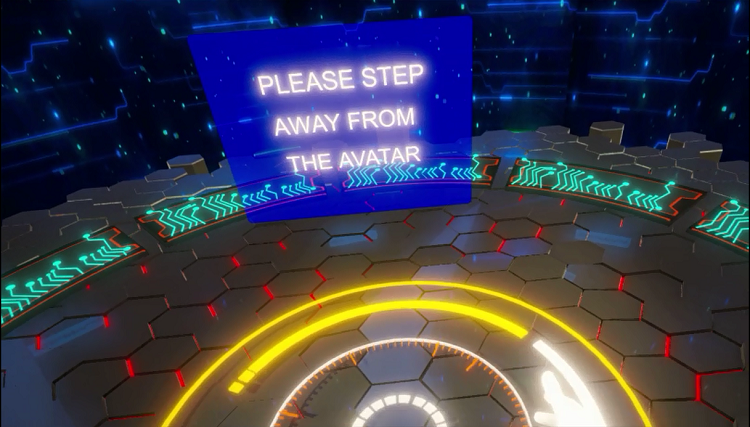
Figure 15. One of our implementations of social decorum in our demo application.
In other words, given how pseudo-real VR is, actions, behaviors, or patterns a user learns in the experience are often directly transferrable to reality. For example, Jake's been playing a VR game that requires him to climb on a table to perform a task. The next time he sees a similar table in a similar situation or environment he may be misled into assuming that it's fine or correct to climb the table. Add to that, if the game were VRST, Jake is expected to directly apply all that he learns.
A fine example of getting this right is Lone Echo—If a player happens to grip the non-player character (NPC) (Capt. Rhodes') hand for more than a set duration, the NPC politely brushes off the players' virtual hands. And what's better, players automatically respond by moving their real hands away too.
But no one is that dumb. Possibly. However, if the current pace of VR's evolution is maintained, very soon VR will become mass consumed, unlike the novelty it is now. Very soon there will be a generation who will not have experienced non-VR media the way that we do—much the way mobile phones are for many septuagenarians. The principles we follow will become norms then.
For our part, we've judiciously implemented this all across the application. As an example, let's look at how we did so in our personal protection equipment (PPE) level.
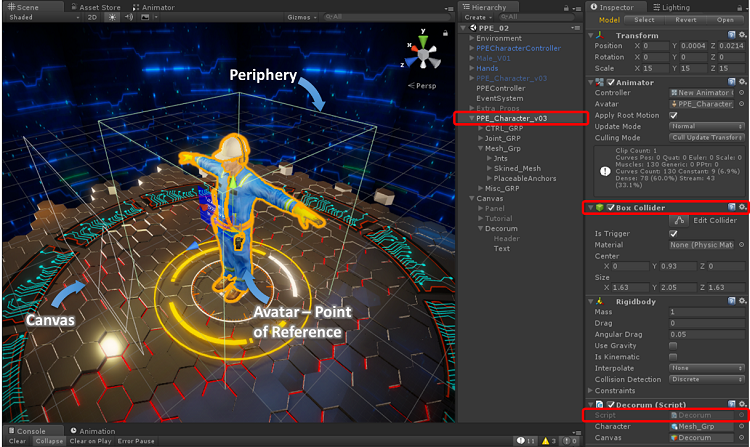
Figure 16. The Keep-Safe-Distance functionality.
Within the PPE character—who we refer to as the avatar here—we set up a box collider. The box collider's dimensions will need to be play-tested a few times to ascertain the exact dimensions, since the learner can approach the avatar from any side or can even use his or her hands to get closer to the avatar.
Once that is set up, we run a simplified Collision script for the effect:
public GameObject character;
    public GameObject canvas;

    private void Start()
    {
        character.SetActive(true);
        canvas.SetActive(false);
    }

    private void OnTriggerStay(Collider other)
    {
        if(other.gameObject.name.Contains("Hand"))
        {
            character.SetActive(false);
            canvas.SetActive(true);
        }
    }

    private void OnTriggerExit(Collider other)
    {
        if (other.gameObject.name.Contains("Hand"))
        {
            character.SetActive(true);
            canvas.SetActive(false);
        }
    }
One look and you will see that this is a simple implementation of a core principle, unlike the more intuitive implementation by the Lone Echo team.
Mission Summary
The status quo
We acknowledge that a lot more features can be added to our demo application, so here's a question: do you agree that the features currently in the demo application are the bare minimum for a VRST? While this question pushes us to try the new, here's the deal; when it comes to safety training, we always adhere to providing our target learners the opportunity to act as if they are in the real environment. This can be done by two methods. One, recreate reality such that learners have enough stimulus to act as if, and two, provide them with the controls as depicted in our Grabbing and Placing Interactions section.

Figure 17. Safety training Scene providing the target learners the opportunity to act as if they are in the real environment.
The differentiator
What current VR technology lacks is that users are still restricted to controls that they must hold. Better technology does exist, but it isn't commercially viable for the massive rollout that safety training requires. However, we should begin experimenting.
The first and most viable option has to be motion tracking and capture, which usually comes in two types: the more common sensors that can read every motion and action learners perform—as is the case with technologies like Leap Motion*—and then the more expensive wearables. For those who do not know, these are gadgets that are embedded with sensors that feed directly into the VR hardware. One that has peculiarly caught our eye is Manus VR*, which seems apt for VRST.
Another vital component that is seemingly less spoken of in VR is analytics. The greatest benefit of VRST is that learners can gain their ten thousand hours in the comfort and privacy of their homes. This also becomes a huge responsibility—how do we ensure that learners are behaving as prescribed? Or for that matter, how do we ensure that our applications are optimally built for the desired progress in the learning curve?
Eye tracking and VR have been coupled for a few years now, and it is deemed to be the next major breakthrough for VR; there's much hype on the same with Tobii*, and we seem totally poised. However, until then we have the eye ray-caster that provides us some analysis. Focus maps and hotspots from eye ray-casts and the soon to arrive eye tracking can provide us with the necessary inputs on when, where, and what are learners focusing on, and for how long. Using colliders as checkpoints is arguably as old as gaming itself and helps tracking behaviors, decisions, and even bounce points and bounce rates. Perhaps it's time to divert some amount of our bandwidth from user experience to user analytics; they do go hand-in-hand. We agree that most of these processes are CPU-intensive, and this requires a considerable investment most indie studios may not perceive as a required investment. It's only a matter of time before we successfully tip the scales off to another virtuous cycle.
Despite these envisaged improvements, it can be confidently stated that VRST has made its leap from on-the-job, experiential wisdom, to off-the-job, experiential learning. Question is, how on-board are you?
About the Authors
Jeffrey Neelankavil is a communications designer and technologies enthusiast. His co-author, Orlin Machado, is an avid gamer and cross-platform game developer who provided the technical code and inputs.