Update 1/15/2016
Update 9/6/2013
Update 3/22/2013
Abstract
This article details an algorithm and associated sample code for software occlusion culling which is available for download. The technique divides scene objects into occluders and occludees and culls occludees based on a depth comparison with the occluders that are software rasterized to the depth buffer. The sample code uses frustum culling and is optimized with Streaming SIMD Extensions (SSE) instruction set and multi-threading to achieve up to 8X performance speedup compared to a non-culled display of the sample scene.
Software Occlusion Culling
The occlusion culling sample has been optimized with Intel® Advanced Vector Extensions 2 (Intel® AVX2) instructions to improve the time spent in the culling pass. The Intel® Core™ m7-6Y75 processor is a dual-core 4.5W processor. Table 1 compares the performance of the Intel® Streaming SIMD Extensions 4.1 (SSE4.1) version to the AVX2 version on this processor. The cull time varies with the scene and with the resolution of the depth buffer. AVX2 reduced the cull time by up to 1.32x.
Table 1. Cull time in milliseconds in two scenes in the sample on the 4.5W m7-6Y75 processor.System configuration is Intel(R) Core(TM) m7-6Y75, 1.2GHz, 4.5W TDP, 2 cores 4 threads, 8GB DDR3, Intel HD Graphics 515, Driver 15.40.10.64.4300, Microsoft Windows 10 Professional 64-bit (Build 10586)
| Resolution | Scene | SSE4.1 (ms) | AVX2 (ms) | SSE4.1/AVX2 |
| 320x192 | 1 | 2.04 | 1.90 | 1.08 |
| 2 | 0.95 | 0.82 | 1.15 | |
| 640x360 | 1 | 2.72 | 2.50 | 1.09 |
| 2 | 1.90 | 1.44 | 1.32 | |
| 1280x720 | 1 | 4.55 | 4.04 | 1.13 |
| 2 | 4.29 | 3.62 | 1.19 | |
| 1920x1080 | 1 | 8.38 | 7.80 | 1.07 |
| 2 | 9.37 | 7.40 | 1.27 |
The resolution of the depth buffer is a parameter that can be varied to control the CPU budget for occlusion culling. Table 1 shows that reducing the resolution from 1920x1080 to 320x192 reduces the time from 7.80 ms to 1.90 ms. Tuning such a parameter must be considered for games that are designed for low-power systems. The m7 6Y75 processor operates at the same power level as tablets and is capable of running a desktop operating system such as Windows* 10. Therefore any game that can run on Windows has the potential to also run on these systems, if the game content is scaled to fit the smaller power budget accordingly.
Occlusion culling is commonly used to improve performance in games. While this can be done on the GPU, this sample provides an alternative to run the culling on the CPU. Culling geometries on the CPU can bring additional benefits over culling them on the GPU. The GPU is often a bottleneck in games and running this on the CPU can alleviate GPU bottlenecks, as well as save the cost of submitting occlusion queries to the GPU. This submission cost includes the Direct3D* API calls and the memory transfer between the CPU and GPU of the occluders.
This update consists of two additional rasterizer optimizations, which were implemented by Fabian Giesen and have been integrated into the sample. These optimizations improve performance in terms of frame rate by roughly 13 percent and in terms of total cull time by about 27 percent. For more details, see https://software.intel.com/content/www/us/en/develop/blogs/software-occlusion-culling-update-2.html.
This update consists of new features and optimizations, which have reduced the total cull time and the total frame time by factors of four times and two times, respectively. For more details, see https://software.intel.com/content/www/us/en/develop/blogs/software-occlusion-culling-update.html.
Introduction
Any realistic 3D scene contains objects that are at least partially occluded. For example, buildings and the environment typically occlude a large number of objects in the scene. The z-buffer is the last stage in the rendering pipeline where object fragments can be identified as occluded. However, occluded objects are still sent to the GPU for rendering, to no visual effect. If we can lower the computational cost of occluded objects, we can improve the application’s performance with no impact to the scene quality.
Using the GPU-generated depth buffer on the CPU is one technique for early detection of occluded objects. However, doing occlusion culling in this manner may cause latency and overhead issues and introduce visual artifacts since the GPU may be several frames behind the CPU. To avoid these problems, we propose software rasterization of the depth buffer on the CPU.
In this approach, we use the CPU to rasterize the depth buffer. Then, we use axis-aligned bounding box tests to determine if an object is occluded. Occluded objects are removed from the rendering pipeline to reduce overhead. We do not cull visible and partially visible objects; we submit them to the GPU for rendering. The sample code associated with the Software Occlusion Culling sample implements this technique. Additionally, in this sample, the software rasterizer is vectorized using SSE and multi-threaded to improve performance.
Key Words
Occluders: Objects that are sufficiently large to hide or occlude other objects in the scene.
Occludees: Objects that are hidden, or occluded, by other objects in the scene.
Software Occlusion Culling has two steps: depth buffer rasterization and depth test culling. The next sections provide details about these steps.
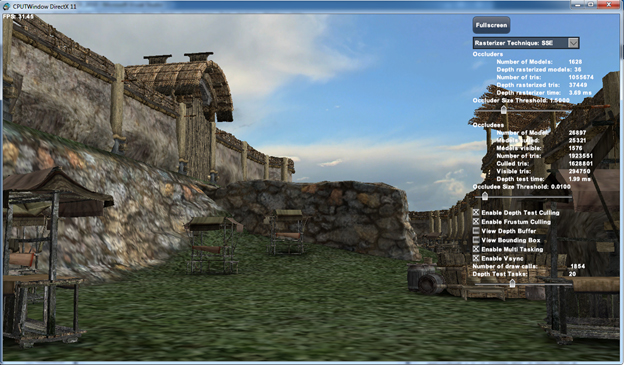
Figure 1: Screenshot of the Software Occlusion Culling sample
Depth Buffer Rasterization
The occluders in the scene are rasterized to the depth buffer on the CPU. Figure 1 shows a screenshot of the Software Occlusion Culling sample. The castle walls and the ground plane are considered as occluders in the scene. The castle walls along with the attached tiny wooden trim and decorations are used as occluders to avoid special pre-processing of the art assets. Ideally, it would have been better to hand pick just the large castle walls as occluders, but we wanted to make sure that the software occlusion culling algorithm worked with a realistic scene without the need for expensive content changes.
Our rasterizer divides the frame buffer into tiles and bins occluder triangles based on the intersection with the tiles. The rasterizer bins triangles into multiple tiles when the triangles cross tile boundaries. When processing a tile, a thread steps through the binned triangles and uses bounding box traversal to rasterize the triangles to the depth buffer. The rasterizer checks if the pixel under consideration is inside the triangle, and if so, it uses barycentric coordinates to interpolate the depth value at the pixel location. The depth buffer rasterization process updates the depth buffer at the pixel position if the newly computed depth is closer to the observer as compared to the already existing depth at the same pixel location.
Once the depth buffer has been rasterized on the CPU, all the occludees in the scene have to be depth tested against the depth buffer to determine which occludees are visible and which can be culled.
Depth Test Culling
We use object space axis-aligned bounding boxes (AABBs) to depth test the occludees in the scene against the CPU-generated depth buffer. The depth test algorithm treats all objects in the scene including the occluders (castle walls and ground plane) as occludees. Using AABB makes the depth tests more conservative. If the AABB is occluded, then the object contained inside it is also occluded and can be culled. If the AABB is visible, then the assumption is that the object contained inside might also be visible. However, as the bounding box is conservative, this assumption may not always be true, and we may have some false positives.
Ideally, if the camera is inside the AABB, the bounding box should be clipped and the portion of the object in front of the camera should be processed. However, we do not have a clipper stage implemented in the sample. Therefore, if any of the occludee bounding boxes is being clipped by the near clip plane, then we trivially accept the occludee as visible and send it to the GPU for rendering.
To determine if an object is clipped by the near clip plane, we could use the homogeneous coordinate w, of the vertices that make up the bounding box. The near clip plane is set to 1.0 in the sample. Objects that are in front of the camera have a w> 1.0. So if any of the vertices that make up the bounding box has a w < 1.0, then the object is being clipped by the near clip plane.
However, we store 1/w instead of the homogenous coordinate w to avoid divide by w at multiple locations in the rasterizer.
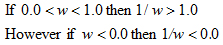
So the bounding box of an occludee is being clipped if 1/w > 1.0 or 1/w < 0.0 for any vertex of the bounding box in which case we trivially accept the occludee as visible.
When frustum culling is enabled, the AABB depth test algorithm processes occludees that are completely inside the view frustum or are clipped by the view frustum. This means occludees that are behind the camera are frustum culled and not rendered. The sample allows enabling depth buffer culling even when frustum culling is disabled. This is not useful in practice, but we provided this feature to measure the performance gain obtained by frustum culling alone. We would like to note that we have a known bug in this configuration; we trivially-accept all objects behind the camera. Hence the number of draw calls increases when frustum culling is disabled and depth test culling is enabled.
When an object is visible and the first pixel of its bounding box passes the depth test, our depth test algorithm marks the object as visible and sends it to the GPU for rendering. However, when an object and the bounding box are completely occluded, the depth test algorithm tests all the pixels of the bounding box. In short, the depth test algorithm spends the least amount of time when an object is submitted to the GPU for rendering and performs the most amount of work when an object is culled.
Optimizations
There were several optimizations implemented in the Software Occlusion Culling sample.
- Binning:
As detailed in the section on Depth Buffer Rasterization, a binning pre-pass is performed on the triangles before rasterizing occluder triangles to the depth buffer. The frame buffer is divided into tiles and the occluder triangles are binned based on the intersection with the tiles. Each tile is individually worked on, and only the pixels inside the tile are considered when rasterizing the triangle to the depth buffer. We use binning to prevent two or more threads from operating on the same pixel at the same time. Binning may also help cache coherency as the thread interacts repeatedly with the same small tile.
- Frustum Culling:
When frustum culling is enabled only objects that are inside the view frustum are processed.
- Vectorizing using SSE:
The Software Occlusion Culling sample is optimized using SSE intrinsics. Wherever possible, the code processes 4 triangles or 4 pixels a time.
- Tasking:
Intel® Threading Building Blocks (Intel® TBB) is used to multi-thread the Software Occlusion Culling sample. Intel TBB is a library that allows developers to distribute and load balance a set of tasks across all available physical cores of a CPU. The sample uses a tasking system created by (Minadakis, 2011) for multi-tasking the depth buffer rasterization and the depth testing algorithms. The task manager is used because it helpfully abstracts and simplifies the task creation and synchronization process performed by Intel TBB.
- Occluder Size Threshold :
We use the occluder size threshold to reduce the number of occluders rasterized to the depth buffer. Occluders that have a screen space size greater than the threshold value may be big enough to occlude other objects in the scene, and we rasterize them to the depth buffer. The depth buffer rasterizer does not rasterize all other occluders in the scene. This improves the depth buffer rasterization time.
- Occludee Size Threshold :
We use the occludee threshold size to reduce the number of occludees that are sent to the GPU for drawing. Occludees, whose screen space size is smaller than the threshold value may be significantly small (occupies only a few pixels); we do not draw them even if they are visible.
Running the Software Occlusion Culling Sample
Figure 1 shows a screenshot of the Software Occlusion Culling sample. The sample has several user interface elements that allow you to inspect and change the behavior of the sample.
Use the Rasterizer technique drop-down list to choose between scalar and SSE versions of the algorithm.
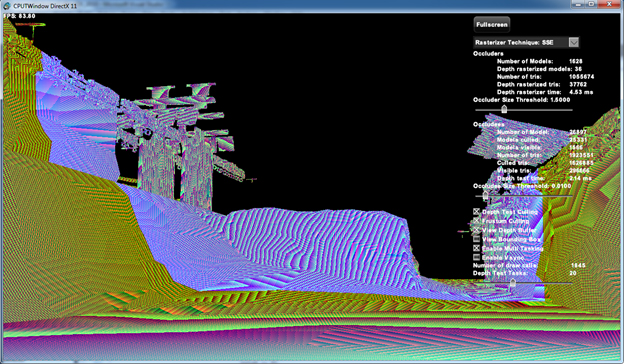
Figure 3: Screenshot of the CPU rasterized depth buffer
The Occluders section in the GUI provides information about the occluders in the scene.
- Number of Models: The number of occluder models in the scene.
- Depth rasterized models: The number of occluder models rasterized on the CPU to the depth buffer.
- Number of tris: The number of triangles in the occluder models.
- Depth rasterized tris: The number of occluder triangles CPU rasterized to the depth buffer.
- Depth rasterizer time: The time taken to CPU rasterize the occluder models to the depth buffer.
- Occluder Size Threshold: Vary this slider to determine which occluder models are rasterized to the depth buffer. If the screen space size of the occluder is greater than the threshold, the occluder is big enough to hide other occludees in the scene and is rasterized to the depth buffer.
The Occludees section in the GUI provides information about the occludees in the scene.
- Number of Models: The number of occludee models in the scene.
- Models culled: The number of occludee models that are culled as they are hidden by occluders.
- Models visible: The number of occludee models that are visible in the scene.
- Number of tris: The number of triangles in the occludee models.
- Culled tris: The number of occludee triangles culled as they are occluded in the scene.
- Visible tris: The number of occludee triangles that are visible in the scene.
- Depth test time: The time taken to depth test the AABBs of the occludee models against the CPU-generated depth buffer.
- Occludee Size Threshold: Vary this slider to determine which occludee models are sent to the GPU for drawing. If the screen space size of the occludee is significantly small (maybe occupies just a few pixels), we avoid drawing the occludee even if it is visible.
The Depth Test Culling checkbox enables / disables software occlusion culling in the sample.
The Frustum Culling checkbox enables / disables frustum culling in the sample. When frustum culling is enabled, only occluders and occludees inside the view frustum are processed in the sample.
The View Depth Buffer checkbox enables /disables viewing of the CPU rasterized depth buffer. When enabled the FP32 depth value in the depth buffer is interpreted as DXGI_FORMAT_R8G8B8A8_UNORM color and displayed on the screen. Figure 2 shows the CPU rasterized depth buffer.
The View Bounding Box checkbox enables / disables the drawing of AABBs for the occluders and occludees.
The Multi Tasking checkbox enables / disables multi-threading in the sample.
The Vsync checkbox enables / disables frame rate clamping in the sample. If enabled, the sample frame rate is clamped to 60 FPS.
The Number of draw calls shows the number of draw calls issued to complete drawing the scene.
Use the Depth Test Tasks slider to vary the number of tasks created by the task manager to depth test the occludees in the scene.
Performance
The performance for the Software Occlusion Culling sample was measured on a 2.3 GHz 3rd gen Intel® Core™ processor (Ivy Bridge) system with 4 core / 8 threads and Intel® HD Graphics 3000. We set the rasterizer technique to SSE, the occluder size threshold to 1.5, the occludee size threshold to 0.01, and the number of depth test tasks to 20. We enabled frustum culling and multi-tasking and disabled vsync.
The castle scene has 1628 occluder models and ~1.05 million occluder triangles. It has 26897 occludee models (occluders are treated as occludees) and ~1.9 million occludee triangles.
The time taken to rasterize the occluders to the depth buffer on the CPU was ~3.77 milliseconds, and the time taken to depth test the occludees was ~2.23 milliseconds
| SSE |
|||
|---|---|---|---|
| Multi-Threading |
Multi-threading + Frustum Culling |
Multi-threading + Frustum Culling + Depth test Culling |
|
| Frame rate (fps) |
3.75 |
10.42 |
31.54 |
| Frame time (ms) |
266.67 |
95.96 |
31.71 |
| # of draw calls |
22877 |
7683 |
1845 |
Table 1: Performance for SSE version. Frame rate is frames per second (fps) and frame time is in milliseconds (ms).
Table 1 shows the SSE performance numbers. When multi-threading and frustum culling are enabled, we get ~3X performance gain over just having multi-threading enabled. Similarly when multi-threading, frustum culling, and depth test culling are enabled, we get ~8X performance gain over just having multithreading enabled and ~3X performance gain over having multithreading and frustum culling enabled.
Future Work
We would like to further optimize the Software Occlusion Culling sample as follows:
- Use AVX2 to optimize the rasterizer code. Since the rasterizer implements fixed point math and AVX2 supports integer math, AX2 can be used to optimize the rasterizer.
- Implement pipelining so that the GPU does not have to wait for the CPU to complete executing the software occlusion culling algorithm to determine which objects have to be sent to the GPU for rendering.
- Implement a non-binned version of depth buffer rasterizer and compare its performance with the binned version.
- Experiment with smaller depth buffers and see how that affects performance. The CPU depth buffer size is currently set to 1280x720 pixels, and it is at the same resolution as the frame buffer. Note that the depth buffer size can be changed before the sample is launched, by modifying the SCREENW and SCREENH values.
- Vary the number of tiles, as the current depth buffer is divided into 32 tiles for the sake of binning, and test how that influences performance.
Release Notes
Here are some release notes for the sample:
- Running the sample in Release mode with the debugger attached (<F5>) will result in long load times. Running the sample without the debugger attached (<Ctrl> <F5>) will dramatically reduce the load times.
- The sample intentionally loads fewer models in Debug mode to improve performance and interactivity.
References
Anderson, J. (2009). Parallel Graphics in Frostbite-Current and Future. Siggraph, (pp. http://s09.idav.ucdavis.edu/talks/04-JAndersson-ParallelFrostbite-Siggraph09.pdf).
Intel Threading Building Blocks. (n.d.). Retrieved from http://threadingbuildingblocks.org/
Kas. (2011, Feb). Software Occlusion Culling. http://fatkas.blogspot.com/2011/02/software-occlusion-culling.html.
Marschner, P. S. (July 21, 2009). Fundamentals of Computer Graphics [Hardcover] (3rd ed.).
Minadakis, Y. (2011, March). Using Tasking to Scale Game Engine Systems. Retrieved from http://software.intel.com/en-us/articles/using-tasking-to-scale-game-engine-systems
Intel, the Intel logo, and Core are trademarks of Intel Corporation in the US and/or other countries.
Copyright © 2012 Intel Corporation. All rights reserved.
*Other names and brands may be claimed as the property of others.