Overview
Intel® Open Network Platform (Intel® ONP) is a reference architecture that provides engineering guidance and supports ecosystem enablement to encourage widespread adoption of SDN and NFV solutions in Telco, Enterprise, and Cloud Services.
Intel ONP is a free-to-use reference implementation that developers can set up for research and development, proof-of-concepts, and performance analysis of some of the core software-defined network/network function virtualization (SDN/NFV) enabling technologies: Data Plane Development Kit (DPDK) for accelerated packet processing, Open vSwitch* (OVS) including support for OVS with DPDK, OpenDaylight* (ODL) controller, and OpenStack* orchestrator. To learn more about Intel ONP, see the References Section at the end of this article.
This article will detail how to quickly deploy and verify Intel ONP (for development, not production) using virtual machines (VM).
Introduction
Intel ONP builds on top of devstack* (an OpenStack installer), adding several customizations, using specific patch-sets, and providing automation. Just specify a few parameters, select several options, and Ansible* scripts will automatically build out the Intel ONP OpenStack environment. This article will provide a step by step, assuming no prior devstack experience.
A minimal, non-production configuration can be built using 2 VMs on just one physical node with at least 16 CPUs, 16G RAM, a 150G drive,, and at least 1 NIC for the external network. For any performance testing, add at least a second NIC and additional physical nodes connected through a Tenant/Private Switch.
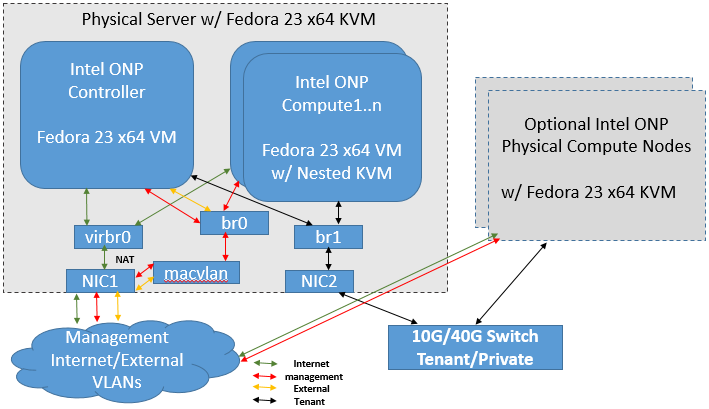
Figure 1. Non Production Intel ONP setup with 1 NIC for development, or 2 NICs for performance testing
Section I: Prepare the Host and the VMs
- On the host system, install Fedora* 23 x64 with the virtualization package and Ansible.
dnf update dnf group install ‘Virtualization’ dnf install ansible1.9 - Create 3 networks/bridges: virbr0 (NAT), br0 (Management), and br1 (Tenant/Private).
a. By default, bridge virbr0 with NAT is created by libvirt and should be associated with the NIC that has internet access (eg: eth0).
b. Create a vLAN for the management network using a macvlan interface associated with eth0, and IP# 192.168.11.5
c. If using a second NIC and tenant private network, create the separate networkip link add link eth0 name macvlan0 type macvlan mode bridge brctl addbr br0 brctl addif br0 macvlan0 ip a add 192.168.11.5/24 dev br0 ip l set dev macvlan0 up ip l set dev br0 upbrctl addbr br1 brctl addif br1 eth1 ip l set dev br1 upNow create the VMs using one of the easiest and quickest tools: virt-builder . Use the prebuilt OS template, Fedora-23 x64, that come with virtbuilder to create the VM images You can also use virt-builder wrappers like upvm to make VM creation/management even simpler.
-
Create compute and controller nodes (VMs):
upvm fedora-23 --img-size 60G --noconsole -n onp21con --root-password password:mypass -m 8192 -c 8 -w network=default -w bridge=br0 -w bridge=br0 -w bridge=br1 upvm fedora-23 --img-size 60G --noconsole -n onp21comp --root-password password:mypass -m 8192 -c 8 -w network=default -w bridge=br0 -w bridge=br0 -w bridge=br1 -
Make sure to change the NIC type for the NIC (ens6) associated with br1 to use e1000 instead of virtio. You can do this by editing VM xml (virsh edit onp21con) and changing the virtual nic type value from virtio to e1000 :
#change NIC associated with br1 to use e1000 instead of virtio virsh edit onp21con #change NIC associated with br1 to use e1000 instead of virtio virsh edit onp21comp -
After creation, boot into each VM and install basic packages.
  dnf group install ‘C Development Tools and Libraries’ ‘Development Tools’ ‘Virtualization’
  dnf install python sudo pciutils libselinux-python
Part II: Configure the Network
5. Disable the NetworkManager service so we can use the basic network service.
systemctl stop NetworkManager.service
systmctl disable NetworkManager.service
6. List out the network interfaces.
           chkconfig network on
           ip l
There should be 4 interfaces in the VMs: ens3(NAT), ens4)management), ens5(external), and ens6(tenant)
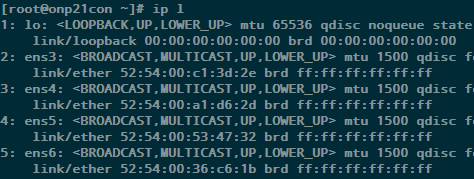
Figure 2. Network Interfaces
7. Configure static IPs for ens4 using 192.168.11.12 for the controller node and 192.168.11.13 for the compute node.
a. Download the Intel ONP scripts (make copies of the original config files before changing).
curl -O https://download.01.org/packet-processing/ONPS2.1/onp_server_2_1_refresh2.tar.gz
tar -xvzf onp_server_2_1_refresh2.tar.gz
cd onp_server_2_1/ansible
cp inventory.ini inventory.ini.orig
cp onps_config.yml onps_config.yml.orig
b. Modify at least the following parameters in the config scripts.
>In inventory.ini (ansible’s inventory file), specify the hostname and IP of each node
>In onps_config.yml specify the node type, NIC interfaces, overlay type, SDN controller, etc.
#### inventory.ini changes ####
[control]
onp21con.example.com  ansible_ssh_host=192.168.11.12

[compute]
onp21comp.example.com  ansible_ssh_host=192.168.11.13


#### opns_config.yml changes ####

ovs_num_hugepages: 1024
max_num_hugepages: 1024
reserved_mem_mb: 4096
node_info:
  onp21con.example.com:
    tunnel_ip: 172.16.1.10
    tunnel_prefix: 24
    networks:
      mgmt:
        interface: ens4
        boot_protocol: static
        ip_address: 192.168.11.12
        prefix: 24
      inter:
        interface: ens3
        boot_protocol: dhcp
      public:
        interface: ens5
        boot_protocol: none
    tenant_networks:
      virtual-1:
        interface: ens6
        boot_protocol: none
        vlan_ranges: 1000:1009
  onp21comp.example.com:
    tunnel_ip: 172.16.1.11
    tunnel_prefix: 24
    networks:
      mgmt:
        interface: ens4
        boot_protocol: static
        ip_address: 192.168.11.13
        prefix: 24
      inter:
        interface: ens3
        boot_protocol: dhcp
      public:
        interface: ens5
        boot_protocol: none
    tenant_networks:
      virtual-1:
        interface: ens6
        boot_protocol: none
        vlan_ranges: 1000:1009
You can also refer to the reference architecture guide for more details.
Part III: Deploy Intel Open Network Platform
8. Deploy Intel ONP using the automated script, as follows.
ansible-playbook –I inventory.ini multimode.yml
Sample output is shown in Figure 3.
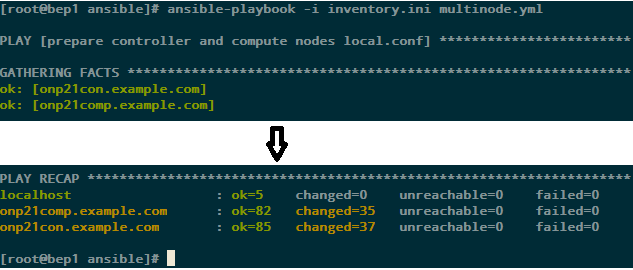
Figure 3. Sample Output from ansible
The deployment happens in 3 stages: system prep, devstack deployment, and a sanity check of the ONP deployment. These steps can be found in the file multinode.yml in the ansible directory and you can comment out any of them if you wish to rerun without repeating them.

Figure 4. Ansible/multimode.yml script
9. Verify the OpenStack hypervisor and network agents list (Figure 5) from the controller node.
At the same time prepare an OpenStack flavor with large memory page size to support Open vSwtich with DPDK
ssh 192.168.11.12
su stack
cd /home/stack/devstack
source openrc admin demo

nova flavor-create largepage-flavor  1002   1024  4   1
nova flavor-key 1002 set “hw:mem_page_size=large”
nova hypervisor-list
neutron agent-list
nova flavor-show 1002

Figure 5. output from Step 9
Part IV: Create Instances and Verify Network
We can now create instances on our Intel ONP deployment for developing/debugging VNFs, or for proof-of-concept & testing purposes. The following steps show you how to create an instance, and perform simple network access verification.
10. Ensure there is sufficient large page memory allocated on the compute node
     echo 2048 > /sys/devices/system/node/node0/hugepages/hugepages-2048kB/nr_hugepages
     grep HugePages_Free /proc/meminfo
11. Create an instance on the controller node using flavor with large memory page size.
ssh-keygen -q -f ~/ssh-key
nova keypair-add key-nova --pub-key ~/ssh-key.pub
nova boot vm1 --image cirros-0.3.4-x86_64-uec --flavor 1002 --key-name key-nova
12. Then verify network access
nova list
ping 10.0.0.5
ssh -i ~/ssh-key cirros@10.0.0.5
Figure 6. Sample output of nova list
For performance and benchmarking, it is recommended that you use additional dedicated physical nodes and a second NIC.
Summary
In this article, we outlined a step-by-step configuration of a non-production Intel ONP setup, and the minimum instances for developing and testing SDN/NFV applications.
The Intel Open Network Platform (Intel ONP) captures best practices and guidelines for efficiently using some of the core SDN/NFV enabling technologies - DPDK for accelerated packet processing, Open vSwitch* (OVS) including support for OVS with DPDK, OpenDaylight* (ODL) controller, and OpenStack orchestrator.
References
Have questions? The perfect place to ask is Software
Open Network Platform
Devstack
Virtbuilder
upvm
Notices
Intel technologies’ features and benefits depend on system configuration and may require enabled hardware, software or service activation. Performance varies depending on system configuration. Check with your system manufacturer or retailer or learn more at intel.com.
No license (express or implied, by estoppel or otherwise) to any intellectual property rights is granted by this document.
Intel disclaims all express and implied warranties, including without limitation, the implied warranties of merchantability, fitness for a particular purpose, and non-infringement, as well as any warranty arising from course of performance, course of dealing, or usage in trade.
This document contains information on products, services and/or processes in development. All information provided here is subject to change without notice. Contact your Intel representative to obtain the latest forecast, schedule, specifications and roadmaps.
The products and services described may contain defects or errors known as errata which may cause deviations from published specifications. Current characterized errata are available on request.
Copies of documents which have an order number and are referenced in this document may be obtained by calling 1-800-548-4725 or by visiting Resource & Documentation Center.
This sample source code is released under the Intel Sample Source Code License Agreement.
Intel and the Intel logo are trademarks of Intel Corporation in the U.S. and/or other countries.
*Other names and brands may be claimed as the property of others.
© 2016 Intel Corporation.