Download PDF [PDF 1.1 MB]
Contents
- Common Security Risks in Android
- Android Application and Package Overview
- Risk Awareness in Android Development
- Hooking Technique Overview
- What is Hooking?
- Implementing Hooking
- Inline Redirection
- Symbol Table Redirection
- Study of the Non-PIC Code in libtest_nonPIC.so
- Go To Part 2 ››
In the Android* development world, developers usually take advantage of third-party libraries (such as game engines, database engines, or mobile payment engines) to develop their applications. Often, these third-party libraries are closed-source libraries, so developers cannot change them. Sometimes third-party libraries introduce security issues to the applications. For example, an internal log print for debug purposes may leak the user credentials during login and payment, or some resources and scripts stored locally in clear text for a game engine can be obtained easily by an attacker.
In this article, I will share a few studies that are conducted using the hooking technique to provide a simple and effective protection solution against certain offline attacks in Android applications.
Common Security Risks in Android
Android Application and Package Overview
Android applications are commonly written in the Java* programming language. When developers need to request performance or low-level API access, they can code in C/C++ and compile into a native library, and then call it through the Java Native Interface (JNI). After that, the Android SDK tools pack all compiled code, data, and resource files into an Android Package (APK).
Android apps are packaged and distributed in APK format, which is a standard ZIP file format. It can be extracted using any ZIP tools. Once extracted, an APK file may contain the following folders and files (see Figure 1):
- META-INF directory
- MANIFEST.MF — manifest file
- CERT.RSA — certificate of the application
- CERT.SF — list of resources and SHA-1 digest of the corresponding lines in the MANIFEST.MF file
- classes.dex — Java classes compiled in the DEX file format understandable by the Dalvik virtual machine
- lib — directory containing the compiled code that is specific to a software layer of a processor, with these subdirectories
- armeabi — compiled code for all ARM*-based processors
- armeabi-v7a — compiled code for all ARMv7 and above-based processors
- x86 — compiled code for Intel® x86 processors
- mips — compiled code for MIPS processors
- assets — directory containing applications assets, which can be retrieved by AssetManager
- AndroidManifest.xml — an additional Android manifest file, describing the name, version, access rights, referenced library files for the application
- res — directory where all application resources are placed
- resources.arsc — file containing precompiled resources
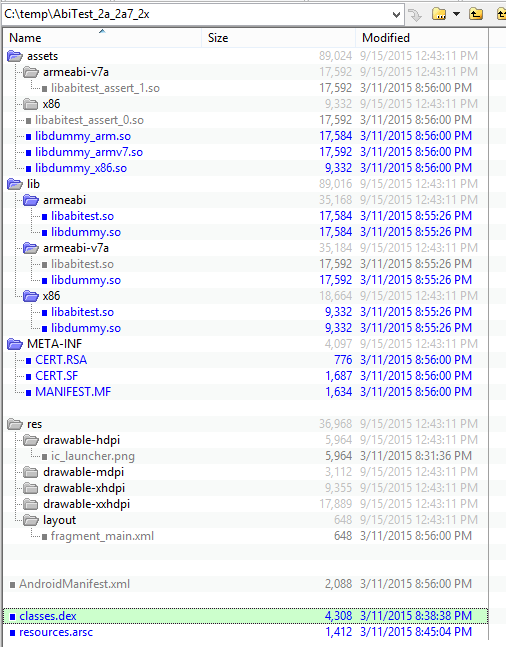
Figure 1: The content of an Android* APK package
Once the package is installed on the user’s device, its files are extracted and placed in the following directories:
- The entire app package file is copied to /data/app
- The classes.dex is extracted and optimized, and then the optimized file is copied to the /data/dalvik-cache
- The native libraries are extracted and copied to /data/app-lib/<package-name>
- A folder named /data/data/<package-name> is created and assigned for the application to store its private data
Risk Awareness in Android Development
By analyzing the folder and file structure given in the previous section, applications have several vulnerable points that developers should be aware of. An attacker can get a lot of valuable information by exploiting these weaknesses.
One vulnerable point is that the application stores raw data in the ‘asset’ folder, for example, the resources used by a game engine. This includes the audio and video materials, the game logic script files, and the texture resource for the spirits and scenes. Because the Android app package is not encrypted, an attacker can get these resources easily by getting the package from the app store or from another Android device.
Another vulnerable point is weak file access controls for the rooted device and external storage. An attacker can get the application’s private data file via root privilege of the victim’s device, or the application data is written to the external storage such as an SD card. If the private data was not well protected, attackers can get some information such as user account information and passwords from the file.
Finally, the debug information might be visible. If developers forget to comment the relevant debugging code before publishing applications, attackers can retrieve debug output by using Logcat.
Hooking Technique Overview
What is Hooking?
Hooking is a term for a range of code modification techniques that are used to change the behavior of the original code running sequence by inserting instructions into the code segment at runtime (Figure 2 sketches the basic flow of hooking).
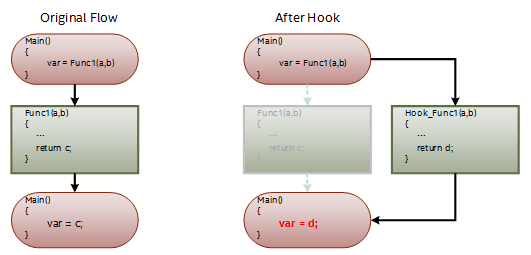
Figure 2: Hook can change the running sequence of the program
In this article, two type of hooking techniques are investigated:
- Symbol table redirection
Analyzing the symbol table of the dynamic-link library, we can find all relocation addresses of the external calling function Func1(). We then patch each relocation address to the start address of the hooking function Hook_Func1() (see Figure 3).
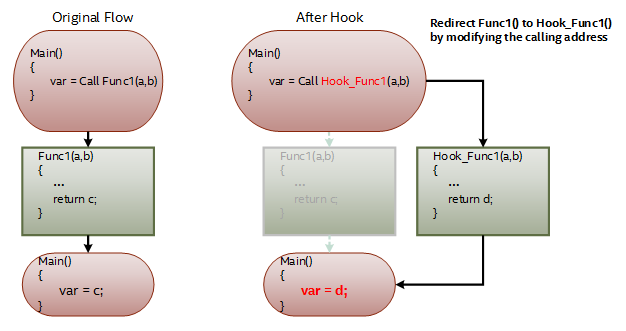
Figure 3: The flow of symbol table redirection
- Inline redirection
Unlike the symbol table redirection that must modify every relocation address, the inline hooking only overwrites the start bytes of the target function we want to hook (see Figure 4). The inline redirection is more robust than the symbol table hooking because it does one change working at any time. The downside is that if the original function is called at any place in the application, it will then also execute the code in the hooked function. So we must identify the caller carefully in the redirected function.
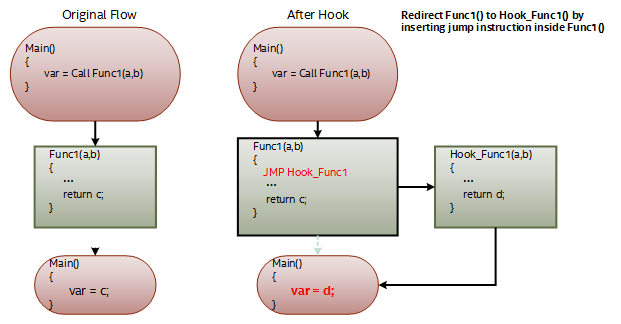
Figure 4: The flow of inline redirection
Implementing Hooking
Since the Android OS is based on the Linux* kernel, many of the studies of Linux apply to Android as well. The examples detailed here are based on Ubuntu* 12.04.5 LTS.
Inline Redirection
The simplest way to create an inline redirection is to insert a JMP instruction at the start address of the function. When the code calls the target function, it will jump to the redirect function immediately. See the example shown in Figure 5.
In the main process, the code runs func1() to process some data, then returns to the main process. The start address of func1() is 0xf7e6c7e0.
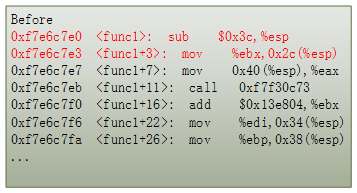
Figure 5: Inline hooking with use the first five bytes of the function to insert JMP instruction
The inline hooking injection process replaces the first five bytes of data in the address with 0xE9 E0 D7 E6 F7. The process creates a jump instruction that executes a jump to the address 0xF7E6D7E0, the entrance of the function called my_func1(). All code calls to func1() will be redirected to my_func1(). The data input to my_func(1) goes through a pre-processing stage then passes the processed data to the func1() to complete the original process. Figure 6 shows the code running sequence after hooking func1(). Figure 7 gives the pseudo C code of func1() after hooking.
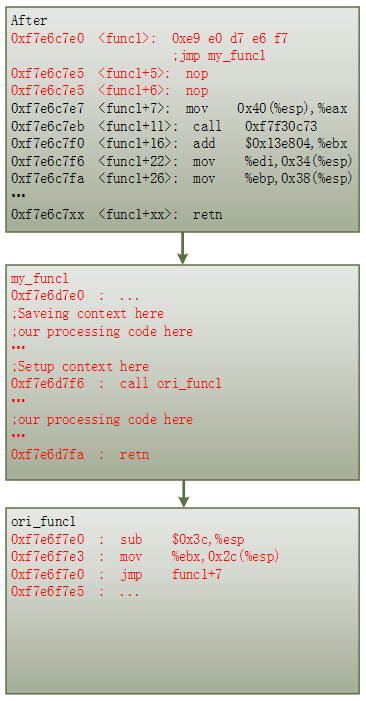
Figure 6: Usage of hooking: Insert my_func1() in func1()
Using this method, the original code will not be aware of the change of the data processing flow. But more processing code has been appended to the original function func1(). Developers can use this technique to add patches to the function at runtime.

Figure 7: Usage of hooking: the pseudo C code of Figure 6
Symbol Table Redirection
Compared to inline redirection, symbol table redirection is more complicated. The relevant hooking code has to parse the entire symbol table, handle all possible cases, search and replace the relocation function addresses one by one. The symbol table in the DLL (Dynamic Link Library) will be very different, depending on what compiler parameters are used as well as how developers call the external function.
To study all the cases regarding the symbol table, a test project was created that includes two dynamic libraries compiled with different compiler parameters:
Figures 8-11 show code execution flow of the test program, the source code of libtest1()/libtest2() which are exactly the same function except compiled with different compiler parameters, and output of the program.
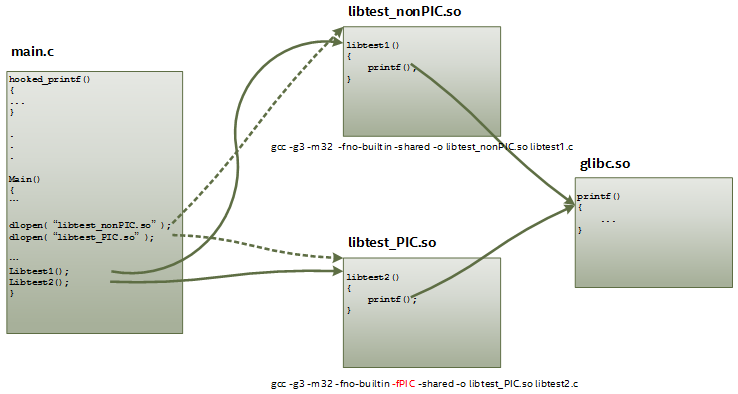
Figure 8: Software working flow of the test project
The function printf() is used for hooking. It is the most used function for printing information to the console. It is defined in stdio.h, and the function code is located in glibc.so.
In the libtest_PIC and libtest_nonPIC libraries, three external function-calling conventions are used:
- Direct function call
- Indirect function call
- Local function pointer
- Global function pointer
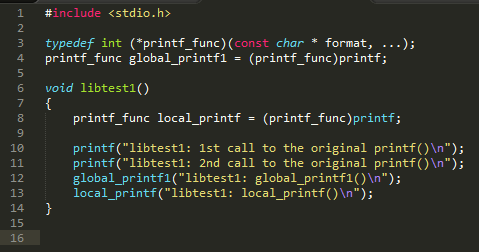
Figure 9: The code of libtest1()
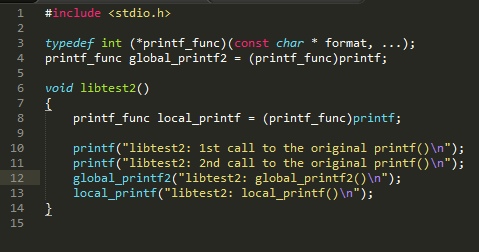
Figure 10: The code of libtest2(), the same as libtest1()
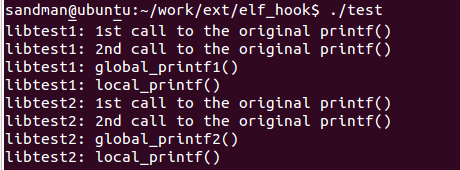
Figure 11: The output of the test program
Study of the Non-PIC Code in libtest_nonPIC.so
A standard DLL object file is composed of multiple sections. Each section has its own role and definition. The .rel.dyn section contains the dynamic relocation table. And the section information of the file can be disassembled by the command objdump –D libtest_nonPIC.so.
In the relocation section .rel.dyn of libtest_nonPIC.so (see Figure 12), there are four places that contain the relocation information of the function printf(). Each entry in the dynamic relocation section includes the following types:
- The value in the Offset identifies the location within the object to be adjusted.
- The Type field identifies the relocation type. R_386_32 is a relocation that places the absolute 32-bit address of the symbol into the specified memory location. R_386_PC32 is a relocation that places the PC-relative 32-bit address of the symbol into the specified memory location.
- The Sym portions refer to the index of the referenced symbol.
The Figure 13 shows the generated assembly code of function libtest1(). The entry addresses of printf() marked with red color are specified in the relocation section .rel.dyn in Figure 12.
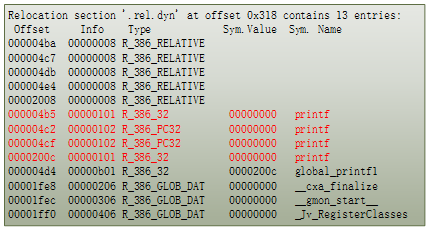
Figure 12: Relocation section information of libtest_nonPIC.so

Figure 13: Disassemble code of libtest1(), compiled in non-PIC format
To redirect the printf() to another function called hooked_printf(), the hooking function should write the address of the hooked_printf() to these four offset addresses.
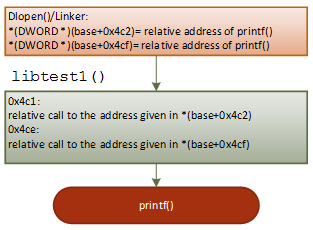
Figure 14: Working flow of 'printf("libtest1: 1st call to the original printf()\n");'
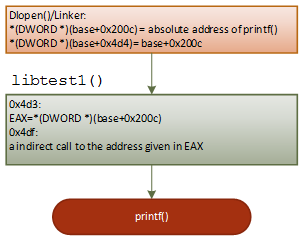
Figure 15: Working flow of 'global_printf1("libtest1: global_printf1()\n");'

Figure 16: Working flow of 'local_printf("libtest1: local_printf()\n");'
As shown in Figures 14-16, when the linker loads the dynamic library to memory, it first finds the name of relocated symbol printf, then it writes the real address of the printf to the corresponding addresses (offset 0x4b5, 0x4c2,0x4cf and 0x200c). These corresponding addresses are defined in the relocation section .rel.dyn. After that, the code in libtest1() can jump to the printf() properly.