This document describes a computer vision (CV) software prototype, the Fruit Classification Proof of Concept (POC), which classifies fruits and vegetables. The software uses Intel® Distribution of OpenVINO™ toolkit and TensorFlow* neural network for object detection. This prototype demonstrates how Intel® Distribution of OpenVINO™ toolkit can be scaled to support fruit and vegetable detection with sufficient accuracy and performance for the independent software vendor (ISV) Kontron*.
Component Integration
The Intel® Distribution of OpenVINO™ toolkit enables data scientists and software developers to create applications and solutions that emulate human vision. It supports traditional CV standards, heterogeneous execution of CV workloads across Intel® hardware and accelerators, convolutional neural networks (CNN), and deep learning inference on the edge.
Find out more Intel® Distribution of OpenVINO™ toolkit.
TensorFlow is an open-source software machine learning framework that incorporates object detection models.
Learn more about TensorFlow.
NOTE: While Intel® Distribution of OpenVINO™ toolkit supports many of Intel's CV accelerators, this guide does not cover topics associated with Intel® Movidius™ Neural Compute Stick (NCS) and FPGA.
System Requirements
Tables 1 and 2 list the minimum requirements for running the implementation.
Hardware
| HARDWARE | CONFIGURATION |
| Processor | Intel® architecture (6th to 8th generation Intel® Core™ and Intel® Xeon® processor, 64 bit only) |
| Memory | 2 GB RAM |
| Network | Network adapter with internet connection |
| Camera | Logitech* USB camera |
Table 1
Software
| SOFTWARE | VERSION |
| Operating System | Ubuntu* 16.04 LTS 64 bit |
| Version Control | Git* |
| CV Software | Intel® Distribution of OpenVINO™ toolkit R5 |
| Deep Learning Framework | Tensor Flow Version 1.5 |
Table 2
Implementation Overview
This section describes how to develop a fruit classification model using TensorFlow*. The instructions in the following sections explain how to:
- Install TensorFlow deep learning framework.
- Set up TensorFlow object detection API.
- Train custom object detector using object detection API.
- Convert the trained model into IR form using the toolkit Model Optimizer (MO).
After completing these steps, install and use Intel® Distribution of OpenVINO™ toolkit to explore the prototype's ability to detect produce.
Install TensorFlow
Install all the dependencies for TensorFlow CPU support.
Install Pre-requisites
sudo apt get update
sudo apt install python3-dev python3-pip              # install python3
sudo pip3 install –U virtualenv                       # system-wide install
Create Virtual Environment
virtualenv –system-site-packages –p python3 ./venv
source ./venv/bin/activate               # sh, bash, ksh, or zsh
When virtualenv is active, the shell prompt is prefixed with (venv).
Install Packages
Install packages within a virtual environment without affecting the host system setup. Start by upgrading pip:
(venv)$ pip install –upgrade pip
(venv)$ pip list   # show packages installed within the virtual environment
(venv)$ pip install tensorflow==1.5
Verify Installation
To verify installation, check the TensorFlow version installed:
(venv)$ python –c “import tensorflow as tf, print(tf.__version__)”
Upon successful installation, a version of the TensorFlow will be displayed on the shell.
Set Up TensorFlow Object Detection API
After successful installation of TensorFlow, install the dependencies for TensorFlow Object Detection API:
(venv)$ pip install pillow
(venv)$ pip install lxml
(venv)$ pip install jupyter
(venv)$ pip install matplotlib
Download the TensorFlow Models
Clone or download the required TensorFlow model:
$ git clone https://github.com/TensorFlow/models
Set Up Environment Variables
To set up environment variables to be used in later stages, follow the steps provided at Introduction and Use – Tensorflow Object Detection API Tutorial.
Pre-process Dataset
The required dataset consists of 30 classes of fruits with a total of 4500 images-- all are downloaded here.
NOTE: Adding more images improves accuracy of training.
Annotate Objects with LabelImg
After downloading the required dataset, annotate the objects in each image manually. This is necessary for training the network. Manual annotation can be done by using a Linux* tool called LabelImg. This open source tool can be downloaded here.
For each image manually annotated, the tool generates a corresponding xml file in the directory specified by the user.
Convert XML to CSV Format
Complete these steps to convert XML files to CSV format:
- Divide the entire dataset into two, with 90% of data to be used for training the model and 10% of data for testing. This is required for validating datasets during training.
- Convert all the XML files generated during annotation to CSV format using this script.
- Name the training dataset CSV file train.csv.
- Name the testing dataset CSV files as test.csv.
Convert CSV Files to TensorFlow Format
Convert the CSV file into tf_record format, understood by the network, with this script.
The records should be named train.record and test.record.
Train the Model
To train the model, download the TensorFlow object detection API from this link. Go to the object detection directory in the file that you have downloaded.
$ cd models/research/object_detection
For training the dataset, choose a pre-trained model or develop a custom model. For simplicity, the pre-trained model Faster-RCNN is used for the POC. The various pre-trained models checkpoints can be downloaded from this GitHub* link.
Download the configuration file here.
Configure the Model
To configure the model, change the configuration file:
1.	num_classes: 30
2.	fine_tune_checkpoint: "faster_rcnn_inception_v2_coco_2018_01_28/model.ckpt"
Set the input_path and label_map_path, under train_input_reader. For eval_input_reader, provide the path for the train.record and test.record in the above paths.
To learn more about how to configure a model, check this tutorial.
Create the Label File
Create the label_map file that contains the names of 30 classes and their corresponding item ID values. This is named as object-detection.pbtxt.
For example, a class, such as apple entry, can be made as follows to generate the label file:
item {
  id: 1
  name: 'apple'
}
Similar entries can be made for other classes.
Train the Model
Train the model with these commands:
(venv)$  cd /<obj_detect_api_dir>/model/research/object_detection
(venv)$ python3 train.py --logtostderr --train_dir=training/ -- pipeline_config_path = training/ssd_mobilenet_v1_pets.config
In case of any error, make sure that the environment variables are properly set. For example, protec and slim must be added to the Python path.
Upon successful training, checkpoint files will be available in Training folder. Train until the loss percentage is <1. It will take approximately 5000 steps (5-6 hrs). When the loss percentage is <1, stop training the model.
Freeze the Model
Generate the frozen model for the custom object detector:
(venv)$ python3 export_inference_graph.py \
    --input_type  image_tensor \
    --pipeline_config_path training/faster_rcnn_inception_v_coco.config \
    --trained_checkpoint_prefix  training/model.ckpt-56129 \
    --output_directory  faster_rcnn_inception_inference_graph
Model Optimization
The model optimization is done using Intel® Distribution of OpenVINO™ toolkit. To set up the toolkit in Ubuntu Linux, refer to Install the Intel® Distribution of OpenVINO™ toolkit for Linux*.
After the model is trained, by following the steps in the previous section, a directory faster_rcnn_inception_inference_graph will be created with frozen_inference_graph, checkpoint and pipeline config files. These files will be input to the toolkit’s model optimizer to generate Intermediate Representation (IR) format (.bin or .xml).
Convert the TensorFlow model into IR format with the following command:
$ sudo Python3 <INSTALL_DIR>/deployment_tools/model_optimizer/mo_tf.py --input_model=/<frozen_graph_location_directory>/faster_rcnn_inception_inferece_graph/frozen_inference_graph.pb --TensorFlow_use_custom_operations_config <INSTALL_DIR>/deployment_tools/model_optimizer/extensions/front/tf/faster_rcnn_support_api_v1.7.json --tensorflow_object_detection_api_pipeline_config =/<frozen_graph_location_directory>/faster_rcnn_inception_inferece_graph /pipeline.config --reverse_input_channels
On successful execution of above, frozen inference graph.xml, frozen inference graph.bin, and frozen inference graph.mapping files will be available in the optimizer directory. These files will be used for testing the model.
To understand details about TensorFlow model conversion mechanism, refer to Using the Model Optimizer to Convert TensorFlow* Models.
Test the Model and Application
The toolkit’s inference engine is used to test the developed fruit detection model along with the prebuilt sample application ‘object_detection_demo_async’.
Execute the following commands to perform the inferencing:
cd <path to object_detection_demo_async executable>
$ ./object_detection_demo_ssd_async -i cam -m <path_to_trained_model>/ frozen_inference_graph.xml
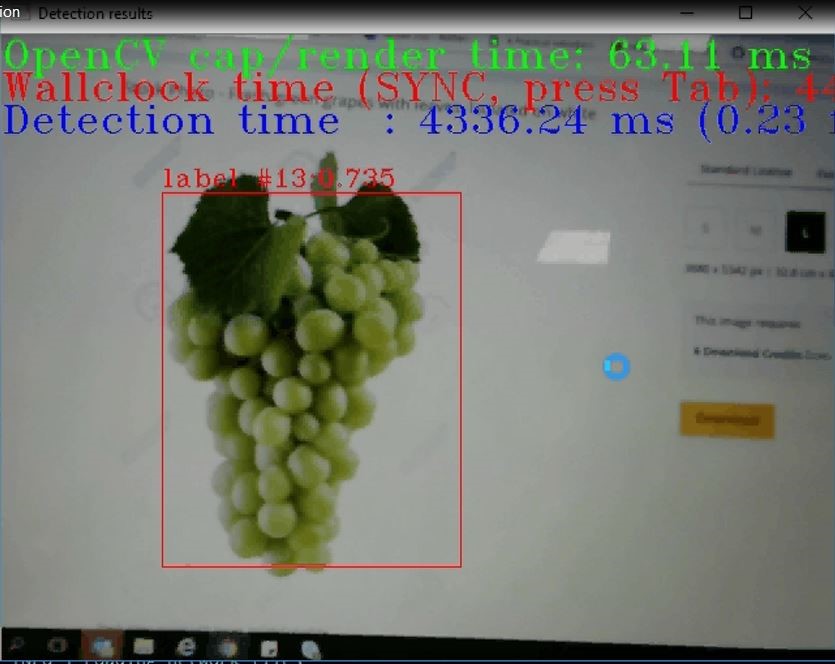
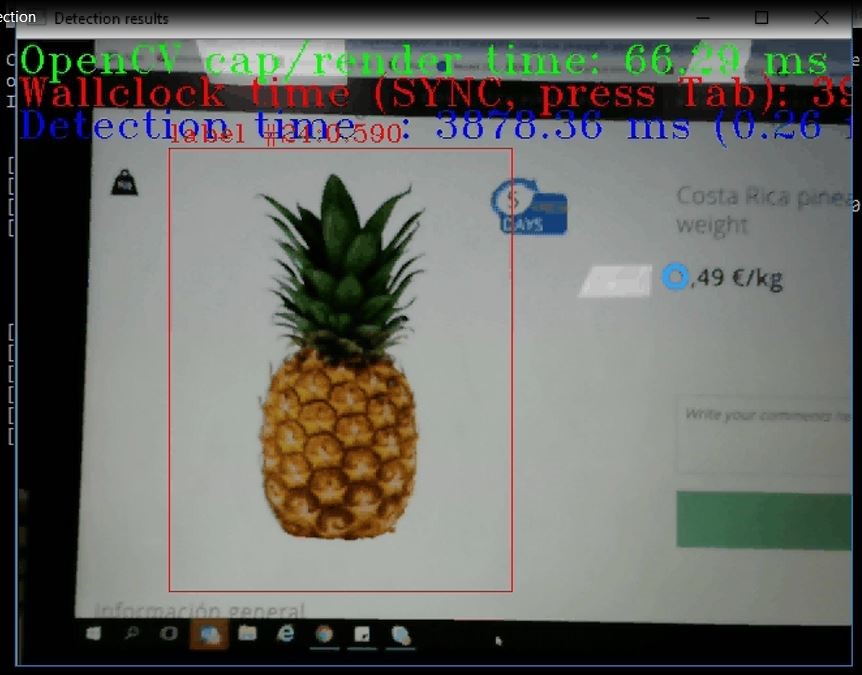
On successful command execution, a camera live feed appears in the terminal. The live feed streams the images to be tested. A rectangular bounding box around produce confirms the detection. Detection accuracy value will be displayed on top of the box.

Figure 1: Fruit Detection with Camera

Figure 2: Fruit Detection with Camera
In Figures 1 and 2, fruit detection is confirmed with the rectangular box around two output images. The Label number for the pineapple is 24, and the Label Number for the cluster of grapes is 13, which represents pineapple and grape classes respectively.
Why the TensorFlow Framework?
There are many different deep learning frameworks available, such as Caffe*, MXNet*, and Darknet*. The development team chose the TensorFlow framework for development of the POC for these reasons:
- It has active online community and support.
- It offers pre-trained models.
- Intel® Distribution of the OpenVINO™ toolkit contained support for the frameworks TensorFlow, Caffe, and MXNet.
With an object detection API already available, TensorFlow presented the qualities best-suited for developing a robust fruit detection application in a short amount of time.
Why the Faster-RCNN Model?
There are many pre-trained TensorFlow models available for object detection. The Faster-RCNN model, faster_rcnn_inception_v2_coco (below in bold), l was preferred for two primary performance metrics, training speed and training accuracy.
The following table lists available pre-trained object detection models and their corresponding performance metrics. The model used for the POC is shown in red.
| MODEL NAME | SPEED (ms) | Accuracy[^1] |
| ssd_mobilenet_v1_coco | 30 | 21 |
| ssd_mobilenet_v1_0.75_depth_coco | 26 | 18 |
| ssd_mobilenet_v1_quantized_coco | 29 | 18 |
| ssd_mobilenet_v1_0.75_depth_quantized_coco | 29 | 16 |
| ssd_mobilenet_v1_ppn_coco | 26 | 20 |
| ssd_mobilenet_v1_fpn_coco | 56 | 32 |
| ssd_resnet_50_fpn_coco | 76 | 35 |
| ssd_mobilenet_v2_coco | 31 | 22 |
| ssdlite_mobilenet_v2_coco | 27 | 22 |
| ssd_inception_v2_coco | 42 | 24 |
| faster_rcnn_inception_v2_coco | 58 | 28 |
| faster_rcnn_resnet50_coco | 89 | 30 |
| rfcn_resnet101_coco | 92 | 30 |
| faster_rcnn_resnet101_coco | 106 | 32 |
| mask_rcnn_inception_v2_coco | 79 | 79 |
Table 3: TensorFlow Pre-trained Model Performance Metrics
If faster inferencing is preferred to accuracy, consider the mobilenet models. If accuracy is more important than speed, consider the inception models.
For object detection, the POC uses the Faster-RCNN model, which performed in the average range in both speed and accuracy. The model ssd_inception_v2_model has metrics close in value to the faster_rcnn_inception_v2_coco model. While ssd_inception_v2 model had a better speed metric, it had lower accuracy, probably due to the faster training time. As mentioned previously, the faster_rcnn_inception_v2_coco model offered easy integration with Intel® Distribution of OpenVINO™ toolkit.