Contents
- Introduction
- Distributing the work
- Initialization
- Runtime Operation of the 1:N Pipeline
- Performance Characteristics on 1:N
- Conclusion
Introduction
As the device ecosystem becomes increasingly more diverse, the need to tailor media content to the consumer becomes even more prevalent. Media content providers must adapt to the changing needs of their customers by adapting their offerings to whatever device characteristics their users prefer. Video transcoding has become the norm for those distributing video, where a single source is transformed into multiple copies with different resolutions and bitrates designed to preform optimally on a particular device.
Intel® Media Server Studio is a development library that exposes the media acceleration capabilities of Intel® platforms for decoding, encoding and video processing, it provides an ideal toolset that enables media providers to adapt to the needs of their customers. This whitepaper details the architectural and design decisions that are necessary when using Intel Media Server Studio to develop a 1:N transcoding pipeline - whereas one input stream would be transcoded to multiple (N) outputs to target the different end-user device profiles.
Conceptually, a 1:N transcoding pipeline can be considered as follows:
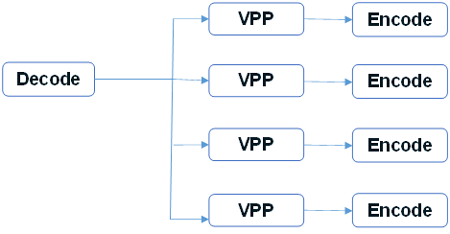
An efficient implementation of a media transcoding infrastructure consists of multiple 1:N pipelines being run in parallel, thus maximizing the amount of streams that can be processed at any one time and reducing the total cost of ownership of the platform. Intel Media Server Studio can make use of the specialized media hardware built into the servers based on the Intel® Xeon processor E3 to accelerate the pipelines using the GPU resources and achieve a higher density than CPU only based designs.
Before creating an optimized system of 1:N pipelines from scratch, you may benefit from an in-depth look at the samples provided by the Intel Media Server Studio package. In particular, the sample_multi_transcode sample can be used to simulate a 1:N pipeline by specifying the inputs/outputs in the parameter file, such as:
	 (File: OneToN.Par)

	-i::h264 <input.H264> -o::sink -join -hw
	-i::source -w 1280 -h 720 -o::h264 <output1.h264> -join  -hw
	-i::source -w 864  -h 480 -o::h264 <output2.h264> -join  -hw
	-i::source -w 640  -h 360 -o::h264 <output3.h264> -join  -hw
	-i::source -w 432  -h 240 -o::h264 <output4.h264> -join  -hw

		   Command:
			./sample_multi_transcode  -par OneToN.Par
The above parameter file specifies a simple 1:N transcode scenario. The first line of the parameter file invokes Intel Media Server Studio's H264 decoder by specifying the input file <input.h264>. The decoder will output the uncompressed frames to an output named "sink", which is a special command line parameter that redirects the frames to an internal buffer instead of writing the file to disk. The second through fifth lines of the parameter file invoke Intel Media Server Studio's h264 encoder to transform the frames into the target resolutions. Instead of reading from disk, the encoder reads from the "source" - which is the same buffer that the decoder writes the uncompressed frames into. The encoded content's resolution and output filename is also specified.
Notice the efficiency of the solution - only a single decoder and multiple encoders are instantiated. A frame is decoded only once and then submitted to each of the encoders. The "-join" and "-hw" command line flags further optimize the solution. The "-join” instructs the program to combine the scheduling and memory management of all components that are active, and the "-hw" instructs the program to execute the pipeline on the GPU rather than the CPU.
Sample_multi_transcode is an ideal program to gauge the expected performance of a 1:N pipeline. It is however a quite sophisticated piece of code that can be used to simulate a variety of different workloads. This complexity can make it difficult for the Intel Media Server Studio novice to extrapolate the key architectural components needed to develop a similar solution in house. The following summarizes how sample_multi_transcode implements this style of pipeline; use it in conjunction with careful code analysis when implementing an in-house solution.
Distributing the work
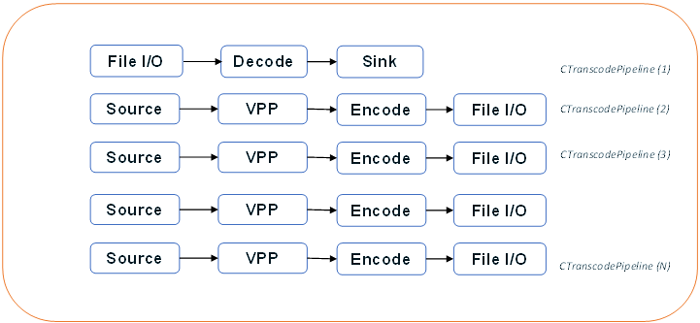
Using the same workload from above we can see that there are five separate work items specified. One decoder and four separate encoders. The first work item decodes the source file to a raw frame, and the remaining items consume the raw frame, and process, and encode it to various bit streams. All the work items are relatively autonomous to one another; however they are all dependent upon the decoder output. Each of these tasks is a natural candidate for parallelization and should be run in its own thread for maximum efficiency.
The Sample_multi_transcode source code enables the separation of work item tasks by using a general purpose class called CTranscodingPipeline. This class contains all the methods and structures necessary to create an autonomous work item that can be instantiated in its own thread. This class sometimes causes confusion with new developers trying to understand how the sample works because of the large size of methods and structures. CTranscodingPipeline is designed to support any type of workload and thus has many methods and member variables that are only used if relevant to the task at hand. For example, one instance of CTranscodingPipeline may use a decoder and file reader, whereas another instance may have a VPP and encoder component and no decoder. This is exactly what happens when the above parameter file is used to run a 1:N pipeline. The inclusion of the VPP component is used to scale the decoded video frame to the correct resolution prior to encoding, so it makes sense to include both the VPP and encoder components into the same instance for CTranscodingPipeline.
Initialization
Pipelines and Sessions
Developers familiar with the Intel® Media SDK API know the concept of a MFXVideoSession. A MFXVideoSession is created to hold the context of an Intel Media SDK pipeline. The reference manual states that each MFXVideoSession can contain a single instance of a decoder, VPP, and encoder component. In the case above, each CTranscodingPipeline creates its own MFXVideoSession for the active components of its instance. The process of creating and joining the sessions together occurs in the CTranscodingPipeline.Init() function.
Memory
The efficient sharing of data between the different components of the 1:N pipeline is paramount to utilizing the hardware resources in an effective way. Intel Media Server Studio performs best when the media pipelines are configured to run in an asynchronous fashion. By default, Intel Media Server Studio delegate’s memory management to the application and it’s the applications responsibility to allocate sufficient memory.
Application developers have a choice about how to implement the 1:N memory allocation scheme. The first option is to use an external allocator. The application implements the functions for alloc (), free (), lock (), and unlock () using either system or video memory. Determining what type of memory to allocate is left to the application to decide, but generally when an application needs to process frames during the transcode (apply special filters for instance), the application provided allocator is a good choice. The alternative choice is use to allow Intel Media Server Studio to do the work of choosing the most optimal memory type dependent on the run time circumstances. This surface neutral type - or opaque - memory is used when Sample_multi_transcode is configured with a 1:N workload:
  m_mfxDecParams.IOPattern = MFX_IOPATTERN_OUT_OPAQUE_MEMORY;
   m_mfxEncParams.IOPattern = MFX_IOPATTERN_IN_OPAQUE_MEMORY;
Using opaque memory makes sense in the 1:N transcode workload where the focus is on simply converting a single video source into multiple copies. The frames flow through the pipeline from one component to another unimpeded by any interaction from the application. If the application does need to operate on the fame data mid-pipeline it needs to explicitly synchronize, which is a performance penalty. In those cases, an external allocator would be preferred.
When sample_multi_transcode configures a 1:N pipeline it does not use an external allocator, but rather an opaque memory scheme to defer the responsibility of frame memory back to the underlying API. When opaque memory is used, the SDK will choose the memory type (system or GPU) at run time to maximize efficiency. This choice occurs during CTranscodingPipeline.Init().
Letting the API select the best memory for the type of job not only gives the application more resiliency to adapt to runtime environments, but it is also easier to maintain.
Regardless of whether opaque or application allocated memory is used the API still needs frame allocation headers to be setup prior to the initialization of the pipeline. The allocation of frame headers sometimes confuses new users of the Intel Media Server Studio. When using opaque memory, the application is only released from the responsibility of allocating the actual frame memory and assigning it to the Data.MemId field of the mfxFrameSurface1 structure. The application still needs to allocate sufficient surface headers for the decoder and encoder to work with. VPP functions will share the encoder’s surfaces since the two components are tightly integrated into a single pipeline. There are many examples throughout the Intel Media Server Studio’s documentation that explain how to allocate the surface headers. The end result will be two surface arrays – one for the decoder, the other for the encoder with the Data.MemId set to 0 for opaque memory or set to a valid surface returned by the applications allocator.
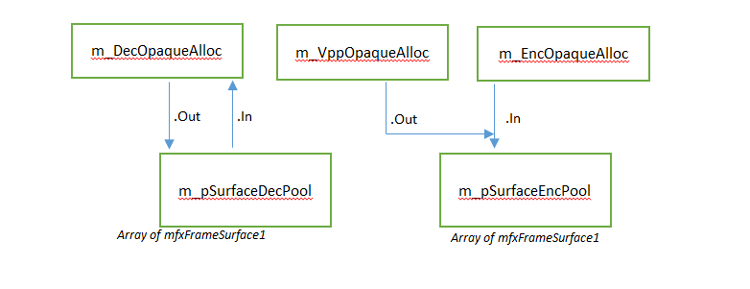
The use of the opaque memory type does however require an extra initialization step connecting the surface pools together and informing the API how the frames should flow through the pipelines. The code for this can be found in the InitOpaqueAllocBuffers()function.
Decode:
	m_DecOpaqueAlloc.Out.Surfaces = &m_pSurfaceDecPool[0];
    m_DecOpaqueAlloc.Out.NumSurface = (mfxU16)m_pSurfaceDecPool.size();
    m_DecOpaqueAlloc.Out.Type = (mfxU16)(MFX_MEMTYPE_BASE(m_DecSurfaceType) |
								MFX_MEMTYPE_FROM_DECODE);
Vpp:
	m_VppOpaqueAlloc.In = m_DecOpaqueAlloc.Out;
	m_VppOpaqueAlloc.Out =m_EncOpaqueAlloc.In;
Encode:
	m_EncOpaqueAlloc.In.Surfaces = &m_pSurfaceEncPool[0];
    m_EncOpaqueAlloc.In.NumSurface = (mfxU16)m_pSurfaceEncPool.size();
	m_EncOpaqueAlloc.In.Type = (mfxU16)(MFX_MEMTYPE_BASE(m_EncSurfaceType) |
								MFX_MEMTYPE_FROM_ENCODE);
The connections between the opaque memory structures inform the API how the frames flow through the pipeline, which can be expressed graphically using the OpaqueAlloc functions as follows:
Runtime Operation of the 1:N Pipeline
Communicating between the Sessions
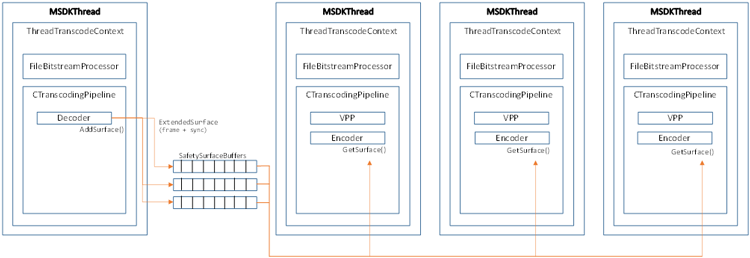
Sample_multi_transcode's 1:N pipeline configuration consists of an (N) amount of CTranscodingPipeline instances containing a specific operation (decode, VPP, encode, and so on.). Each of these instances carries its own MFXVideoSession. The passing of frame data across the threads is handled by a set of mutex protected buffers called the SafetySurfaceBuffer.
class SafetySurfaceBuffer
    {
    public:
        struct SurfaceDescriptor
        {
            ExtendedSurface   ExtSurface;
            mfxU32            Locked;
        };

        SafetySurfaceBuffer(SafetySurfaceBuffer *pNext);
        virtual ~SafetySurfaceBuffer();

        void              AddSurface(ExtendedSurface Surf);
        mfxStatus         GetSurface(ExtendedSurface &Surf);
        mfxStatus         ReleaseSurface(mfxFrameSurface1* pSurf);

        SafetySurfaceBuffer               *m_pNext;

    protected:

        MSDKMutex                 m_mutex;
        std::list<SurfaceDescriptor>       m_SList;
    private:
        DISALLOW_COPY_AND_ASSIGN(SafetySurfaceBuffer);
    };
The SafetySurfaceBuffer is the key to understanding how the frames flow from the decoder to the encoders across the threads. During initialization of sample_multi_transcode, the program will calculate the number of instances of CTranscodingPipeline it needs to implement the 1:N pipeline. For each instance of a "source" pipeline, a SafetySurfaceBuffer is created in the function CreateSafetyBuffers(). The buffers are created and linked together as such:
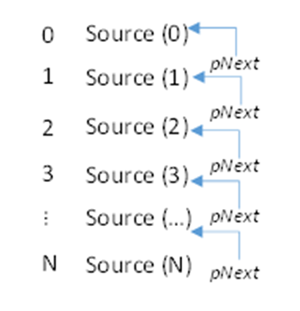
There is no SafetySurfaceBuffer created for the sink (decoder) pipeline, just those instances of CTranscodingPipeline that contain VPP and encoders. When the pipeline that contains the decoder completes the frame, the working surface and sync point are placed in the ExtendedSurface structure and added to SafetySurfaceBuffer. The application does not need to explicitly sync the frame, but rather copies the pointer into the ExtendedSurface.
Starting the Pipelines
Once the process of creating and configuring the different instances of CTranscodingPipeline and SafetySurfaceBuffer have been completed, they can be dispatched into separate threads for execution. This process occurs in the Launcher::Run() function.
MSDKThread * pthread = NULL;
    for (i = 0; i < totalSessions; i++)
    {
        pthread = new MSDKThread(sts, ThranscodeRoutine, (void *)m_pSessionArray[i]);
        m_HDLArray.push_back(pthread);
    }
    for (i = 0; i < m_pSessionArray.size(); i++)
    {
        m_HDLArray[i]->Wait();
    }
Each instance of the m_pSessionArray contains a preconfigured pipeline which is dispatched into its own thread. The callback “ThranscodeRoutine” is where the main execution starts.
mfxU32 MFX_STDCALL TranscodingSample::ThranscodeRoutine(void   *pObj)
{
    mfxU64 start = TranscodingSample::GetTick();
    ThreadTranscodeContext *pContext = (ThreadTranscodeContext*)pObj;
    pContext->transcodingSts = MFX_ERR_NONE;
    for(;;)
    {
        while (MFX_ERR_NONE == pContext->transcodingSts)
        {
            pContext->transcodingSts = pContext->pPipeline->Run();
        }
        if (MFX_ERR_MORE_DATA == pContext->transcodingSts)
        {
            // get next coded data
            mfxStatus bs_sts = pContext->pBSProcessor->PrepareBitstream();
            // we can continue transcoding if input bistream presents
            if (MFX_ERR_NONE == bs_sts)
            {
                MSDK_IGNORE_MFX_STS(pContext->transcodingSts, MFX_ERR_MORE_DATA);
                continue;
            }
            // no need more data, need to get last transcoded frames
            else if (MFX_ERR_MORE_DATA == bs_sts)
            {
                pContext->transcodingSts = pContext->pPipeline->FlushLastFrames();
            }
        }

        break; // exit loop
    }

    MSDK_IGNORE_MFX_STS(pContext->transcodingSts, MFX_WRN_VALUE_NOT_CHANGED);

    pContext->working_time = TranscodingSample::GetTime(start);
    pContext->numTransFrames = pContext->pPipeline->GetProcessFrames();

    return 0;
}
Each instance of CTranscodingPipeline will be started and continue processing until it runs out of data at which point the final frames are flushed out of the pipelines and the transcoder terminates.
Performance Characteristics on 1:N
The Intel Media Server Studio is a highly configurable solution that gives the developer a large array of controls to use in order to tune their pipelines to meet most requirements. As in all video transcoder products, a tradeoff must be made between throughput and video quality. By leaving the quality parameters to their defaults we can investigate some of the pure performance flags of sample_multi_transcode, which impact the overall throughput of the solution.
These experiments were performed on the Intel® Core™ i7-5557U processor with Iris™ Pro graphics 6100 using CentOS* 7.1. We used sample_multi_transcode from the Intel Media Server Studio 2015 R6.
Two key settings to investigate first are “Join” and “Async Depth”.
The "-join" command maps to the Intel Media SDK API’s MFXJoinSession function. When sessions are joined, the first session will become the parent and handle the scheduling of resources for all other sessions joined to it. This feature allows for the efficient reuse of resources between the active sessions.
The “-async_depth” command controls the depth of the asynchronous queue that Intel Media Server Studio maintains. A deeper queue allows more tasks to be implemented in parallel before the application must explicitly “sync” to free the resources. A large async depth could cause a shortage of the resources that are available. The following par files are used to show the impact of Join and Non-Joined sessions at various Async depths:
-i::h264  ~/Content/h264/brazil_25full.264 -o::sink –hw –async 1 -join
-i::source -w 1280 -h 720 -o::h264 /dev/null -hw -async 1 -join
-i::source -w 864  -h 480 -o::h264 /dev/null -hw -async 1 -join
-i::source -w 640  -h 360 -o::h264 /dev/null -hw -async 1 -join
-i::source -w 432  -h 240 -o::h264 /dev/null h264 -hw -async 1 -join
Note: -async was varied between 1 and 10 with both –join and without –join. The output was directed to /dec/null to eliminate the disk I/O from being calculated into the total Frames per second (FPS).
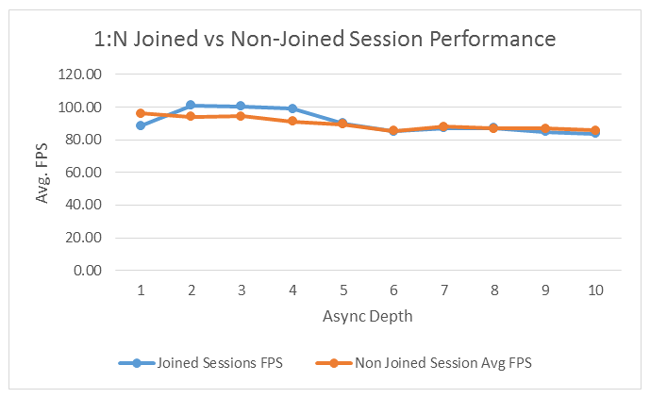
This workload deliberately focused on lower resolution encoding as it is a more difficult case; higher-resolution outputs typically have better performance characteristics. As you can see from the above graph, the “-join” flag does not have a significant impact on the throughput of this workload. A small async depth does improve the average FPS of the pipelines, but at larger values it does not contribute to the overall performance. We recommended that you gauge the level of performance of your own workloads with both join and non-join configurations.
Now we can vary the quality settings to see what impact it has on the throughput of the 1:N pipeline. We use this par file to vary the quality settings:
-i::h264  ~/Content/h264/brazil_25full.264 -o::sink –hw –async 2 –u 1
-i::source -w 1280 -h 720 -o::h264 /dev/null -hw -async 2 –u 1
-i::source -w 864  -h 480 -o::h264 /dev/null -hw -async 2 –u 1
-i::source -w 640  -h 360 -o::h264 /dev/null -hw -async 2 –u 1
-i::source -w 432  -h 240 -o::h264 /dev/null –hw –async 2 –u 1
Note: -u (TU) was varied between 1 and 7 without –Join and Async Depth held constant at 2. The output was directed to /dec/null to eliminate the disk I/O from being calculated into the total FPS.
As the graph above shows, the Target Usage parameter has a large impact on the overall throughput of the 1:N pipeline. We encourage you to experiment with the target usage settings to determine your ideal throughput vs the resulting quality to find the ideal settings.
There are a large amount of other settings the Intel Media Server Studio provides that can be further adjusted to find the best performance for your individual workloads. The multitude of different encoding options such as BRC, buffer sizes, and low latency options can be used to find the right balance between speed and quality. Sample_multi_transcode exposes most of these options though the command line.
Conclusion
This paper discussed the key architectural and performance characteristics of using Intel Media Server Studio’s sample_multi_transcode when configured in a simple 1:N pipeline. This type of workload is ideal for transcoding single-source content into multiple resolution outputs. This and many other samples are available to developers here: https://software.intel.com/en-us/intel-media-server-studio-support/code-samples. Media content providers who want to target an ever-increasing device ecosystem can utilize sample_multi_transcode when designing their own content delivery systems.