Overview
Intel® Edge Software Device Qualification (Intel® ESDQ) for Video Analytics provides customers with the capability to run an Intel provided test suite at the target system, with the goal of enabling customers to self-qualify on their platform.
The information below is specific to the Intel® ESDQ for Video Analytics package. For documentation on the Intel® ESDQ CLI binary, refer to Intel® Edge Software Device Qualification (Intel® ESDQ) Overview.
Select Configure & Download to download Intel® ESDQ for Video Analytics and refer to Get Started for installation steps.
Target System Requirements
- One of the following processors:
- Intel Atom® processor with Intel® SSE4.1 support.
- 6th - 11th generation Intel® Core™ processors.
- Intel® Xeon® processor E3, E5, and E7 family.
- 2nd Generation Intel® Xeon® Scalable Processors.
- 3rd Generation Intel® Xeon® Scalable Processors.
- At least 8 GB RAM.
- At least 64 GB hard drive.
- An Internet connection.
- Ubuntu* 20.04 LTS Kernel 5.4†
† Use Kernel 5.8 for 11th generation Intel® Core™ processors.
How It Works
The test module for Video Analytics interacts with the Intel® ESDQ CLI through a common test module interface (TMI) layer, which is part of the Intel® ESDQ binary.
Selected modules from Customize Download option will be validated.
Test results will be stored in the output folder. Intel® ESDQ generates a complete test report in HTML format, along with detailed logs packaged as one zip file, which you can manually choose to email to the ESH support team.
Edge Video Analytics Test Module
The Edge Video Analytics Test Module consists of two parts:
- Health Check
- Video Analytics Tests using Object Detection pipeline
Health Check
The test suite runs a health check to make sure all the components that are part of the Video Analytics package software stack are properly installed and configured correctly. This includes the containers for the Edge Video Analytics Microservice and Eclipse Mosquitto message broker.
Object Detection Pipeline Test
The test runs the sample object detection model which is already included in the Edge Video Analytics Microservice Docker image. Using the REST POST request, the object detection pipeline tests verify the inference on CPU and GPU. The test suite validates the output of the sample applications to make sure that all the components work as expected.
Get Started
Intel® ESDQ CLI tool can be installed as part of the Video Analytics package.
NOTE: Be aware that screenshots may show a package version number that is different from the current release. See the Release Notes for information on the current release.
Download and Install Intel® ESDQ for Video Analytics
- Select Configure & Download.
- Select the latest option for Version or Tag.
- Select Ubuntu 20.04 LTS as Target System.
- Select Customize Download as Distribution.
- Select the Customize Download button to download the Intel® Edge Software Device Qualification (Intel® ESDQ) for Video Analytics.
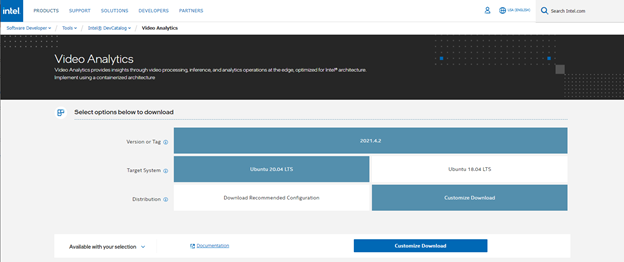
Figure 1. Configure & Download Page
- Click the Edit button to reconfigure the options and download another version of Intel® ESDQ for Video Analytics in subsequent releases.
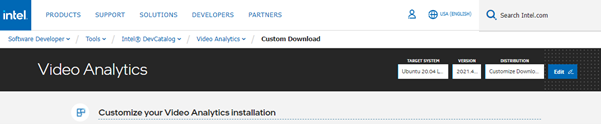
Figure 2. Edit Download - Click the Next button until the Download button appears (screen 6 of 6).
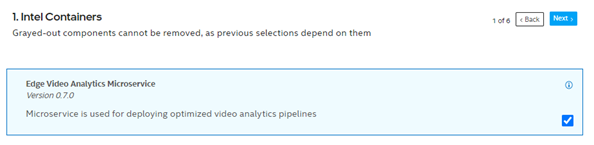
Figure 3. Customize Download - Screen 1 - You will notice one of the components in the list is Intel® Edge Software Device Qualification. Click the Download button.
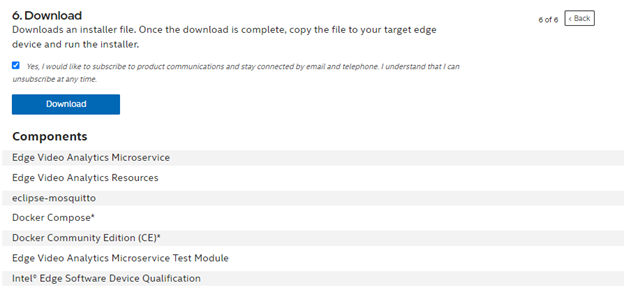
Figure 4. Customize Download - Screen 6 - Select Accept License Agreement on the pop-up window, then follow the instructions below.
- Copy and Save the Product Key.

Figure 5. Product Key - Transfer the downloaded package to the target Ubuntu* system.
- View the edgesoftware_configuration.xml included in the edge software zip package and look for the Intel® ESDQ ingredient and test modules for Edge Video Analytics microservice.
<project path="installation/src" id="62cdb148d4e53700213ad37e" version="0.7.2" label="esdq/EVAM_Test_Module"/> <project path="installation/src" id="62717851af4093002b29a8d8" version="8.0" label="esdq" esb_install="true"/> - Prepare the target system for Video Analytics installation:
- Make sure the target system is Ubuntu 20.04, Linux Kernel 5.8 or above.
- Make sure apt source list is updated to latest and sudo, lsusb, unzip are already installed.
apt update apt install sudo usbutils unzip - Make sure the Python 3 environment is set up correctly.
- Make sure pip3 setup tools, psutil, are available in the target system.
pip3 install –-upgrade pip
pip3 install setuptools psutil
- Provide executable permission to edgesoftware.
chmod +x ./edgesoftware - Run the command below to install Intel® ESDQ and Edge Video Analytics.
./edgesoftware install - During the installation, you will be prompted for the Product Key. The Product Key is contained in the email you received from Intel confirming your download (or from the saved Product Key in the step above).
- When the installation is complete, you see the message Installation of package complete and the installation status for each module.

Figure 6. Installation Status - Find the module ID for the Intel® ESDQ by running the command:
./edgesoftware list --default
Example output: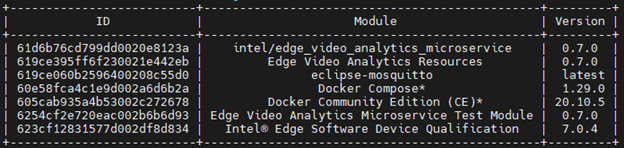
Figure 7. Edgesoftware List - After module installation is completed successfully, reboot the system:
reboot
Run the Application
For the complete Intel® ESDQ CLI, refer to Intel® ESDQ CLI Overview. The test modules are already available in the target system.
- Change directory with the command:
cd <PRODUCT_INSTALLED_DIRECTORY>/video_analytics/Video_Analytics_<version>/esdqWhere <version> is the package version downloaded.
-
Run Intel® ESDQ test and generate report:
./esdq run -r
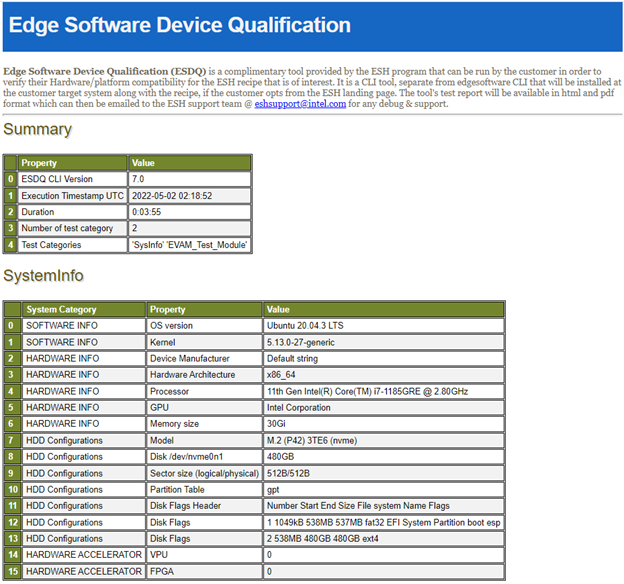
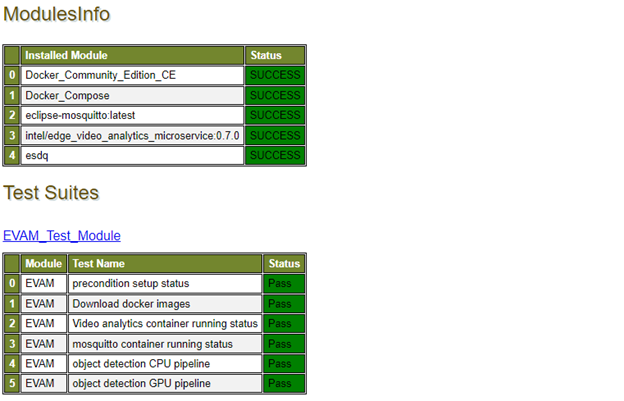
- Navigate to the artifacts location by clicking on the respective test module name under the Test Suites section of the report.
The test report should look like the following examples:
Note: The results shown below are for illustration only.
Release Notes
Current Version: 0.7.2
New in This Release
- Updated the test cases to check configured module versions.
Version 0.7.0
- Initial features for recommended configuration.
Troubleshooting
Network Requirements
If one of the following errors is returned, check your firewall/proxy settings. You may update apt source to your local mirror site or run Intel® ESDQ in VPN network.
- Failed to install Python requirements
- Failed to clone the git repo for model downloads
- Request timed out after 3 minutes Unable to connect to github
Object Detection Pipeline Tests Failed
If proxy details are missing, then it fails to get the required source video file for running the pipelines and installing the required packages inside the container.
Possible solutions:
- In proxy environment, if single user proxy is set (i.e. in .bashrc file) then some of the component installation may fail or installation hangs. Make sure you have set the proxy in the /etc/environment file.
- If your system is in a proxy network, add the proxy details in the environment file: /etc/environment
HTTP_PROXY=http://<IP:port>// HTTPS_PROXY=http://<IP:port>// NO_PROXY=localhost,127.0.0.1 - Create the Docker group and add user to the group.
- Create the Docker group with the command:
sudo groupadd docker -
Add your user to the Docker group:
sudo usermod -aG docker $USER
- Create the Docker group with the command:
Support Forum
If you're unable to resolve your issues, contact the Support Forum.