By: Paul Veitch
BT Research & Innovation
Ipswich, UK
paul.veitch@bt.com
Background
A key challenge for widespread network functions virtualization (NFV) adoption is to provide predictable and deterministic quality of service (QoS) in terms of key metrics like network throughput, packet latency, and jitter. Addressing this challenge is particularly crucial for successful 5G deployments, which will need to support a diverse range of service types, many having stringent performance targets.
Factors affecting NFV performance exist at different layers of the stack: physical hardware, system BIOS, host hypervisor, and virtualized network functions (VNFs) are critical components, all of which can be “tuned” for more predictable behavior. A crucial aspect of NFV performance management is ensuring the protection of VNF resources against “noisy neighbor” effects arising from shared resources, such as the processor’s last-level cache (LLC), being consumed in extremis within a multi-tenant setup. This means one VNF’s resources are restricted by another’s, which negatively impacts performance (Figure 1).
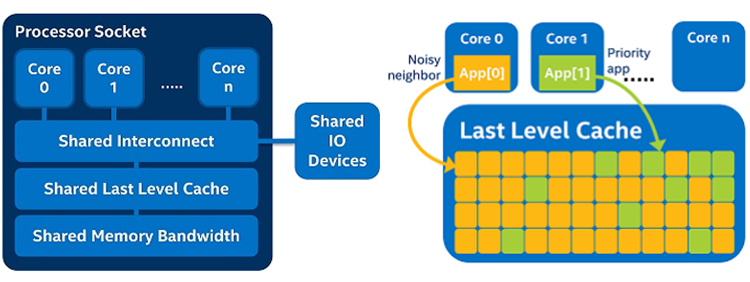
Figure 1: Shared processor resources and last-level cache hogging by “noisy neighbor.”
Since 2015, Intel has launched a range of core processors enabled to support features like Cache Monitoring Technology (CMT), Cache Allocation Technology (CAT), and Memory Bandwidth Monitoring (MBM). Collectively, these tools enable proactive monitoring of shared resource consumption and software-programmable control of available resources realizing “platform-level” QoS for different VNFs in a multi-tenant environment. The syntax “pqos” is used for command-line settings for CAT.
This article provides some practical insights into BT’s setup and testing of CAT using real-world VNFs, including a Fortinet vFirewall* and a Brocade vRouter*. This article complements a recently published paper at IEEE Netsoft 2017 1, which focused on proving the benefits of technologies like CAT to mitigate noisy neighbor effects.
Experimental Setup: Foundation
The testbed is based on Linux* KVM (Kernel-based Virtual Machine) using Open vSwitch* with the Data Plane Development Kit (OVS-DPDK). The x86 server uses Intel® Xeon® processors D-1537 enabled to support CMT and CAT software. Table 1 lists the key hardware and software elements.
Table 1: Testbed components
| Testbed Component | Version/Description |
|---|---|
| X86 Hardware | Intel® Xeon® processor D-1537 (16 x logical processors, 16 G RAM, 256 GB SSD storage), 12 MB cache |
| Hypervisor Base OS and Kernel | CentOS* 7 3.10.0-327.22.2.e17.x86_64 |
| Hypervisor Open vSwitch* | 2.6.0 |
| Data Plane Development Kit | 16.07 |
| QEMU* | 2.5.1.1 |
| VNF 1 - vFirewall | Fortinet FortiGate* VM64-KVM 2: 1 vCPU, 1 G RAM |
| VNF 2 - vRouter | Brocade 5600* virtual router 3: 4 vCPU, 4 G RAM |
| VNF3 - Noisy Neighbor VM | Fedora* 22: 2 vCPU, 2G RAM Stress Processes: stress-ng-0.03.20, memtester version 4.3.0 |
| Tester | Spirent Avalanche* 4.40, running RFC2544 throughput test wizard, fixed + iMIX profiles |
Some information in Table 1 is worth expanding on:
- The Intel Xeon processor D-1537 has 8 physical CPU cores on a single socket, hence the designated 16 logical processors is with hyper-threading enabled.
- Note the 12 MB cache attributed to the Intel Xeon processor D-1537: when we show the class-of-service (CoS) constructs used to define how cache resources are partitioned, we will see 12 bits being used per “CoS way,” which means the 12 MB divides into 12 separate 1 MB chunks.
- The vendor VNFs used are generally available (GA) and considered high-value workloads we aim to protect (using CAT) from the effects of resource hogging by the noisy neighbor VNF. The noisy neighbor VNF is a Fedora* virtual machine (VM) running a range of stress processes deliberately causing high degrees of resource consumption.
- Figure 2 shows the ways in which the VNFs co-reside in a multi-tenant setup. Essentially we have a single target VNF alongside a noisy neighbor, as well as dual VNFs in a service chain alongside a noisy neighbor VNF. The target VNFs use vhost drivers connecting to the virtual switches (“Lan-bridge” and “Wan-bridge” in the diagram), which themselves connect to physical Gigabit Ethernet interfaces set up using DPDK poll mode drivers (PMDs). The noisy neighbor VNF is not in the data path and uses standard virtio drivers connecting to the virtual switch labeled “vm-bridge.”

Figure 2: (a) Target virtualized network function (VNF) and noisy neighbor. (b) Dual VNFs and noisy neighbor.
Experimental Setup: Baseline System Dependencies and VNF Setup
Although the OVS-DPDK installation is already well documented 4, there are certain setup pre-requisites worth highlighting. An excerpt from the grub.cfg file found in /etc/default highlights three notable kernel boot parameters: hugepages setup (as needed for DPDK 5), isolcpus setup (allowing CPUs 1‒15 to be kept for workload assignment separate from the CPU scheduling tasks associated with CPU 0), and selinux disabled.
GRUB_CMDLINE_LINUX="crashkernel=auto rd.lvm.lv=centos/root rd.lvm.lv=centos/swap rhgb quiet default_hugepagesz=2M hugepagesz=2M hugepages=6144 nosoftlockup intel_idle.max_cstate=0 mce=ignore_ce idle=poll isolcpus=1-15 selinux=0 enforcing=0 intel_iommu=off iommu=pt LANG=en_US.UTF-8"
The following command allows grub settings to take effect on CentOS 7 before rebooting:
grub2-mkconfig -o /boot/efi/EFI/centos/grub.cfg
Confirmation that these settings have taken effect can be validated with cat /proc/cmdline:

More specifically, confirmation of the hugepages setup can be viewed using the mount command, an excerpt of which is shown below:
![]()
In terms of assigning workloads to CPUs in the range 1‒15, Table 2 shows what was used for the BT testing.
Table 2: Virtualized network functions (VNFs) and system CPU pinning.
| Function/Process | Pinned CPUID(s) |
|---|---|
| Noisy Neighbor VNF | 6,7 |
| Target VNF - Single Firewall | 5 |
| Target VNF - Single Router | 1,2,3,5 |
| Target VNF - Second Router | 9,10,11,13 |
| OVS-PMD (Open vSwitch* Poll Mode Driver) | 4,12 |
| OVS-db (Open vSwitch Database) | 1 |
The other major workloads worth pinning to CPUs to assure performance are the Open vSwitch Database (OVS-db) and PMDs (OVS-PMD). The way in which these are pinned to CPUs 1 and CPUs 4,12, respectively, is highlighted below in an excerpt of a script (lines 8 and 12) used to initialize the OVS with DPDK:
# Start the database server.
./ovsdb/ovsdb-server --remote=punix:$DB_SOCK --remote=db:Open_vSwitch,Open_vSwitch,manager_options --pidfile --detach
# Initialize the database.
./utilities/ovs-vsctl --no-wait init
# Start OVS with DPDK on cpu 1
./utilities/ovs-vsctl --no-wait set Open_vSwitch . other_config:dpdk-init=true
./utilities/ovs-vsctl --no-wait set Open_vSwitch . other_config:dpdk-socket-mem="2048,0"
./utilities/ovs-vsctl --no-wait set Open_vSwitch . other_config:dpdk-lcore-mask="0x2"
./vswitchd/ovs-vswitchd unix:$DB_SOCK --pidfile --detach
# set OVS PMD thread on cpu 4 & 12
./utilities/ovs-vsctl set o . other_config:max-idle=50000
./utilities/ovs-vsctl set Open_vSwitch . other_config:pmd-cpu-mask=0x1010
The hexadecimal masking works as follows: “0x2” equates to 0000000000000010, so the position of the 1 in the equivalent binary mask represents CPU 1 from the 16 available logical CPUs numbered 0‒15. “0x1010” equates to 0001000000010000, so the positioning of the 1s in the equivalent binary mask represents CPUs 12 and 4 from the available logical CPUs numbered 0‒15.
Now to the VNFs. The Fortinet FortiGate* FG-VM01 vFirewall has a footprint of 1 vCPU and 1 GB RAM, whereas the Brocade 5600* vRouter uses 4 vCPU and 4 GB RAM. The test cases described in 1 involve either a single vFirewall plus noisy neighbor, single vRouter plus noisy neighbor, or dual vRouters in series plus noisy neighbor. This explains why CPU 5 is used for the vFirewall and also appears in Table 2 when used for one of the two vRouters. The allocation of VNF workloads to CPUs is otherwise fairly arbitrary, avoiding CPU core 0, and the cores used for other workloads as already discussed (for example, 4 and 12).
A sample excerpt of the XML file used to provision the Brocade vRouter (using the virsh command line tool) shows the CPU pinning to achieve what is shown in Table 2.
<vcpu placement='static' cpuset='1,2,3,5'>4</vcpu>
  	 <cputune>
   	  	<vcpupin vcpu="0" cpuset="1"/>
<vcpupin vcpu="1" cpuset="2"/>
     		<vcpupin vcpu="2" cpuset="3"/>
     		<vcpupin vcpu="3" cpuset="5"/>
  	 </cputune>
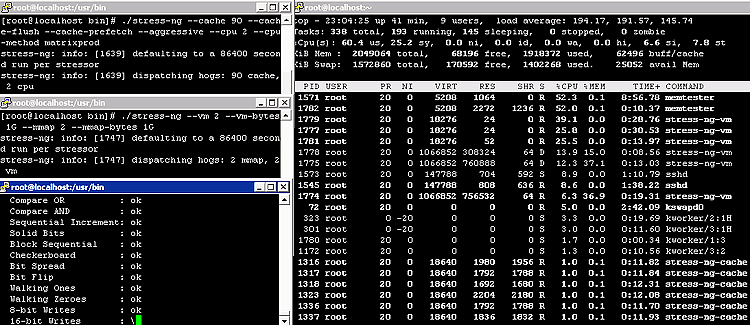
The noisy neighbor VNF is based on a synthetic VM using Fedora 22, and consumes a footprint of 2 vCPU with 2 GB RAM. The stress processes make use of the memtester and stress-ng utilities, with seven processes running simultaneously and launched via seven separate SSH sessions. Two of the sessions run memtester, while the stress-ng instances are defined as follows (two instances of the first defined process and three instances of the second defined process are run):
./stress-ng --cache 90 --cache-flush --cache-prefetch --aggressive --cpu 2 --cpu-method matrixprod
./stress-ng --vm 2 --vm-bytes 1G --mmap 2 --mmap-bytes 1G
All such processes are launched from /usr/bin. A sample top output alongside corresponding stress processes launched within the synthetic noisy neighbor VM, confirm the effect they have on system resource utilization.
Experimental Setup: CAT install and usage
The previous sections explained how we defined VNFs and other workloads to make use of CPU pinning in order to tie those workload/processes to specific CPU core threads. We now show how the CAT tooling can be used to partition and allocate LLC resources (recalling we have 12 MB capacity on our Intel Xeon processor D-1537) in such a way that we map and assign the logical CPU threads into reserved pools of LLC capacity.
First the installation. A small number of simple steps are provided at https://github.com/intel/intel-cmt-cat/blob/master/INSTALL. The actual zipped package is called “intel-cmt-cat-master.zip” and can be downloaded from https://github.com/intel/intel-cmt-cat.
One small glitch that occurred due to the use of CentOS OS is that /usr/local/lib (where Intel’s CMT/CAT software is installed by default) needs to be specified. A new local.conf file was created in /etc/ld.so.conf.d/ with the single entry content as shown below (binding provided by the command ldconfig):

Once installation is completed, the pqos commands are run from /usr/local/bin.
Before showing examples of pqos commands, it is worth explaining that the CoS construct at the heart of CAT acts as a resource control tag into which a CPU thread can be grouped. Definition of capacity bitmasks determines how much of the LLC space is available and the degree of overlap and isolation. Typically, a capacity bit to cache way mapping is one-to-one, but one-to-many options are also possible. For the Intel Xeon processor D-1537, the LLC has 12 “ways,” and the CoS capacity bitmask has 12 bits, each comprising 1 MB of cache storage.
In basic terms, having defined the VNF/workload pinning to specific CPU cores, we then associate each CPU core thread with a specified quantity of LLC bandwidth (using the CoS bitmasks). This allows us to prioritize the VNFs and workloads in terms of LLC resources.
As was shown in the Netsoft 2017 paper 1, CAT was extremely effective in mitigating against the effects of noisy neighbor VNFs aggressively hogging LLC resources. A number of scenarios were explained in terms of how LLC resources were allocated to the different workloads, as well as the before-and-after effects of the different CAT settings. These test scenarios and results are not repeated here; rather we are interested in highlighting the syntax employed and validation of the CAT settings used to underpin certain test cases.
Uneven and Even are two distinct models (see Table 3). The Uneven model assigns 11 out of 12 CoS ways to the noisy neighbor VNF and only a single CoS way to everything else, including the target VNF, which is representative of an aggressive hogging of LLC by the noisy neighbor 1. The Even model assigns 4 CoS ways for the noisy neighbor, 4 for the target VNF (for example, vFirewall) and 4 for all other workloads (OVS-db, OVS-PMD, and so on).
Table 3: Cache Allocation Technology (CAT) class-of-service way definitions using bitmasks.
| CAT CoS Model | Binary Bitmasks | Hex | Cache Capacity | CPU Assignments |
|---|---|---|---|---|
| Uneven (11-1) | 1111 1111 1110 0000 0000 0001 |
0xffe 0x1 |
11 MB 1 MB |
6,7 (noisy neighbor) 0‒5,8‒15 (everything else) |
| Even (4-4-4) | 1111 0000 0000 0000 1111 0000 0000 0000 1111 |
0xf00 0xf0 0xf |
4 MB 4 MB 4 MB |
6,7 (noisy neighbor) 5 (virtual firewall) 0‒4,8‒15 (everything else) |
Let’s step through the syntax to achieve the LLC partitioning as per the schema of Table 3. For the Uneven model we first define the 11 CoS way and 1 CoS way masks, enumerated as CoS ways 1 and 2, respectively, and using the Hex equivalent of the 12-bit binary masks:
./pqos -e “llc:1=0xffe”
./pqos -e “llc:2=0x1”
Next we assign those CoS ways to specific CPU cores, the first is the noisy neighbor VNF (CPU cores 6,7) while the second is all other workloads (CPU cores 0‒5,8‒15):
./pqos –a “llc:1=6,7”
./pqos –a “llc:2=0-5,8-15”
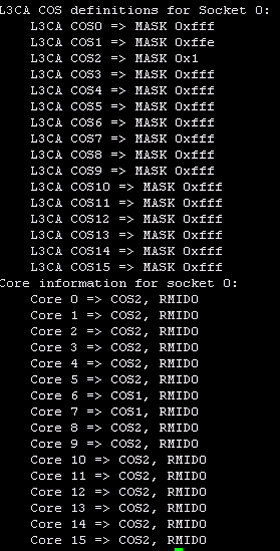
Using the command ./pqos –s allows us to check the setup. We can see a default COS0 class as well as the newly defined COS1 and COS2 classes. Further down, we can see how CPU cores are associated with CoS ways: the CPU cores associated with the noisy neighbor (6,7) are in COS1 class (which will have access to 11 MB of LLC), while all other CPU cores are in COS2 class (restricted to just a single 1 MB chunk of LLC).
For the Even model, meanwhile, we define three groups, each with 4 CoS ways, enumerated as CoS ways 0, 1, and 2 respectively and using the Hex equivalent of the 12-bit binary masks:
./pqos -e "llc:0=0xf00”
./pqos -e "llc:1=0xf0”
./pqos -e "llc:2=0xf”
Next we assign those CoS ways to specific CPU cores, the first is the noisy neighbor VNF (CPU cores 6,7), the second is our target (that is, the high-value VNF we aim to protect using CPU core 5), while the third is for all other workloads (CPU cores 0‒4,8‒15):
./pqos –a “llc:0=6,7”
./pqos –a “llc:1=5”
./pqos –a “llc:2=0-4,8-15”
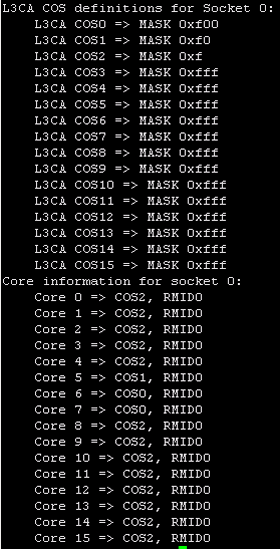
As before, we use ./pqos –s to check the setup. Looking further down, we see the CPU cores associated with the noisy neighbor (6,7) are in the COS0 class (so will have access to 4 MB of LLC), the target VNF’s CPU core (5) is in the COS1 class (also with 4 MB of LLC), and remaining CPU cores in COS2 have access to the other 4 MB of LLC.
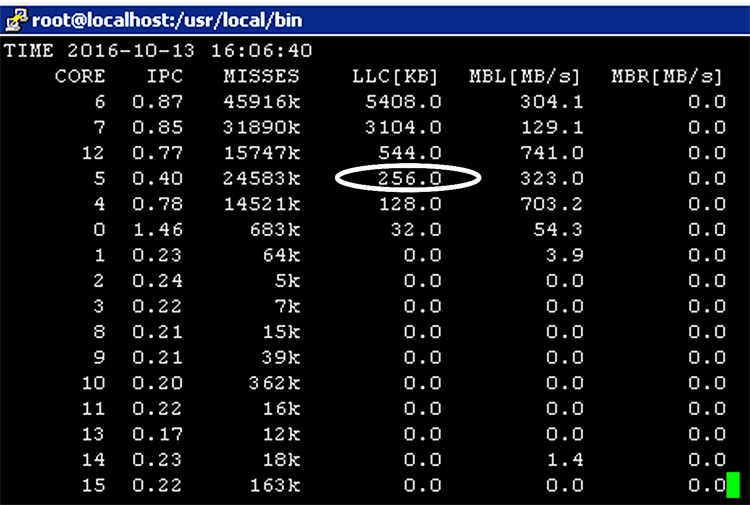
A final practical insight to supplement the test results outlined in 1, is to show the output of the ./pqos –T command while running test traffic through the setup. For the vFirewall tests (with 1518-byte frame sizes), the following output shows LLC occupancy with the Uneven CoS model, thus hugely favoring the noisy neighbor over the target VNF. The LLC occupancy levels of the CPU cores associated with the noisy neighbor (6,7) significantly outweigh those for CPU cores associated with the target VNF (core 5).
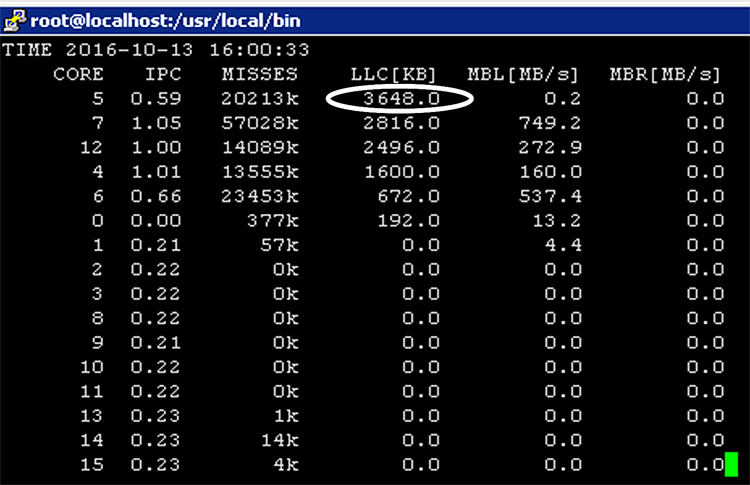
Rerunning with the Even allocation shows the target VNF (core 5) achieving the highest LLC consumption, with remaining resources distributed between other active workloads (for example, the noisy neighbor using cores 6,7 as well as the OVS-PMD using cores 4,12):
Summary
This article provides additional practical insights into the BT Group’s and Intel’s testing of CAT, as detailed in the Netsoft 2017 paper1. Some points worth stating:
- The pqos command line syntax is succinct and easy to use.
- Changes to CAT settings can be applied in situ without the need for system reboot, and so on.
- Although manual setup was explained here, it would lend itself to scripting, which would itself lend to more automation in how CAT settings are applied. In 1, we stressed how pre-profiling and monitoring of VNF behavior in terms of LLC consumption could lead to more accurate and optimal assignments.
References
- Paul Veitch, Edel Curley, and Tomasz Kantecki, “Performance Evaluation of Cache Allocation Technology for NFV Noisy Neighbor Mitigation,” Proceedings of IEEE Netsoft 2017. http://ieeexplore.ieee.org/document/8004214/
- https://www.fortinet.com/content/dam/fortinet/assets/data-sheets/FortiGate_VM.pdf
- https://github.com/openvswitch/ovs/blob/master/Documentation/intro/install/dpdk.rst
- http://dpdk.org/doc/guides/linux_gsg/sys_reqs.html#compilation-of-the-dpdk