Overview
Network functions virtualization (NFV) uses the concept of server virtualization and network virtualization to replace physical network devices with software programs executing network functions on commodity hardware. While this new technology is more flexible than traditional network equipment, it has certain challenges: developers may take a lot of time to write and stitch optimized low-level code, and it still delivers slower performance compared to traditional network equipment. Network Function Framework (NFF) is proposed to address these challenges. NFF-Go is a framework built with the Google Go* programming language to allow developers to deploy applications much faster; it internally implements low-level optimizations and can auto-scale to multicores using built-in capabilities to take advantage of Intel® architecture.
NFF uses Data Plane Development Kit (DPDK) for efficient input/output (I/O) and the Go programming language as a high-level, safe, productive language. NFF’s goal is to provide a framework for building performant cloud-native network functions. This tutorial shows to install Go programming language and NFF-Go on both virtual machines and bare metal.
Architectural Concepts
To achieve high performance in packet processing, NFF-Go leverages DPDK for low-level I/O - receiving, storing, sending and releasing packets. DPDK contains a set of libraries to accelerate packet processing workloads. One main feature is that DPDK allows applications to run in user space, bypassing the heavy layers of kernel networking and interfacing directly with the hardware. Other important features include the use of memory hugepages and optimal memory management.
NFF can use other I/O sources to get packets when DPDK is not available on the host – such as Kernel, AF_XDP, memory buffer, file, packet capture (PCAP), Remote Procedure Call (RPC).
The high-level Go programming language is used for NFF because it supports efficient concurrency (goroutines). With Go programming language, it is quick to deploy an application and easy to maintain source code; the Go programming language enables garbage collection support and provides high-performance like C/C++ programming languages. Go programming language is the choice for modern cloud software-defined infrastructure.
Packet Processing Graph
One important concept of NFF-Go is the packet processing graph. NFF-Go allows developers to build complex network functions by sequentially chaining predefined blocks into a high-level directed graph, called a packet processing graph (see Figure 1). In a packet processing graph, each node provides specific packet processing functionality to the flow, referred to as a flow function. Each directed edge represents a flow, which must be opened by a node (flow function) and closed by a node. The first node starts a flow, gets packets from network interface port(s), and puts them into the flow. The next node gets packets from the flow, handles them according to a user-defined function, and passes the packets to the same flow. A node can start new flows, but other flows must be closed elsewhere in the graph. The last node in the graph normally gets the packets from a flow, closes the flow, and either outputs the packets to network interface port(s) or discards them. The packet processing graph must be constructed between the system initialization and the system start functions.
The packet processing graph can handle fast packet I/O and perform auto-scaling to sustain high performance. This approach allows developers to focus on packet processing functionality, not on low-level tasks like buffer management or basic optimization.
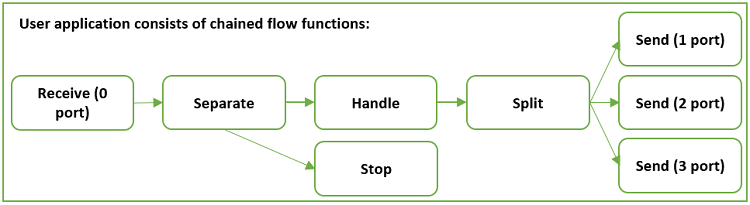
Figure 1. Blocks in a packet processing graph of the user application (Source: Areg Melik-Adamyan, Ilya Philippov, Novel Approach to Network Function Development)
Flow Functions
Each node in the packet processing graph represents a flow function. There are five predefined flow functions: Receive, Send, Stop, Merge, and Partition. Developers can configure the parameters of these predefined flow functions but cannot change their functionalities. Table 1 summarizes the predefined flow functions and their actions:
Table 1: Predefined Flow Functions and their actions.
| Flow Function | Input | Action | Output |
|---|---|---|---|
| Receive | Packets from provided port | - Start an output flow F0 - Read packets from port - Send packet to flow F0 | Packets in flow F0 |
| Send | Packets from flow F0 | - Read packets from flow F0 - Send packets to port - Close flow F0 | Packets in provided port |
| Stop | Packets from flow F0 | - Read packets from flow F0 - Release packets - Close flow F0 | |
| Merge | Packets from flow F0, F1, F2, … | - Start an output flow Fn - Read packets from flows F0, F1, F2, … - Send packets to flow Fn sequentially - Close flows F0, F1, F2, … | Packets in flow Fn |
| Partition | Packets from flow F0 | - Start output flows F1, F2, … - Read packets from flow F0 - Send packets to F0, F1, F2, … cyclically | Packets in flows F0, F1, F2, … |
To allow developers to manipulate packets in the flow, four user-defined flow functions are available: Handle, Separate, Split, and Generate. Developers get a user-defined function as a parameter, with which they can enable high-level packet processing functionality, while low-level optimization is preserved. Table 2 summarizes the user-defined flow functions and their actions:
Table 2: User-Defined Flow Functions and their actions.
| Flow Function | Input | Action | Output |
|---|---|---|---|
| Handle | Packets from flow F0 | - Read packets from flow F0 - Apply user-defined function to packets - Send packets to flow F0 | Packets in flow F0 |
| Separate | Packets from flow F0 | - Start an output flow F1 - Read packets from flow F0 - Send packets to flows F0 or F1 depending on the output from the user-defined function | Packets in flow F0 and F1 |
| Split | Packets from flow F0 | - Start output flows F1, F2, F3, … - Read packets from flow F0 - Send packets to flows F0, F1, F2, … depending on the output from the user-defined function | Packets in flows F0, F1, F2, … |
| Generate | - Start an output flow F0 - Apply user-defined function generate packets - Send packets to flow F0 | Packets in flow F0 |
Working with NFF-Go
This section shows how to install NFF-Go on an Intel® Xeon® processor-based server. The sections that follow demonstrate how to run examples in a virtual environment, and on two machines with a back-to-back connection. In this tutorial, two systems named ebi2s20c01 and ebi2s20c02 are used. These systems are equipped with the Intel® Xeon® Gold 6138 processor @ 2.00GHz, 2 sockets, 20 cores per socket, and running Ubuntu* 16.04 LTS 64-bit. Intel® Ethernet Controller X710 for 10GbE is used to connect these systems.
To run on a virtual environment, Oracle* VM VirtualBox in this case, install the VirtualBox package and Vagrant* in addition to Go programming language and NFF-Go.
A Vagrant script is used to create a reference development environment for NFF-Go programs. It creates several virtual machines (VM) connected with direct network links, installs necessary packages, downloads the NFF-Go framework, and builds it into every VM so that they become ready to run NFF-Go programs.
VirtualBox is the default VM provider for Vagrant. The scripting configuration for VirtualBox works better than for other providers. VirtualBox supports several virtual Intel® network cards, all of which are supported by DPDK. VirtualBox also supports so-called 'direct' connections for private Vagrant networks out of the box.
Below are the instructions for installing NFF-Go. From a terminal of the ebi2s20c01 machine, set HTTP/HTTPS proxy if you are behind a firewall:
$ export http_proxy=http://<myproxy.com>:<myproxyport>
$ export https_proxy=http://<mysecureproxy.com>:<myproxyport>
Download Vagrant 2.2 and VirtualBox 5.2.20 to test NFF-Go in a VirtualBox:
$ sudo apt-get update
$ sudo apt-get install dpkg
Download and install Vagrant 2.2.0 (at least 2.0.1):
$ curl https://releases.hashicorp.com/vagrant/2.2.0/vagrant_2.2.0_x86_64.deb > ./vagrant_2.2.0_x86_64.deb
$ sudo dpkg -i vagrant_2.2.0_x86_64.deb
$ vagrant --version
Vagrant 2.2.0
Download and install VirtualBox 5.2.20:
$ curl https://download.virtualbox.org/virtualbox/5.2.20/virtualbox-5.2_5.2.20-125813~Ubuntu~xenial_amd64.deb >
./virtualbox-5.2_5.2.20-125813_Ubuntu_xenial_amd64.deb
$ sudo dpkg -i virtualbox-5.2_5.2.20-125813_Ubuntu_xenial_amd64.deb
$ vboxmanage --version
5.2.20r125813
Download and install Go programming language 1.11:
$ curl https://storage.googleapis.com/golang/go1.11.linux-amd64.tar.gz > ./go-1_11.tar.gz
$ tar -xvzf ./go-1_11.tar.gz --directory /home/$USER >/dev/null 2>&1
$ ~/go/bin/go version
go version go1.11 linux/amd64
To install NFF-Go, set GOROOT and GOPATH environment variables:
$ mkdir -p /home/$USER/gopath/bin
$ mkdir -p /home/$USER/gopath/pkg
$ mkdir -p /home/$USER/gopath/src
$ chmod -R 755 /home/$USER/gopath
$ echo 'export GOROOT="/home/$USER/go"' >> /home/$USER/.bash_aliases
$ echo 'export GOPATH="/home/$USER/gopath"' >> /home/$USER/.bash_aliases
$ echo 'export PATH="$PATH:$GOROOT/bin:$GOPATH/bin"' >> /home/$USER/.bash_aliases
$ mkdir -p gopath/src/github.com/intel-go
$ git clone --recurse-submodules http://github.com/intel-go/nff-go
$ cd gopath /src/github.com/intel-go
$ ln -s /home/$USER/nff-go .
$ cd nff-go/scripts/
$ ./get-depends.sh
$ echo 'export NFF_GO="$GOPATH"/src/github.com/intel-go/nff-go' >> /home/$USER/.bash_aliases
$ source /home/$USER/.bash_aliases
Go programming language downloads the source code into $GOPATH/src. NFF-Go is an open source Berkeley Software Distribution (BSD) licensed project; review its license in the file $NFF_GO/LICENSE. Note that to download software packages successfully, date and time must be set correctly on each system.
Running NFF-Go applications in a virtual environment
This section shows how to run NFF-Go examples using VirtualBox. In the machine ebi2s20c01, navigate to the $NFF_GO/vagrant directory where Vagrant script is set up.
$ cd $NFF_GO/vagrant
$ vagrant plugin install vagrant-reload
Installing the 'vagrant-reload' plugin. This can take a few minutes...
Fetching: vagrant-reload-0.0.1.gem (100%)
Installed the plugin 'vagrant-reload (0.0.1)'!
If using an HTTP proxy, install the Vagrant proxyconf plugin.
$ vagrant plugin install vagrant-proxyconf
Enable Intel® Virtualization Technology (Intel® VT) for IA-32, Intel® 64 and Intel® Architecture (Intel® VT-x) before creating and configuring guest machines according to the Vagrantfile file:
$ vagrant up
This command executes the configuration in the Vagrantfile file. The default Vagrantfile builds three VMs with Ubuntu* 18.04, downloads, and builds all dependencies (golang, nff-go, dpdk, etc). It may take time to complete this operation; afterward, verify the status of VMs:
$ vagrant status
Current machine states:
nff-go-0 running (virtualbox)
nff-go-1 running (virtualbox)
nff-go-2 running (virtualbox)
This environment represents multiple VMs. The VMs are all listed
above with their current state. For more information about a specific
VM, run `vagrant status NAME`.
Vagrant status shows that three VMs are running: nff-go-0, nff-go-1, and nff-go-2. Open two terminals in ebi2s20c01; each terminal will be used to connect to a VM. In the first terminal, connect to the first VM nff-go-0:
$ cd $NFF_GO/vagrant
$ vagrant ssh nff-go-0
vagrant@nff-go-0:~$ lsb_release -a
No LSB modules are available.
Distributor ID: Ubuntu
Description: Ubuntu 18.04.1 LTS
Release: 18.04
Codename: bionic
[vagrant@nff-go-0 ~]$ echo $NFF_GO_CARDS
00:06.0 00:07.0
We see that "00:06.0" and "00:07.0" are the cards assigned by default. Find the cards that support DPDK on this system.
[vagrant@nff-go-0 ~]$ sudo $NFF_GO/dpdk/dpdk-18.08/x86_64-native-linuxapp-gcc-install/sbin/dpdk-devbind -s
Network devices using kernel driver
===================================
0000:00:03.0 '82540EM Gigabit Ethernet Controller 100e' if=enp0s3 drv=e1000 unused= *Active*
0000:00:08.0 '82540EM Gigabit Ethernet Controller 100e' if=enp0s8 drv=e1000 unused=
0000:00:09.0 '82540EM Gigabit Ethernet Controller 100e' if=enp0s9 drv=e1000 unused=
This shows ports 00:08:0 and 00:09:0 support DPDK and are available. Set the NFF_GO_CARDS environment variable:
[vagrant@nff-go-0 ~]$ export NFF_GO_CARDS="00:08.0 00:09.0"
[vagrant@nff-go-0 ~]$ echo $NFF_GO_CARDS
00:08.0 00:09.0
Bind these ports:
[vagrant@nff-go-0 ~]$ bindports
[vagrant@nff-go-0 ~]$ sudo $NFF_GO/dpdk/dpdk/x86_64-native-linuxapp-gcc-install/sbin/dpdk-devbind -s
Network devices using DPDK-compatible driver
============================================
0000:00:08.0 '82540EM Gigabit Ethernet Controller 100e' drv=igb_uio unused=e1000
0000:00:09.0 '82540EM Gigabit Ethernet Controller 100e' drv=igb_uio unused=e1000
In the second terminal, connect to the nff-go-1 VM:
$ cd $NFF_GO/vagrant
$ vagrant ssh nff-go-1
[vagrant@nff-go-1 ~]$ sudo $NFF_GO/dpdk/dpdk/x86_64-native-linuxapp-gcc-install/sbin/dpdk-devbind -s
Network devices using kernel driver
===================================
0000:00:03.0 '82540EM Gigabit Ethernet Controller 100e' if=enp0s3 drv=e1000 unused= *Active*
0000:00:08.0 '82540EM Gigabit Ethernet Controller 100e' if=enp0s8 drv=e1000 unused=
0000:00:09.0 '82540EM Gigabit Ethernet Controller 100e' if=enp0s9 drv=e1000 unused=
0000:00:0a.0 '82540EM Gigabit Ethernet Controller 100e' if=enp0s10 drv=e1000 unused=
0000:00:10.0 '82540EM Gigabit Ethernet Controller 100e' if=enp0s16 drv=e1000 unused=
This shows ports 00:08:0 and 00:09:0 support DPDK and are available. Set the NFF_GO_CARDS environment variable:
[vagrant@nff-go-1 ~]$ export NFF_GO_CARDS="00:08.0 00:09.0"
[vagrant@nff-go-1 ~]$ echo $NFF_GO_CARDS
00:08.0 00:09.0
[vagrant@nff-go-1 ~]$ bindports
[vagrant@nff-go-1 ~]$ sudo $NFF_GO/dpdk/dpdk-18.08/x86_64-native-linuxapp-gcc-install/sbin/dpdk-devbind -s
Network devices using DPDK-compatible driver
============================================
0000:00:08.0 '82540EM Gigabit Ethernet Controller 100e' drv=igb_uio unused=e1000
0000:00:09.0 '82540EM Gigabit Ethernet Controller 100e' drv=igb_uio unused=e1000
On both nff-go-0 and nff-go-1 VMs, navigate to the tutorial directory:
[vagrant@nff-go-0 ~]$ cd $NFF_GO/examples/tutorial
[vagrant@nff-go-1 ~]$ cd $NFF_GO/examples/tutorial
For demonstration purposes we run only the program step3.go in this tutorial. Readers are encouraged to try other examples in the $NFF_GO/examples/tutorial directory. Below is the pseudo-algorithm for the step3.go program:
Receive packets from port 0, direct them to first flow
Set a partition:
   Start second flow
   Direct the first 300 packets to the first flow, and the next 300 packets to second flow
Define Handle in first flow
Define Handle in second flow
Output packets in first flow to port 0
Output packets in second flow to port 1
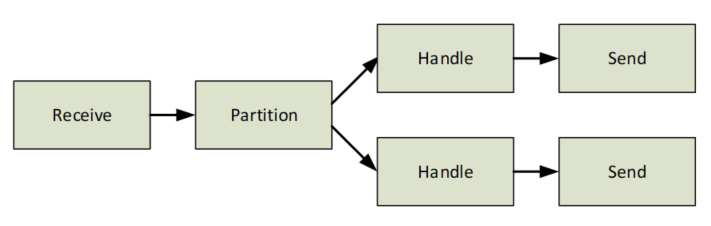
Figure 2. The packet processing graph of the “step3.go” example.
On the nff-go-1 VM, run the application step3:
[vagrant@nff-go-1 tutorial]$ sudo ./step3
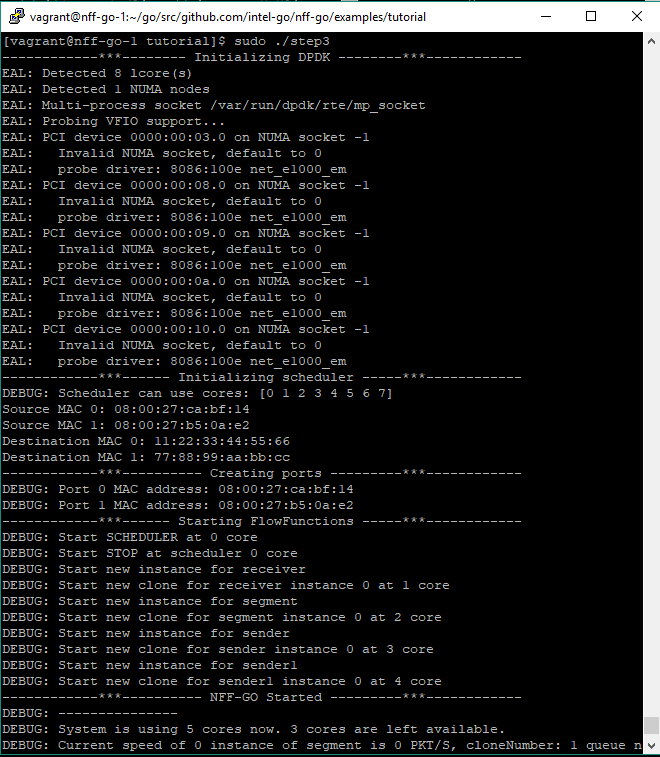
Figure 3. step3.go application
On the nff-go-0 VM, generate packets using Pktgen:
[vagrant@nff-go-0 tutorial]$ sudo ./genscripts
Generating scripts for -target direct
[vagrant@nff-go-0 tutorial]$ ./runpktgen.sh
Pktgen:/> load step3.pg
Pktgen:/> start 0
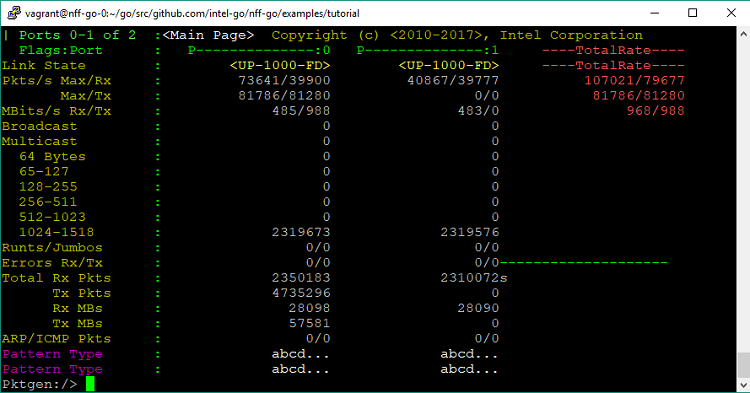
Figure 4. A Pktgen interface snapshot shows that port0 generates 4735296 packets. Half of these packets are received in port 0, while half are received in port 1.
This shows that the Pktgen in nff-go-0 VM generates a number of packets on port 0, and the step3.go program in nff-go-1 VM receives them and splits into two flows equally: one flow sends packets back to port 0, the other flow sends packets to port 1. Pkgen in nff-go-0 VM confirms that both port 0 and 1 receive packets.
Pktgen:/> quit
Running NFF-Go applications on bare metal
In this section, two systems named ebi2s20c01 and ebi2s20c02 are used. Both systems are equipped with Intel Xeon Gold 6138 processor @ 2.00GHz, 2 sockets, 20 cores per socket, and running Ubuntu 16.04 LTS 64-bit. On each system, two Intel® Ethernet Controllers X710 for 10GbE are connected back-to-back. Figure 5 illustrates this setup:
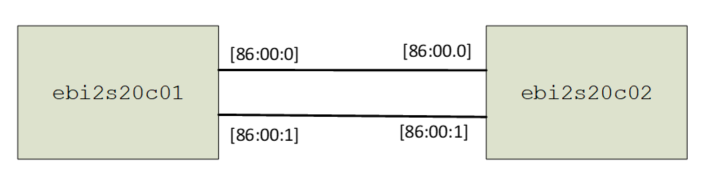
Figure 5. Two hosts are connected back-to-back.
On both ebi2s20c01 and ebi2s20c02, since Go programming language and NFF-Go are installed (see previous section), you can install NFF-Go dependencies and build NFF-Go (this also builds DPDK and Pktgen):
$ cd $NFF_GO/scripts
$ ./get-depends.sh
$ rm -fr $GOPATH/pkg/linux_amd64
$ cd $GOPATH/src/github.com/intel-go/nff-go
$ make
Set environment variables according to this setup:
$ cd $NFF_GO/vagrant
$ source scripts.sh
$ export GOPATH="$HOME"/gopath
$ export GOROOT="$HOME"/go
Use DPDK devbind tool to find available network interface cards (NICs) on this system:
$ sudo "$NFF_GO"/dpdk/dpdk/usertools/dpdk-devbind.py –s
Network devices using kernel driver
===================================
0000:3d:00.0 'Device 37d2' if=eno1 drv=i40e unused= *Active*
0000:3d:00.1 'Device 37d2' if=eno2 drv=i40e unused=
0000:86:00.0 'Ethernet Controller X710 for 10GbE SFP+ 1572' if=enp134s0f0 drv=i40e unused=
0000:86:00.1 'Ethernet Controller X710 for 10GbE SFP+ 1572' if=enp134s0f1 drv=i40e unused=
0000:86:00.2 'Ethernet Controller X710 for 10GbE SFP+ 1572' if=enp134s0f2 drv=i40e unused=
0000:86:00.3 'Ethernet Controller X710 for 10GbE SFP+ 1572' if=enp134s0f3 drv=i40e unused=
As 86:00.0 and 86:00.1 are connected back-to-back to the NIC in other machine (Figure 5):
$ export NFF_GO_CARDS="86:00.0 86:00.1"
$ bindports
$ sudo "$NFF_GO"/dpdk/dpdk/usertools/dpdk-devbind.py -s
Network devices using DPDK-compatible driver
============================================
0000:86:00.0 'Ethernet Controller X710 for 10GbE SFP+ 1572' drv=igb_uio unused=i40e
0000:86:00.1 'Ethernet Controller X710 for 10GbE SFP+ 1572' drv=igb_uio unused=i40e
Navigate to the tutorial directory and run the program step11, which features updated rules, packet vector, and auto-scaling:
$ cd $NFF_GO/examples/tutorial
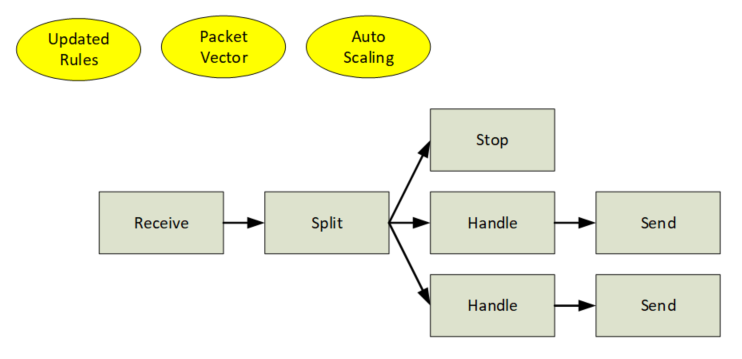
Figure 6. The Packet Processing Graph of the “step11.go” example.
In the host ebi2s20c02, run the application step11 which starts with 7 cores, as shown in Figure 7.
EBI2S20C02:tutorial$ sudo ./step11
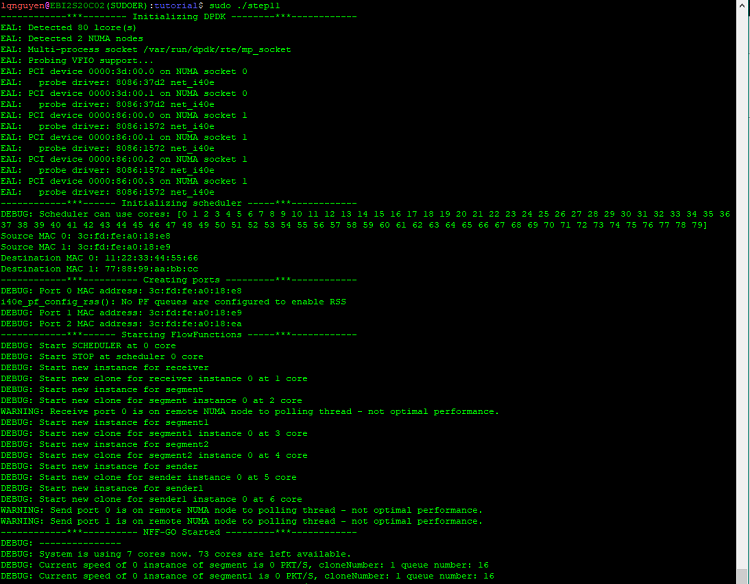
Figure 7. Running the application step11 in ebi2s20c02, notice that 7 cores are used.
This application uses the rules defined in “rules2.conf”
EBI2S20C02(SUDOER):tutorial$ cat rules2.conf
# This file is used in "Forwarding.go" example. It divides packets to four flows and drop some of them
#  Source address, Destination address, L4 protocol ID, Source port, Destination port, Output flo
    111.2.0.0/31            ANY              ANY            ANY            ANY              1
    111.2.0.2/32            ANY              ANY            ANY            ANY              0
        ANY                 ANY              ANY            ANY            ANY              2
In the host ebi2s20c01, run Pktgen to generate packets:
EBI2S20C01(SUDOER):tutorial$ sudo ./genscripts
Generating scripts for -target direct
EBI2S20C01(SUDOER):tutorial$ ./runpktgen.sh
Pktgen:/> load step11.pg
Pktgen:/> start 0
This generates packets according to script3, defined in genscripts.go; that is, it will generate packets with source IP addresses: 111.2.0.0, 111.2.0.1, 111.2.0.2, and 111.2.0.3. As the step11.go application in ebi2s20c02 receives these packets, it applies the rules defined in rules2.conf: packets with source IP addresses 111.2.0.0, 111.2.0.1 are sent to flow 1, packets with source IP addresses 111.2.0.2 are sent to flow 0, and packets with source IP addresses 111.2.0.3 are sent to flow 2. The program step11.go then drop packets in flow 0, packets in flow 1 (111.2.0.0, 111.2.0.1) are sent to port 0 and packets in flow 2 (111.2.0.3) are sent to port 1.
On ebi2s20c01, only two ports connect to ebi2s20c02 (port 0 and 1). At port 0, it should receive half the number of packets generated, and at the port 1, it should receive one-quarter the number of packets generated. The screenshot of Pktgen on EBI2S20C01 confirms that:
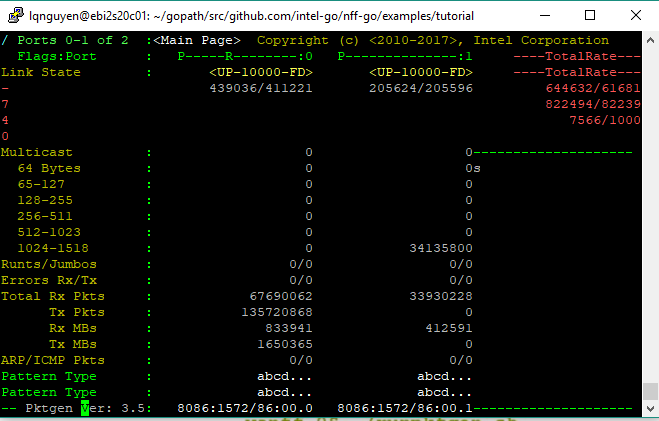
Figure 8. Half the total packets are received in port 0, one quarter are received in port 1.
Note that 14 cores are used to run the program step11. This is because the program step11 allocates more cores to handle the heavy workload – a very useful feature of NFF-Go.
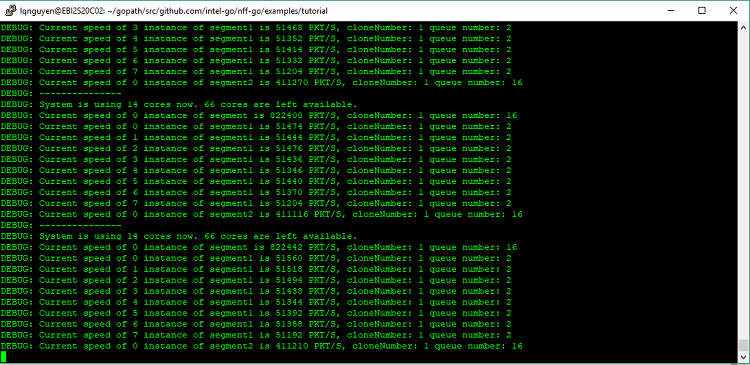
Figure 9. With a heavy workload, NFF-Go allocates more cores dynamically.
Another interesting feature of NFF-Go is that you can change the rules on the fly. For example, you can edit the rules2.conf file and forward all packets to port 2. The change will be reflected right away without restarting the program step11.go.
Conclusion
NFF-Go was designed to accelerate the deployment of VNFs to the market. NFF-Go uses the Go programming language and DPDK to deliver a high-performance library and provides an easy, fast way to build applications: developers simply construct a packet processing graph by chaining the flow functions.
This tutorial showed how to install Go programming language and NFF-Go. Two examples were selected to run in virtual machines and on bare metal.
References
- Areg Melik-Adamyan, Ilya Philippov, Novel Approach To Network Function Development
- Network Function Framework for GO
- NFF-Go Developers Guide
- Data Plane Development Kit
About the Author
Loc Q Nguyen received an MBA from the University of Dallas, a master’s degree in Electrical Engineering from McGill University, and a bachelor's degree in Electrical Engineering from École Polytechnique de Montréal. He is currently a software engineer with Intel Corporation's Software and Services Group. His areas of interest include computer networking, parallel computing, and computer graphics.