As 9th generation Intel® Core™ desktop processors reach more customers, the intriguing potential of extreme multitasking is being realized in new and innovative ways. Customers push boundaries in multiple fields, with video and audio benefiting from increased processing power.
In 2018, a new Intel® Core™ i9+ processor was provided to Master of Shapes (MOS), a Los Angeles (LA)-based interactive design studio. The challenge: build a breathtaking, immersive, virtual reality (VR) demo on a single computer, to demonstrate that leading-edge projects no longer require multiple computers to accomplish amazing feats.
Billing itself as a “space-surfing, geometry-taming, buffalo-riding future house,” MOS is known for transporting people out of reality through interactive installations. For over a month, the MOS team conceptualized, designed, and programmed the experience while their friends at Canopy LA handled the immersive 360 audio. Then, in just four days, the teams transformed an empty warehouse into an out of this world jungle.
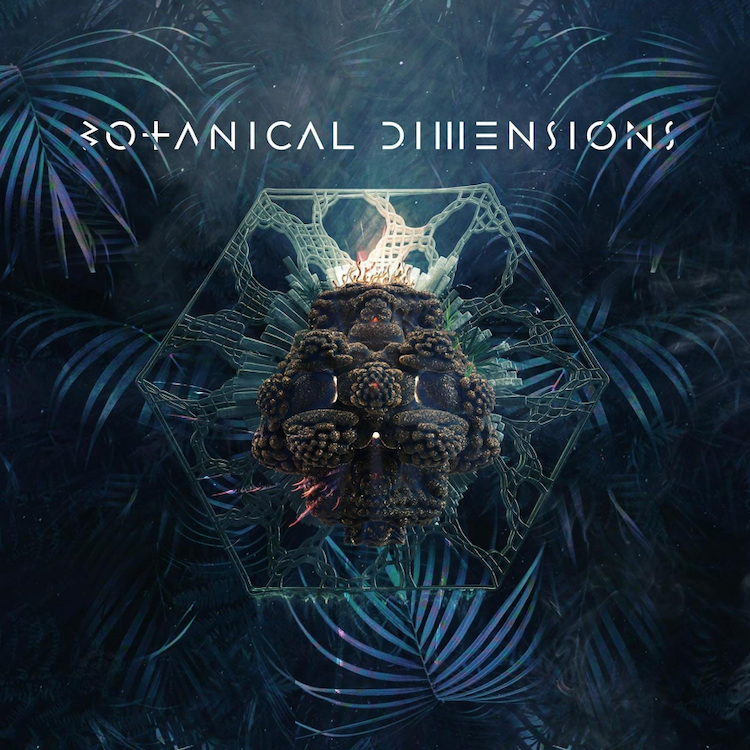
This paper describes the technical effort to bring Botanical Dimensions to life. In this interactive, multi-world experience, participants move through a jungle to find a hidden portal to alternate realms. Users control their flight patterns through multiple worlds via a controller and encounter breathing, undulating alien botanicals with 360 spatialized audio.
Planting the Seeds
Our goal was to combine the power of true spatial audio with that of an advanced CPU, to create as much audio and visual complexity as we could imagine. This entailed transforming a large warehouse space into a robust recording environment.
The build had three principal steps:
- Build 15-feet hexagonal LEDs, to act as a pathway, and a rear-projection screen.
- Create a jungle.
- Program the experience and audio using Unreal Engine* 4 (UE4) and other tools.
Previsualization
First, we designed the hexagons and projection screen. The hexagons were lined up to create perspective and a layered pathway.
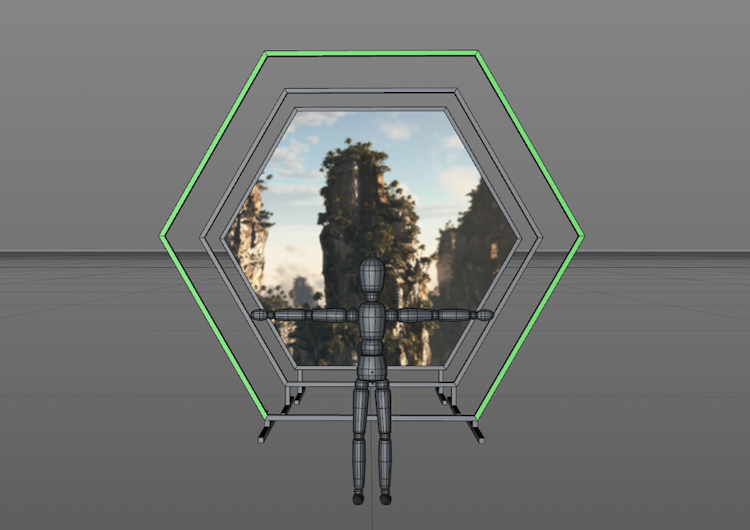
Figure 1. The hexagons cascade to create the perspective.
The hexagons had steel bases and aluminum, U-shaped channel tubes, lined with RGB LED strips.
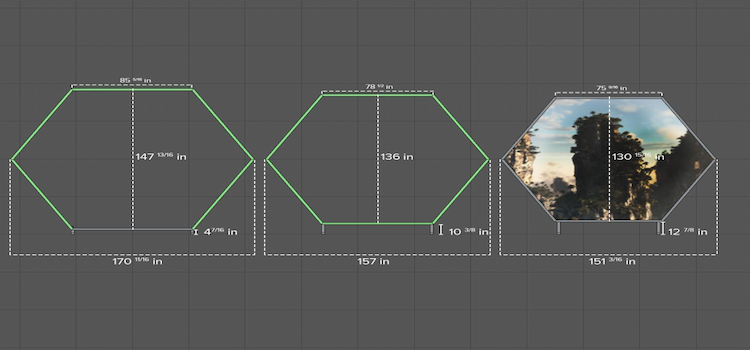
Figure 2. Each hexagon is slightly smaller than the last.
The Space
We wanted a location with enough room for users to walk down a trail before the final piece was revealed. Luckily, we found Electric Pony Studios, a warehouse in downtown LA that is 100 feet long and 35 feet wide.
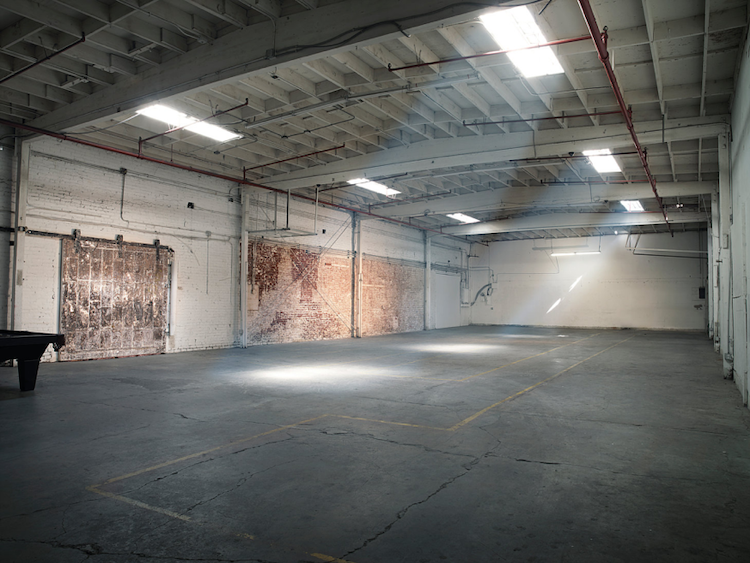
Figure 3. Electric Pony Studios warehouse, ready to populate with jungle scenery.
The Projection Screen
Having built the hexagons, we stretched a projection screen over the final frame. This allowed us to rear-project a portal to virtual worlds on that hexagon. The preceding frames were then put into position.
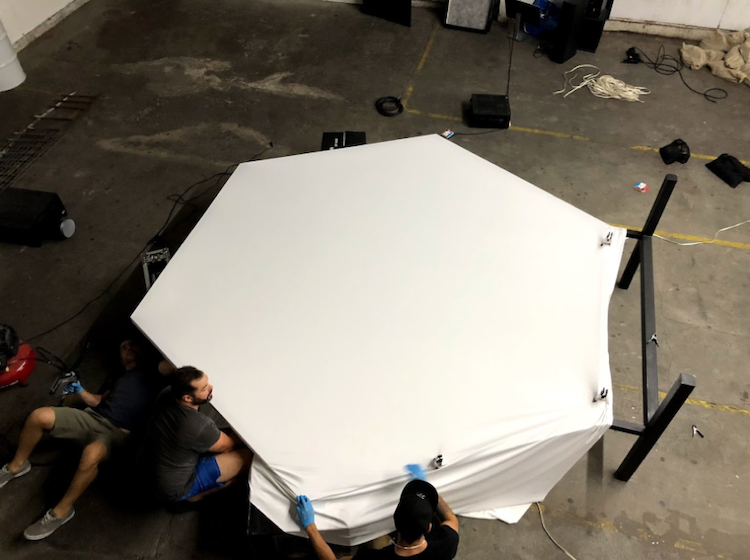
Figure 4. Stretching projection screen fabric over the final hexagon frame.
Controlling the LEDs
To control the LEDs, we needed to send data to each RGB pixel on the strips lining the hexagons. A PixLite* 16 controller triggered moments from UE4, based on the user’s input.
Final Set Creation
After assembling the hexagons, we built a lake around the base of the portal, filled the space with plants to simulate a jungle, and hung speakers for a Dolby Atmos* setup. We even brought in real mulch to create the feel of walking outside as users follow the jungle path to the main experience screen.
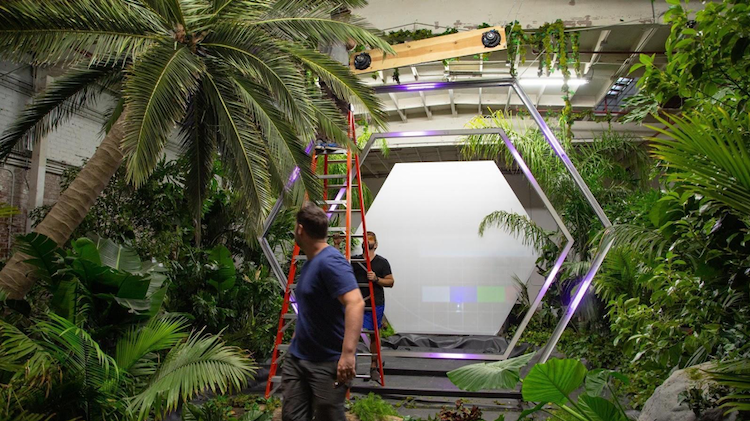
Figure 5. The jungle scene takes shape, with plants, hexagons, and speakers.
Game Asset Creation
We wanted flexibility when building the VR terrain in a game engine. The Houdini Engine* plugin (see below), combined with UE4’s built-in tools, allowed us to start coding quickly.
We wanted the plants to have a unique look, and achieved this by using visually “glitchy” animated materials. Secondary animation (motions that react to the movement of others) complemented these.
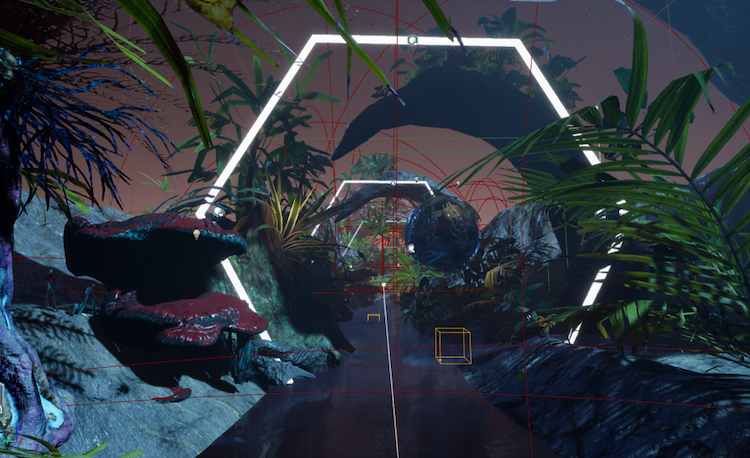
Figure 6. Jungle view from inside the game engine.
Creating the animation used three major elements:
- Houdini Engine
- Animated materials
- Position animation using shaders
We’ll cover each of these next.
Set Up Houdini Engine
With UE4 installed, download the free Houdini Engine plugin. This allows you to create tools in Houdini and expose those parameters to UE4 right before run time. It lets you quickly build assets that can be changed in UE4. Learn more with the introductory tutorial.
Changes made in UE4 are developed by “cooks” that “bake” new layers of mesh in Houdini. The result is an updated static mesh that Houdini sends to Unreal. A 9th generation Intel Core desktop processor undertakes this process in near-real time, which is very convenient. You get the power of Houdini Engine, the ease-of-use of UE4, and the processing power to push the system almost as hard as you want.
Build Terrain
A spline is a smooth curve through the points of a trajectory. We wanted a spline path along which users could fly, yet retain freedom of movement. Ideally, terrain should follow and adapt to points on the spline. To achieve that, we built a tool in Houdini and exposed it to UE4. (A demonstration of building the terrain is in this video.)
Animate Fluids
Houdini Engine is commonly used for fluid simulations, but it’s a heavy computation load for a game engine. We created a fluid simulation in Houdini Engine, then baked it to a vertex animation that lets you export positions into a texture. This delivered a simulation that ran efficiently in UE4.
Check out this tutorial on vertex animation and review this walk-through of fluid setup, or this explanation of floating islands.
Animate Materials
In addition to animated fluids, we wanted to add a “glitchy” artistic element to some of the objects in the scene. For this, we created animated materials in UE4, driven by panners, or nodes that give textures an animated look. An example of the setup is below:
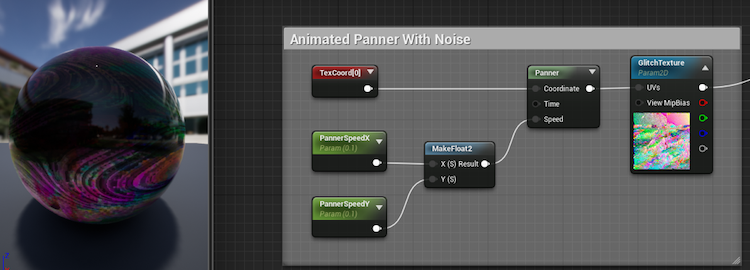
Figure 7. Animated panner setup with logic flow.
We wanted plants and other objects in the world to undulate randomly. A traditional approach is to animate position on “tick” or every frame rendering, via a timeline or keyframe animation. We created our animation using the world position offset parameter on the materials used for the objects. The result was much more functional.
Here is the setup for creating these undulating animations:

Figure 8: Flowchart for creating animations.
We used the time function to animate a material, as it correlated to game time since the “tick” or individual frame rendering.
We drove that programmed animation through a sine function, which enabled us to undulate a value from -1 to any number we decided, by adjusting the scale intensity. Multiplying this by UE4’s Vertex Normal World Space effectively scaled the entire object along its normals. This created the undulating effect that gave the object an appearance of breathing and scaling.
We used a similar technique to animate the rotation of the objects:

Figure 9. Flowchart for animating the rotation of an object.
And here’s how we animated the position:
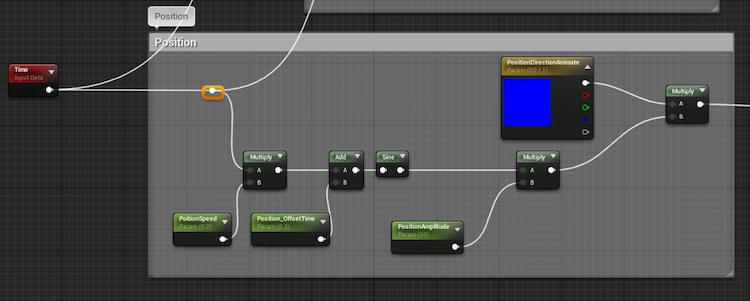
Figure 10. Flowchart for animating the position of an object.
Set the Controller
Botanical Dimensions offers the opportunity to step inside the fractal complexity of the natural world. To add an interactive element, we equipped a 3D-printed Mandelbulb controller (named for Benoît Mandelbrot, the “Father of Fractal Geometry”) and equipped it with an HTC Vive* tracker.
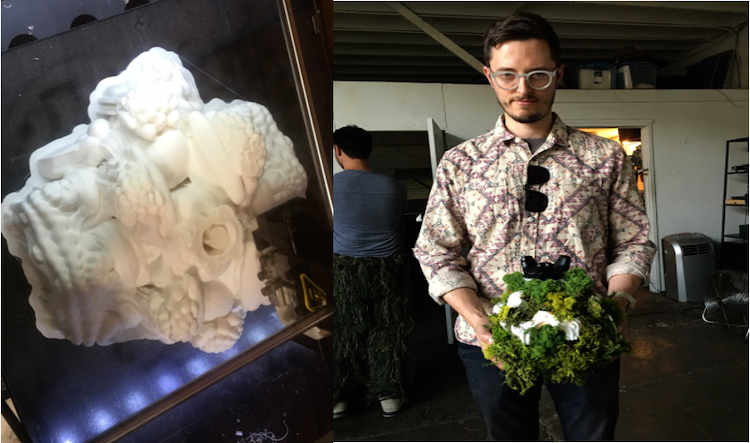
Figure 11. (left) 3D-printed Mandelbulb controller. (right) Immersive installation artist Jonathan Fletcher Moore holding the embellished controller, equipped with an HTC Vive controller.
Position and orientation data of the controller, fed into Unreal Engine, influenced both the spatial audio and how you flew through the virtual world.
Inside Unreal Engine, we added rotation values from the controller to the relative location data inside the program that drives users’ movement. This allowed the user to control how much they wanted to offset or rotate themselves from the path defined by the spline.
To allow this freedom of movement, we programmed a procedural spline system in UE4. Using Houdini Engine, we were able to drive the terrain formation and guide the user’s flightpath.
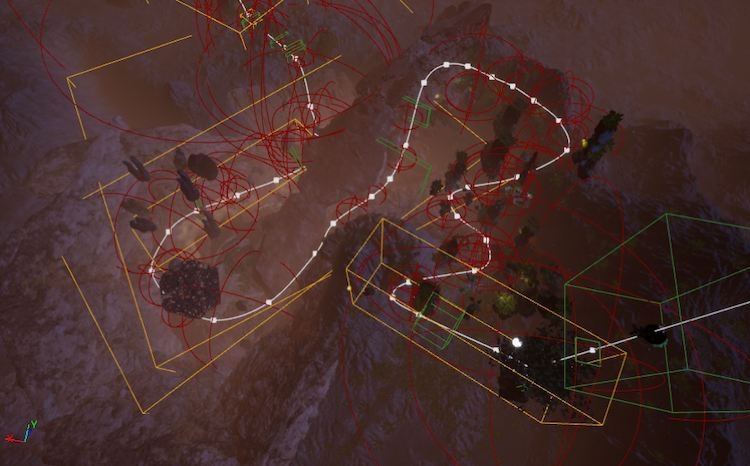
Figure 12. UE4 enables nonlinear travel for the user.
The following are the steps we used to create the procedural spline system:
- Draw spline element.
- On Event Begin Play, get all actors with tag “spline”.
- Create a variable that stores the reference of that spline actor to set the reference to the spline.
We converted UE4’s speed from centimeters per second to miles per hour, to get a better reference for the size of the world we wished to create. We added that calculation to a float variable named Distance Along Spline. This let the pawn know how fast to go and told us how far along the spline it was.
Next, we used Get Location at Distance Along Spline and set the actor’s transform to that location. We used Get Rotation Along Distance Along Spline, then rInterp To (rotate interpretation), and set that rotation to the actor transform.
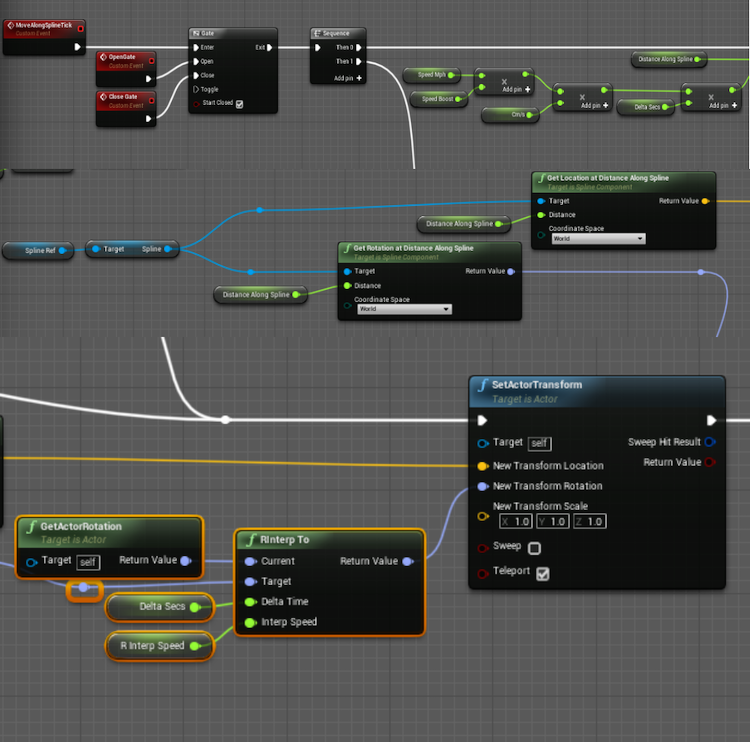
Figure 13. Logic path for moving and rotating.
Event Trigger System
Audio effects, LED effects, “speed” fans, and visuals are triggered in Botanical Dimensions. To handle all these triggers in a clean way, we designed an event system using enums (enumerated type). Here’s the advice from Crunchify.com:
“Enums are lists of constants. When you need a predefined list of values which do not represent some kind of numeric or textual data, you should use an enum. You should use enums when a variable (especially a method parameter) can only take one out of a small set of possible values.”
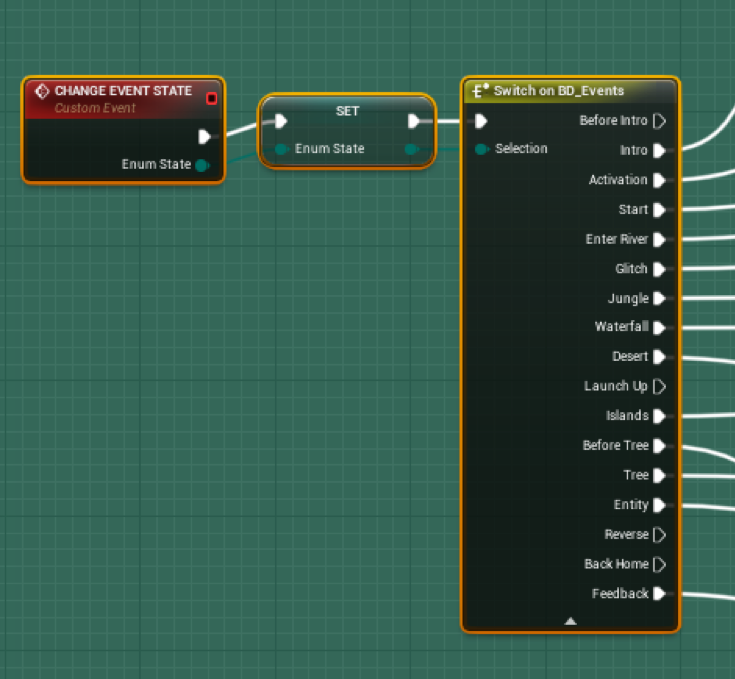
Figure 14. Enums helped handle all the different events triggered during the experience.
Events are determined by collision volumes throughout the level. Overlapping a volume summons an event. For example, when the user flies near the waterfall, specific sounds and LED animations are triggered.
Our event triggers were handled by a custom actor blueprint that we named TriggerBP. Each type of trigger is tagged as such by adding tags on the individual instances in the scene. So if it’s the event we want to call when a user hits a tree, we tag the trigger “tree”.
Inside this blueprint we handle all the logic of our collision events. Our steps to determine the types of collision were as follows:
- On Event Begin Play, we “Get All Actors of Class ‘TriggerBP’”
- We store the references to these objects in a variable .
- On Event Actor Begin Overlap (event called when actor overlaps our collision volume). we check the tag name of that collision.
- We compare the tag name with our fixed set of possible tags Enum.
- Using switch on enum mode, we fire off the event that corresponds with the collision volumes tag name.
Custom events were generated by specific triggers. For example, the user’s speed fluctuated according to what part of the world they were in; slowing in swampy jungles and accelerating when flying over the desert.
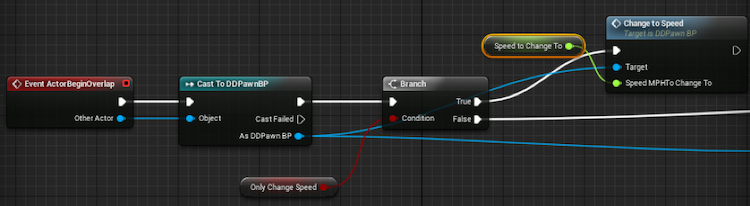
Figure 15: Logic flow for triggering.
Communication from UE4
UE4 was our main tool. However, we also created triggers in other programs. To communicate from UE4 to those programs, we used a plugin.
To send socket connection information, we needed to bind to the socket on “Event Begin Play” and to the proper port. This establishes a way to communicate via TCP to other programs.
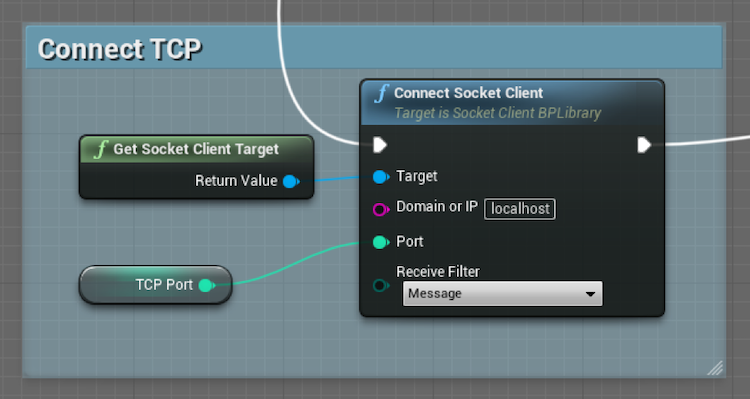
Figure 16. Binding the socket to the proper port.
A simple protocol governed messages formatted in this structure: “name”|“value”. For example, we sent controls to our LEDs using “led”|value.
Our receiving program was TouchDesigner*. We read the TCP message in TouchDesigner, then sent an OSC message to control the LEDs. (OSC is a messaging protocol commonly used in lighting and audio programs.)
For example, the haptic fans sped up or slowed down, depending on the speed of travel in the game. The message was received in TouchDesigner. A DMX call was sent to the DMX switch that controlled the fans. (A DMX switch is like a normal power strip, into which you would plug things. In this case, it only provides power if you send the right DMX value, which gives you the ability to control analog things like fans from your computer.)
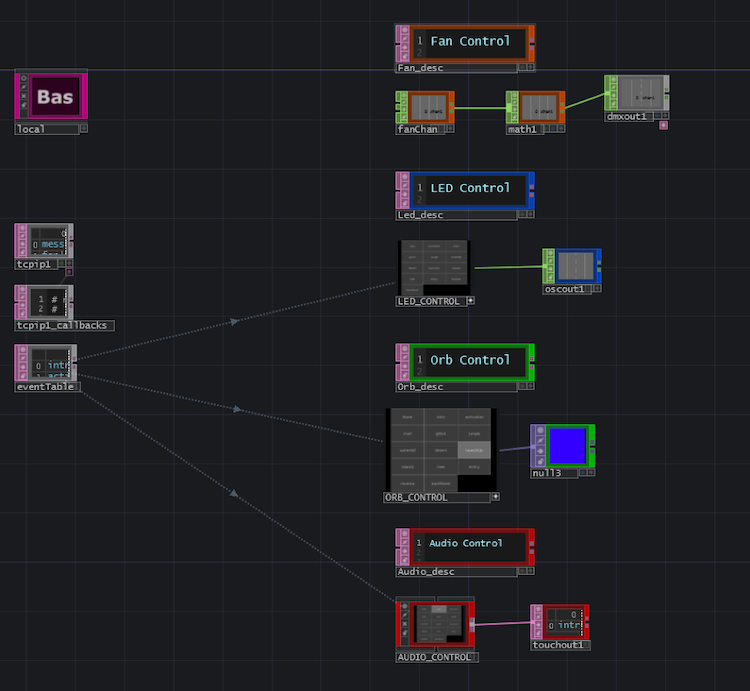
Figure 17. Fan and LED control from TouchDesigner to a DMX switch.
Wwise* Middleware Enhances Interactive Experiences
Wwise* by Audiokinetic* is a go-to middleware tool for our interactive experiences because it provides audio editing and processing that is scalable and highly efficient in multithreading. It has flexible spatial audio support, up to third-order ambisonic bussing (see below), as well as 7.2.4 Dolby Atmos.
We incorporated Wwise into Botanical Dimensions to help create an immersive, visceral experience, to explore the capabilities of the software, and to test the limits of the Intel Core processor.
Why Use Dolby Atmos?
Our Atmos setup was formatted for complete immersion. We wanted users to feel they were really in the jungle, so we set up a 7.2.4 speaker array. Seven speakers surrounded the user, while two subwoofers and four speakers were above the setup, adding to the atmospheric effect. For detailed information, please refers to Dolby’s 7.1.4 Speaker Configuration guide.
Set Up Wwise
- Create an Unreal C++ Project. (If you already have a Blueprint Project, create a “Dummy” C++ class. This converts your project into a compliant solution.)
- Download the latest version of Wwise that is compatible with your UE4.
- Via the Wwise launcher, ensure you have the corresponding Microsoft* Spatial Sound Platform plugin installed.
- In the Wwise launcher, navigate to the “Unreal” tab. Locate your UE4 project. Click the “Integrate Wwise into Project” button. Follow the steps to complete the integration.
- With Wwise integrated into your C++ UE4 project, perform three modifications:
-
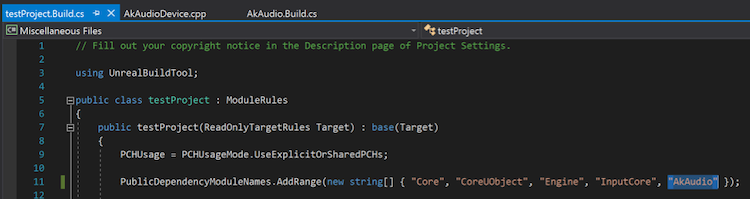
Include “AkAudio” in the public dependencies of the YourProject.Build.cs file. (Location: …\Unreal Projects\testProject\Source\testProject)
-
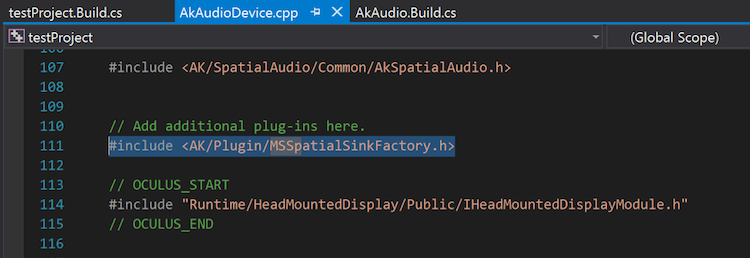
Register the Microsoft Spatial Sound Platform’s header file in the AkAudioDevice.cpp file. (Location: …\Unreal Projects\testProject\Plugins\Wwise\Source\AkAudio\Private)
-
Register the Microsoft Spatial Sound platform’s .lib file in the AkAudio.Build.cs file. (Location: ...\Unreal Projects\testProject\Plugins\Wwise\Source\AkAudio)

-
-
Fix errors. At this point, the Wwise integration with Unreal Engine 4.20.1 will cause a new error when accessing Microsoft DirectX* libraries. We solve this by replacing a line of code in the AkAudio.Build.cs file:
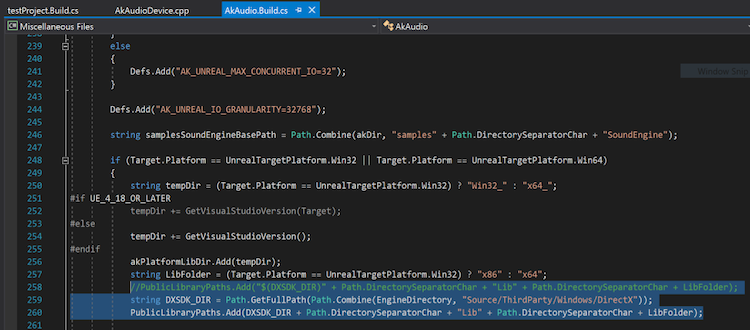
The original code:
PublicLibraryPaths.Add("$(DXSDK_DIR)" + Path.DirectorySeparatorChar + "Lib" + Path.DirectorySeparatorChar + LibFolder);Replace this with:
string DXSDK_DIR = Path.GetFullPath(Path.Combine(EngineDirectory, "Source/ThirdParty/Windows/DirectX")); PublicLibraryPaths.Add(DXSDK_DIR + Path.DirectorySeparatorChar + "Lib" + Path.DirectorySeparatorChar + LibFolder); - Inside visual studio, click “Build your solution” and open your project. In your Wwise Project, navigate to the Actor Mixer Hierarchy and select the Master Audio Bus. Assign the Microsoft Spatial Sound Platform Output as the audio device.
- Ensure your system output is set correctly. Botanical Dimensions went out HDMI to a Denon* AVR-X8500H receiver.
- Confirm that Dolby Atmos is recognized by your computer by right-clicking the speaker icon in your toolbar.
Wwise should now be set up correctly.
Interactivity in Botanical Dimensions
In preproduction, we struggled to find an intuitive, fun method of driving an interactive system. After multiple iterations, we designed a 3D-printed fractal controller, onto which we mounted an HTC Vive tracker. We could grab the controller’s location and orientation in the VR experience, and use that data to drive the filtering, panning and modulation of sounds.
In Wwise, Real-Time Parameter Controls (RTPCs) serve as float variables that you can point to from your game engine. These communicate when the value of game elements changes. It also works in reverse, if a system built in Wwise needs to communicate its values to a game engine to drive an audio-reactive system. This is how we communicated our controller’s location and orientation.
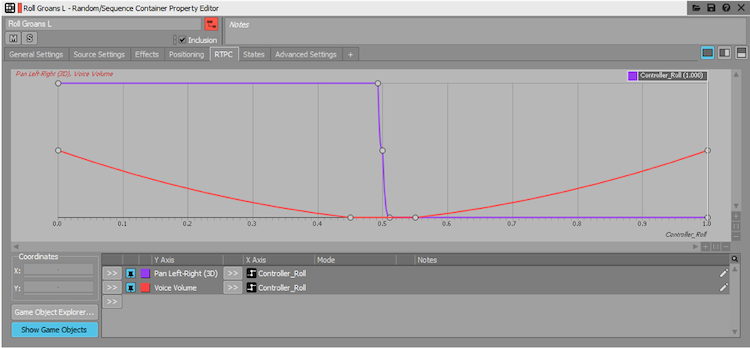
Figure 18. Wwise Property Editor helps control how value changes are mapped to our audio-reactive system.
This is our simplified system for conforming audio to the standard roll value of UE4. As the player rolls their controller left and right, the sound appears to intensify and is spatially positioned to correspond with the tilt.
We did something similar for controller yaw (the rotation around the vertical axis). The sounds and modulations (which we will discuss later) are different, but the same sort of interaction occurs. We did this to make the players’ influence over game play immediately apparent to them.
Transporting someone into an experience takes more than just a cohesive visual aesthetic. Sound is key, as it fill the emptiness between the screen and the user and provides clues to the nature of the surroundings. If you give the user an audio experience that is profound and precise, it’s easier to immerse them in the VR. Dolby Atmos, ambisonic sound, and reverb – all discussed below – helped us accomplish that.
Dolby Atmos
Dolby Atmos is primarily used in linear media in theater environments, but proved perfect for this project. Like cinema, Botanical Dimensions had a back and front, with a display at the front. The 7.2.4 speaker array allowed us to craft a 3D sound field. Objects and environmental ambience benefited from the enhanced localization.
The Microsoft Spatial Sound Platform plugin can output a Dolby Atmos signal from Wwise. This is useful for small audio teams that may not have access to a programmer who knows how to program custom mixer and sync plugins. While it’s possible to write a multichannel output plugin in Wwise, a tool built to do so is more convenient.
Utilizing Our Dolby Atmos Array
Pictured below is one of our 3D positioning automation paths for an electromagnetic audio layer. This represents the physical path of a sound object created in Wwise. The center of the grid is the player position. In this example, we’ve designed numerous paths for this one layer to travel along.
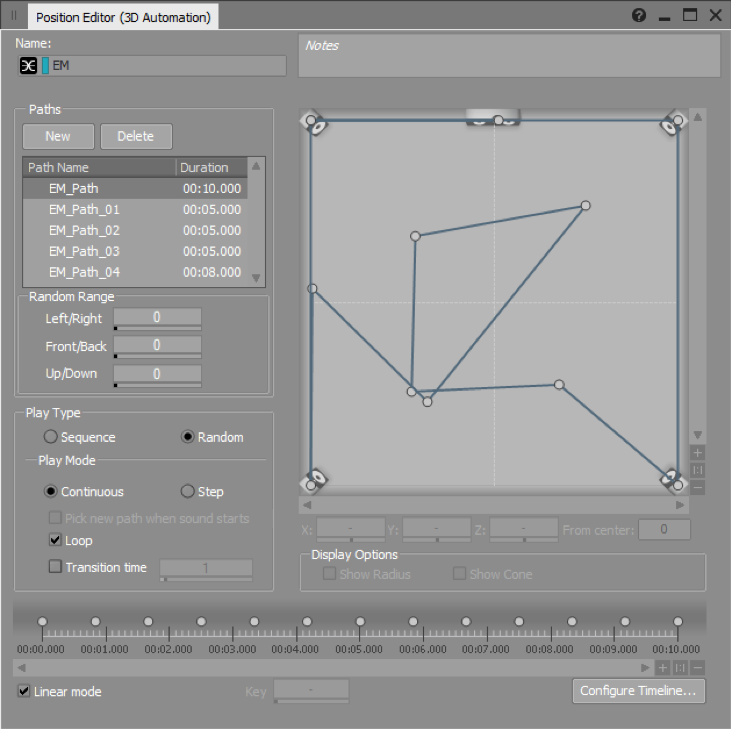
Figure 19. Utilizing the Dolby Atmos array.
This type of 3D positioning is different to how you would treat a sound tied to – for example – a bird in flight. The method allows for paths and positions to be predetermined. It proved essential for crafting our creative ambience, which was complex and multilayered.
Note We did not use this method for static objects that existed in the map, as it would prevent proper spatialization.
Mixing Considerations
Our enhanced 3D sound field required precise design and mixing. This involved complex bus configurations (determining how audio is routed to its destination) and careful reverb design.
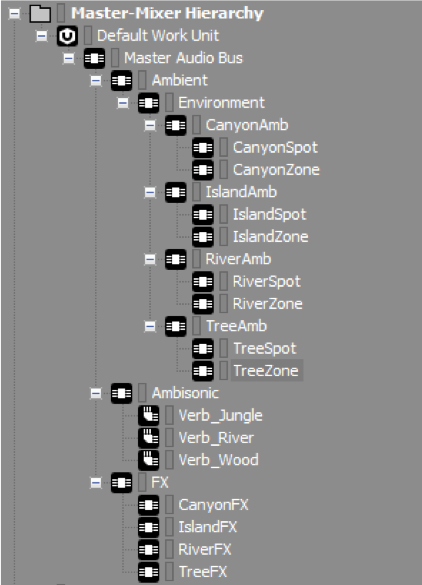
Figure 20. Master-mixer hierarchy for bus configuration.
The figure above shows our bus configuration. It was not complex, but ensured we had access to specific groups of signals. This meant that mix decisions would not affect sounds we had already fine-tuned.
The Microsoft Spatial Sound Platform plugin resides in our Master Audio Bus. It allows Wwise to output a 7.2.4 signal. Anything that outputs to this bus is positioned in a 7.2.4 channel configuration.
We did something different with the ambisonic bus.
Ambisonics is a method for recording, mixing and playing back three-dimensional 360-degree audio. Invented in the 1970s, it was later adopted by the VR industry, which requires 360 audio solutions.
Ambisonics treats an audio scene as a 360-degree sphere of sound, coming from different directions around a center point. The center point is where the microphone is placed while recording, or where the listener’s ‘sweet spot’ is located while playing back.
The most popular ambisonics format, widely used in VR and 360 video, is first-order ambisonics. This uses four channels of audio to create a complete sphere of sound. However, we used a second-order ambisonic microphone to record effects. This creates a nine-channel sphere, giving a very accurate representation of real-world 360 audio.
We set the bus to output in a second-order ambisonic configuration. This allowed us to easily use some of our ambisonic recordings.
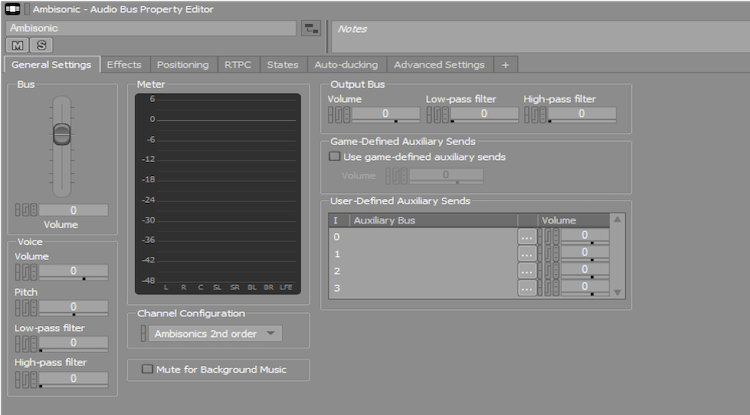
Figure 21. Ambisonic Audio Bus Property Editor screen.
To capture and refine a convincing environment, you need to pay close attention to localization and reverb. Our optimal localization involved ambisonic, stereo, and mono recordings. We used the ambisonic recordings as a bed, and laid the mono and stereo sources on top. This created a lush, detailed mix that enveloped the user as they journeyed to the center of the experience.
Audio teams often encounter problems when a user is given free rein to explore an experience away from a primary, programmed track. This is because ambisonics are captured from a single point in space. However, the higher the order of ambisonics, the wider the capture point becomes. This is why we used a second-order ambisonic microphone.
We mixed the ambisonic recordings lower than might be expected. This was because tucking the recordings back in the mix meant they served as a bridge between the sound sources and the reverb. In effect, the ambisonics became more a bed for the reverb than for the point sources.
Using a system with an advanced CPU meant we could undertake computationally intensive processes such as convolution reverb. This utilizes impulse responses (the output that results from an input) to essentially capture the sound of an area.
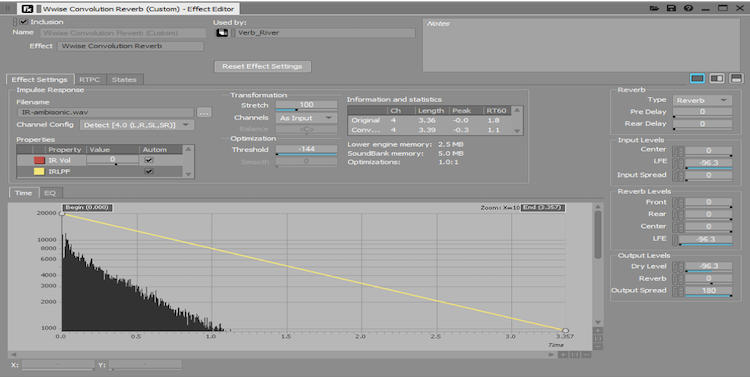
Figure 22. Wwise Convolution Reverb (Custom) Effect Editor screen.
The results you get from convolution reverb are nuanced and flexible. The trade-off for this high quality, time-based effect is a relatively large CPU hit. However, thanks to the power of the Intel® Core™ i9+ processor, and Wwise’s multithreading capabilities, these calculations were no issue and required no optimization after tuning.
Real-Time Modulation
The scale of Botanical Dimensions grew significantly before its launch. Much of the project was in flux as the deadline loomed, which is common in the audio world. Wwise helps you build complex audio systems quickly, which is a major reason why we use it in our projects. Our powerful system allowed us to expand the size of the experience a week before launch.
Most of our early testing and mixing was done in a 12-feet-squaret room. Our dual-subwoofer setup was perfect for this scale, but Botanical Dimensions was built in a warehouse that was over 6,000 square feet. We borrowed more powerful subwoofers, but found a lot of our source material no longer had the sub-frequencies necessary to hit the subwoofers and resonate within the space.
To tune our setup for this huge space, we needed to quickly replace and supplement our low end. We did this using signal generators, combined with envelopes (which represent the varying level of a sound wave over time) and low-frequency oscillations (LFOs) built into Wwise.
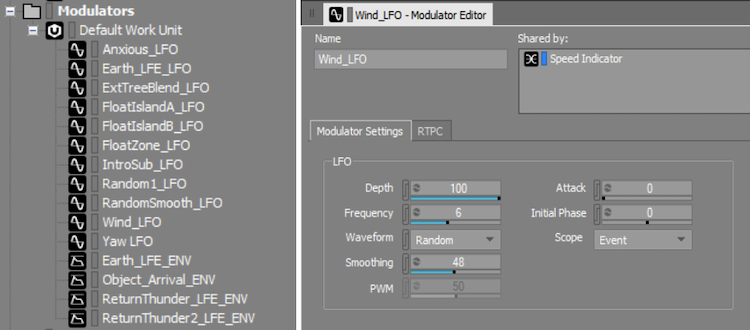
Figure 23. Modulators helped us scale up from a small space to a large warehouse.
Listed on the left of Figure 23 (above) are modulators that we used in conjunction with signal and sine generators. With these tools, we were able to hit precise frequencies at key moments during the experience. This saved us hours of time re-bouncing samples and performances, and introduced another layer of dynamics to the experience. For example, when we moved to a larger venue, our flight speed system no longer sounded as we intended, due to different reflections in the warehouse. An LFO gave our wind buffets a more natural feel as the speed increased.
Voice Use and Optimization
The powerful CPU freed us from worrying about optimizations. The only applicable ones were audio conversions and voice use (each for RAM optimization). We kept the audio quality high with our conversions, but tried to slightly decrease our file sizes.
To optimize voice usage, we leaned on the CPU rather than the RAM, by triggering the start and end of most sounds with collision spheres. This streamlined our mix process, specifically with attenuation curves. In UE4, we used the collision sphere to define the area in which we wanted to hear our sounds. The size of that area defined our attenuation radius in Wwise. We were happy to see that this system worked flawlessly, given the quick turnaround of its implementation.
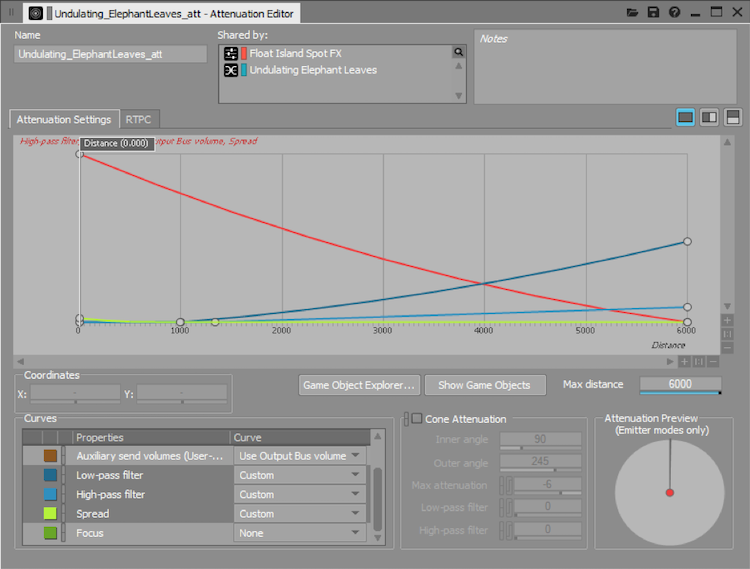
Figure 24. Attenuation Editor.
Going Further
If you lead a large project like this, try pushing your hardware even more. Of course, considerations must be made if you plan on releasing your project to the public, in order to meet a wide spectrum of configurations. For projects similar in scale to Botanical Dimensions, where the public is not the end user, here is a great place to learn about high-level stream management in Wwise.
Dolby Atmos and Intel Create Immersive Installations
Botanical Dimensions combined several techniques to communicate with each component in the system. Previously, we would have divided roles between multiple computers. This makes things complicated and adds both hardware costs and headaches. The multicore ability of the Intel® Core™ i9+ processors allowed us to accomplish all the tasks on one machine, which was a huge time-saver and, overall, made the process easier.
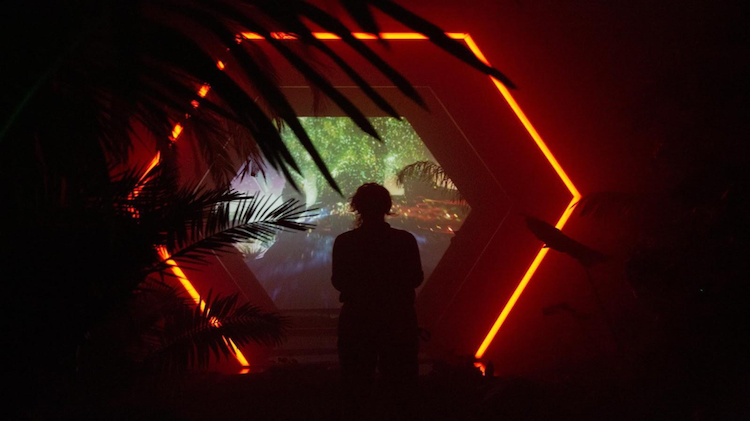
Figure 25. Inside Botanical Dimensions.
Running Multiple Programs
UE4 served as our main control, sending information via the TCP socket to TouchDesigner and Wwise. Wwise sent our audio info to the Dolby Atmos system. TouchDesigner handled OSC control, DMX control, and LEDs. Below is a diagram of our system layout.
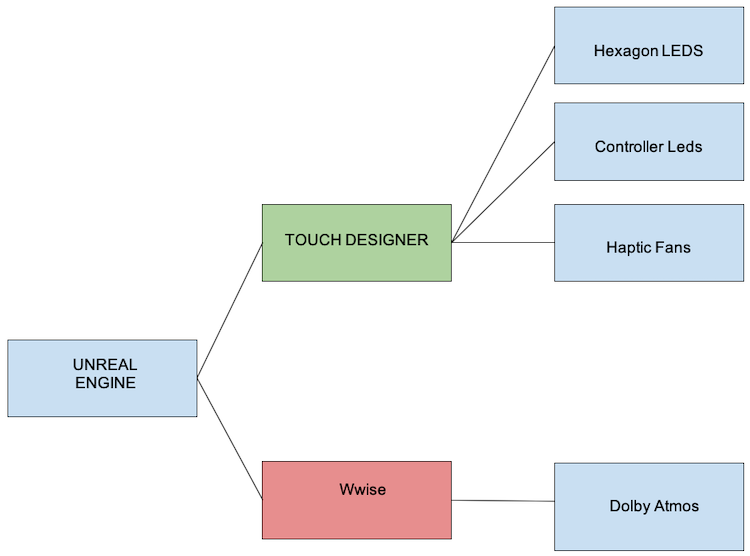
Figure 26. Our system layout.
It was important to not take a performance hit on our game thread while other processes were running. In addition to the multithreaded socket communication system, we optimized performance by leveraging TouchDesigner and Wwise’s built-in profilers.
The Role of UE4
UE4’s built-in CPU profiler helped us identify anything that caused issues. Our goal was 60 frames per second (fps) as an absolute minimum. Thanks to an NVIDIA GeForce* GTX 1080 Ti GPU and the Intel® Core™ i9+ processor, we achieved an average 75 fps. We never suffered from being CPU bound.
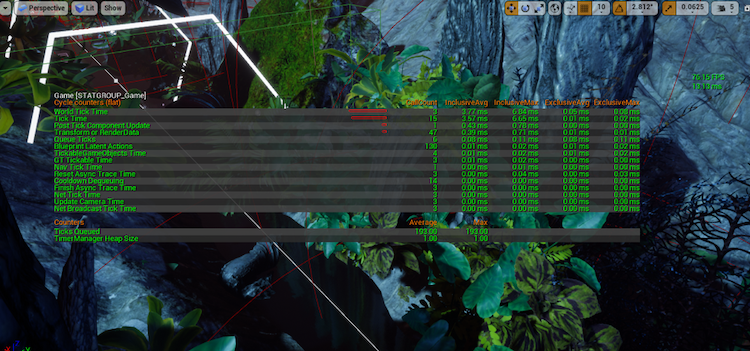
Figure 27. UE4’s CPU profiler.
The Role of TouchDesigner
We ran TouchDesigner on its own thread via batch file, so that ‘show control’ commands would not affect our game play. Using the built-in performance monitor, we optimized our CPU processing time and kept everything running smoothly.
The Role of Wwise
Wwise is a powerful audio tool that eats up a lot of CPU resources. Specific effects can take a big toll. However, even with multiple audio channels being exported, we maintained a good performance. We used Wwise’s built-in profiler to detect bottlenecks.

Figure 28. The Wwise profiler helps conserve CPU resources.
Following this guide was also helpful.
For greater optimization, we suggest forcing specific tasks onto different threads by overriding low-stream and high-stream manager level settings. Learn more.
These tricks gave us greater control of the multithreading and let us push the limits of the Intel® Core™ i9-7900X processor; with 10 cores, running at 3.3 GHz.
Even with everything running, we had spikes, but averaged around 40% - 60% CPU usage.
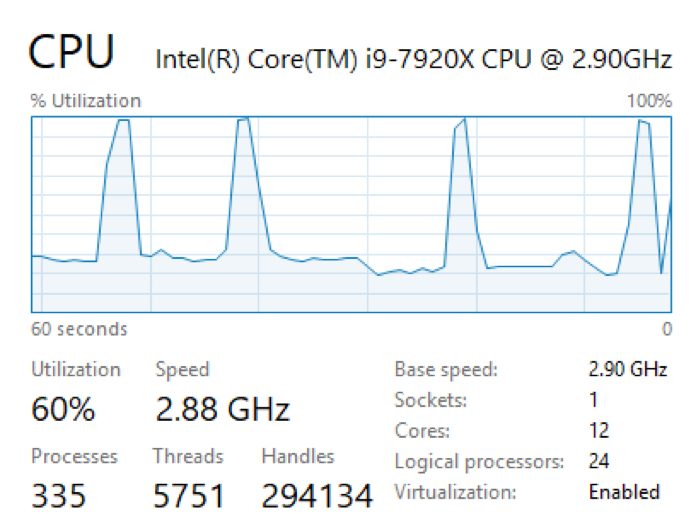
Figure 29. CPU utilization graph showing extreme peaks.
Conclusion
We were able to quickly work through demanding scenarios that previously took many hours of processing time. The Intel® Core™ i9+ processors handled all of the tasks we threw at it, with speed and efficiency. We look forward to dreaming up new ways to put the system to the test, as we continue to build stunning immersive environments.
About the Author
Adam Amaral is the founder, CEO and Creative Technologist of Master of Shapes. He constantly strives to be pushed out of his comfort zone and, consequently, has developed wide expertise while creating award-winning work. If Adam is not taming buffaloes or playing with robots, he keeps busy by designing tours for Miley Cyrus or producing award-winning commercial content and interactive installations. More recently, he has been creating innovative VR/AR experiences and working with new technologies, all while attempting to get to outer space.
Notices
No license (express or implied, by estoppel or otherwise) to any intellectual property rights is granted by this document.