Autoscaling refers to the operation of automatically adjusting the number of running application containers to meet the traffic demand. In the current K8s design, each application container runs inside its dedicated runtime environment pod. Scaling the application containers means creating/deleting more pods, which could result in high latency and slow response. The cold startup latency of pods, which is the time it takes to bring up pods with new container instances, could impact some time-sensitive applications during a traffic surge. This is especially true in scenarios such as FaaS (function as a service). To cut down on the time used to adjust the number of instance replicas, this article explains how to replicate app containers in a running pod on demand without restarting the POD or instantiating new POD sandboxes.
Usage scenarios
The following sections outline some typical usage scenarios.
User Story 1: Autoscaling function instances
FaaS is an event-driven computing service that allocates containers on demand to run the developer’s function code in response to event requests. It provides many benefits to the end-users, such as zero maintenance, utility-like billing, and on-demand auto-scaling. When your function is deployed in FaaS, your function will be deployed as a “function instance”, which is a container that has your code in it. When you send more traffic than the deployed function instance can handle, a scale-out operation happens, creating new function instances to serve the incoming requests in parallel. On the contrary, when the incoming traffic is lower than the current function instance capacity, a scale-in operation happens, causing the termination of some function instances.
In this autoscaling pattern, the system needs to be reactive and react fast. Scaling up/down function instances through pod creation/deletion incurs high latency and slow response. Rather than spawning a new pod to run the new function instance, we can leverage this feature to simply create a new function container in an existing pod. This avoids the cold startup latency associated with creating a new pod sandbox and setting up the new pod network.

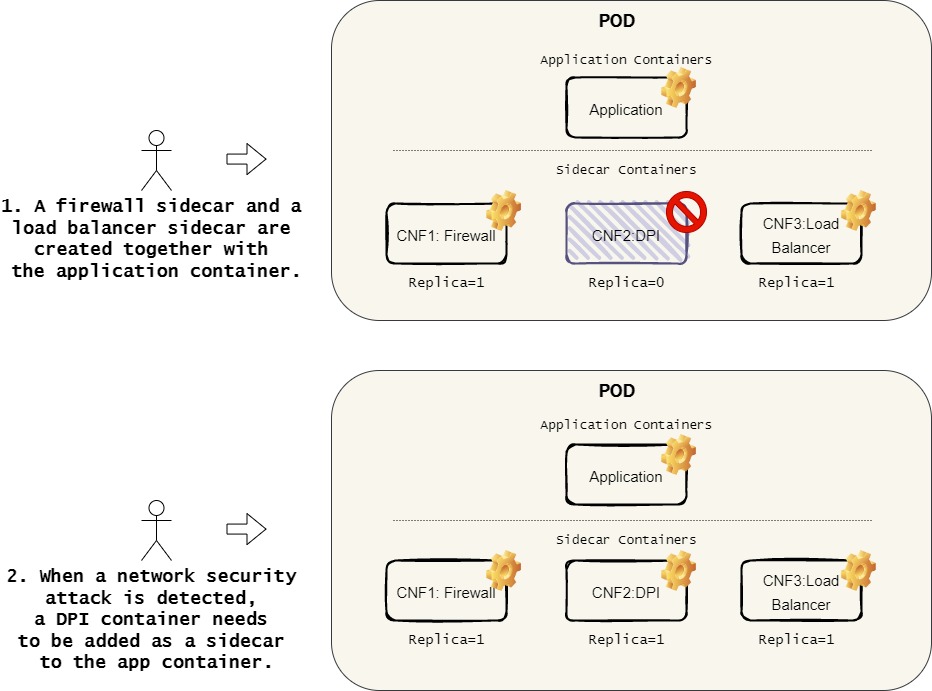
User Story 2: Container network functions
Container network functions (CNF) implement network features such as firewall, network links management, deep packet inspection (DPI), and others. They can be deployed in a pod to support various types of Service Mesh. The current implementation only supports static configuration of the CNFs as sidecars inside a pod. Once the pod starts running, no new CNFs can be dynamically injected into a pod and no existing CNFs can be dynamically upgraded without a pod restart. Although ephemeral containers can be used to inject containers into a running pod, it creates temporary containers with no resource guarantees and no exposed ports; this does not serve our scenario. The dynamic injection/upgrade is needed in many use cases. For example, when a network security attack is detected, we may need to inject a DPI side car into some PODs to trace and identify the hacker information. We can leverage this feature to dynamically adding/deleting/swapping CNF sidecars in a running POD without restart.
User Story 3: Confidential containers
Confidential computing protects data in use by performing computation in a hardware-based trusted execution environment (TEE). In cloud computing, container images are protected by leveraging TEE. Intel® Software Guard Extensions (Intel® SGX) is a form of hardware-based encryption that is built-in to many Intel processors. Intel SGX enables system memory to be split into so-called enclaves, which are private, hardware-encrypted areas within RAM. As you can see in Figure 3 below, when creating a pod, the encrypted container images are downloaded from the image registry, decrypted, and decompressed in an enclave in the pod. A container created in this manner is known as a confidential container. When scaling up the application, new pods are created. The decrypted container image in the first pod’s enclave could not be shared to the new pods, meaning that the encrypted image would be downloaded and decrypted again and again. It is time consuming to decrypt container images, especially when the image size is big. The elastic pod method replicates the application instances in the same pod that shares the image in one enclave. It helps to avoid the time used to download, decrypt the container image, and make remote attestations.

Figure 3: Confidential computing: confidential containers
User Story 4: Performance optimization in a large cluster
If we scale up the application using Replicaset, kubelet watches, syncs the status change of each pod, and sends updates to the API server periodically. In our method, the status changes of the replication containers within a PLEG’s relist duration are consolidated and updated in one patch request to the API server. In a large cluster, our method dramatically reduces the number of requests to the API server and eventually eases the write loads to the etcd database.

High-level design
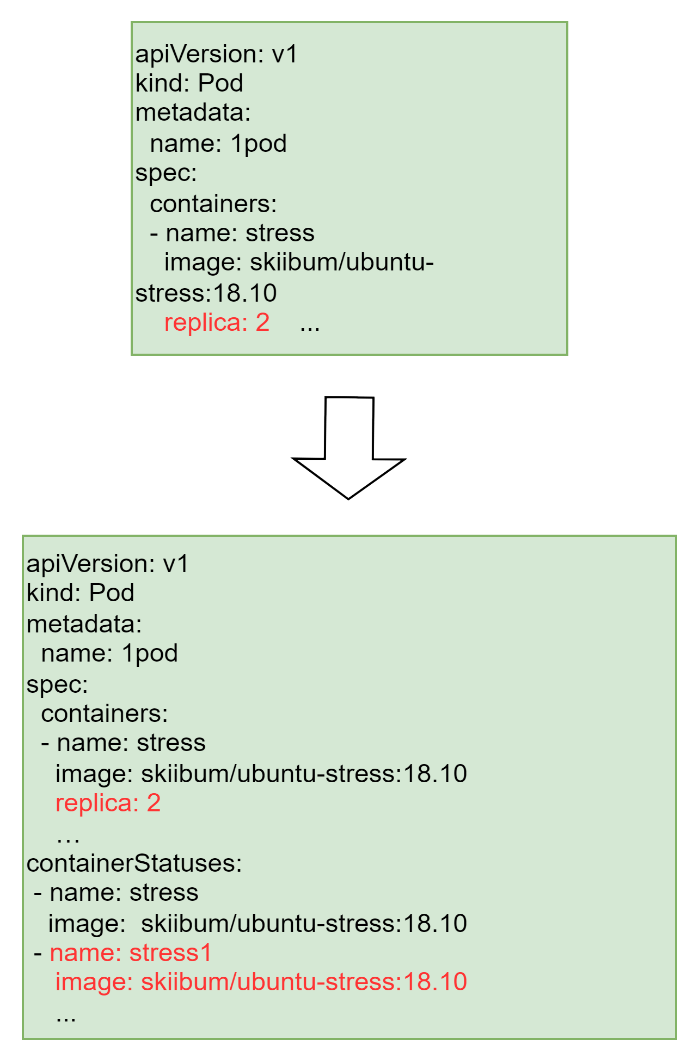
This feature adds a field named replica for each container object in the pod’s spec. It specifies the number of the running container instances. The value ranges from 0 to a pre-defined positive integer, with a default value of 1. To differentiate the container replicas from each other, the kubelet adds a different suffix attached to the original container name to manage these containers. The container statuses of the replicated containers are tracked in the ContainerStatuses. The replica field is modified by sending new patch requests to the API server after the pod is created, such as:
$ kubectl patch pods 1pod --patch '{"spec":{"containers":[{"name":"stress","replica": 2}]}}'
It can scale containers up/down without restarting the pod.
To track the container replication status, we introduce five replication phases, each of which represents a different stage of the replication.
• Unset: is an initial ready state, set when the replication is accomplished; set by Kubelet.
• Proposed: set when the updated pod spec passes the API server validation; set by the API Server.
• InProgress: set when the Scheduler confirms that there are enough node resources to support this request; set by the Scheduler.
• Infeasible: set when the Scheduler finds out that the request is over the node’s resource capacity; set by the Scheduler.
• Timeout: set when it takes too long to complete the replication, Kubelet stops retrying and sets the Timeout status.
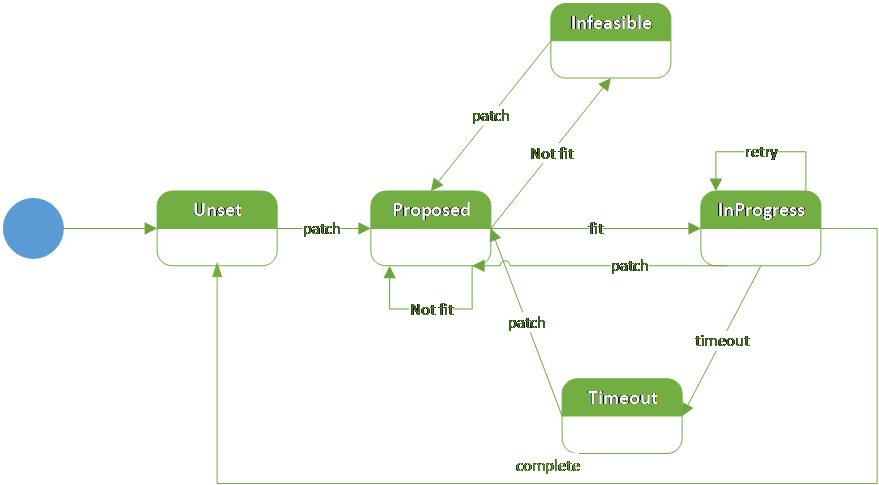
The system flow could be described as follows:
1. When a new container’s replica modification request arrives, the API Server validates the patch request for the pod and sets it to the Proposed phase.
2. Scheduler watches pods in the Proposed phase and checks whether the node resource can meet the patch request. There are three possibilities depending on the current node’s resources:
• If the resource requested by the patch exceeds the total capacity of the node where the pod is located, the Scheduler sets the phase to Infeasible and does not process it.
• If the sum of resources requested by the patch doesn’t exceed the total capacity of the node where the pod is located, however the current available resource does not fit the request, it remains in the Proposed phase.
• If current resources can meet the request, the Scheduler sets the phase to InProgress.
3. Kubelet watches pods in the InProgress phase. When the phase is set to InProgress, Kubelet takes actions to create/delete corresponding containers in the pod. When the desired actions are done, Kubelet sets the phase to unset. When the replication time exceeds the timeout duration, Kubelet sets the phase to Timeout. Otherwise, it remains in the InProgress phase.
4. Additionally, whatever the current phase is, when a new patch enters, the phase goes to Proposed and proceeds to the latest patch.
The workflow diagram below illustrates the sequence to scale up/down the replications in one pod.

Figure 7: The sequence to scale up/down replications in a pod
Proof of concept demo
In the demo, multiple scenarios are illustrated, including scaling containers up/down in a pod that hosts only one container, scaling from/to zero replications in a pod and scaling containers up/down in a pod that hosts two containers.
Our proof of concept is implemented based on Kubernetes v1.23.1, and the test is performed in an all-in-one Kubernetes cluster with Debian:11 as the container image.
Performance test result summary:
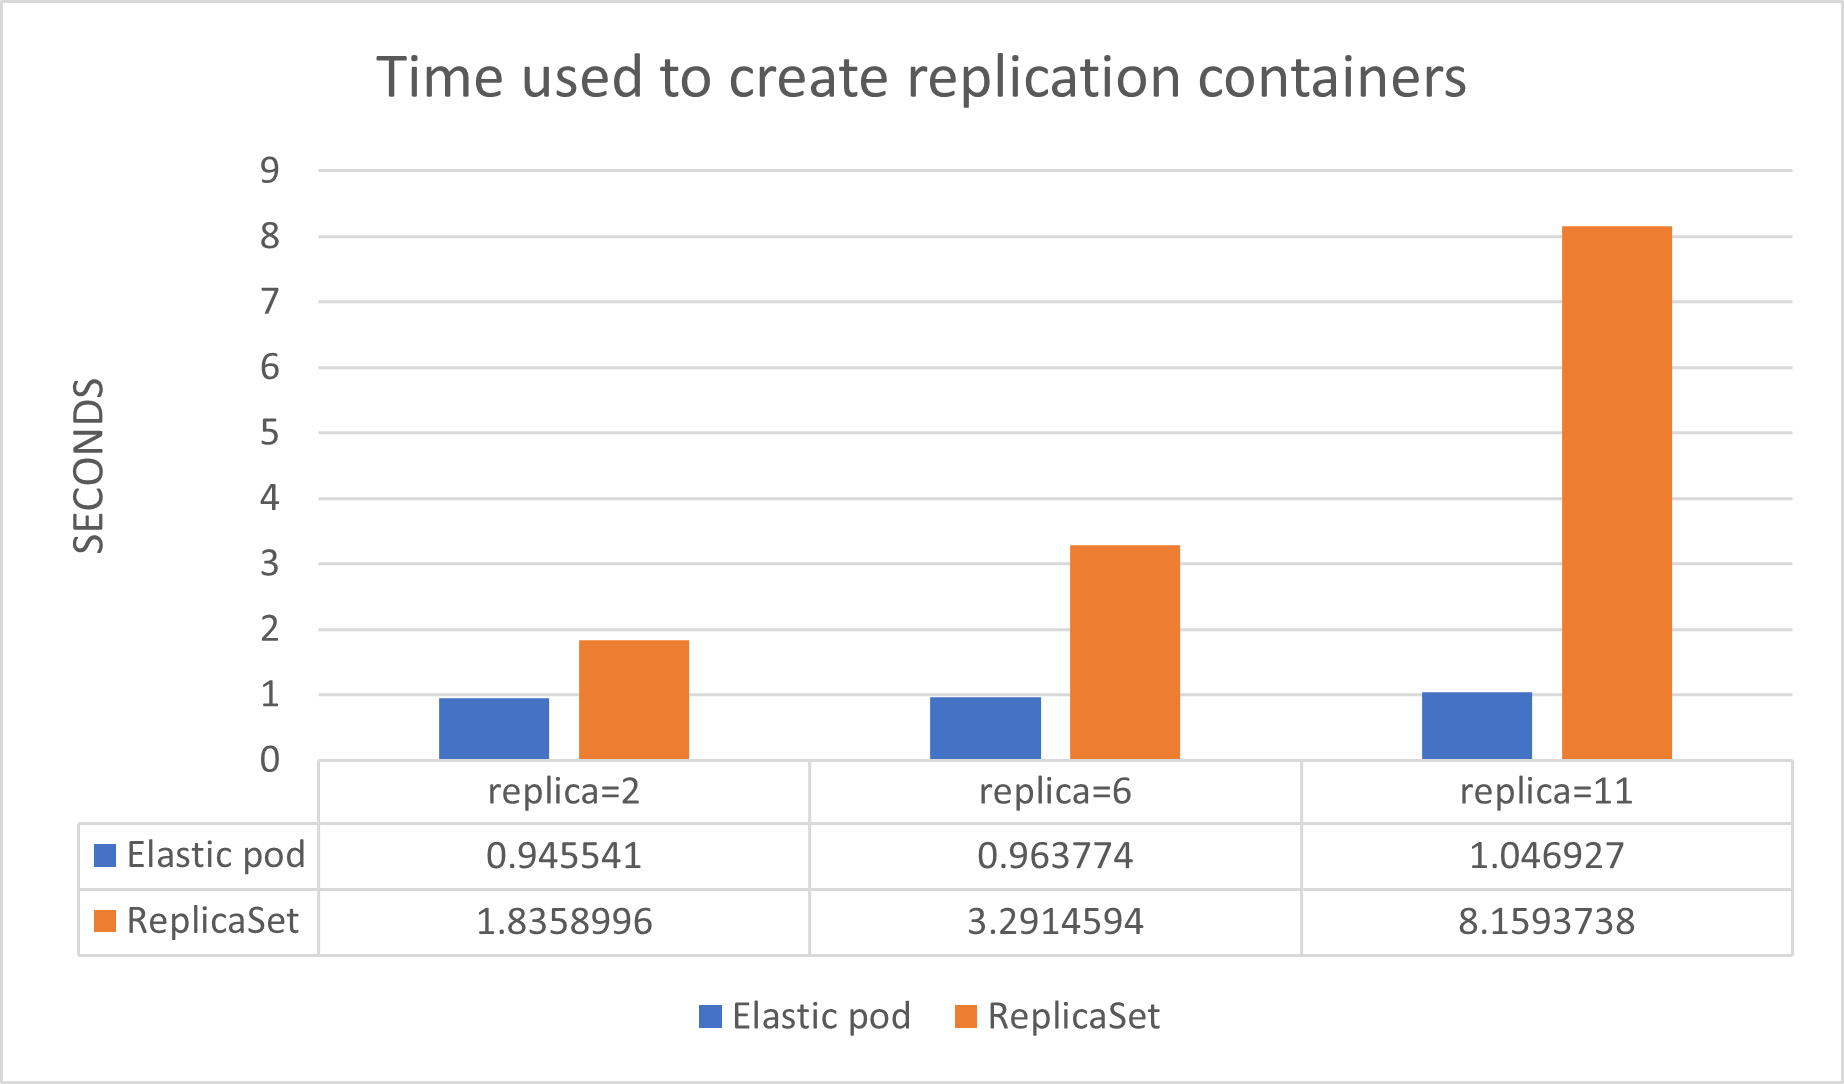
As the column chart illustrates, the blue column represents the Elastic pod method and the orange column represents the ReplicaSet method provided by Kubernetes. The x-axis represents the replica value specified in the patch request and the y-axis is the scaling latency in seconds. The containers in the pod are created with 1 replica initially. While testing the container replication, we looped every test 30 times and recorded the average elapsed time. As the replica value increased, the creation time with the ReplicaSet method dramatically increased from about 1.84s to 8.16s. However, the replica value does not have much impact on the scaling latency using the elastic pod method, with the time increasing from about 0.95s to 1.05s. When adding 10 replications, elastic pod reduces cold-start latency up to 87.17% compared with ReplicaSet. In conclusion, the higher the scaling concurrency requirement is, the greater the performance gain from the elastic pod mechanism.
Event
A talk on this feature was delivered at the Open Source Summit NA 2022: https://www.youtube.com/watch?v=9jNoUGyv24E&list=PLYD11aUryodCmZNUdrDw7CmR_vSO5yJ_i&index=3. If you are interested in the feature, watch the presentation video and feel free to contact us through the email address in the presentation.