Intel® System Studio – Developing with Sensor Libraries
Introduction
Intel® System Studio 2018 includes several new features to simply the development of Internet-of-Things and embedded applications. This includes: UPM/MRAA Sensor Libraries, container-based cross compile environment, Eclipse* IDE, and Target Connection Agent (TCA).
The Sensor Libraries consist of two main components: the MRAA library and the UPM library.
The MRAA library provides a low-level I/O access to GPIOs, analog inputs, I2C, SPI, and UART interfaces on multiple hardware platforms.
The UPM library provides support for more than 400 sensors, with new sensors being added regularly. The UPM library uses the MRAA library as the hardware abstraction layer.
Prerequisites
The following hardware and software components are required for application development using Intel® System Studio 2018 and Sensor Libraries:
- Host system with a supported OS: Windows*, Linux*, or macOS*
- Intel® System Studio 2018 installed on the host system
- Docker* platform installed on the host system
- Target system with a supported OS – Ubuntu* Linux*
- Network connection between the host and the target system
Note: The target system needs to have an SSH server installed. The root SSH login is required in order to run MRAA/UPM based applications. Please refer to Getting Started with Application Development Using Intel® System Studio 2018 guide for the root login setup instructions.
Developing Sensor Libraries Applications
Deploying Sensor Libraries on Target
While Intel® System Studio includes pre-compiled Sensor Libraries in the containers used for cross compiling, it is still needed to deploy libraries on the target. For Ubuntu* Linux*, MRAA and UPM are available through a Personal Package Archive (PPA). Run the following command to install MRAA/UPM libraries on the target:
sudo add-apt-repository ppa:mraa/mraa
sudo apt-get update
sudo apt-get install libmraa1 libmraa-dev mraa-tools python-mraa python3-mraa libupm-dev python-upm python3-upm upm-examples
For other Linux* distributions, the MRAA and the UPM libraries can be compiled, using the source code and instructions provided in the following GitHub repositories:
Creating New Project
Start Intel® System Studio 2018 IDE. When prompted enter a workspace location, it is normally resides in users home directory, for example C:\Users\<username>\workspace on Windows* OS, or /home/<username>/workspace on Linux* OS.
Use File -> New -> Project… menu to start the New Project Wizard.
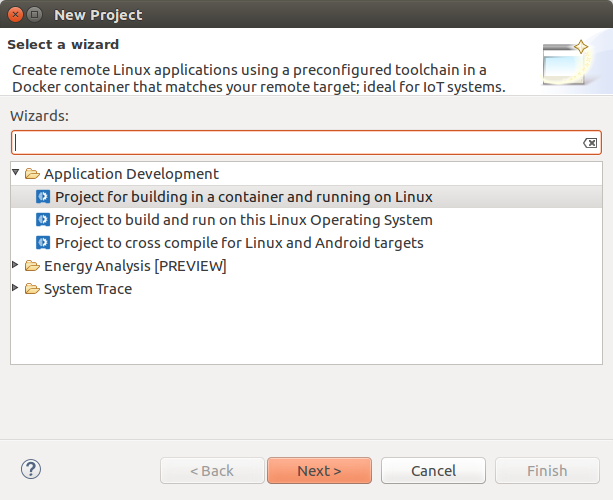
In the first, Select a wizard screen, double click on Application Development to open the list. Select Project for building in a container and running on Linux from the list as shown below, and click on the Next> button.
Select the Docker toolchain that matches your target system. For example, screenshot below shows Ubuntu Linux 16.04 64-Bit (GCC) as the target. Click on the Next > button.

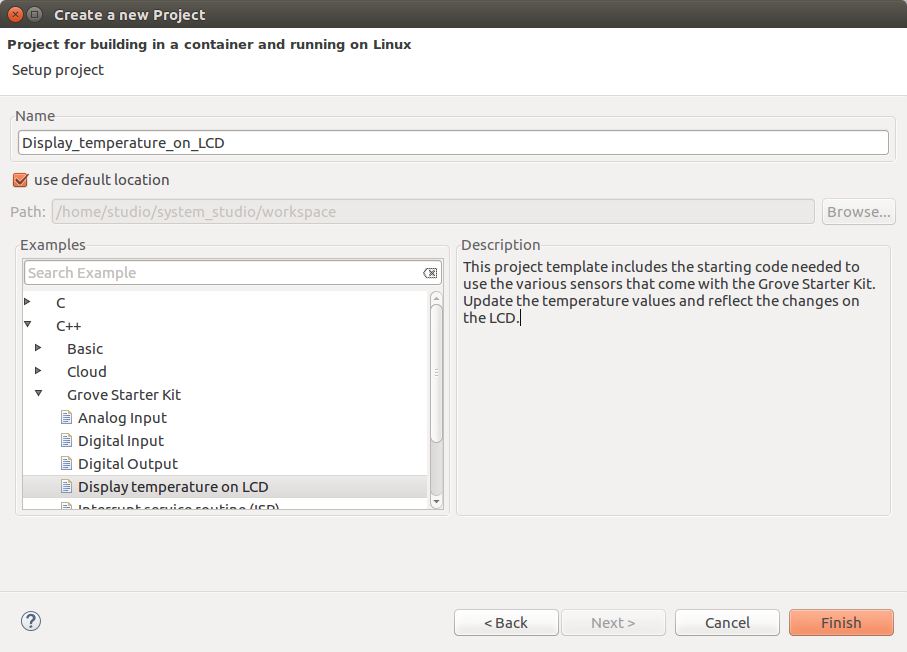
In the next Setup Project screen, enter the project name and select one of the examples as a starting point of your project. Click on the Finish button. It might take some time to setup the new project, as Intel® System Studio needs to setup the Docker container for the project.
Using Sensor Support Window
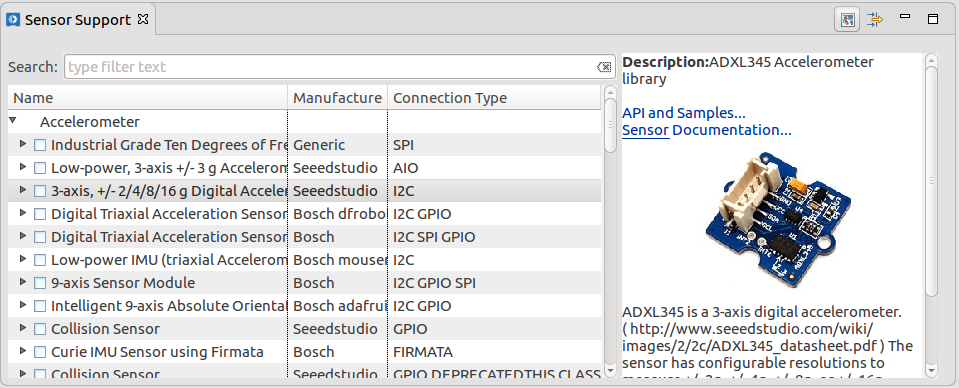
The Intel® System Studio IDE offers Sensor Support view, which simplifies finding the sensors supported by the UPM library, and browsing library’s documentation and samples.
Note: The Sensor Support view is normally shown at the bottom right of the IDE window. If needed it can be enabled using Window->Show View->Sensor Support menu.
Use the Search feature to display the relevant sensors by typing the sensor name or a part of sensor description, or alternatively browse through the sensor list.
When a sensor is selected, the sensor description is shown on the right side of the Sensor Support view. The description includes links to the UPM library API, documentation, and examples for that sensor.
Selecting the checkbox on the left side of the sensor name adds the relevant UPM library header to the current project source file. (A C/C++ source file needs to be open in IDE editor first).
Configuring Target Connection
To configure a new target connection click on the Target Connection drop-down list, and select New Connection… The New Connection wizard will open.
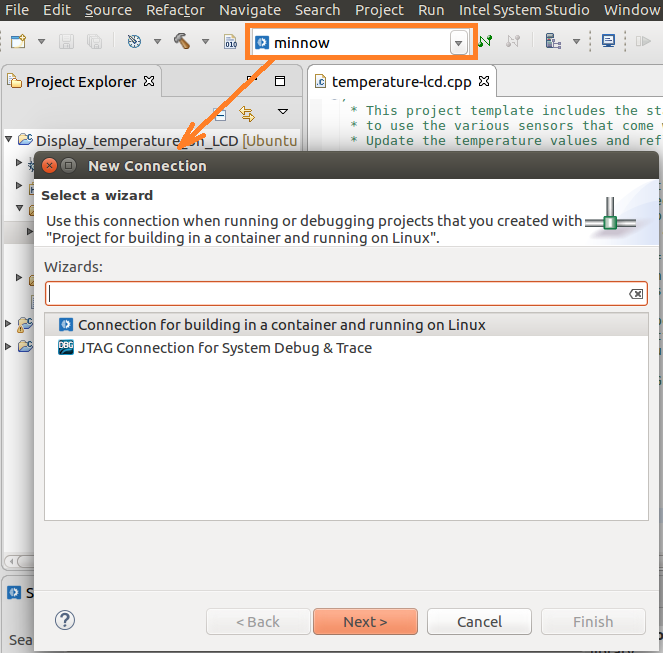
Select Connection for building in a container and running on Linux and click on the Next > button.
In the next window, enter the Connection Name, for example a target device description, the target IP address, and then click Finish.

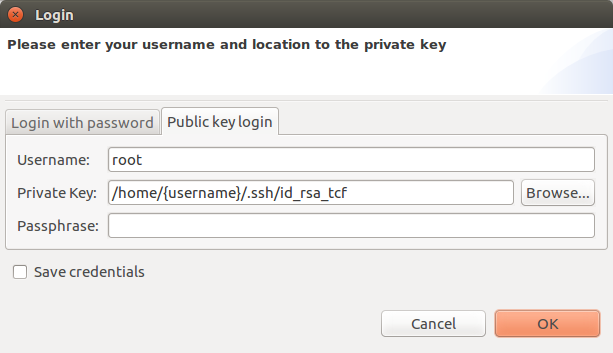
Intel® System Studio will create the new target connection, and show the Login dialog. Intel® System Studio uses the login information to connect to the target system using SSH, copy and start the TCF (target connection framework) agent. Either password-based or key-based authentication can be used. Note, that the UPM and the MRAA libraries require root privileges to run on the target, and using shared key authentication is a more secure way for the root SSH login. When using SSH key-based authentication, make sure that the target device has the corresponding shared key in root’s .ssh/authorized_keys file.
Click on Public key login tab. Enter the username (root), and locate the private SSH key using Browse… button, and click ion the OK button to establish the connection. Note that Ubuntu* Linux* and macOS* file browsers do not show hidden files and directories (that is any files or directories with names starting with a dot), including .ssh directory, where the SSH keys are normally stored. Push Ctrl+H (Ubuntu*) or CMD+SHIFT+. (macOS*) key combination to show hidden files.
Deploying, Running, and Debugging the Application
Use Build (hammer) icon on the toolbar or Project -> Build Project menu to build the application
Use Run (play) icon on the toolbar or Run -> Run menu to deploy and run the application on the target. The application output (if any) will be shown in the Console view.
Use Debug (bug) icon on the toolbar or Run -> Debug menu to deploy the application on the target, and start the debugger.

References
- Intel® System Studio: /content/www/us/en/develop/tools/system-studio.html
- Docker* installation instructions: https://software.intel.com/en-us/intel-system-studio-docker-install
- Sensors supported by the UPM library:
- Sensor List: https://iotdk.intel.com/docs/master/upm/modules.html
- Industrial Sensors: /content/www/us/en/develop/articles/industrial-sensors-with-upm-support.html
- UPM library GitHub repository: https://github.com/intel-iot-devkit/upm
- MRAA library GitHub repository: https://github.com/intel-iot-devkit/mraa