Overview
The Intel® ESQ for Intel® AI Edge Systems enables customers to run Intel-provided test modules on their target system, allowing them to qualify their platform as an edge AI-ready device. The edge AI silicon portfolio is organized into the following tiers, and the recommended configurations are documented in the system requirements. Appropriate test modules are run depending on the tier.
For more information, see Edge AI Systems from Intel.
Reference Edge AI Systems
The reference edge systems are organized along the following tiers:
- Efficiency-optimized edge AI enhances AI performance with integrated CPUs, GPUs, and NPUs, ideal for low power while maximizing potential performance.
- Scalable performance edge AI delivers adaptable AI performance with a built-in AI accelerator and the option to add a discrete GPU of your choice, including Intel GPUs.
- Mainstream and entry-edge AI offer a balance between computing, inferencing, total cost of ownership, and low power.
Intel conducted extensive testing and documented the results and the methodology in Verified Reference Blueprints (VRBs). For more information, see VRBs.
System Requirements
Scalable Performance Edge AI |
|||
| CPU Generation | Intel® Xeon® 5 processor | 13th generation Intel® Core™ processor or higher | |
| SKU | Dual Socket TDP 250 watts 32 cores minimum AI Features: Intel® Advanced Matrix Extensions (Intel® AMX) and Intel® Advanced Vector Extensions 512 (Intel® AVX-512) |
Single Socket 32 cores minimum TDP 250 watts AI Features: Intel AMX and Intel AVX-512 |
Intel® Core™ i7 or higher 8 Performance-cores (or P-cores) minimum TDP 65 watts AI Features: Intel® Advanced Vector Extensions 2 (Intel® AVX2) |
| System Memory | Minimum 512 GB DDR5 at 5600 MT/s (1DPC) | Minimum 256 GB DDR5 at 5600 MT/s (1DPC) | Minimum 64 GB DDR5 |
| Discrete GPU | Intel® Data Center GPU Flex Series 140, Intel® Data Center GPU Flex Series 170, Intel® Arc™ A380 GPU, Intel® Arc™ A380E GPU, Intel® Arc™ A750 GPU, Intel® Arc™ A770 GPU | Intel Arc A380 GPU, Intel Arc A380E GPU, Intel Arc A750 GPU, Intel Arc A770 GPU | |
Efficiency Optimized Edge AI |
|||
| CPU Generation | Intel® Core™ Ultra processor Series 1 or Series 2 | ||
| SKU | Intel® Core™ Ultra 5 processor or higher, iGPU with 7 Xe-cores or more TDP 28 watts AI Features: Intel AVX2 |
||
| System Memory | Minimum 32 GB DDR5 | ||
Mainstream and Entry Edge AI |
|||
| CPU Generation | 14th generation Intel Core processors or higher | ||
| SKU | Intel Core i7 processor or higher, 8 P-cores minimum TDP 65 watts AI Features: Intel AVX2 |
||
| System Memory | Minimum 64 GB DDR5 | ||
Recommended Settings for Secure Boot and Performance
Each system configuration may require a specific secure boot and performance configuration. To learn more about BIOS settings, visit Intel AI Edge Systems VRB, and then select a VRB configuration that corresponds to the target platform.
How It Works
This four-step qualification process is designed to be straightforward and user friendly, allowing system manufacturers and integrators to efficiently validate their systems and ensure they are ready for deployment in the market. The qualification not only provides assurance of the system's quality and reliability but also enhances its credibility among users and within the broader ecosystem. The following is an overview. For more details, see the Get Started Guide.
Intel ESQ for Intel AI Edge Systems

Step 1: Download and Install the Qualification Tool
The first step requires registering and downloading the qualification tool. After downloading the app, you must install the qualification tool on the system intended for certification.
Step 2: Run the Qualification Tool
Once the qualification tool is installed, the next step is to run the program. This involves initiating a series of automated tests that assess various aspects of the system's hardware and software.
Step 3: Submit Report
Upon completion of the tests, the qualification tool generates a report detailing the system's performance and compatibility results. Submit the report to Intel for approval by emailing intel.edge.ai.systems@intel.com.
Step 4: Publish
Once approved, the newly qualified system is published on the Recommended Systems.
Get Started
Prerequisites
-
Install Ubuntu* Desktop 22.04 on the target system.
Note Ubuntu 22.04.3 LTS is preferred for Intel® Core™ and Intel® Core™ Ultra processors. Ubuntu 22.04.4 LTS Server is preferred for Intel® Xeon® processors.
- Install the required drivers with the corresponding Intel AI Edge Systems configuration as mentioned in the VRB guidelines.
To speed up system driver and library installation, go to Edge Developer Kit Reference Scripts, and then select the appropriate scripts for the target platform. - Install required runtime libraries and packages.
sudo apt-get install libnuma-dev python3-dev jq - Set up the Hugging Face* token before running Intel ESQ.
- Enable Hugging Face. For instructions, refer to the step-by-step guide in the Appendix.
- If the default Hugging Face server is not accessible, you may configure an alternative mirror by referring to the step-by-step guide in the Appendix.
- Export the Hugging Face token copied in your terminal. Ensure a similar terminal is used to run the application.
export HF_TOKEN=<your-huggingface-token>
- Set up Docker*. Refer to the official Docker documentation:
- Follow steps 1–3 under Install Using apt Repository.
- To configure nonroot use for Docker, follow steps 1–4 under Manage Docker as a Nonroot User.
- If you are using Ubuntu 24.04.3 LTS, upgrade python-venv to python3.12-venv.
sudo apt install python3.12-venv - If you are using Ubuntu 22.04.4 LTS Server operating system, install unzip.
sudo apt-get install unzip
Install the Package
- To get the qualification tool, go to the Software Catalog page, select your options, and then select Download.

- Accept the license agreement and copy the product key.
- Transfer the downloaded package to the target Ubuntu system and unzip it:
unzip edge_system_qualification.zip - Once the package has been extracted, enter edge_system_qualification, and then change edgesoftware software permissions.
cd edge_system_qualification chmod +x edgesoftware - If you are installing the software on Ubuntu 24.04.3 LTS, create a virtual environment variable.
python3 -m venv venv - During the installation process, you are prompted to enter the product key. This is the key you copied in step 2. The same product key for this software should be included in the confirmation email you received during download.
./edgesoftware install - Restart the system when the message Installation of package complete appears with the installation status for each module.
Run the Intel ESQ Application
Note Before running Intel ESQ, ensure the qualification tool is downloaded and installed.
- To run Intel ESQ as a complete test suite using the command line interface (CLI), change the directory to the location of the Intel ESQ folder:
cd ~/esq - Check the Intel ESQ version:
Ensure the released version matches the version you downloaded. For example: Version: 11.2.0esq --version
- To view the available CLI option, run the following:
esq --help
- To list the available test modules, run the following:
esq module list
- During the test run, to grant permission to your computer, provide the following:
- At the start, your Hugging Face account access token
-
Later, your device credentials
Note The system test module is a predistributed test module in the Intel ESQ.
- Run the qualification test.
Note We recommend running Intel ESQ as a non-root user.
esq --verbose run
![]()
![]()
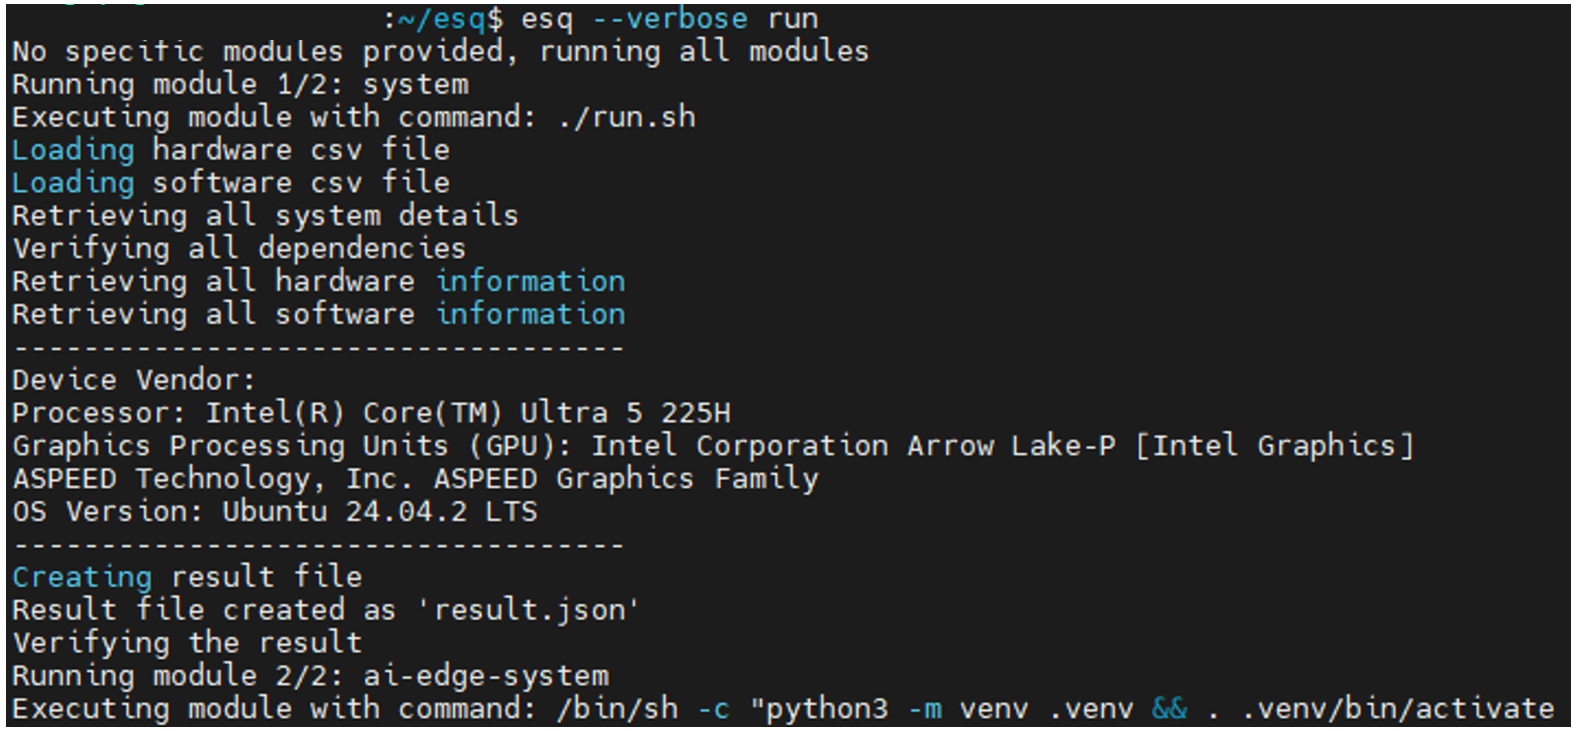
- After the test run of the test module is finished, the CLI displays the location of the generated report. Navigate to the Reports folder.
cd reports - The report directory displays as shown in the following image:

- Test results are stored in the output folder. Intel ESQ generates a complete test report in HTML format and detailed logs packaged as one ZIP file, which you can email to the Intel ESQ support team.
Support
System manufacturers seeking tuning support for Intel AI Edge Systems or inquiries about verified reference blueprints can email intel.edge.ai.systems@intel.com.
Appendix
Enable Intel® Data Center GPU
We recommend that original equipment manufacturers (OEMs) complete the Intel® Data Center GPU Verified System Library program for data center systems designed with Intel Data Center GPUs. This verification process allows customers to validate the functionality of the system for production use. It also provides end-user assurance of system quality before running Intel ESQ tests.
List of Servers Enabled with Intel® Data Center GPU Flex Series
Enable Hugging Face*
This guide walks you through the process of generating a Hugging Face access token and enabling relevant repository access on Hugging Face.
Generate Hugging Face Access Token
Step 1: Create a Hugging Face Account
- Go to Hugging Face.
- Sign up or sign in:
- If you don’t have an account, select Sign Up and follow the instructions to create one.
- If you already have an account, select Log In and enter your credentials.
Step 2: Generate an Access Token
- After you sign in, select your profile picture or username in the top-right corner to open the menu.
- From the menu, select Settings.

- In the Settings menu, select Access Tokens.
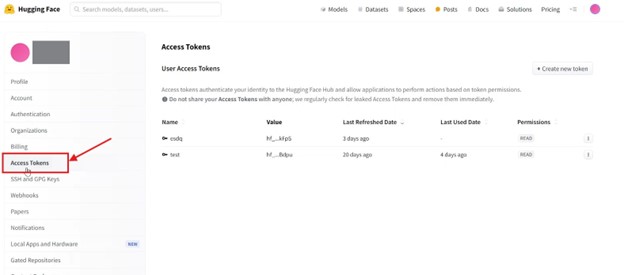
- Select Create new token.

- Under Token type, select Read and enter a Token name.
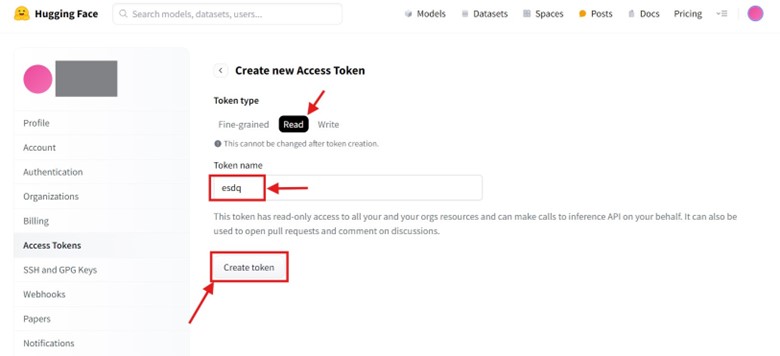
- Select Create token.
- Copy and save your access token in a secure location for future use, and then select Done to exit.
- Export the Hugging Face token copied in your terminal. Ensure a similar terminal is used to run the application.
export HF_TOKEN=<your-huggingface-token>
Note Remember to copy, export, and store the generated access token so that it can be retrieved in the future.
Enable Relevant Repository Access on Hugging Face
Follow these steps to enable the Llama-3.1-8B-Instruct repository in Hugging Face.
Step 1: Browse Hugging Face Repository
- Go to Hugging Face and sign in to your account.
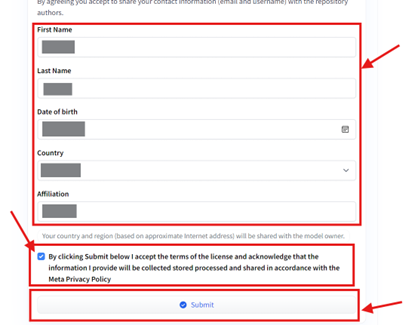
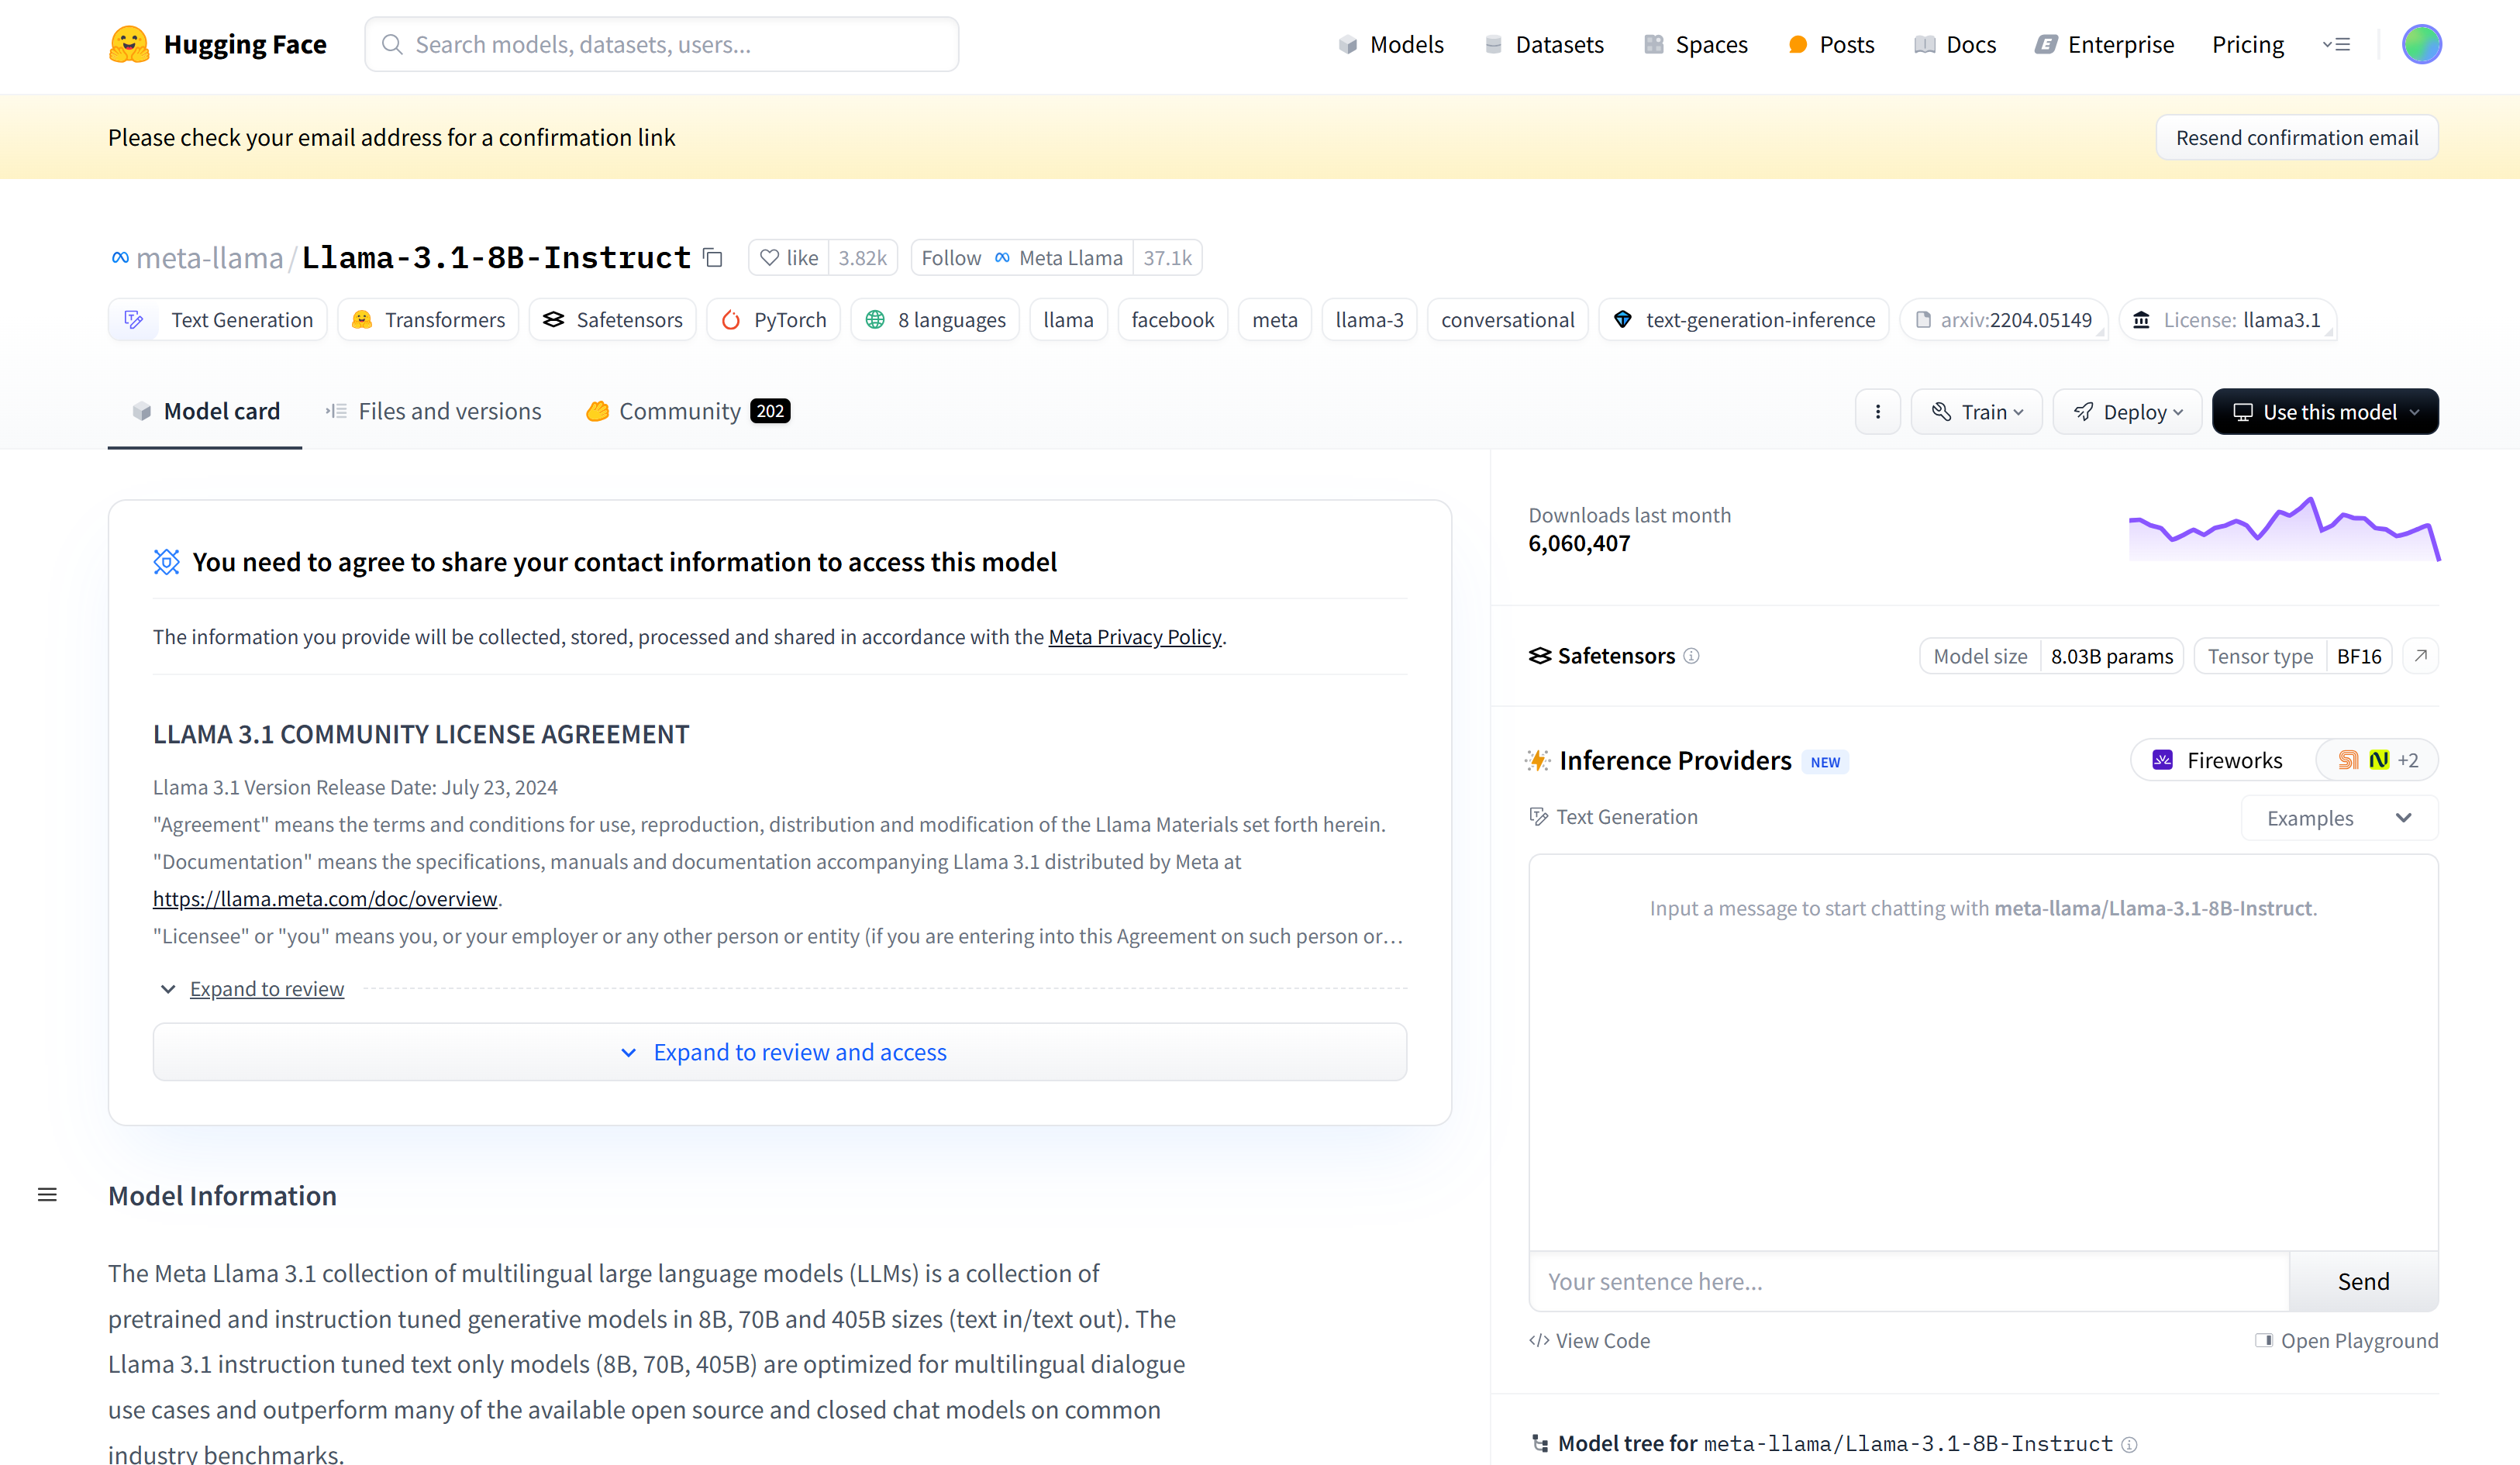
- Go to the Llama-3.1-8B-Instruct repository and select Expand to review and access.
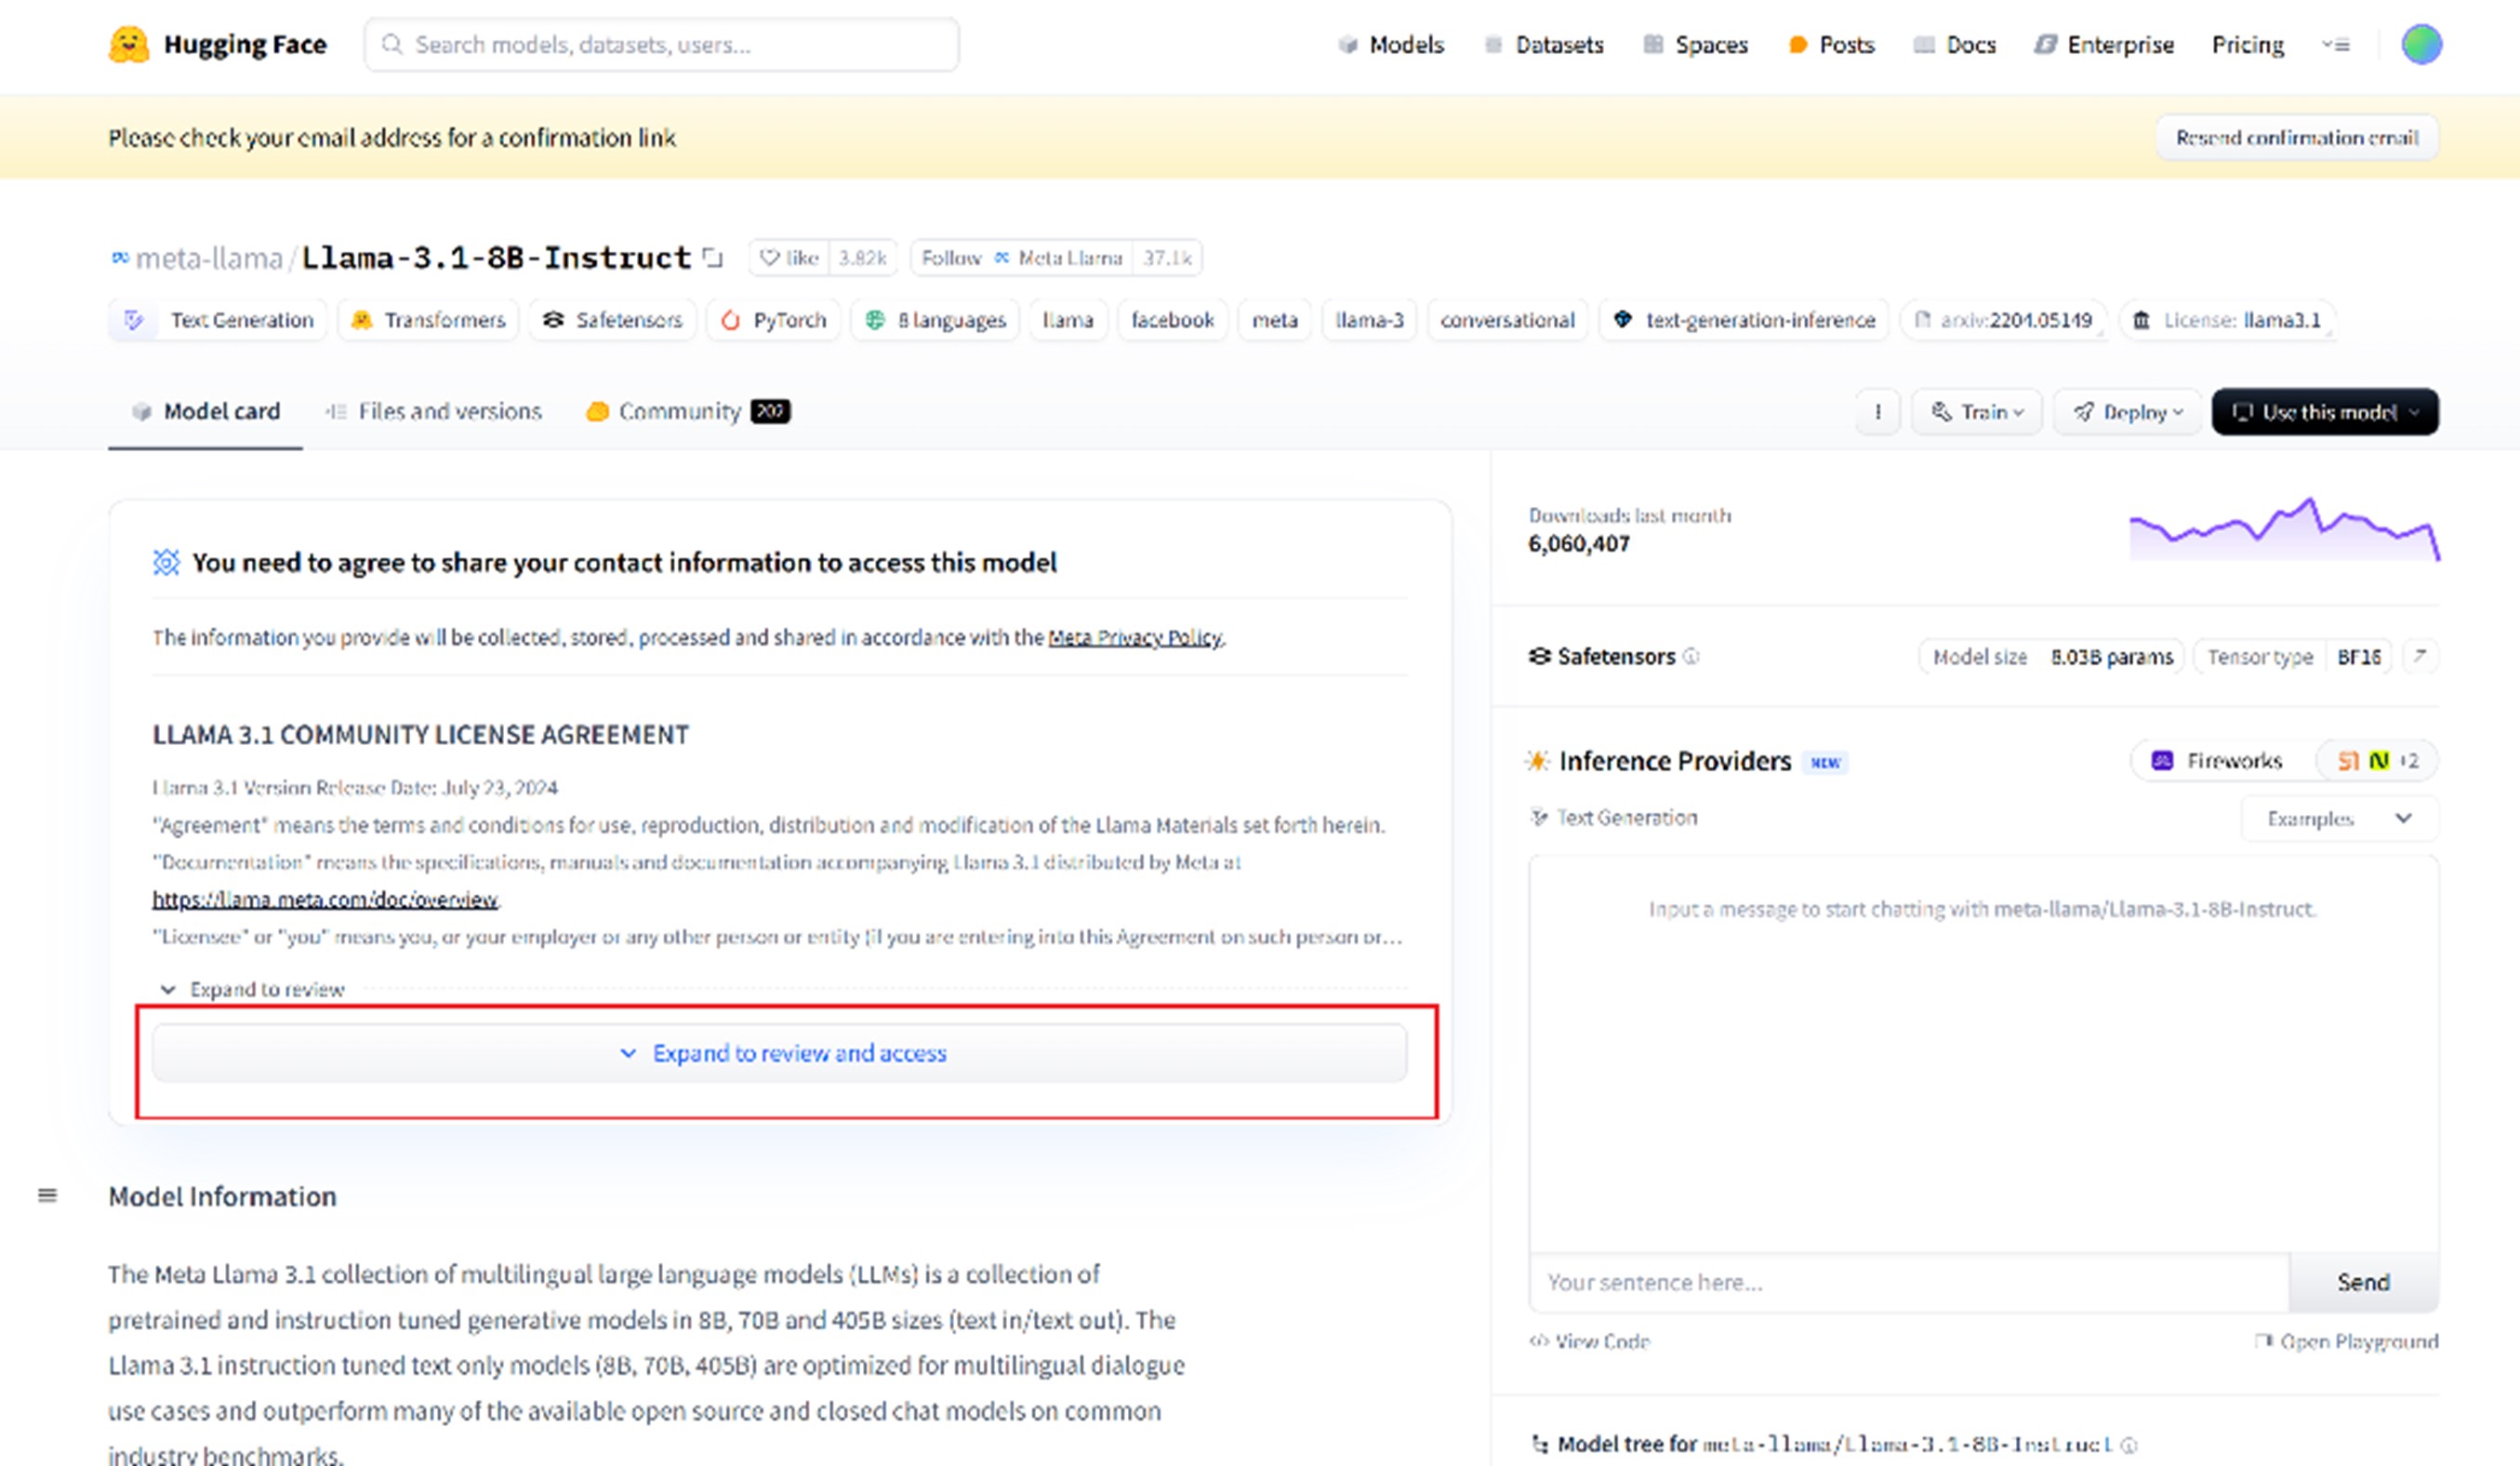
- Review the license agreement, fill in the necessary details, accept the license terms, and then select Submit.
- After submission, validate whether the submission was successful.
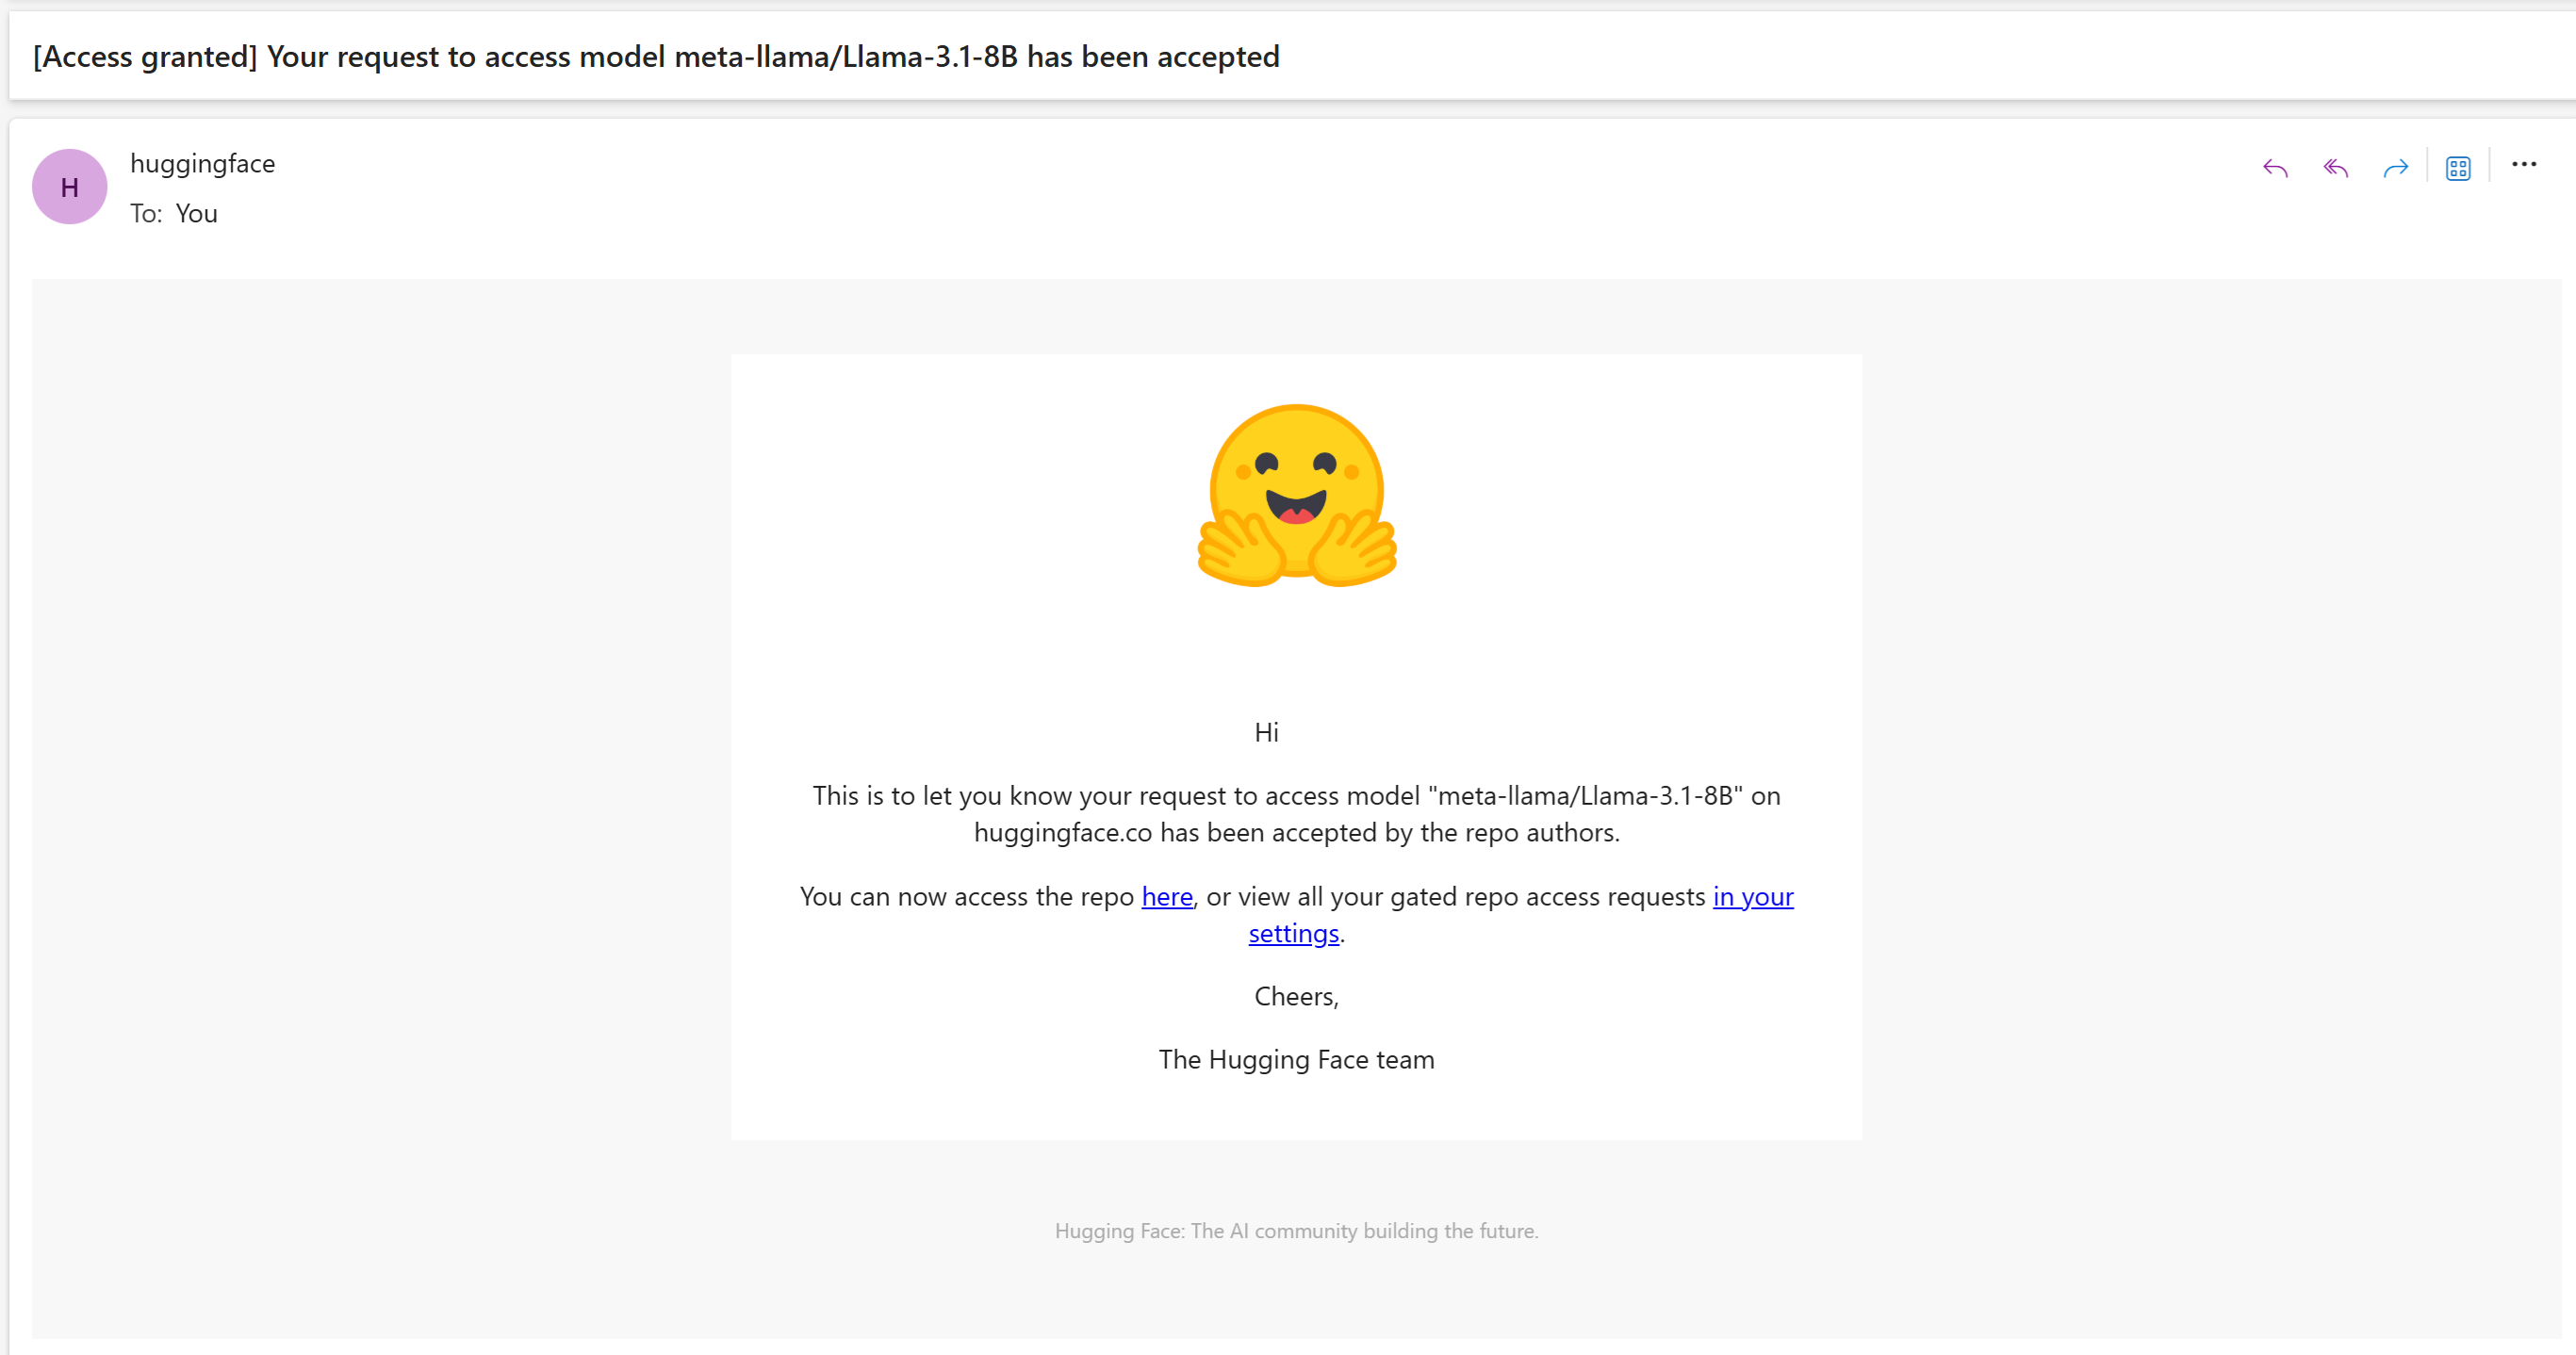
Step 2: Ensure Successful Access to the Repository
- When you receive access to the repository, Hugging Face sends you an email. The approval email should be received within one working day.
Step 3: Run the Intel AI Edge Systems
After you receive the Llama-3.1-8B-Instruct repository approval email, run the Intel AI Edge Systems application by following the Get Started Guide.
Alternative Hugging Face Mirror Support
If the default Hugging Face server is not accessible, you may configure an alternative mirror by setting the HF_ENDPOINT environment variable as HF_ENDPOINT=https://hf-mirror.com.
Additionally, ensure that both the Docker client and Docker daemon environment configurations are updated to allow access to the mirror.
- Docker daemon environment setup:
- Configure the Docker daemon environment as follows:
vi /etc/systemd/system/docker.service.d/daemon-env.conf - Edit HF_ENDPOINT target as the section below:
[Service] Environment="HF_ENDPOINT=https://hf-mirror.com" - Reload the systemd daemon to apply the changes and restart docker by running the following commands:
sudo systemctl daemon-reload
sudo systemctl restart docker
- Configure the Docker daemon environment as follows:
- Docker client configuration:
- If HF_ENDPOINT is not defined, the library will default to Hugging Face server.
- Before running the tool, set the HF_ENDPOINT=https://hf-mirror.com environment variable in /etc/environment or use the following command in your terminal session.
This ensures that the library will use the specified mirror for accessing Hugging Face resources.
Accessing Gated Repositories
Certain repository in Hugging Face server requires both login and permission. For security reason, HF-mirror does not support direct login.
- You need to log in to the official Hugging Face website and request permission there. Additionally, you must obtain your Hugging Face Access Token from the default Hugging Face website. Once you have the Access Token, you can proceed with downloading using Intel® ESQ CLI.