Animators have long referenced video footage when animating by hand and artists today continue in this tradition taking advantage of the current motion capture technologies for computer graphics (CG) animation. Full body movements, as well as subtle facial motion and precise hand and finger animation, can all be captured and applied to CG rigged mesh characters.
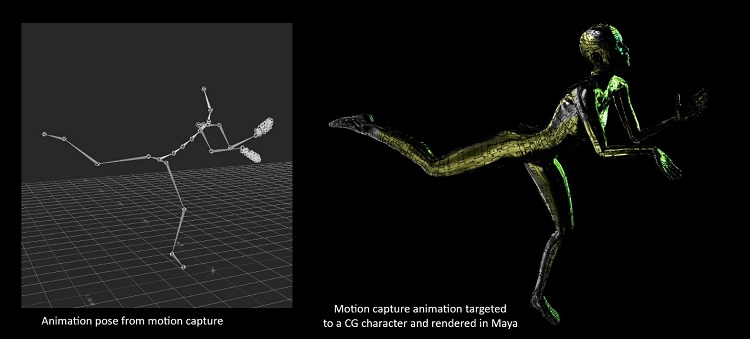
Figure 1. The left shows a sample of a motion capture animation pose; the right shows the pose applied to a CG character.
A variety of industries use motion capture systems - biomechanics, clinical studies, fitness, sports performance, and animal science to name a few - but this article will focus on animation usages for the game and entertainment industry. Having the ability to capture the nuances of human motion is a valuable asset, and once the motion is captured, there are a number of software pipelines to take this motion into gaming or entertainment projects. This article will cover a commonly used pipeline, some of the motion capture technology available and creative concerns in using motion capture.
Techniques below use demos from a projects I am working on, Robot Prayers Robot Pas De Deux. Noitom Perception Neuron* PRO is used to capture the motion at the Noitom* motion capture stage at Fonco Studios in Los Angeles. Their software and hardware far exceeded my hopes for the quality of the motion I could capture. Note that while no motion capture system is perfect and cleanup is often required, products such as Autodesk* MotionBuilder and Maya* make this easy to do.
Noitom Perception Neuron PRO
"Motion capture is more than human motion digitalization; motion capture is a portal to the virtual world and to making oneself the center of human-machine interaction. This portal needs to be easy to access, affordable, accurate, and user-friendly,” Dr. Tristan Dai, CTO of Noitom.
Perception Neuron PRO, the newest system from Noitom, was chosen to use in these demos for a variety of reasons. A significant advantage of inertial motion capture technology is that it’s wireless and only requires cameras for localization. There are also no occlusion or line of site restrictions. Other motives are the reasonable price, quality of the motion capture, ease of set up, ability to use indoors and outdoors in any lighting condition, including darkness, and the sensors work even when worn under costumes. Motion capture occurs from the full body, all the way down to individual finger movements. The technology can track subjects on a large sound stage or other area with no increase in expense.
Inertial motion capture uses inertial measurement units (IMUs) with built-in sensors to detect position and movement. A gyroscope measures angular rate and an accelerometer detect speed and gravitational force. These measurements calculate the change in position relative to gravity as well as the movement of the IMU through acceleration in any direction. The magnetometer uses the Earth's magnetic north for individual sensor calibration.

Figure 2. The sensors come in a case which they can charge in. Each sensor mounts and clicks into the proper place on the motion capture harness for that body part. The software is dependent on the sensors being in the correct location. The motion capture works even if the sensors are under clothing which is useful in live performances where you do not want the audience to see the sensors.
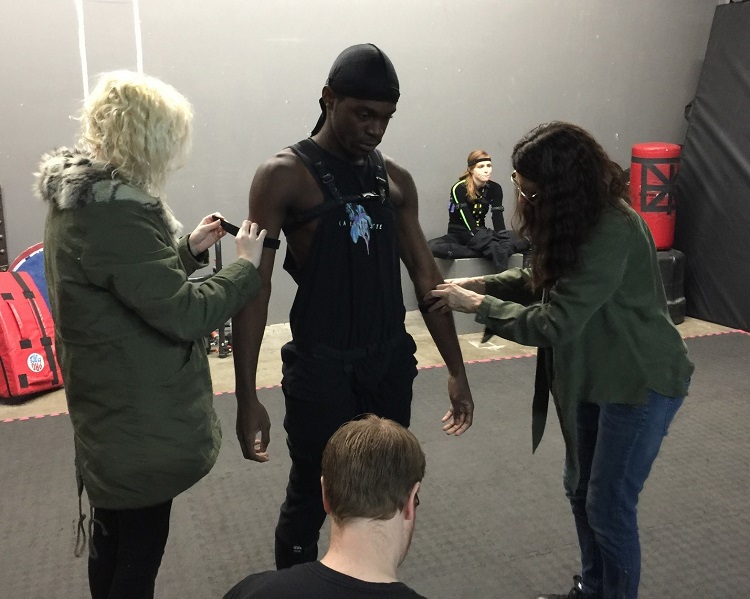
Figure 3. Ari Karczag, his assistant, and Audri Phillips suiting up dancer, Mathew Gibbs, in the Perception Neuron PRO motion capture harness on the Noitom Motion Capture Stage at Fonco Studios in Los Angeles. It usually takes between 5 and 10 minutes to get suited up.
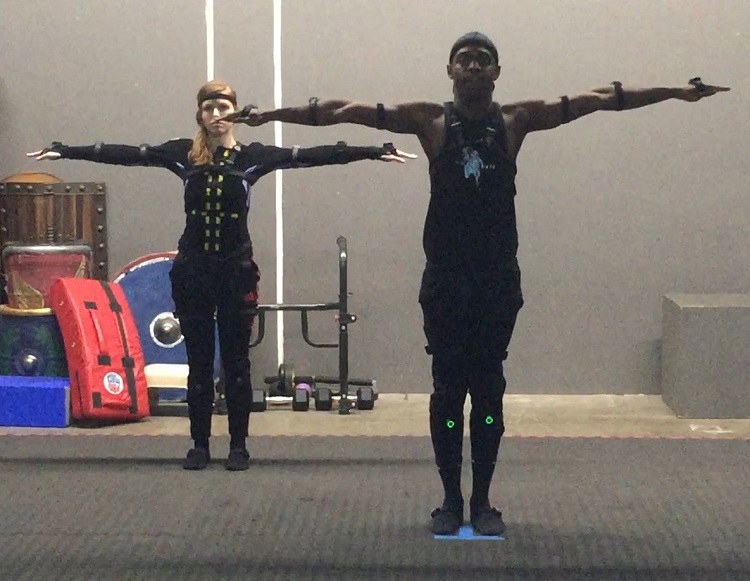
Figure 4. Once the Subjects are suited up in the Perception Neuron PRO motion capture harnesses with sensors, three calibration poses are taken to register the system with the sensors. Dancers Renee Kester and Mathew Gibbs are in the T Pose. Photo credit: Tim Hicks.
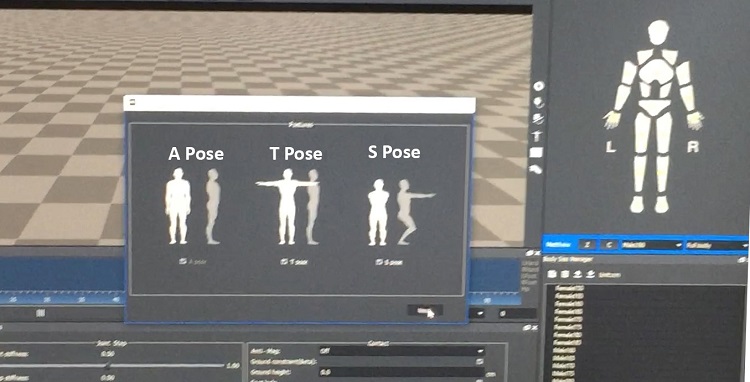
Figure 5. The Noitom’s Perception Neuron PRO software showing the three calibration poses: the A pose, T pose, and S pose. Once the subjects are wearing the harness, they complete the three poses to calibrate and register the system before beginning the motion capture. Calibration is a reasonably quick process.
Overall orientation of the body is determined by the three calibration poses. The first one with the arms out straight to the sides is called the T pose and is the same pose that CG characters generally start in. The poses for the two dancers are taken from the center XYZ mark on the floor which is lined up and registered with the software XYZ center point. It is also registered on the software where they are standing relative to each other. Dancer height is necessary for the software, and for best results, the same height measurements should apply to the CG mesh characters the motion capture will merge with later. Inertial sensors worn by the subject transmit data wirelessly through radio waves to a small base station hub that connects to a computer via a USB port.
The system is susceptible to magnetic interference of a magnetic field intensity greater than 70 (usually not a problem as the magnetic field intensity for most areas is under 25). No part of the suit or performer should be in contact with a magnetic field of 70 or higher, and of course, the performer should not be carrying their smartphone. There are free apps you can install on your smartphone that will measure magnetic fields where you are standing.
When using Wi-Fi while capturing the motion, a live stream can be sent directly into Unreal Engine*, Maya or Autodesk MotionBuilder and merged with a rigged CG character and output onto a monitor. Imagine a dance performance where the live performers on stage are wearing the sensors and their motion is being merged onto their CG representatives/avatars on a large screen. As well as being used live, the captured motion can also be used anywhere that a (.fbx) or (.bvh) file can be imported into, including many 3D packages and game engines. For example, it can be used to create renders from Maya, put into a game in Unity* or Unreal Engine, or to render sequences from Unity or Unreal Engine.
Different Types of Motion Capture Systems
In addition to the Perception Neuron PRO system the demos in this article use, there are a variety of different motion capture systems available with their strengths and weaknesses. The one you use should be evaluated based on your budget, ease of use, size of the area your performers need to perform in, and the type and complexity of the job you are doing. The two main methods that motion capture systems use can fall under either a marker or markerless category.
Marker Motion Capture Systems
Subjects to be tracked put on the markers, otherwise known as sensors, for marker motion capture systems. Sometimes whole suits are worn, other times just straps containing the sensors are fastened around the body at the joints, head, waist, hands, and there is even a special mask for facial motion capture.
Passive Optical Systems
Most of the marker systems use a passive optical system. The markers are coated with retro reflective material, and the cameras emit an infrared light that reflects off of the markers. The light that is reflected is picked up by the surrounding cameras which are adjusted to only sample the bright reflective markers. The cameras are capturing the positions of the sensors. If the sight lines of the cameras are blocked from seeing the sensors by objects or performers, obscuring other performers or their body parts, valuable sensor location information can be lost. This occlusion can cause the loss of valuable data. Generally, the motion capture is shot with the subject or subjects surrounded by a circle of cameras; the more cameras, the greater the accuracy.
The cameras can also get confused as to which marker is which, causing increased data cleanup in post-production. It is expensive to scale to large tracking areas as more cameras are needed. On a positive note, the passive optical systems have proven to be excellent at providing precise, reliable data and capturing very complex and swift movements. These typically are expensive high-end systems; a few of the companies that use this passive optical system are Ariel and Vicon*.
Active Optical Systems
Active optical marker systems use colored LED lights as the sensors. The lights don't reflect light back to the cameras rather they are powered to emit their own light. Wires generally connect LED markers to a motion capture suit, and the subject wears a battery pack or charger. It’s possible to triangulate positions by illuminating one or more LEDs using software to identify them by their relative positions. Similar to celestial navigation – usually, 2 to 4 cameras will be set up around the subject and used to calculate measurements either from the video or directly from the live stream. The small marker LED lights are located automatically on the camera image captured during the recording. This system is not good for large tracking areas but does have very accurate tracking in the millimeter range. Since the LED lights blink at different rates, the lights are not mixed up.
Electromagnetic Tracking Systems
Also considered a marker system, electromagnetic tracking systems, are often used in virtual reality (VR), augmented reality (AR), and robotics. One such company is Polhemus which use alternating current (AC) technology. A source acts as a transmitter which emits an electromagnetic dipole field. The small, lightweight sensor is placed on the object or embedded in the object to be tracked. The source and sensor can be completely embedded and still function. Position and orientation can be measured, using the x, y, z coordinates of space or also called yaw, pitch, and roll. One of the drawbacks to this type of system is that it is generally susceptible to magnetic fields. Anything that can generate a magnetic field can interfere in the signals sent to the sensors. No cameras or lights are needed, and no gyros, accelerometers or magnetometers are involved.
Inertial Systems
The Perception Neuron PRO, explained above, also fits into the marker category. Noitom has also partnered with FaceRig* for real-time facial animation software.
Xsens* is another company that uses inertial motion capture technology for full body and facial performance capture.
Markerless Motion Capture Systems
Video-Based Systems
Not requiring subjects to wear sensors, markerless motion capture systems come in a variety of forms. Some, like Simi Motion*, are video-based systems that use silhouettes to create the motion capture. They capture movement based on silhouettes. The subject is captured using approximately eight cameras positioned around the person in a circle. The background must be stable and provide a good contrast to the actor for best extraction of the silhouettes from the background. Silhouettes are then extracted and fit to a virtual 3D model. Optimal fitting of the silhouettes with 3D models is critical to allow extraction of 3D joint positions and joint angles.
Depth Camera Systems
One company has a system which takes advantage of several Kinect* cameras in combination with their body segment detection algorithms to create motion capture. Depth cameras do not rely on physical body markers as they are using the Kinect pattern of near-infrared light to perceive depth.
Exporting Motion Capture from Perception Neuron PRO Software
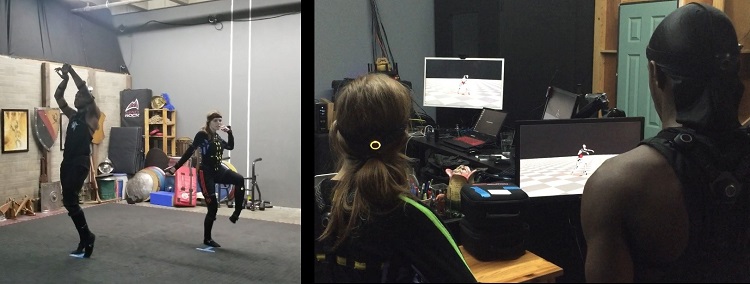
Figure 6. On the left, Perception Neuron PRO motion capture of two dancers wearing the sensors, performing the Robot Pas de Deux at the Fonco Studios in Los Angeles. Each dancer must be captured on a separate computer with the Perception Neuron software on it. On the right, the dancers review playback of their dance, each on the computer that captured their performance.
Make sure that the sensors and straps are firmly in place on the performers. The ability to play back the motion capture that was just taken gives you the opportunity to view the motion and decide if another take is necessary. While the dancers dance together, they are each being captured separately on different computers. Later they can be imported individually into Maya or Unreal Engine and combined into one scene. A good technique to sync up the motion with words or sound is to have the performers clap at the start of the audio. Filming the performance as a reference to refer back to is also advisable.
After the motion is captured, export it from the Perception Neuron Pro software to use in other programs. In this case, it is exported as a .fbx or .bvh file and imported into MotionBuilder*. BVH process files work best for making sure the T pose comes in oriented correctly. Sometimes the motion capture is not perfect in that there can be unwanted intersections of body parts or a jerkiness of motion. This is usually the result of a sensor slipping on the target person, crawling without having indicated to the software that knees or elbows would be touching the floor or high-speed acrobatics such as backflips being performed. MotionBuilder is a good place to reanimate the motion to correct any problems. Fortunately, the motion captured from the Perception Neuron PRO system used in this project required very little cleanup. In MotionBuilder the same motion capture file can be merged with different CG rigged mesh characters. Noitom, like most other motion capture systems, can export the data in different formats that are compatible with Unity, Unreal Engine, 3ds Max*, Maya, and MotionBuilder.
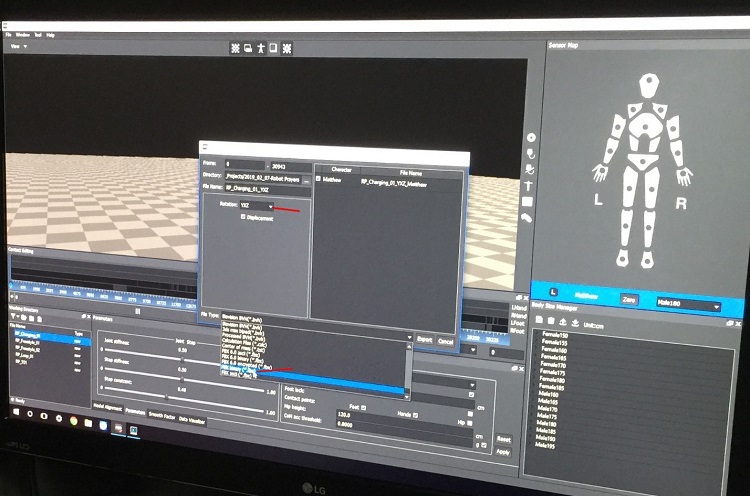
Figure 7. The Noitom software allows the captured motion files to be exported in different formats.
The Pipeline: Using the Capture Files in Autodesk MotionBuilder
There are a number of basic steps in MotionBuilder to merge or target the motion from a motion capture file to a rigged mesh CG character. From the Perception Neuron PRO software, you are given a choice of several formats to export to such as, .fbx or .bvh files.
The process you’ll use is first to characterize the motion capture file, save it out, and then characterize the CG rigged mesh character you want the motion capture to target. Then merge the motion capture file with the CG rigged mesh character. This merges the animation to your CG rigged mesh character. The full process is in the steps below.
MotionBuilder offers many animation tools, allowing the CG rigged mesh character with the motion animation applied to it to be changed and reanimated. Using the layers feature in MotionBuilder can greatly help with any cleanup. There are many ways to modify how the motion capture is fitting onto and controlling the CG rigged mesh as well.
The motion captured for our project was very accurate, so all of the takes were able to be used in Robot Pas De Deux. The biggest problem encountered was when the imported .fbx files saved out from the Perception Neuron PRO software into MotionBuilder did not have the motion capture file hips facing the positive Z direction. These had to be changed and keyframed at the start of the animation or the -10 frame before the characterization could begin. This did not happen when the imported files were imported out as .bvh files. The figures were conveniently and automatically put into a T pose with the hips facing in the proper direction. However, many people start their animation at the -ten frame in the T pose so that the movement begins on frame one.
Steps to Import and Apply Motion Capture to a Rigged CG Mesh Character
1. Import the motion file into MotionBuilder. Make sure the hips are facing in the positive Z direction. If not rotate them and keyframe them on either the -ten frame or frame one. Notice how the motion data skeleton is laid out. Later you will see how it correlates with the rigging in the character mesh that you will be merging.
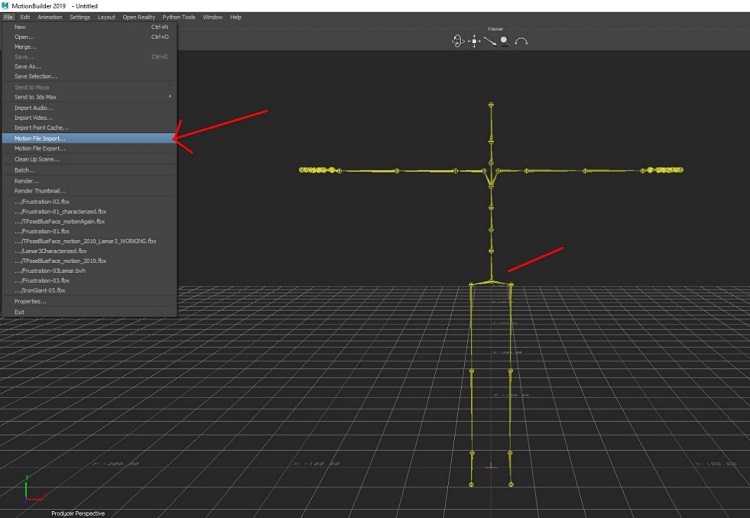
Figure 8. Import the motion capture file using the menu shown on the left. Once imported ensure the hips are facing in the positive Z direction.
2. Define the skeleton. Select each bone and assign it to the corresponding bone in the human figure.
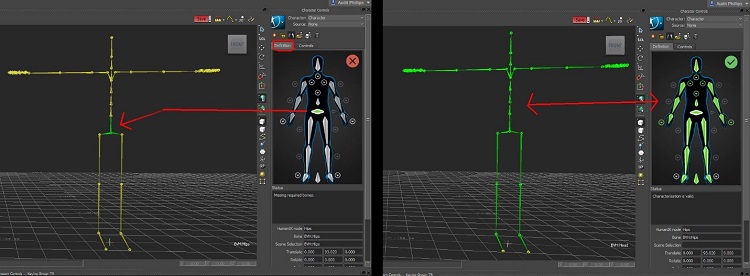
Figure 9. When complete, the human diagram (known as the HumanIK* in Maya) is green, and there is a check mark by the diagram.
3. To finish characterizing your figure, select the Controls tab over the human figure diagram on the right. Pick the biped option and then the FK/IK option when their windows pop up. Rename the character in the navigator window so that in the next step when you merge the file with your rigged GC mesh they will have different names. Now save the character out.
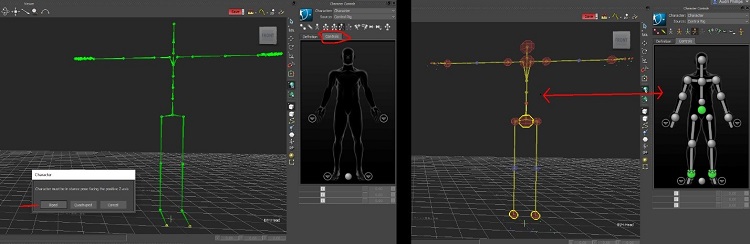
Figure 10. The left picture shows the motion capture is fully characterized. Picking the joints in the human figure diagram will also select the corresponding joint in the motion file figure.
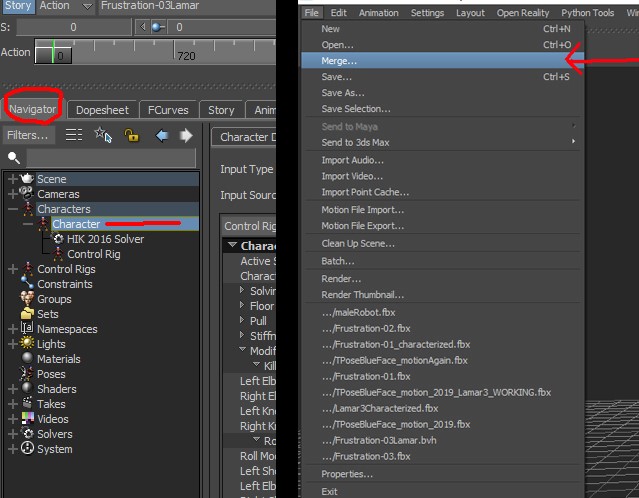
Figure 11. The Navigator window pictured on the left is where you will rename the character before saving it out. Pictured on the right is the dropdown under the file tab you will use in step 5 to Merge your character.
4. Create a new scene and open the rigged CG mesh character that is the motion capture target. You must characterize it in the same manner as the skeletal motion capture you just saved out, including renaming the character.
5. Select Merge in the drop down under file to bring in the now characterized skeletal motion capture file you last saved out. Now you will have the movement from your motion capture file on your rigged CG mesh.
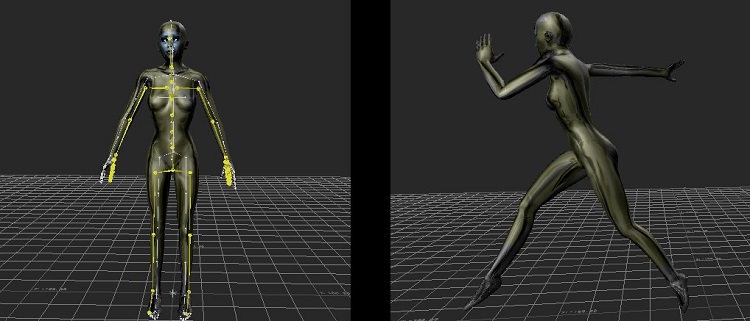
Figure 12. In MotionBuilder, a rigged CG mesh model merged with a motion capture animation on the left, on the right the same model now merged with the motion capture animation leaping with the skeleton hidden.
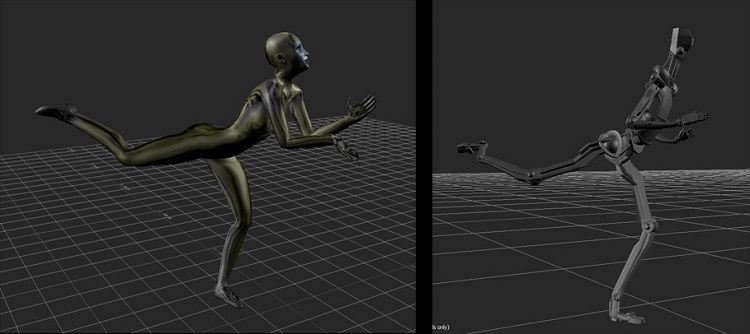
Figure 13. The same motion file animation can be applied to different CG rigged mesh models.
Rigging a CG mesh character to target for a capture file in for example MotionBuilder is the same as rigging a character for any 3D software. All you need is a continuous forward kinematic (FK) skeleton hierarchy skinned to a mesh, no inverse kinematics (IK) handles or animation controls are required. The standard character rigging used in Maya or 3ds Max works well. Also note that while it is not shown in this article, it is possible to do a quadruped character.
Note It is also possible to stream the motion capture while you are capturing it in real time onto a rigged mesh figure in MotionBuilder.
Taking Motion Capture into Maya
Import the saved out animated characters from MotionBuilder into any Maya scene. Color and light the figures as you would like and make sure they visually match the scene they have been imported into. You can render out of Maya and then export the files to other packages. Many people have started using the Substance Designer plugin to create their materials as this assures the materials created can go into other packages exactly as they are. If not, there some rebuilding of the materials may need to be done in Unreal Engine or TouchDesigner*, for example.
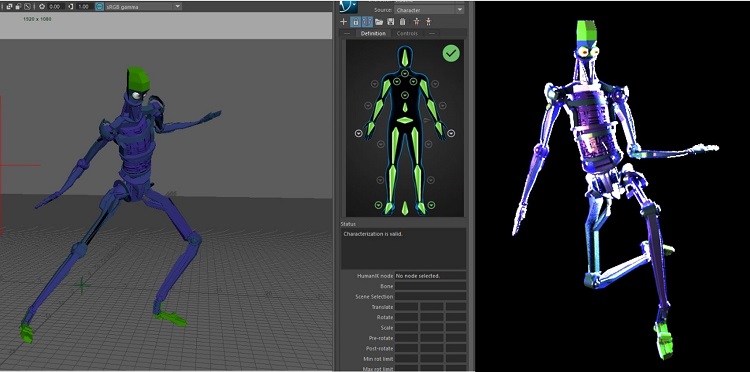
Figure 14. Once the figures have been imported into Maya, you have access to the same HumanIK (controls and skeleton definitions) that were created for them in MotionBuilder making it easy to change their animation in Maya.
It is possible to get many motion-capture mesh-rigged animated figures into a Maya scene using .fbx files. For example, motion capture was taken of the two people dancing the Robot Pas de Deux with the Perceptron Neuron PRO system on separate machines. The motion capture animation files were imported and run separately through MotionBuilder, and then merged with the rigged CG models. Put the two figures together in Maya by first opening up one of them as a scene and then importing the other one in as a .fbx file.
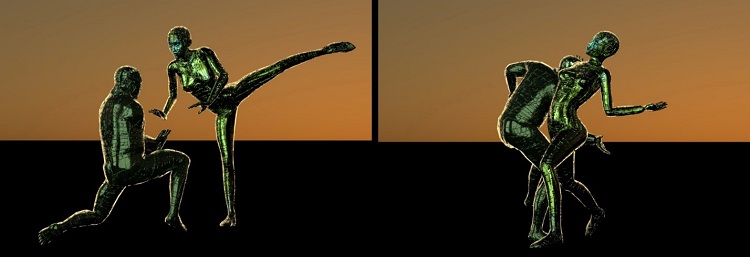
Figure 15. Frames from MotionBuilder capture applied to CG characters and rendered in Maya.
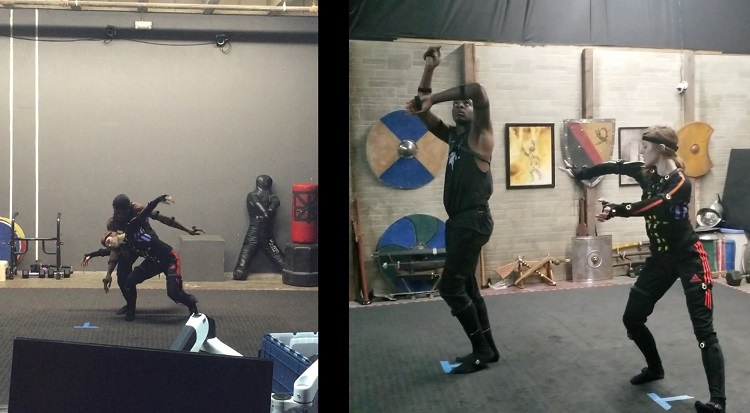
Figure 16. Frames from the dance captured in the motion capture shoot and used on CG characters rendered in Maya.
Importing a Motion Capture Character from Maya into TouchDesigner
While this may change shortly, it is not currently possible live stream the motion capture into TouchDesigner from the Noitom system or any other motion capture system. However, the rigged animated .fbx files of the characters can be taken into TouchDesigner, and all of the parameters can be accessed and used real-time in a performance. The first step is to export the rigged characters with the motion capture animation from Maya, as an .fbx file, saving them out to a location of your choice. Select the character and in the Maya export preset box use the FBX exporter from 2016-2017 (this is the FBX exporter version TouchDesigner has implemented for this year). Make sure the animation box is checked in the exporter, all the other defaults set in the exporter can remain.
Next import the .fbx file into TouchDesigner; it will come in as a Geometry COMP node.
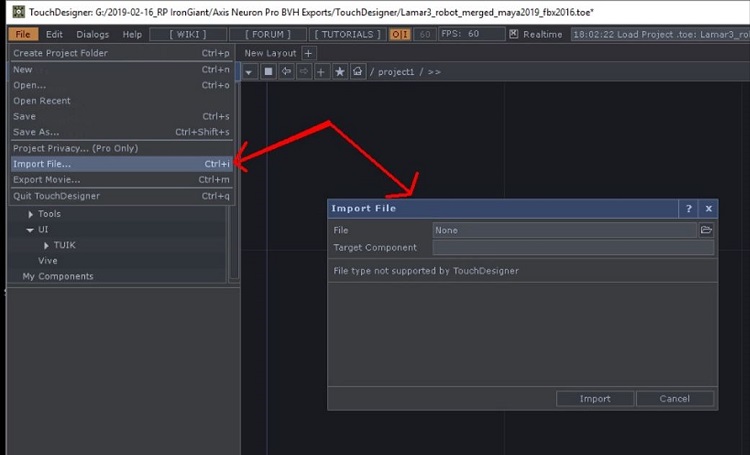
Figure 17. The TouchDesigner import dropdown and pop up window in which you choose the .fbx file to import.
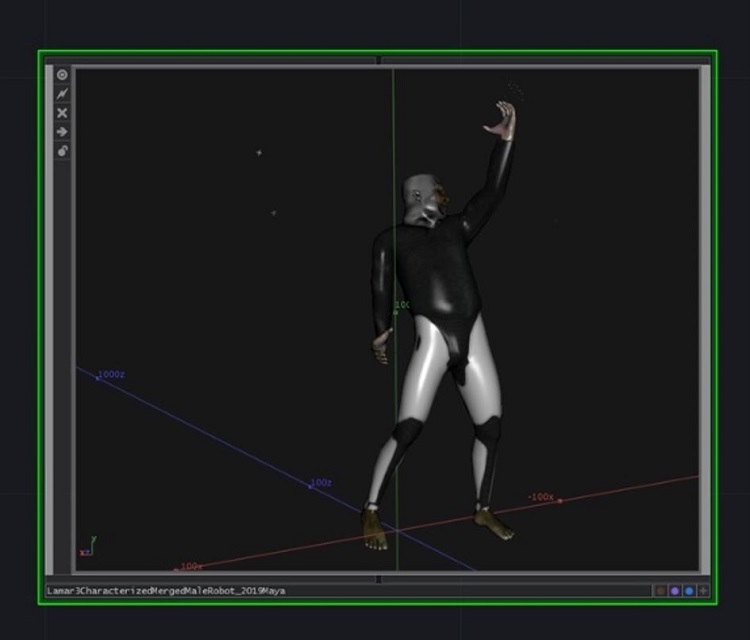
Figure 18. The Geometry COMP with the animated figure you have imported in.
Once in TouchDesigner you now have the option of using any of the possibilities available on your character in real time.
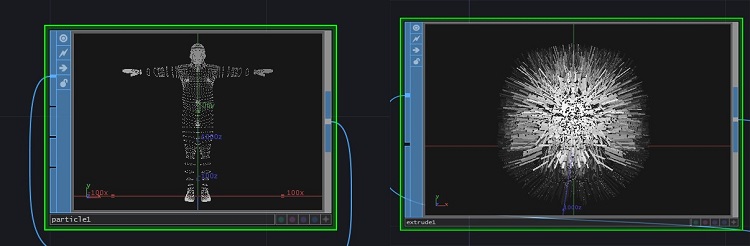
Figure 19. Two simple real-time effects done on the imported animated character. On the left, turning the character into particles and on the right, using the Extrude SOP.
Importing Motion Capture Characters into Unreal Engine from Maya
In your Maya scene select your character and all the joints in the outliner. Then under file choose the Export selection. Pick FBX export in the window that pops up. Open the presets window.
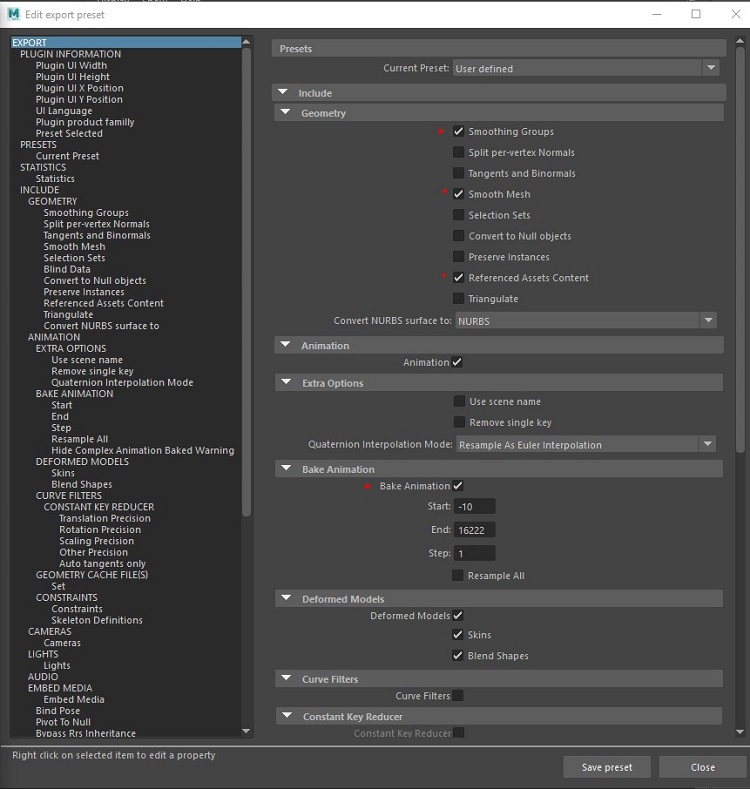
Figure 20. In the presets, in addition to making sure the defaults are selected, also select the following: smoothing groups, smooth mesh, bake animation, and embed media. Then export the selection to your chosen location.
In your Unreal Engine project go to the content editor and pick the folder you would like to use for your animated character. I recommend creating its own folder or going into the geo folder. Click on the Import button. In the import box that pops up make sure Skeletal Mesh, Import Mesh, and Animation are checked. Have Animation on the Animation Length Exported Time. Make sure materials and textures are on. You want your character to only use its own skeleton and not any other skeleton that is already in Unreal Engine so make sure the drop-down next to skeleton is on none. You can do this by clearing it out.
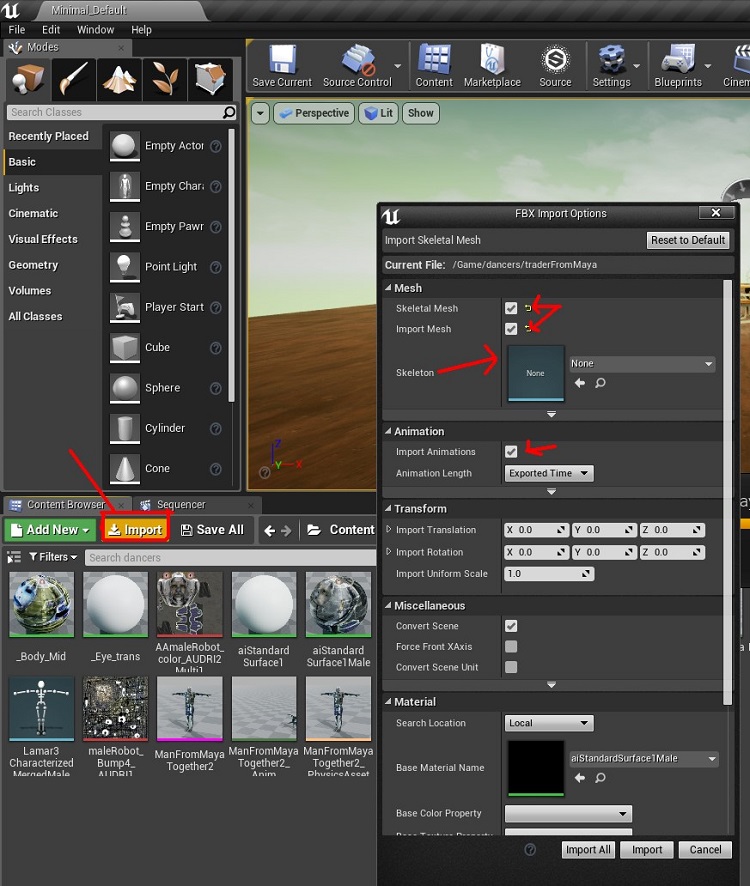
Figure 21. In the content browser folder of your choice click on the import tab. Put your settings in the FBX Import options window that pops up.

Figure 22. Sample motion capture animated CG figures imported into Unreal Engine. For those familiar with Unreal Engine, the chair and table were imported into the standard Unreal environment with just a few changes.
Conclusion
Motion Capture systems will be increasingly used in the entertainment industry. Three seconds of complex character animation could take a computer animator almost a day to do well. This makes the nuanced real-life quality animation achievable on motion capture systems very appealing. It is to be noted that although it is swiftly changing the most popular motion capture systems used by the entertainment industry for high-end jobs are passive optical systems.
Inertial systems are increasing in use because of their convenience, large tracking field, and accuracy. Generally, a passive optical system with a broad array of cameras is supposed to be better for movements such as people tumbling, crawling, doing fast acrobatics, and backflips. Ari Karczag, who represents Noitom as their West Coast Operations Manager and Motion Capture Supervisor, cautions that the Noitom system might not get the best results from crawling on the floor and acrobatic moves. However, I found that the system was excellent for catching a complex fast-moving dance performance with accuracy. Surprisingly little cleanup was needed for the animation. Ultimately I am pleased with the system. One of the best advantages of motion capture is that you can use the 3D animation on many different platforms and types of projects.
I will be using the motion capture I got in a number of ways on the Robot Prayers project; for VR and AR as well as for at the next live immersive performance at the Vortex Immersion fulldome in downtown Los Angeles. Something I want to try out in the future is streaming the motion capture of a real-time performance onto a fulldome. I hope to have the live dancers in the Noitom Perception Neuron PRO suits and simultaneously project their movement onto CG characters dancing in real-time with them onto the dome.
Special thanks to everyone on the Robot Prayers team who helped out at the motion capture shoot, Maija Beeton, Tim Hicks, and Edward Fury. A special thanks to Ari Karczag who trained us all on the Noitom system and ran the motion capture shoot. Ari graduated from USC's Film School and now represents Noitom International as their West Coast Operations Manager and Motion Capture Supervisor. I can not leave out a thank you as well to the 3 very talented dancers on the Robot Prayers team, Renee Kester, William Gibbs and Edward Fury. Also thanks to Tao B. Wang of Intel for both his input and allowing me the time necessary to do the article.
About the Author
Audri Phillips is a Los Angeles-based visual designer/art director, 3D animator, content creator, and immersive media specialist. Her experience includes over 25 years in the visual effects and entertainment industry, at studios such as Sony*, Rhythm & Hues*, Digital Domain*, Disney*, and DreamWorks* Animation.
An interest in science has always played a part in Audri’s work. She uses cutting-edge technology in her computer animation, art, and immersive media performances.
Audri is a member of the Intel® Software Innovator program, writes articles for Intel® Developer Zone, is a member of Autodesk* Developers Network, is a resident artist at Vortex Immersion Media, and is a consultant and researcher for the start-up patent technology company Stratus Systems. She is also the creator, co-founder, and director of an immersive transmedia project exploring AI and our identities in a world where man and machine are melding, Robot Prayers.
Audri has a BFA from Carnegie Mellon University and has been an adjunct professor at universities in Los Angeles. She taught a fulldome masterclass in Shanghai, China, and spoke at and had her work shown at the Toronto Virtual Reality Conference (VRTO).
A selection of her works is available on Vimeo* and creativeVJ.