Introduction
In the Sierra Nevada mountain range, Bodie is a mining town founded during the California Gold Rush. It thrived in the late 1800s and endured into the early twentieth century, but was abandoned when the ore ran out. California State Parks now maintains what they call a state of “arrested decay.”
Project objectives
This code sample demonstrates how VR can be used to reach audiences other than gamers. Bodie, California is both a tourist application and an educational resource.
The trip to Bodie
My colleague – Steve Schroedl at Third Rock Studio – and I worked with California State Parks and the California Film Commission to obtain permits for photography and video. We also paid for access to a park guide.
Our first day was spent shooting photographs. We placed the camera at a location, took a 360-degree still image, then moved on to the next spot. Days two and three were spent with the guide. She gave us a list of places – both inside and outside buildings – where we could shoot 360-degree video while she spoke in front of the camera.
Not all the media captured on this trip is used in the initial version of the Bodie application as the sheer volume of hard drive space that would be required is prohibitive. Another factor is the nature of this initial version, which is a developer-focused release and code sample.
Project Resources
Virtual reality hardware
- Oculus Rift*
- HTC Vive*
Equipment
- 360 camera: Insta360* Pro camera, featuring six individual lenses, each of which captures 6K resolution with a 200-degree field of view (FOV). This camera is capable of lens isolation, which is beneficial because it equalizes the exposures of the six lenses.
Image software
- Photo editing: Photoshop* CS6 software
- Video editing: Final Cut Pro* X software
- 360 editing: Insta360* Pro Stitcher software, to stitch photographs and video into 360 scenes.
Building the VR Application
How to display 360-degree video and photosphere images
This Unity* software document shows how to set up a scene for displaying 360-degree media. I designed the Bodie application around concepts in the document. Both the video and stills used the same principles as explained in the document authored by Unity.
Software tools
- Unity version 2018.2.5f1
- SteamVR* Unity Plugin v1.2.3. The SteamVR Unity plugin had all the essential functionality I needed. It handled both the HTC Vive and Oculus Rift controller input, so I didn’t need to download Oculus software developer kit (SDK) or other third-party software.
- Microsoft Visual Studio* 2018
Unity* project layout and structure
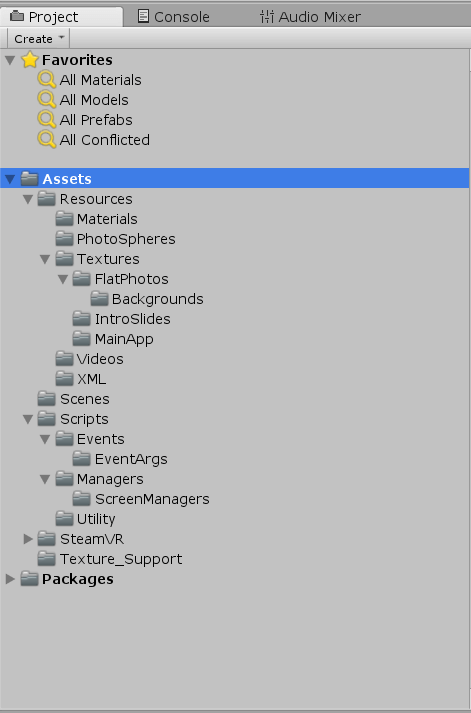
Figure 1. Unity project assets.
Resources
The app stores images and video in the Resources folder. This in turn uses the Unity Resources class to extract media for display. The XML folder does not contain media, but XML data that is used to identify files to be loaded at runtime.
Scenes
The sole scene for the application is named “Bodie California.”
Scripts
The main Scripts folders contain the following:
- Events and Event Args: These contain scripts that handle controller input, clicks and supporting event args needed to identify user interaction with the VR controllers and on-screen buttons.
- Managers and ScreenManagers: This structure has at its root the ManagerMainApp.CS class. This is the main application controller and manager. The word “manager” rather than “controller” ensures there is no confusion between a software class that controls other software classes and a VR hand controller. The ManagerMainApp class binds everything. It knows how to display intro screens and the main home screen, and loads the immersive photospheres and videos.
The ScreenManagers folder contains classes that control and manipulate the project’s CanvasScreens, and load proper image types. CanvasScreens are Unity Canvas objects with some extra functionality built around them. I appended the word “Screens” to the name to give them a little more meaning in this context.Screens in this context have a 2D image applied to them and the user will view them as though they were looking at a screen in a movie theater. So to speak.
- Utility: This contains “other” or “utility” type classes that load images, load XML data, and control the laser pointer.
Texture_Support
This contains the main Bodie360Texture used by the skybox material for displaying 360-degree video.
SteamVR* Unity plugin
This is the SteamVR Unity plugin, downloaded from the Unity* Asset Store.
Unity project hierarchy
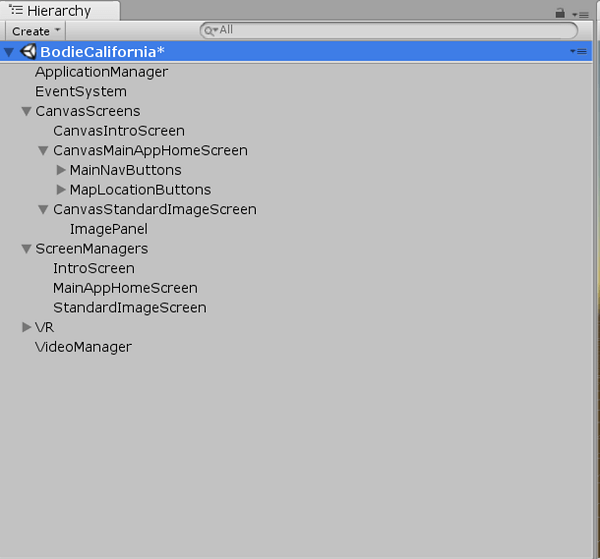
Figure 2. Unity project hierarchy.
ApplicationManager
ApplicationManager is an empty game object that holds a reference to the ManagerMainApp.cs class, responsible for launching the intro screen, flat image screen, and home screen.
CanvasScreens
The root CanvasScreens is an empty game object that is used as a container for other screens. All canvas objects in this group contain a Unity Canvas Group object that works with the FadeManager.cs class to fade in and out the canvas screens.
- CanvasIntroScreen: This displays splash screens and fades images in and out. It uses an image object to display the images that appear when the application loads.
- CanvasMainAppHomeScreen: The home screen allows users to navigate the VR experience. It uses an image to display the main Bodie town map. Two sets of buttons are available from this screen:
- MainNavButtons: The Start Tour button places the user in an immersive, 360-degree video tour, with navigation from video to video. The Image Tour button displays the CanvasFlatPicturesScreen, allowing the user to view 2D images of Bodie.
In the inspector, both buttons are wired to the OnLaserButtonClick function in the ManagerMainApp.cs class.
- MapLocationButtons: These represent locations on the map that, when clicked, put the user into immersive 360-degree mode. Each button can be configured to display either a 360-degree video or a 360-degree photosphere image. This is accomplished by adding the MapButtonClickArgs script to each button. MapButtonClickArgs has two arguments set in the inspector: the filename and the media type. Each button is linked to the OnMapItemClick function in the ManagerMainApp.cs class.
- MainNavButtons: The Start Tour button places the user in an immersive, 360-degree video tour, with navigation from video to video. The Image Tour button displays the CanvasFlatPicturesScreen, allowing the user to view 2D images of Bodie.
- CanvasStandardImageScreen: This displays 2D images of Bodie. To navigate these images, the user clicks the HTV Vive touch pad, left or right, or the Oculus Rift joystick, left or right.
ScreenManagers
The root ScreenManagers is an empty game object used for organization. It contains three child game objects, with instances of the C# screen manager classes attached.
- IntroScreen: This game object is the screen controller for the CanvasIntroScreen.
- MainAppHomeScreen: This game object contains a reference to the CanvasManAppHomeScreen. Its functionality is limited because most of the application’s core functionality is based on the ApplicationManager game object.
- StandardImageScreen: This controls the CanvasStandardImageScreen.
VR
This game object contains support for the VR system and interactions.
- Player: This is a SteamVR prefab, which resides in Assets/SteamVR/InteractionSystem/Core/Prefabs. Steam provides its own documentation for this prefab, so no additional detail is provided here.
- LaserPointerSystem: This was added to the SteamVR Player prefab “Hand2” game object. It contains a VRC_LaserPointer.cs script, which draws a laser that hovers over buttons.
- PlayerHandControllerEvents: This empty game object is a container for the Player prefab’s “Hand” events. Only the right-hand “Hand2” has been wired up.
- RightHand: Maintains two scripts and works with VR controller events; in this case, the right hand on the SteamVR player prefab.
- VRC_EventPublisher.cs: Listens for events from the VR controller and publishes those events back out to any client class that wants to listen to those events. It uses the right-hand “Hand2” on the SteamVR player prefab to listen for button presses.
- VRC_EventListener.cs: Listens to events from the VRC_EventPublisher by maintaining an instance of the VRC_EventPublisher class; the same instance attached to the RightHand game object. It also has an instance of the VRC_LaserPointer. This was created and attached to Hand2 on the Player prefab, as defined in the LaserPointerSystem game object.
The Main App Manager variable is the same class instance instance that’s defined in the ApplicationManager empty game object in the project Hierarchy. This is used so functions on the MainAppManger.cs class can be called when events occur.
VideoManager
The VideoManager game object maintains the video aspect. This includes how the 360-degree videos are displayed and traversed.
- VideoManager: This script loads individual videos to be played on the skybox. It maintains a reference to the Unity video player game object. This game object is consumed and used by the MainAppManager.cs class, as defined in the ApplicationManager game object.
- VideoPlayer: This is the standard Unity video player, used to display the 360-degree videos. The concepts in this Unity document were used to set up the playing of the videos.
Microsoft Visual Studio* 2018
Figure 3. Microsoft Visual Studio* 2018 source code folders.
The Microsoft Visual Studio* 2018 solution groups classes by functionality. Below are brief descriptions of the code. For deeper explanations, refer to the heavily commented code, which includes a thorough explanation of each class.
Assets/resources/XML
These represent files associated with aspects of the application. PhotoSphereList.xml contains the names of the photosphere files for display. VideoList contains the names of the videos for display.
When looking at these XML files, note that the filenames do not have an extension associated with them. This is because using Unity’s Recourses.Load() functionality requires that no filename extensions be supplied.
The XML files provide flexibility. Of the many photosphere images in the resources, you may wish to work with only a few. This allows you to know—at both runtime and design time—which to isolate and work with. Another benefit is that knowing what files you want lets you load one at a time rather than all of them at once.
Assets/Scripts/Events
- VRC_EventListener.cs: “VRC” stands for “Virtual Reality Controller”. This listens to events published by the VRC_EventPublisher.cs class. Everything that this class does could be done in the ManagerMainApp.cs class. However, creating a separate class—to listen to events that can call functions on other classes—helps prevent the ManangerMainApp.cs class becoming too convoluted. It also allows more flexibility. And isolating this functionality in a separate class means it can be reused.
- VRC_EventPublisher.cs: This class is loosely modeled after SteamVR_TrackedController.cs. It listens for button input from the HTC Vive or Oculus Rift controller, then launches an event back to a client class. Everything happens in the update function. The class constantly listens for input on the controller. When a button is pressed, the script sends out the corresponding event.
Further functionality was created for the touch pad, to indicate the direction clicked. The directions are up, down, left, and right. Left and right navigate previous and next. The GetTouchPadDirection(…) function includes details that explain how this is calculated.
Assets/Scripts/Events/EventArgs
- MapButtonClickArgs.cs: Contains information about which map button was clicked. The main home screen contains an illustrated map of Bodie. This map has markers that represent individual 360-degree photosphere images or 360-degree videos (see figure 4).
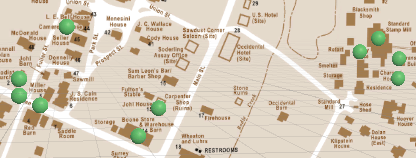
Figure 4. Map of Bodie on the home screen.
Each of these markers represents a user interface (UI) button. MapButtonClickArgs is added to each button, allowing the application to know which photosphere or video to load at runtime. This information is passed back to the ManagerMainApp class in the ApplicationManager game object. The data is then used to determine what to load and display.
- VRC_EventPublisherEventArgs.cs: This class is used when a user interacts with the VR controller and presses a button. The VRC_EventPublisher.cs class creates an instance, populates the variables, and launches the event, sending it as an argument.
- VRC_LaserPointerEventArgs.cs: This class is used with the laser pointer. It is populated in VRC_LaserPointer.cs and sent as an argument. It is deployed when the user clicks on “Start Video Tour” or “Flat Image Gallery.”
Assets/Scripts/Managers
ManagerMainApp.cs: This is the main controlling class. It pulls together the screen managers, skybox changer, and video manager. The class monitors the state of the application and contains functions that are called by the event classes.
When the application starts, this class puts the app state into UNKNOWN by default. This prevents any 360-type functionality executing. It runs the intro splash screens and displays the main home screen.
For fade transitions between the canvas screens (excluding the intro screen), the SteamVR_Fade.Start() function is heavily used in the co-routines.
APP_STATES illustrates what is happening in the application at any given moment. Monitoring the app state makes it possible to create smarter functions that operate in different states. For example, the “MoveNext” and “MovePrevious” functions—used by the event system—can navigate between 360-degree videos or photographs. This concept can be extended to support moving between next and previous photosphere images.
Assets/Scripts/Managers/ScreenManagers
The manager area of the code was initially designed to contain functionality to fade the canvas screens in and out.
NOTE: In the initial design, I included functionality in ScreenManagerBase.cs, allowing each screen manager that inherited from the base class to fade in and out.
However, after design and coding were complete, I discovered the SteamVR Unity plugin can fade the VR camera. This eliminates the need to manually fade each canvas screen. Rather than redesign the application, I left the functionality in place, to be revisited.
Currently, the only canvas screen manager that manages its own fading is the IntroScreen. This provides a nice transition between the intro splash images.
Once I changed the fading from each screen controller to using the SteamVR object methodology, I realized I could have removed the screen manager classes altogether, because almost all the control happens in the ManagerMainApp.cs.
Due to time constraints, I left these classes in place but would like to re-architect the overall class structure of the application.
- ScreenManagerBase.cs: Base class for all screen manager classes. It contains the core functionality of fading a canvas group in and out.
- ScreenManagerFlatImageScreen.cs: Controls the canvas that displays 2D images. NextImage() and PreviousImage() functions make a call to the utility SpriteList.cs class to display static 2D images.
- ScreenManagerIntroScreen.cs: Uses the base classes’ ability to fade in and out a canvas. A makeshift timer swaps images, creating an intro splash screen effect. The class has the ability to loop through the images. This feature isn’t used, but is available for a redesign.
- ScreenManagerMainApp.cs: Manager for the home screen. Most of what was going to be in this class is present in the ManagerMainApp.cs class. The class is very basic, without additional functionality inherited from the base class.
Assets/Scripts/Utility
- Comments.cs: Supports the creation of comments in the inspector. If you attach this to a game object in the inspector, comments typed in the comments field are serialized out. Currently this isn’t used in the application, but is available for anyone interested in this type of functionality.
- FadeMananger.cs: Used to control the alpha channel on a CanvasGroup object. It can fade a canvas from alpha 1 to alpha 0 (black). The class sends out events indicating when the canvas becomes visible or invisible.
- SkyboxChanger.cs: Changes the skybox at runtime. There are three skybox materials:
- 360Video: Used when displaying a 360-degree video.
- 360PhotoSphere: Used when displaying a 360-degree photosphere image.
- BlackScreen: Used for fading in and out between canvas screens.
- SpriteList.cs: Loads sprites from the resources folder. It can traverse the list forward and backward, extracting a sprite from the list at the current index. It is used by the intro screen and the 2D image screen that displays pictures from Bodie.
- VideoManager.cs: Provides a wrapper around the Unity video player. It is responsible for reading the XML file containing the list of videos. The class supports playing a single video or cycling through a list, as defined in the XML file.
- VRC_LaserPointer.cs: Creates the laser pointer. It uses layers to recognize hit targets, and knows how to hover over buttons. It includes a ClickButton() function, which is called from the VRC_EventListener.cs class.
- XMLListLoader.cs: Reads content in XML files. It is used by the VideoManager.cs class. It is given an XML filename and a repeating tag to load into an XmlNodeList. It has a variety of uses, but currently is used only to load a list of video files to play at runtime.
Assets/SteamVR
This is the SteamVR Unity plugin source code. No modifications to this code have been done.
Putting it all together
controller buttons
This application is compatible with Oculus Rift and HTC Vive. Only one controller for each—for right-hand control—has been enabled.
HTC Vive* controller
On the HTC Vive controller, four buttons are used (see figure 5).
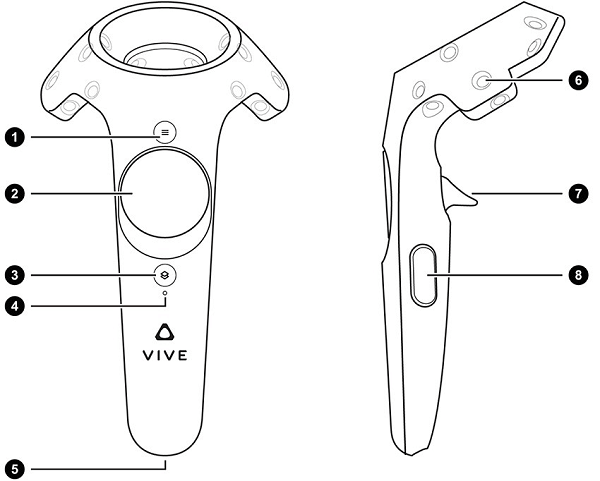
Figure 5. HTC Vive controller buttons. Source: Unity Documentation for OpenVR Controllers
- Button 1 Menu: Displays the main home screen when a user is in 360-degree video mode, 360-degree photosphere mode, or 2D image gallery mode.
- Button 2 Trackpad: Navigates previous and next when the application is showing 360-degree video tours or the 2D image gallery.
- Button 7 Trigger: Clicks buttons.
- Button 8 Grip: Toggles the laser on and off.
Oculus Rift* controller
Four buttons are also used on the Oculus Rift controller:
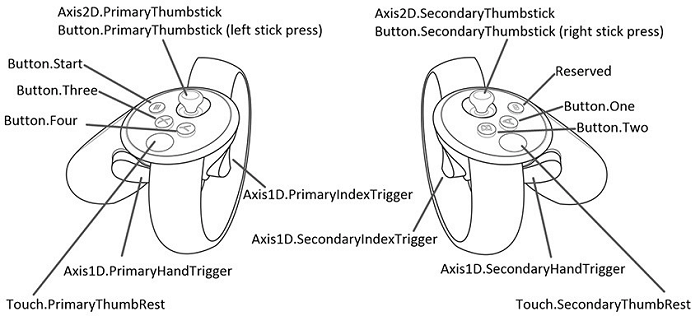
Figure 6. Oculus controller buttons. Source: Unity Documentation for OpenVR Controllers
- Axis1D.SecondaryIndexTrigger: Clicks on buttons.
- Axis1D.SecondaryHandTrigger: Toggles the laser on and off.
- Button.One (A): Displays the main home screen when a user is in 360-degree video mode, in 360-degree photosphere mode, or in the 2D image gallery mode.
- Axis2D.SecondaryThumbstick: Navigates previous and next when the application shows a 360-degree video tour or the 2D image gallery. Unlike the HTC Vive controller, this is a two-step process. The user moves the stick fully to the left or right, then presses down on the thumb stick.
Layer masks and tags
All buttons that must interact with the laser have been assigned the tag HIT_TARGET and assigned to the layer HIT_LAYER_MASK.
Application execution
Excluding any normal object initialization by Unity and the SteamVR SDK, the first thing that executes is the ManagerMainApp’s Start() function. This is in the ApplicationManager game object in the hierarchy.
In the Start() method, a few things are set up, then it is instructed to run the opening intro screen sequence. The opening intro screen sequence is nothing more than the CanvasIntroScreen game object displaying two different images one after another with a nice transitional fade affect. After the images are displayed, the CanvasIntroScreen is hidden and the CanvasManAppHomeScreen displayed.
At this point the application becomes idle, awaiting input from the VR controller. When the VRC_EventPublisher detects an event (button press), notification is dispatched and the VRC_EventSubscriber takes action, calling back into the ManagerManApp.cs class for the proper function.
Controller events
All events start in the VRC_EventPublisher class. In the hierarchy, this class is attached to the “RightHand” game object, to which SteamVR’s “Player” prefab is assigned. The script listens to the hand (see figure 7).
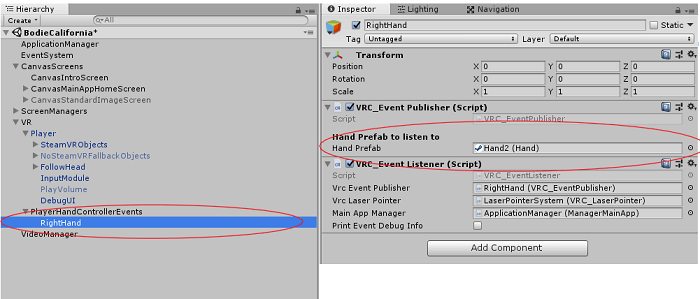
Figure 7. VRC_EventPublisher components.
Toggling the laser on and off
When the grip button (vive) Axis1D.SecondaryHandTrigger(oculus) is squeezed, the GripButtonClicked event is triggered in the VRC_EventPublisher class. The VRC_EventListener class calls the corresponding event handler, OnGripClicked. This sets the ShowLaser property of the VRC_LaserPointer class. The laser is turned on and off by this simple toggle.
Clicking main menu buttons
The Oculus Rift “A” button and the HTC Vive “Menu” button return users to the home screen.
Pressing these buttons notifies the VRC_EventListener, which calls the MainAppManager’s ReturnToHomeScreen function. This is an event handler for other functionality in the application, and is reused in this case. ReturnToHomeScreen determines which state the app is in, stops any video that might be playing, and starts the co-routine to show the main screen.
Start video tour
VRC_EventListener’s OnTriggerPressed calls the VRC_LaserPointer ClickButton() function. ClickButton() ensures the pointer is hovering over a button, then invokes the button’s onClick method (see figure 8).
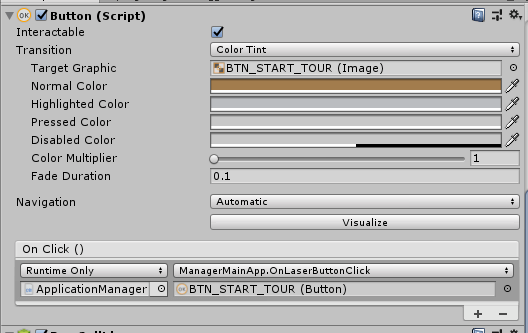
Figure 8. Starting the tour.
This button is linked to ManangerMainApp.OnLaserButtonClick. OnLaserButtonClick determines which button was clicked and calls the proper co-routine; in this case, “StartVideoTour.”
StartVideoTour changes the app state, sets up the VideoManager object, fades the VR camera, changes the skybox so it can display 360-degree video, and plays the video.
From this point, the user can use the pads on the controllers to navigate previous and next, or click the Oculus Rift A button/HTC Vive Menu button to return to the home screen.
2D image gallery
The 2D image gallery button is connected the same as Start Video Tour: everything operates the same up to the ManagerMainApp.OnLaserButtonClick. From this point, the “StartFlatImageGallery” co-routine is called. This sets the application state and fades out the VR camera. GoToFullBlack changes the skybox. The CanvasStandardImageScreen is activated and the SteamVR camera is faded back in.
At this point, the user can use the same pad buttons to navigate previous and next, and to return to the home screen.
Clicking map buttons
The map buttons are defined in the hierarchy (see figure 9). Each of these buttons is represented by a green ball on the Bodie home screen map.
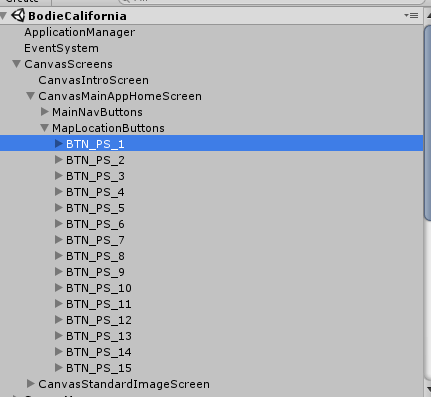
Figure 9. Map buttons in the hierarchy.
These correspond to the green ball button indicators on the map screen (see figure 10).
Figure 10. Button indicators on the map screen.
Figure 11 shows the controls for the definition of the map button image:
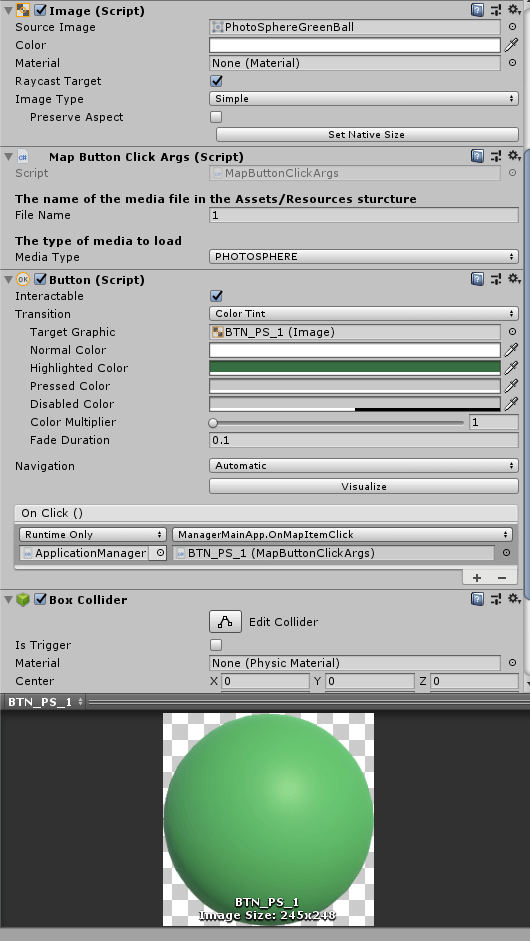
Figure 11. Map button image.
As shown in the previous figure, the buttons are assigned a green sphere image. MapButtonClickArgs is added to each button, allowing the application to know which button was clicked and what to display.
The buttons are linked to the ManagerMainApp.OnMapItemClick function. OnMapItemClick determines what type of media to load—a photosphere or video—and calls the appropriate co-routine. If a button has been configured to play a video, the PlaySingleVideo co-routine is called. This behaves differently to the video tour: it is designed to play a single video only.
PlaySingleVideo changes the application to the single video state, fades to full black, sets up the video play, starts the video, and fades back to visible. When the video has played, it automatically returns the user to the home screen. This is accomplished by assigning the video player’s loopPointReached event to the “SingleVideoDone” function.
LoadPhotoSphere sets the app state, fades the VR camera, changes the skybox to the photosphere material, and fades the VR camera back in. The user manually returns to the home screen by pressing A on the Oculus Rift or Menu on the HTC Vive.
Changing the skybox
The skybox is controlled by the SkyboxChanger.cs script. Three materials are used to control what is displayed at any given time:
- _material360Video is used when a 360-degree video is displayed. This Unity3D document explains how it is set up.
- _material360Photosphere shows 360-degree static images in the skybox, using the Cubemap shader. At runtime, the ChangeTo360PhotoSphere is called, sending the name of the texture to display. The texture is retrieved from the Resources folder and put on the material. The material is then assigned to the skybox.
- _materialBlackScreen is used when the skybox needs to be black (displaying no images). This would be the case when the home screen, intro, and image gallery screens are visible.
Stitching 360: Comparative Analysis
The Insta360 camera’s six lenses produce 6K resolution each, but their total resolution is 8K. We reduced this to 4K to save disk space. For instance, one video—1:02 minutes in length—at the native output created a file size, post-stitch, of 1.97 GB. Stepped down to 4K, the same video was 496 MB. Adding 8264 compression reduced the final size to 107.6 MB.
Despite these drastic steps, the videos remain great quality for today’s VR headsets.
We had the opportunity to compare two processors while creating twenty-nine 360-degree videos:
- Intel® Xeon® E5 processor, 3.5 GHz, Six-Core, 12MB L3 Cache: Producing one minute of 360-degree video took 22 minutes of stitching.
- Intel® Core™ i9-7980XE processor, 2.66GHz, 18-Core: Producing one minute of 360-degree video took five minutes of stitching.
This suggests that the Intel® Core™ i9 processor is more than four times faster at stitching videos than the Intel Xeon E5 processor.
In Closing
I am not a Unity 3D expert, but have used it for other projects. Bodie, California taught me a lot along the way – although there are aspects of its architecture that I’d like to change. I plan to rework the application to provide a more immersive home screen, as well as enabling navigation from location to location within the immersive environment without having to return to the home screen.
I hope this article is educational and provides insight into how to create 360-degree VR experiences in Unity.
About the Author
Rick Blacker is a developer evangelist based in the United States. He helps people understand how to incorporate Intel® RealSense™ technology into Windows*-based applications and Unity games.