Intel® Data Center Diagnostic Tool for Intel® Xeon® Processors
Content Type: Maintenance & Performance | Article ID: 000058107 | Last Reviewed: 07/02/2026
The Intel® Data Center Diagnostic Tool is a tool to verify the health of CPU cores.
The current version is 685 and was released on July 1, 2026.
A top focus of hyperscale cloud providers and enterprise data centers has always been to provide the best possible uptime and reliability. Historically, the industry has done quite well, routinely achieving >99.999% uptime. However, modern computing infrastructure brings ever-increasing user expectations for Quality of Service (QoS) and high availability. These expectations emphasize the need for powerful software tools that can help identify and minimize unexpected system faults that might compromise QoS or uptime.
At Intel, we build and employ advanced component level testing and validation tools that significantly reduce defects in our products that might result in system errors. Our hyperscale customers and their suppliers use these same Intel-developed software tools to maintain fleet health throughout the life of their systems. They recognize that over time, close monitoring of system assets can improve overall fleet resiliency and customer QoS.
Intel recognizes many different customers can benefit from the same capabilities, and the Intel® Data Center Diagnostic Tool is a streamlined version of this software for managing on-premise environments.
The Intel® Data Center Diagnostic Tool (Intel® DCDiag) is designed for IT managers to conduct periodic maintenance of their data center fleets. Intel® DCDiag can be used on any size of data center to help ensure the highest level of ongoing quality and availability. In addition, DCDiag can be used for periodic fleet screening in the foreground (~45-minute runtime) or in background mode and can identify faulty microprocessors. Running periodic system maintenance helps proactively identify potential issues and gives system administrators the ability to replace those microprocessors.
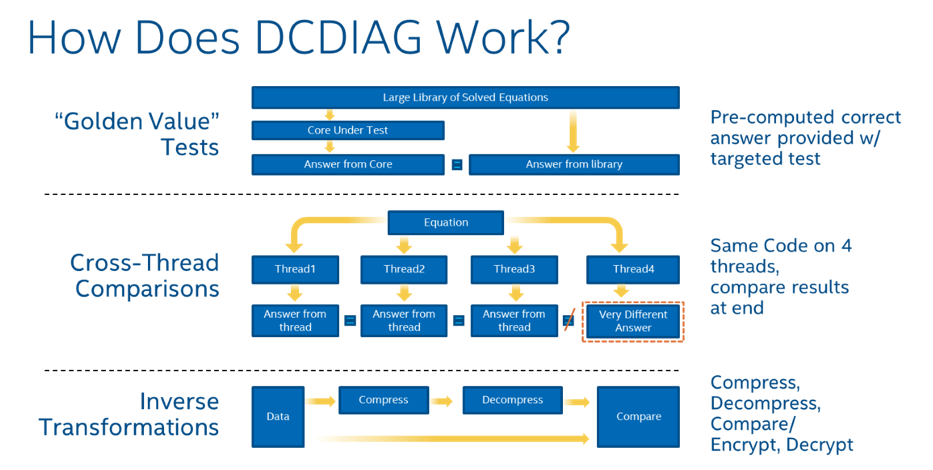
Intel® DCDiag is a suite of tests that methodically checks most of the SoC functionality, including that of each individual microprocessor core. By verifying that every DCDiag computation is correct, and not just confirming that the test completed execution properly, DCDiag is able to detect many types of faults, including those that manifest as Silent Data Errors.
Intel® DCDiag finds failures by checking for correct results of processor operations with multiple tests.
Random data sets are used to test instructions and cores. The report out is an easy-to-understand pass/fail on a processor. Processors that fail the test should be returned to the system vendor or distributor for replacement.
DCDiag test results are designed to be easy to understand. When the diagnostic completes, the system returns one of the following messages:
Check the system's processor model and version. This message appears if the Intel Data Center Diagnostic Tool does not detect a production version of the supported processors. Engineering samples are not supported by this tool.
Find help in identifying the processor.
The latest version of the microcode addresses known issues. Intel recommends updating to the latest version.
If test results show a fail, check if your server node's processors are still under warranty.
If you have a Boxed Intel® Xeon® Processor still under a 3-year warranty, contact Intel Customer Support for assistance.
If you have a tray processor, contact your system or processor vendor or place of purchase for assistance.
The Intel® Data Center Diagnostic Tool is an application available for both Linux* and Windows* operating systems. The tool can be installed and run on many current Linux* and Windows* distributions, see Installation on Linux* and Windows*.
Starting with version 558 the tool can be installed on Windows* using the provided MSI installer and run on any version of Windows® 10, Windows* Server 2016, or later currently supported by Microsoft. Please consult Windows* Server release information to determine which versions of Windows* Server systems are currently available and supported.
For best coverage, run the application in the root system of a server. It is possible to run it inside a container or virtual machine but be aware that some functionality may be disabled.
In addition, Intel has introduced a new Reliability, Availability, and Serviceability (RAS) capability called Intel® In-Field Scan. This is a family of tools designed to help system administrators quickly and easily find processors that have failed over time. For more information on Intel In-Field Scan, go to this link.
Intel® In-Field Scan and Intel® DCDiag are complementary test tools. Intel® In-Field Scan is minimally intrusive and designed to quickly test one core, while all the other cores in the node continue to run customer workloads. Intel® DCDiag is a comprehensive processor test suite and is most effective when the entire processing node is dedicated to testing. Because the tools run different test content, Intel has found that each tool identifies different failures across the processors tested.
| Note | For developers: Intel started the Open Data Center Diagnostic Project, which opens Intel’s Data Center Diagnostic framework and provides select tests. This offers developers a consistent test development framework that invites the creativity of the Open-Source community to enhance cloud fleet management through the development of unique test screens and other innovative solutions. For more information, check this framework and tests. |
| Date | Version | Description |
| July 07, 2021 | 540 | Initial version |
| Aug 16, 2022 | 549 | Bug fix |
| Sept 20, 2022 | 549 | Command changed to enable the tool and verify the enabling |
| Jan 10, 2023 | 550 | Include 4th gen Intel® Xeon® Processors |
| Jan 20, 2023 | 576 | Version 576 Release |
| Dec 14, 2023 | 594 | Version 594 Release |
| March 22, 2024 | 603 | Version 603 Release |
| April 22, 2024 | 605 | Version 605 Release |
| June 21, 2024 | 612 | Version 612 Release |
| July 22, 2024 | 613 | Version 613 Hotfix Release |
| September 20, 2024 | 621 | Version 621 Release |
| December 12, 2024 | 630 | Version 630 Release |
| March 26, 2025 | 639 | Version 639 Release |
| June 27, 2025 | 648 | Version 648 Release |
| September 23, 2025 | 657 | Version 657 Release |
| December 16, 2025 | 666 | Version 666 Release |
| March 17, 2026 | 675 | Version 675 Release |
| July 1, 2026 | 685 | Version 685 Release |