Download PDF [PDF 660 KB]
Introduction
This tutorial describes how to set up a demonstration or test cluster for Open vSwitch (OvS) and Data Plane Development Kit (DPDK) to run together on OpenStack, using DevStack as the deployment tool and the Neutron ML2/GRE Tunnel plugin.
While the learnings presented here could be used to inform a production deployment with all of these pieces in play, actual production deployments are beyond the scope of this document.
The primary source for most of the details presented here are the documents provided in the following git repository:
https://github.com/openstack/networking-ovs-dpdk
The doc/source/getstarted/devstack/ directory at the root of this repository contains instructions for installing DevStack + OvS + DPDK on multiple operating systems. This tutorial uses the Ubuntu* instructions provided there and expands upon them to present an end-to-end deployment guide for that operating system. Many of the lessons learned in the creation of this document can be applied to the CentOS* and Fedora* instructions also provided in the repository.
Anyone using this tutorial should, at least, understand how to install and configure Linux*, especially for multi-homed networking across multiple network interfaces.
Knowledge of Open vSwitch and OpenStack is not necessarily required, but would be exceedingly helpful.
Requirements
Hardware
- Two physical machines, one to act as a controller and one as a compute node.
- Systems must support VT-d and VT-x, and both capabilities should be enabled in the system BIOS.
- Both machines should be equipped with DPDK-supported network interfaces. A list of the supported equipment can be found at https://github.com/openstack/networking-ovs-dpdk.
- In the examples shown here, an Intel® X710 (i40e) quad-port NIC was used.
- Both machines must have at least two active physical network connections: one to act as the 'public' (or 'API') network and one to act as the 'private' (or 'data') network.
- This latter network should share the same broadcast domain/subnet between the two hosts.
- See below for an example setup.
- IMPORTANT: If you have a two-socket (or more) system, you should ensure that your involved network interfaces either span all NUMA nodes within the system, or are installed in a PCIe slot that services NUMA Node 0.
- You can check this with the command from the package. On Ubuntu, you can install it with the following command:
sudo apt-get install -y hwloc - lstopo will output a hierarchical view. Your network interface devices will be displayed underneath the NUMA Node that’s attached to the slot they are using.
- If you have the NICs installed entirely on a NUMA Node other than 0, you will encounter a bug that will prevent correct OvS setup. You may wish to move your NIC device to a different PCIe slot.
- You can check this with the command from the package. On Ubuntu, you can install it with the following command:
Operating System
- For this tutorial, we will use Ubuntu 16.04LTS Server. The installation .ISO file for this OS can be downloaded from https://www.ubuntu.com/download/server.
- Steps should be taken to ensure that both systems are synchronized to an external time service. Various utilities are available for this function in Ubuntu 16.04, such as chrony.
- At least one non-root user (with administrative sudo privileges) should be created at installation time. This user will be used to download and run DevStack.
Networking
- At least two active network connections are required.
- Both hosts must be able to reach the Internet either via one of the two connections on-board, or via some other device. If one of the two interfaces is your default interface for connecting to the Internet, then that interface should be your 'API network.'
- The addressing for the two NICs on each host must be static. DevStack will not cope with using DHCP-assigned addresses for either interface.
- In the examples, the initial configuration of the machines before running DevStack is shown in figure 1 below.
- Note that in this particular configuration a third, unshown NIC on each machine functions as the default interface that DevStack uses to reach the Internet.
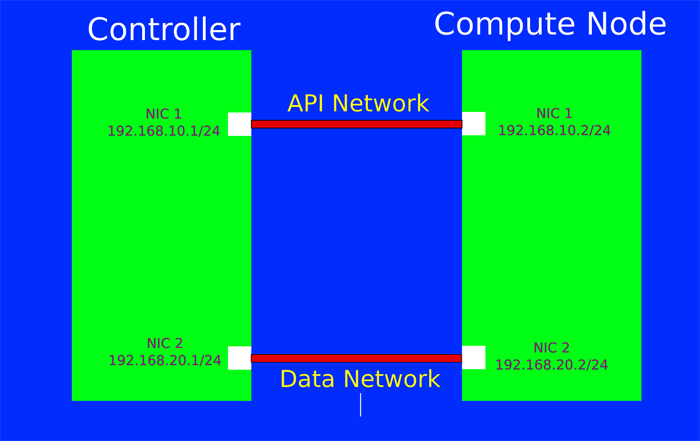
Figure 1. Initial machine configuration before DevStack is installed.
Preparation
Once your systems are set up with appropriate BIOS configuration, operating systems, and network configurations, you can begin preparing each node for the DevStack installation. Perform these actions on BOTH nodes.
User Setup
- Login as your non-root user, we'll assume here that it is called 'stack.'
- The command sudo visudo will allow you to edit the /etc/sudoers file. You will want to set up the non-root user to be able to sudo without entering a password. The easiest way to do that is to add a line like this to the bottom of the file, then save it:
stack ALL=(ALL) NOPASSWD: ALL - Test your configuration by logging completely out of the machine and back in, then try sudo echo Hello. You should not be prompted for a password.
A Word About Network Proxies
- You may skip this section if your Internet access does not require going through a proxy service.
- If you do work behind a proxy, please note that your OS and the DevStack installation will need to be configured appropriately for this. For the most part, this is a typical setup that you are likely accustomed to; for example, you likely configured the apt subsystem when you installed the Ubuntu OS in the first place.
- Of special note here is that git needs to be configured with a wrapper command.
- Install the socat package:
sudo apt-get install -y socat - Create a text file in your non-root user's homedir called
git-proxy-wrapper. - Here is an example of what should go into this file. Replace PROXY and PROXY PORT NUMBER with your appropriate values for your SOCKS4 proxy (not HTTP or HTTPS).
#!/bin/sh
 _proxy=<PROXY>
 _proxyport=<PROXY PORT NUMBER>
 exec socat STDIO SOCKS4:$_proxy:$1:$2,socksport=$_proxyport
- Install the socat package:
- You may need more detail if your proxy service requires authentication or another protocol.
See the documentation for more information. - Set this file executable
(chmod +x git-proxy-wrapper)and set the envariableGIT_PROXY_COMMAND=/home/stack/git-proxy-wrapper(if the non-root user is 'stack'). You should add this export to your~/.bashrcto ensure it is available at all times (like other proxy variables).
Install DevStack
- You will need the package to clone the DevStack repository:
sudo apt-get install -y git - To download DevStack, as your non-root user and in its home directory:
git clone https://github.com/openstack-dev/devstack.git - You should now have the contents of the DevStack distribution in ~/devstack.
Configure and Run DevStack
The systems are now prepared for DevStack installation.
Controller Installation
In its default state, DevStack will make assumptions about the OpenStack services to install, and their configuration. We will create a local.conf file to change those assumptions, where pertinent, to ensure use of DPDK and OvS.
If you wish to clone the networking-ovs-dpdk repository (which is the first link in this article, in the Introduction) and use the sample files included in the repository, you will find them at doc/source/_downloads/local.conf.*. However, this guide will present pared-down versions of these that are ready-made for this installation.
- Log in to your controller host as your non-root user.
cd devstack - Edit a file called 'local.conf' and copy in the text in the following block:
[[local|localrc]] #HOST_IP_IFACE=<device name of NIC for public/API network, e.g. 'eth0'> #Example: #HOST_IP_IFACE=eth0 HOST_IP_IFACE= #HOST_IP=<static IPv4 address of public/API network NIC, e.g. '192.168.10.1'> #Example: #HOST_IP=192.168.10.1 HOST_IP= HOST_NAME=$(hostname) MYSQL_PASSWORD=password DATABASE_PASSWORD=password RABBIT_PASSWORD=password ADMIN_PASSWORD=password SERVICE_PASSWORD=password HORIZON_PASSWORD=password SERVICE_TOKEN=tokentoken enable_plugin networking-ovs-dpdk https://github.com/openstack/networking-ovs-dpdk master OVS_DPDK_MODE=controller_ovs_dpdk disable_service n-net disable_service n-cpu enable_service neutron enable_service q-svc enable_service q-agt enable_service q-dhcp enable_service q-l3 enable_service q-meta DEST=/opt/stack SCREEN_LOGDIR=$DEST/logs/screen LOGFILE=${SCREEN_LOGDIR}/xstack.sh.log LOGDAYS=1 Q_ML2_TENANT_NETWORK_TYPE=gre ENABLE_TENANT_VLANS=False ENABLE_TENANT_TUNNELS=True #OVS_TUNNEL_CIDR_MAPPING=br-<device name of NIC for private network, e.g. 'eth1'>:<CIDR of private NIC, e.g. 192.168.20.1/24> #Example: #OVS_TUNNEL_CIDR_MAPPING=br-eth1:192.168.20.1/24 OVS_TUNNEL_CIDR_MAPPING= Q_ML2_PLUGIN_GRE_TYPE_OPTIONS=(tunnel_id_ranges=400:500) OVS_NUM_HUGEPAGES=3072 OVS_DATAPATH_TYPE=netdev OVS_LOG_DIR=/opt/stack/logs #OVS_BRIDGE_MAPPINGS="default:br-<device name of NIC for private network, e.g. 'eth1'>" #Example: #OVS_BRIDGE_MAPPINGS="default:br-eth1" OVS_BRIDGE_MAPPINGS= MULTI_HOST=1 [[post-config|$NOVA_CONF]] [DEFAULT] firewall_driver=nova.virt.firewall.NoopFirewallDriver novncproxy_host=0.0.0.0 novncproxy_port=6080 scheduler_default_filters=RamFilter,ComputeFilter,AvailabilityZoneFilter,ComputeCapabilitiesFilter,ImagePropertiesFilter,PciPassthroughFilter,NUMATopologyFilter - Wherever you see an Example given in the file contents, you will need to fill in a value appropriate to your setup for that particular setting. The contents are dependent on your particular hardware and network setup.
- Save the file.
- You are now ready to run the DevStack .installation. Issue the command
./stack.sh. - Wait for successful completion and the return of your command prompt. It will take quite a while (20 minutes to an hour or more depending on your connection), as DevStack will need to install many software repositories.
- If you encounter errors, the log at
/opt/stack/logs/screen/xstack.sh.logwill likely be the best source of useful debug information. - If you need to restart the installation, unless you are very familiar with DevStack's setup, it is best to wipe and reload the entire OS before proceeding. DevStack sometimes does not recover well from partial installations, unfortunately.
Compute Node Installation
The setup for the compute node is very similar to that of the controller, but the local.conf looks a little different. The same instructions apply here that you used above. Do not attempt compute node installation until your controller has installed successfully.
- Log in to your compute node as the non-root user.
cd devstack - Edit a
local.conffile as above, but use the following text block and values:[[local|localrc]] #HOST_IP_IFACE=<device name of NIC for public/API network, e.g. 'eth0'> #Example: #HOST_IP_IFACE=eth0 HOST_IP_IFACE= #HOST_IP=<static IPv4 address of public/API network NIC, e.g. '192.168.10.2'> #Example: #HOST_IP=192.168.10.1 HOST_IP= HOST_NAME=$(hostname) #SERVICE_HOST=<IP address of public NIC on controller> #Example: #SERVICE_HOST=192.168.10.1 SERVICE_HOST= MYSQL_HOST=$SERVICE_HOST RABBIT_HOST=$SERVICE_HOST GLANCE_HOST=$SERVICE_HOST KEYSTONE_AUTH_HOST=$SERVICE_HOST KEYSTONE_SERVICE_HOST=$SERVICE_HOST MYSQL_PASSWORD=password DATABASE_PASSWORD=password RABBIT_PASSWORD=password ADMIN_PASSWORD=password SERVICE_PASSWORD=password HORIZON_PASSWORD=password SERVICE_TOKEN=tokentoken enable_plugin networking-ovs-dpdk https://github.com/openstack/networking-ovs-dpdk master OVS_DPDK_MODE=compute disable_all_services enable_service n-cpu enable_service q-agt DEST=/opt/stack SCREEN_LOGDIR=$DEST/logs/screen LOGFILE=${SCREEN_LOGDIR}/xstack.sh.log LOGDAYS=1 Q_ML2_TENANT_NETWORK_TYPE=gre ENABLE_TENANT_VLANS=False ENABLE_TENANT_TUNNELS=True #OVS_TUNNEL_CIDR_MAPPING=br-<device name of NIC for private network, e.g. 'eth1'>:<CIDR of private NIC, e.g. 192.168.20.2/24> #Example: #OVS_TUNNEL_CIDR_MAPPING=br-eth1:192.168.20.2/24 OVS_TUNNEL_CIDR_MAPPING= Q_ML2_PLUGIN_GRE_TYPE_OPTIONS=(tunnel_id_ranges=400:500) OVS_NUM_HUGEPAGES=3072 MULTI_HOST=1 [[post-config|$NOVA_CONF]] [DEFAULT] firewall_driver=nova.virt.firewall.NoopFirewallDriver vnc_enabled=True vncserver_listen=0.0.0.0 vncserver_proxyclient_address=$HOST_IP scheduler_default_filters=RamFilter,ComputeFilter,AvailabilityZoneFilter,ComputeCapabilitiesFilter,ImagePropertiesFilter,PciPassthroughFilter,NUMATopologyFilter - Save the file and follow the rest of the instructions as performed above for the controller.
Launch a Test Instance
At this point, you should have a working OpenStack installation. You can reach the Horizon dashboard at the public IP address of the controller node, on port 80. But before launching an instance, we need to make at least one 'flavor' in the Nova service aware of DPDK, and specifically the use of hugepages, so that it can appropriately use the DPDK-enabled private interface.
Enable DPDK in Nova
- Log in to your controller host as the non-root user.
cd devstack - source openrc admin demo - this command will set up your environment to act as the OpenStack 'admin' user in the 'demo' project.
nova flavor-key nova flavor-key m1.small set hw:mem_page_size=large - The preceding command ensures that an instance launched with the m1.small size will use hugepages, thus enabling use of the DPDK device.
Open Ports
We need to make sure that ICMP and TCP traffic can reach any spawned VM.
- Connect to your public API network with HTTP on port 80 through a browser.
- Login with the credentials 'demo' and 'password.'
- Select 'Access & Security' from the left-hand menu.
- Click 'Manage Rules' in the 'default' security group.
- Click 'Add Rule' button.
- Select 'All ICMP' from 'Rule' drop-down menu and then click 'Add' in lower right.
- Repeat the above 2 steps, selecting 'All TCP' this time.
Launch an instance
Now we are ready to launch a test instance.
- Select 'instances' from the left-hand menu.
- Select 'Launch Instance' from the right-side button.
- Give an instance name such as 'test.' Click 'Next' at the lower right.
- Ensure 'Select Boot Source' is set to 'Image.'
- Select 'No' for 'Create New Volume.' It will not work in this tutorial setup because we have not enabled the Cinder service.
- Click the '+' sign next to the Cirros image under 'Available.'
- Click 'Next' in the lower-right corner.
- Click the '+' sign next to the 'm1.small' flavor.
- Select 'Launch Instance.'
Eventually, you should see your instance launch become available. Make note of the private IP address given.
Test Connectivity to Instance
The VM is up and running with a private IP address assigned to it. You can connect to this private IP, but only if you are in the same network namespace as the virtual router that the VM is connected to.
These instructions will show how to enter the virtual namespace and access the VM.
- Log in to the controller host as the non-root user.
sudo ip netns exec `ip netns | grep qrouter` /bin/bash - You should get a root-shell prompt. You can use this to ping the IP address of the VM.
- You can also ssh to the VM. In CirrOS, you can log in with username 'cirros' and password 'cubswin:)'
Summary
This completes a demonstration installation of DPDK with OpenVSwitch and Neutron in DevStack.
From here, you can examine the configurations that were generated by DevStack to learn how to apply those configurations in production instances of OpenStack. You will find the service configurations under the /opt/stack/ directory, and in their respective locations in /etc (e.g. /etc/nova/nova.conf). Of particular note for our purposes are /etc/neutron/neutron.conf, which defines the use of the ML2 plugin by Neutron, and /etc/neutron/plugins/ml2_conf.ini, which specifies how OpenVSwitch is to be configured and used by the Neutron agents.
End Notes
OvS Bridge Information
For reference, here is the sample bridge structure that shows up on a lab system that was used to test this tutorial. This is from the compute node. On this system, ens786f3 is the private/data network interface designation. There are two running VMs; their interfaces can be seen on br-int.
$ sudo ovs-vsctl show
3c8cd45e-9285-45b2-b57f-5c4febd53e3f
    Manager "ptcp:6640:127.0.0.1"
        is_connected: true
    Bridge br-int
        Controller "tcp:127.0.0.1:6633"
            is_connected: true
        fail_mode: secure
        Port "int-br-ens786f3"
            Interface "int-br-ens786f3"
                type: patch
                options: {peer="phy-br-ens786f3"}
        Port patch-tun
            Interface patch-tun
                type: patch
                options: {peer=patch-int}
        Port br-int
            Interface br-int
                type: internal
        Port "vhufb2e2855-70"
            tag: 1
            Interface "vhufb2e2855-70"
                type: dpdkvhostuser
        Port "vhu53d18db8-b5"
            tag: 1
            Interface "vhu53d18db8-b5"
                type: dpdkvhostuser
    Bridge br-tun
        Controller "tcp:127.0.0.1:6633"
            is_connected: true
        fail_mode: secure
        Port "gre-c0a81401"
            Interface "gre-c0a81401"
                type: gre
                options: {df_default="true", in_key=flow, local_ip="192.168.20.2", out_key=flow, remote_ip="192.168.20.1"}
        Port patch-int
            Interface patch-int
                type: patch
                options: {peer=patch-tun}
        Port br-tun
            Interface br-tun
                type: internal
    Bridge "br-ens786f3"
        Controller "tcp:127.0.0.1:6633"
            is_connected: true
        fail_mode: secure
        Port "br-ens786f3"
            Interface "br-ens786f3"
                type: internal
        Port "dpdk0"
            Interface "dpdk0"
                type: dpdk
        Port "phy-br-ens786f3"
            Interface "phy-br-ens786f3"
                type: patch
                options: {peer="int-br-ens786f3"}
Neutron Plugin Information
This tutorial set up the ML2/GRE tunnel plugin to Neutron, since it is the most likely plugin to work without additional setup for a specific network buildout. It is also possible to use the ML2/VXLAN plugin or the ML2/VLAN plugin. Examples for each of these plugins are given in the local.conf files in the networking-ovs-dpdk repository mentioned above.
NUMA Debugging
While it is beyond the scope of this tutorial to dive into multi-socket NUMA arrangements, it is important to understand that CPU pinning and PCIe will interact with DPDK and OvS, and sometimes to simply cause silent failures. Ensure that all of your CPU, memory allocations, and PCIe devices are within the same NUMA Node if you are having connectivity issues.
Additional OvS/DPDK Options of Note
OVS_PMD_CORE_MASK is an option that can be added to local.conf to isolate DPDK's PMD threads to specific CPU cores. The default value of '0x4' means that CPU #3 (and its hyperthread pair, if HT is enabled) will be pinned to the PMD thread. If you are using multiple NUMA nodes in your system, you should work out the bitwise mask to assign one PMD thread/CPU per node. You will see these CPUs spike to 100% utilization once DPDK is enabled as they begin polling.
You can find other interesting and useful OVS DPDK settings and their default values in devstack/settings in the networking-ovs-dpdk repository.
About the Author
Jim Chamings is a Sr. Software Engineer at Intel Corporation, who focuses on enabling cloud technology for Intel’s Developer Relations Division. He’d be happy to hear from you about this article at: jim.chamings@intel.com.