Overview
In this tutorial, learn how to use Anomalib with your custom datasets by following our Jupyter* Notebooks. Additionally, we will walk through an industrial use case featuring the Dobot Magician robot: a robot arm used for educational, industrial, and intelligent use cases. Access to a Dobot is optional; you can complete this tutorial with or without one.
Quality control and assurance are crucial to the reputation and customer experience of any business. For instance, in the manufacturing industry, detecting anomalies on the production line ensures the best quality products and can save time and money from recalls. It can also monitor and analyze sensor data from machinery that could predict or indicate equipment malfunctions. Overall defect detection in edge IoT enables fast localized data analysis, reduces latency, enhances security, and improves operational efficiency.
Typically, supervised learning-based approaches are used. These require sufficient annotated abnormal samples to achieve adequate anomaly detection results. However, there are cases where the industry norm is an unbalanced dataset, lacking representative samples in the anomalous class. One way to address these issues is through unsupervised anomaly detection, which requires little to no annotation.
An example of an unsupervised anomaly detection and localization model is the open source, end-to-end library Anomalib. Used here in combination with the OpenVINO™ toolkit, Intel’s deep learning toolkit, Anomalib provides state-of-the-art anomaly detection algorithms that can be customized to specific use cases and requirements.
Prerequisites
- A USB camera connected to your system
- Your computer with or without an Intel® GPU, an integrated GPU, or a discrete GPU
- A dataset, either from Dobot or borrowed from our Jupyter Notebook
Step 1: Install Anomalib and Jupyter* Notebook
Create a Python* environment to run Anomalib and Dobot .dll files using Python 3.8, and then activate that environment:
For Windows*:
python -m venv anomalib_env
anomalib_env\Scripts\activate
For Ubuntu*:
python3 -m venv anomalib_env
source anomalib_env/bin/activate
Install Anomalib either through PyPI* or a local installation through the source. This also installs the Jupyter Notebook and ipywidgets to add interactive browser controls to the Jupyter Notebook.
To install through PyPI:
pip install anomalib
Complete the full package installation using Anomalib’s subcommand:
anomalib install
To install Anomalib through the source:
git clone https://github.com/openvinotoolkit/anomalib.git
cd anomalib
pip install -e
Connect your USB camera and verify it works. To do this, open a simple camera application and close the application once verified.
Step 2: Install Dobot Magician (Optional)
If you don’t have a Dobot Magician, you can use another notebook to train models with your data. You can try training and inferencing using our 501a notebook for Anomalib or this dataset (automatic download).
Note Throughout this tutorial, you can modify our notebooks to avoid, comment out, or change the robot code for your own needs.
If you have access to Dobot Magician, to set it up, do the following:
- Install the Dobot requirements following Dobot’s documentation.
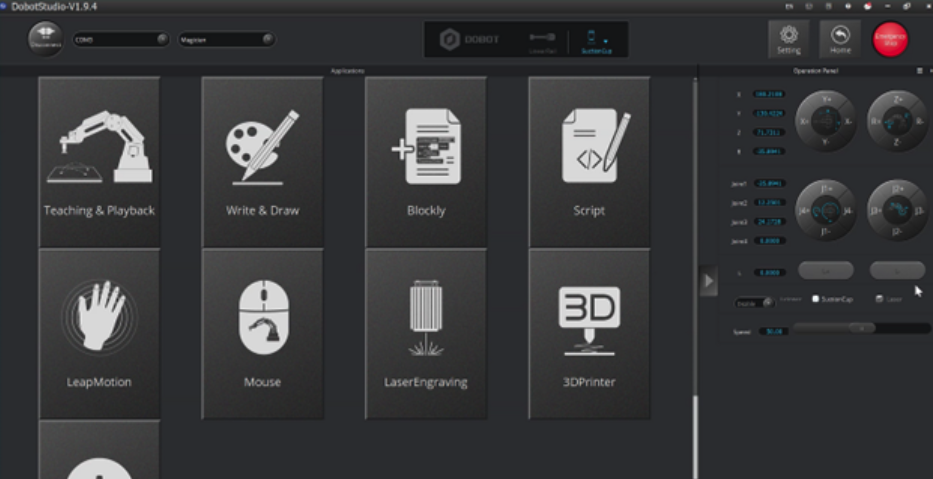
- Check all connections to the Dobot Magician and verify that it works in Dobot Studio.
- Install the vent accessory on the Dobot and verify that it works in Dobot Studio.
- To find the coordinates area, in Dobot Studio, select Home. To calculate coordinates, refer to the Dobot documentation.
- Locate the following:
• Calibration coordinates. This is the initial position in the upper-left corner of the cube array.
• Place coordinates. This is the position where the robot arm leaves the cube over the conveyor belt.
• Anomaly coordinates. This is the position where you want to release the abnormal cube. -
To run the notebooks using the robot, download the Dobot API and drivers files and add those to notebooks/500_uses_cases/dobot.

Step 3: Perform Data Acquisition and Inferencing with Notebook 501b
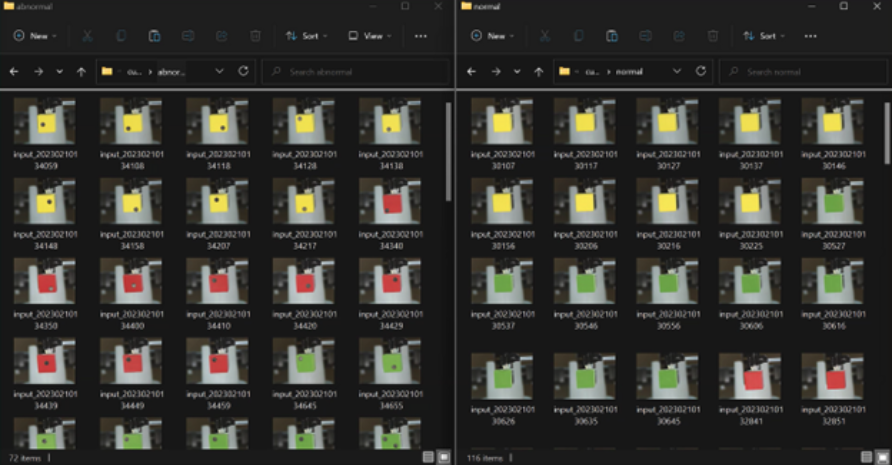
Next, create a folder with a normal dataset. For this example, we created a dataset of color cubes and added the abnormality with a black circle sticker, which simulated a hole or defect on the box.

For data acquisition and inferencing, use the 501b notebook.
Note The acquisition variable serves as the toggle between data acquisition and inferencing.
To acquire data, ensure the acquisition variable is set to True.
- For data without abnormalities, name your folder accordingly.
- For anomalous images, name your folder accordingly.
During data acquisition, the dataset is created directly in the Anomalib cloned folder, which is where the Anomalib/dataset/cubes folder is located. If you don’t have a Dobot Magician device, you can modify the code to save images or use the downloaded dataset for training.
For inferencing, the acquisition variable must be False. In this case, it won’t save any images. The system reads the frame, runs the inference using the OpenVINO toolkit, and decides where to locate the cube. Normal cubes will be on the conveyor belt, and abnormal cubes will be out from the conveyor belt.
In acquisition mode, the notebook saves every image in the anomalib/datasets/cubes/{FOLDER} for further training. In inferencing mode, the notebook does not save images. It only runs inference and shows the results.
The rest of this tutorial takes a closer look at the training notebook.
Step 4: Configure Training with Notebook 501a
Use the 501a notebook for training, which uses PyTorch Lighting and the PaDiM model. This model has several advantages, such as not requiring a GPU, allowing training with only the CPU, and using a high training speed.
The following sections explain the packages used for this example and how to call the packages you need to use from the Anomalib library.
Configuration
There are two ways to configure Anomalib modules: with the config file (a YAML file) or with the API.
Configuration with the Config File
This PaDiM config file contains the core training and testing process, including the dataset, model, experiment, and callback management. Config files for other models can also be found in this list.
You can also reference the config file for folder dataset configuration.
To use a config template, run the following command. Anomalib prints a config template to fill out the details:
anomalib train --model Padim --data Folder --print_config
If you want to save this config template, you could do the following:
anomalib train --model Padim --data Folder --print_config > config.yaml
Fill out the details, such as folder paths, and start training:
anomalib train -c config.yaml
Configuration with the API
The API method provides the simplest way to see the functionality of the Anomalib library.
Dataset Manager
Using the API, you can modify the dataset module. You can prepare the dataset path, format, image size, batch size, and task type with the following:
from anomalib.data.folder import Folder
from anomalib.data.task_type import TaskType
datamodule = Folder(
	root=Path.cwd() / "cubes",
	normal_dir="normal",
	abnormal_dir="abnormal",
	normal_split_ratio=0.2,
	image_size=(256, 256),
	train_batch_size=32,
	eval_batch_size=32,
	task=TaskType.CLASSIFICATION,
)
datamodule.setup()  # Split the data to train/val/test/prediction sets.
i, data = next(enumerate(datamodule.val_dataloader()))
print(data.keys())
Load the data into the pipeline using the following code:
i, data = next(enumerate(datamodule.val_dataloader()))
Model Manager
This tutorial uses PaDiM (the AI model) as the anomaly detection model, but you can also use: Accurate and Interpretable Video Anomaly Detection (VAD), CFA, CFLOW, CS-Flow, DFKDE, DFM, DRAEM, DSR, EfficientAD, FastFlow, GANomaly, PatchCore, Reverse Distillation, R-KDE, STFPM, U-Flow, and WinCLIP.
Set up the model manager using the API, with PaDiM imported using anomalib.models:
from anomalib.models import Padim
model = Padim(
	backbone="resnet18",
	layers=["layer1", "layer2", "layer"],
)
Step 5: Perform the Training
Now that we set up the data module and model, we can train the model. The final component to train the model is the Engine object, which handles the train/test/predict/export pipeline. Let's create the engine object to train the model:
from anomalib.engine import Engine
from anomalib.utils.normalization import NormalizationMethod
engine = Engine(
    normalization=NormalizationMethod.MIN_MAX,
    threshold="F1AdaptiveThreshold",
    task=TaskType.CLASSIFICATION,
    image_metrics=["AUROC"],
    accelerator="auto",
    check_val_every_n_epoch=1,
    devices=1,
    max_epochs=1,
    num_sanity_val_steps=0,
    val_check_interval=1.0,
)
engine.fit(model=model, datamodule=datamodule)
Additionally, we can test with the following:
test_results = engine.test(model=model, datamodule=datamodule)
Next, export the model to OpenVINO:
from anomalib.deploy import ExportType
# Exporting model to OpenVINO
openvino_model_path = engine.export(
    model=model,
    export_type=ExportType.OPENVINO,
    export_root=str(Path.cwd()),
)
Optimization and Quantization
Use the NNCF library, which is seamlessly integrated into Anomalib’s back end, for optimization and quantization. Select between post-training quantization, accuracy-control quantization, and weight compression. Replace your engine.export call:
# Exporting optimized/quantized models
# Post Training Quantization
openvino_model_path = engine.export(
    model,
    ExportType.OPENVINO,
    str(Path.cwd()) + "_optimized",
    compression_type=CompressionType.INT8_PTQ,
    datamodule=datamodule
    )
# Accuracy-Control Quantization
openvino_model_path=engine.export(
    model,
    ExportType.OPENVINO,
    str(Path.cwd()) + "_optimized",
    compression_type=CompressionType.INT8_ACQ,
    datamodule=datamodule,
    metric="F1Score"
    )
# Weight Compression
openvino_model_path=engine.export(
    model,
    ExportType.OPENVINO,
    str(Path.cwd()) + "_WEIGHTS",
    compression_type=CompressionType.FP16,
    datamodule=datamodule
    )
Validate Using OpenVINO Toolkit Inference
Using the previously imported OpenVINOInferencer from the anomalib.deploy module, run the inference, and check the results. First, check that the OpenVINO toolkit is in the result folder:
inferencer = OpenVINOInferencer(
	# Pass the config file to the inferencer in case
	# you are making modification to your training process
	# through your production system, otherwise keep the API use
	#config=CONFIG_PATH,
	path=openvino_model_path,  # Path to the OpenVINO IR model.
	meta_data_path=metadata_path,  # Path to the metadata file.
	device="CPU",  # We would like to run it on an Intel CPU.
)
Perform Inference and Review Prediction Results
To perform inference, call the predict method from OpenVINOinferencer, and then set up the OpenVINO toolkit model and metadata of the model. The predict method also determines which device to use:
predictions = inferencer.predict(image=image)
Predictions include the original image, prediction score, anomaly map, heat map image, prediction mask, and segmentation result. From this set, use the information that is useful to your task type.

In the end, your defect detection use case featuring the Dobot robot looks something like this:

Step 6. Improve the Accuracy of Your Model with Your Own Dataset
To improve your model's accuracy, you can apply data transformations to your training pipeline. Anomalib uses the TorchVision Transforms v2 API to accomplish this. This gives access to common transforms like Resize to adjust image dimensions and Normalize to adjust pixel values. The variety of transforms is useful in applying preprocessing and data augmentations to improve your training pipeline.
Additionally, you can try a variety of robust models. Anomaly detection libraries aren’t magic; they can fail when used on challenging datasets. You can try different models and benchmark the results of each experiment. Use the benchmarking entry point script and config file for these purposes, letting you select the best model for your use case.
Conclusion
Typically, for AI to enhance quality control and quality assurance, it must use balanced datasets. Even with the large amount of data samples available, the stringent requirements for accurate and effective predictions in the industrial and medical industries make techniques with balanced datasets insufficient. Another option is to use unsupervised anomaly detection using Anomalib with the OpenVINO toolkit, which can learn from unlabeled data and provide predictions that improve over time.
Give it a try. We look forward to your creativity and innovations in using the Anomalib library. For problems or errors with the Anomalib installation process, submit issues to the OpenVINO toolkit GitHub* repository. Remember to share your results in our discussion channel.
Additional Resources
Jupyter Notebooks
For more detailed information on performance benchmarks, visit GitHub.