In this article, we describe the process on how to download and install the Intel® MPI library in Google Cloud Platform* (GCP). This allows you to run MPI workloads on the cloud service provider. Furthermore we highlight also the technique and the process to build a cluster of Virtual Machines nodes.
How to create and configure a Compute Engine (Virtual Machine) in GCP
1. On the Google Cloud Platform, login with your account or create a new one if you do not have it.
2. Enter in the dashboard and click on the Navigation menu to select Compute Engine > VM instance

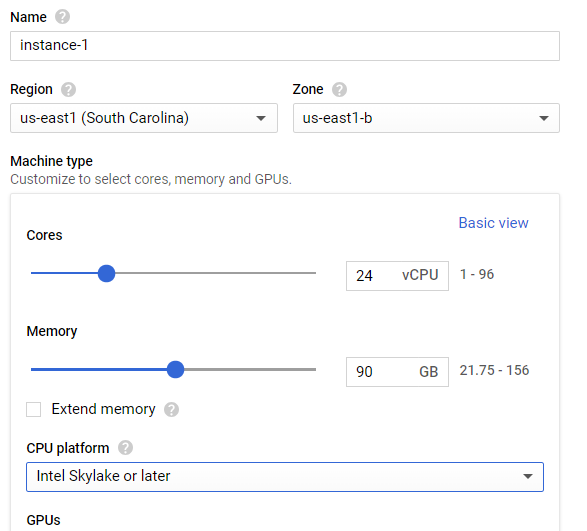
3. From the VM Instance menu, click on Create Instance and configure the virtual machine as shown here:

4. From the Machine type menu, click on Customize to select the number of cores needed. For our MPI test, we recommend to use 24 cores and Intel® Skylake processor or later for initial testing of the Intel® MPI library.

1. From the Boot disk, you can choose any Linux operative system supported by the Intel MPI library.
2. Then click to create and a new virtual machine is generated.
3. Connect to the VM instance using your preferred way.
Getting Started with Intel® MPI in GCP Compute Engine
In this part, we show how to download and install the Intel© MPI library and run a simple test. Intel® MPI Library is available free of charge from /content/www/us/en/develop/tools/mpi-library.html.
1. Once you are connected to your VM instance, download and install the MPI library as described in the official documentation.
2. During the installation process, use the current system as Installation Target, which is a single node.
3. The installation progress check if the required software is installed in the VM. Please follow the instructions in case of missing packages.
4. Set up the Intel® MPI Library environment:
source <install_dir>/bin/compivars.sh Launch the Intel® MPI benchmarks
In this part, we show how to run the Intel® MPI benchmarks, which can be used for analyzing the performance of the system. Detail information can be found here: /content/www/us/en/develop/articles/intel-mpi-benchmarks.html .
1. To compile the Intel® MPI benchmark suite, go to the installation path and run make:
cd <install_dir>/bin/imb/src/src_c
make
2. To run the MPI benchmark, use the following command line syntax:
mpirun -np <P> IMB-<component> [arguments]
where:
- P is the number of processes. P=1 is recommended for all I/O and message passing benchmarks except the single transfer ones.
- <component> is the component-specific suffix that can take MPI1, EXT, IO, NBC, and RMA values.
By default, all benchmarks run on Q active processes defined as follows: Q=[1,] 2, 4, 8, ..., largest 2x.
Building a small cluster of VM nodes
In this part, we describe how to create a small cluster of 2 VM nodes and run a simple MPI test using the Intel® MPI library. The solution provided can be also easily replicated with as many VM nodes as needed.
Connecting to the VM using ssh key
1. Use a terminal window of your choice on your machine and generate a new key as follows:
ssh-keygen -t rsa -f ~/.ssh/google-cloud-key -C [USERNAME]where USERNAME is your GCP username for that instance.
2. Then make sure to apply the following read permission:
chmod 400 ~/.ssh/google-cloud-key3. Add the key to the Metadata your GCP project, as described here: https://cloud.google.com/compute/docs/instances/connecting-to-instance
4. Now in VM instances from your GCP portal take a note of the “External IP” address and connect from your terminal window via ssh:
ssh -i ~/.ssh/google-cloud-key USERNAME@EXTERNAL-IPreplacing the USERNAME and the EXTERNAL-IP with the appropriate values.
5. In the VM, install the Intel© MPI library, as described in the previous part.
6. Once the installation is done correctly and the first MPI test run successfully, you need to create a Snapshot of the VM, so this can be replicated “N” times, according to the number of VM nodes you want. In our example is N=2.
7. Create 2 VM instances from the previous snapshot, as described here: https://cloud.google.com/compute/docs/instances/create-start-instance#createsnapshot
Setting up the internal communication between the VMs
1. In VM instances from your GCP* portal take a note of the “Internal IP” address, which are needed for creating the internal connection between the 2 nodes. You need the “External IP” for connect via ssh.
2. We need now to copy your ssh key credentials to the machines, so they can login into each other. Open a terminal window on your local machine and run:
scp -i .ssh/google-cloud-key .ssh/google-cloud-key EXTERNAL-IP-1:~/.ssh/id_rsa
scp -i .ssh/google-cloud-key .ssh/google-cloud-key EXTERNAL-IP-2:~/.ssh/id_rsa
3. Connect to VM node 1 using your terminal window using the appropriate EXTERNAL-IP-1:
ssh -i ~/.ssh/google-cloud-key USERNAME@EXTERNAL-IP-14. Connect to both machine and create the hosts file with the list of the internal ip addresses:
echo INTERNAL-IP-1 >> hosts
echo INTERNAL-IP-2 >> hosts
replacing the INTERNAL-IP-1 and INTERNAL-IP-2 with the appropriate values.
5. From VM node 1, connect to the node 2 via ssh INTERNAL-IP-2 and then accept the host key. Then immediately connect to the node using ssh INTERNAL-IP-1 and accept the host key. Type exit twice and return to the initial terminal. Now the 2 machines are connected without passwords.
6. Connect to one of the 2 VM node and run the following command to check if the connection between the nodes is correct:
mpirun –f hosts –n 4 hostnameThe result output should give the name of the 2 VM nodes:
instance-1
instance-1
instance-2
instance-2
7. If this is the case, the communication between the 2 nodes has been created and one can run any MPI application which uses both nodes.