Intel recently released new Intel® Arc™ A-Series Graphics hardware, including the Intel Arc A770 high-performance GPU. While the A770 excels at gaming, digital content creation, and streaming, it is also capable of running deep learning (DL) workloads on your personal computer.
TensorFlow* (TF) is an established DL framework. Intel engineered a plugin interface with Google to allow TF to target a variety of accelerators, including GPUs and other offload devices. Recently, Intel released the Intel® Extension for TensorFlow*, a plugin that allows TF DL workloads to run on Intel GPUs, including experimental support for the Intel Arc A-Series GPUs running on both native-Linux* and Windows* Subsystem for Linux 2 (WSL2). For running on native Windows, the TensorFlow DirectML Plugin can be used.
Installing the Intel Extension for TensorFlow on WSL2 with Ubuntu* 20.04 is easy. To illustrate, let’s walk through the steps to set up Windows and WSL2 with drivers, runtime packages, TF, and the extension. We’ll show how easy it is to run the popular KerasCV* Stable Diffusion capability with TF in a Jupyter* notebook for text-to-image generation on an A770 GPU.
Setting Up Ubuntu-20.04 in WSL2
An Alder Lake 12th Gen Intel® Core™ i9-12900 personal computer with an Intel Arc A770 16 GB discrete GPU card is used in this article. As a prerequisite, WSL2 should be installed on Windows 11 with an Ubuntu-20.04 container. Instructions for setting up the Ubuntu-20.04 container with WSL2 can be found here. WSL2 uses a special Linux kernel build that includes DirectX for accessing the GPU in the Windows host. This allows the general-purpose GPU compute capabilities to be shared between Windows and Linux. Because the GPU is managed by the Windows host, GPU drivers need to be installed in Windows itself. To install the low-level drivers for the GPU, the standard installer for Intel Arc Graphics Windows DCH Driver should be used. The latest driver (v31.0.101.3490) was installed using the self-installing executable.
Setting Up Intel Compute Runtime and oneAPI Packages in Ubuntu Linux
Once the drivers are installed on Windows and the Ubuntu-20.04 container on WSL2 is up and running, the next step is to install a few Ubuntu/Debian packages using the apt-get command. First, we need to add the specific repository for Intel graphics packages to the apt system:
$ sudo apt-get install -y gpg-agent wget
$ wget -qO - https://repositories.intel.com/graphics/intel-graphics.key | \
     sudo gpg --dearmor --output /usr/share/keyrings/intel-graphics.gpg
$ echo 'deb [arch=amd64 signed-by=/usr/share/keyrings/intel-graphics.gpg]
     https://repositories.intel.com/graphics/ubuntu focal main' | \
     sudo tee /etc/apt/sources.list.d/intel.gpu.focal.list
$ sudo apt-get update
Once the repository is registered, the Intel runtime packages can be installed using:
$ sudo apt-get install \
       intel-opencl-icd=22.28.23726.1+i419~u20.04 \
       intel-level-zero-gpu=1.3.23726.1+i419~u20.04 \
       level-zero=1.8.1+i419~u20.04
This will install the above packages and any implicit dependencies into Ubuntu 20.04 (running in WSL2).
The Intel Extension for TensorFlow is built using Intel® oneAPI toolkits. As such, some oneAPI runtime libraries must also be installed. First, register the Intel oneAPI repositories with the apt system:
$ wget -O- \
   https://apt.repos.intel.com/intel-gpg-keys/GPG-PUB-KEY-INTEL-SW-PRODUCTS.PUB | \
   sudo gpg --dearmor --output /usr/share/keyrings/oneapi-archive-keyring.gpg
$ echo "deb [signed-by=/usr/share/keyrings/oneapi-archive-keyring.gpg] \
     https://apt.repos.intel.com/oneapi all main" | \
     sudo tee /etc/apt/sources.list.d/oneAPI.list
$ sudo apt-get update
Then, install the DPC++ and oneMKL runtime packages:
$ sudo apt-get install intel-oneapi-runtime-dpcpp-cpp intel-oneapi-runtime-mkl
(For this article, the versions installed were intel‑oneapi‑runtime‑dpcpp‑cpp=2022.2.1‑16953 and intel‑oneapi‑runtime‑mkl=2022.2.1‑16993.) This installs just the libraries for running the Intel Extension for TensorFlow, but does not include the full development packages for oneAPI (which are much larger). If you prefer to install the full oneAPI development package, please see the oneAPI installation documentation.
Creating a Python* Virtual Environment
Miniconda* is recommended for using TF with GPUs. Full documentation for creating a conda environment for Linux can be found here. As a first step, download and install Miniconda in Ubuntu-20.04:
$ curl https://repo.anaconda.com/miniconda/Miniconda3-latest-Linux-x86_64.sh \
     -o Miniconda3-latest-Linux-x86_64.sh
$ bash Miniconda3-latest-Linux-x86_64.sh
Next, install TF and the Intel Extension for TensorFlow into a new environment and update pip to the latest version:
$ conda create --name keras-cv python=3.9
$ conda deactivate
$ conda activate keras-cv
(keras-cv)$ pip install --upgrade pip
Now we can install TF (v2.10.0) and the Intel Extension for TensorFlow (v1.0.0):
(keras-cv)$ pip install tensorflow==2.10.0
(keras-cv)$ pip install --upgrade intel-extension-for-tensorflow[gpu]
The special “[gpu]” syntax at the end of the package name specifies that the GPU backend for the extension should be selected.
Installing and Running Stable Diffusion for TensorFlow/Keras
Now comes the fun part. A popular and easy-to-run TF Keras model for Stable Diffusion is available in the KerasCV package. We will use this implementation to run text-to-image generation inside a Jupyter notebook. First, install the classic Jupyter Notebook package:
(keras-cv)$ pip install notebook
Next, install KerasCV and the packages it uses, and then start the Notebook server:
(keras-cv)$ pip install keras-cv tensorflow-datasets matplotlib ipywidgets
(keras-cv)$ jupyter notebook
This will give a URL for connecting to the Notebook server. On Windows, open a browser, and then copy and paste the URL into the address field. This should take you to the Jupyter Notebook page.
Now let’s try some text-to-image generation. Create a new notebook and run the following commands. Note that most output from the commands have been left out for brevity, but the images generated in this run have been kept as an example:
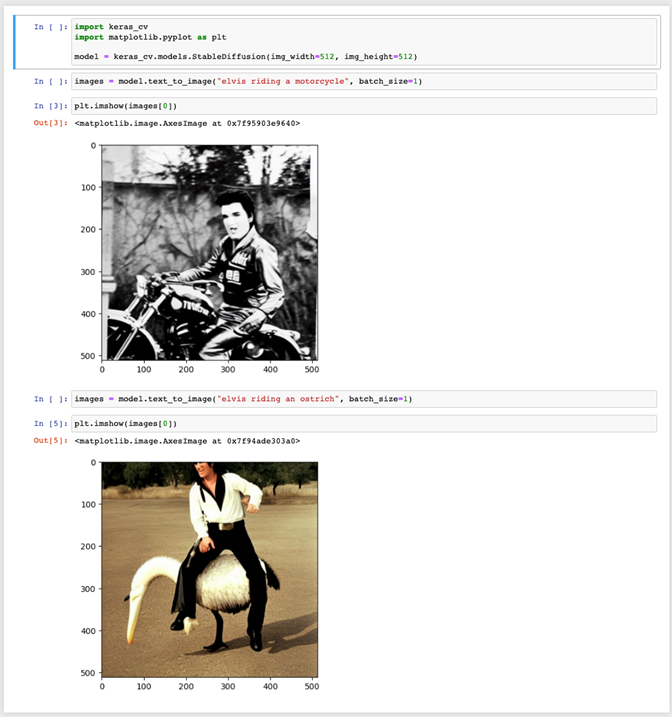
Note that the first run of “model.text_to_image(…)” will incur some startup overhead, but subsequent runs will be faster. As the model runs it will show a progress bar, indicating how many steps have been completed. When the workload is finished, this progress bar will also indicate how many seconds each iteration took as well as the overall time to generate the image. Experimenting with different prompts, such as changing what Elvis is riding, should change the image generated. This Stable Diffusion model uses randomization, so subsequent runs will create different images from the same prompt.
Determining if the Intel Arc GPU Was Used
The TF output from the Stable Diffusion model will show if the Intel Arc GPU is used. The Intel Extension for TensorFlow uses a device called “XPU” and selects it automatically if an Intel Arc GPU is accessible. The TF output will contain something like:
2022-11-10 19:06:45.243358: I tensorflow/core/grappler/optimizers/custom_graph_optimizer_registry.cc:114] Plugin optimizer for device_type XPU is enabled.
Another method to monitor the Arc GPU usage in real-time is to use the Windows Task Manager. Simply start Task Manager, select the Performance tab to get the list of monitored devices, and select the GPU device corresponding to Intel Arc A770 graphics. The GPU page will have four panels at the top, each with a drop-down menu that allows you to change the view. In one of these panels, choose the Compute selection from the drop-down menu. While the Stable Diffusion workload is running in the Ubuntu-20.04 WSL2 container, you will see computation for the Intel Arc GPU in the Task Manager’s Compute panel in Windows while “model.text_to_image(…)” is executing. You should also see activity in panels such as Copy and Dedicated GPU Memory Usage. This shows that while the workload is running in Linux (in WSL2), the computation is being done on the GPU.
Conclusion
The Intel Extension for TensorFlow allows common DL workloads to run on Intel GPUs. While support for the Intel Arc series GPUs is currently experimental, popular models like Stable Diffusion already run well. The previous example shows how easy it is to set up an Ubuntu-20.04 container in WSL2 to quickly start running DL workloads on an Intel GPU. For further instructions on how to do the same for Intel Arc GPUs running in native-Linux (Ubuntu 20.04), please see the complete installation documentation in the GitHub repository for the Intel Extension for TensorFlow.
Resources
Intel Extension for TensorFlow GitHub repository
Intel Extension for TensorFlow pypi.org page
Intel Extension for TensorFlow documentation
High-performance image generation using Stable Diffusion in KerasCV